Send email message
You can use this command to send an email message.
Email account tab
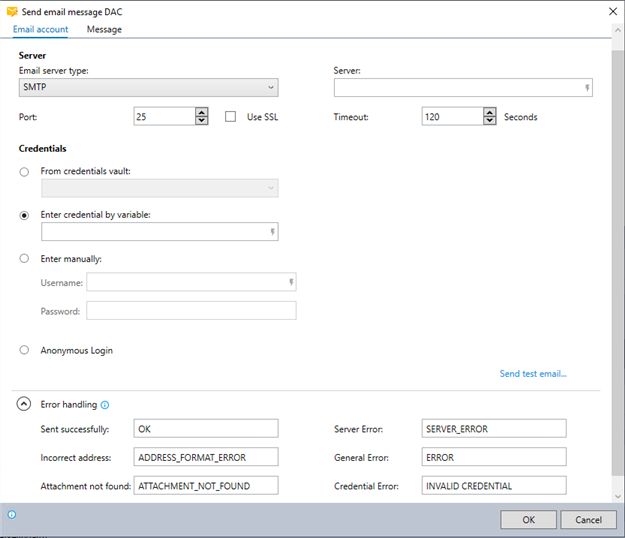
The settings available on the Email account tab vary for SMTP and Exchange servers.
 If SMTP server type is selected
-
Enter the settings for your email server in the Server section.
-
Choose how to input credentials:
-
From credentials vault: Select this option if you want to get credentials from the Nintex Credentials Vault.
-
Enter credential by variable: Use this option if you want to input credentials using variables.
-
Enter manually: If you choose this option, enter the username, password, application ID, tenant ID, and client secret manually.
The login credentials used will provide the default From: and Reply to: addresses for the message. These addresses can be overridden by utilizing advanced address options in the Message tab.
-
-
(Optional) Click Send a test email if you want to test it.
-
Expand the Error handling section to customize the error codes and messages for any errors, or choose the default values.
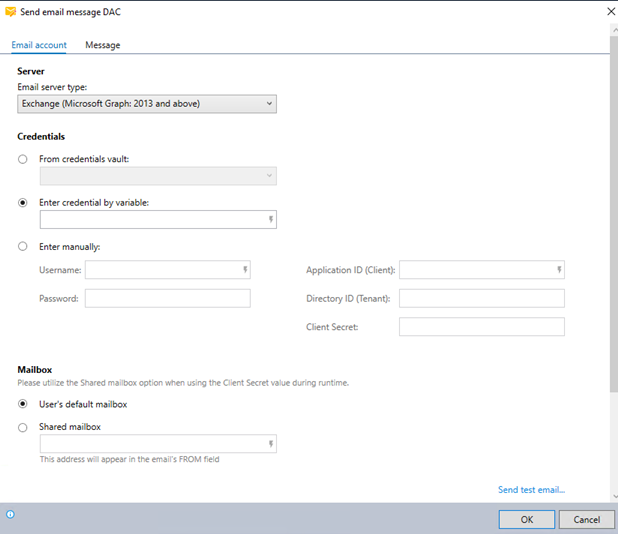
If Exchange server type is selected
-
Select Exchange (Microsoft Graph 2013 and above) as the Email server type.
-
Choose how to input credentials:
-
From credentials vault: Select this option if you want to get credentials from the Nintex Credentials Vault.
-
Enter credential by variable: Use this option if you want to input credentials using variables.
-
Enter manually: If you choose this option, enter the username, password, application ID, tenant ID, and client secret manually. You can get these from Microsoft Azure under the Email application settings.
-
Working with the Microsoft 365 new authentication method? You can set the Application ID and Team ID directly into the Credentials Vault settings in the Nintex RPA Admin Tool.
-
Once IDs are entered, they cannot be removed; they can only be edited. To remove the IDs, you must delete the trigger and re-create it. Read more about Working with Microsoft 365 Exchange Modern Authentication.
-
Application ID is not sensitive information and is not encrypted.
-
Directory ID is sensitive information and is encrypted.
-
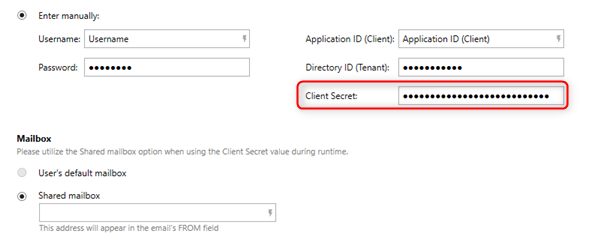
Client Secret is sensitive information and is encrypted.
Inputting a client secret locks the Mailbox option to Shared mailbox without an option to change it back to the User's default mailbox.
-
-
-
Select a mailbox to send the email message from:
-
User's default mailbox: This uses the credentials entered earlier.
-
Shared mailbox: Enter the mailbox address.
The mailbox data entered will provide the default From: and Reply to: addresses for the message. These addresses can be overridden by using advanced address options in the Message tab.
-
-
(Optional) Click Send a test email... to test the email account settings.
-
Expand the Error handling section to customize the error codes and messages for any errors, or choose the default values.
Message tab
/Advanced Commands_192.png)
-
(Optional) Click the
/Advanced Commands_193.png) button to access advanced address options for the email.
button to access advanced address options for the email.Advanced address options:
-
Click the
/Advanced Commands_194.png) icon to:
icon to:-
Enter a long list of addresses (or addresses with display names) on the To: ,CC: ,or Bcc: lines
-
Enter addresses with display names on the From: or Reply to: lines
-
-
-
Choose whether to send the email in Plain Text or Rich Text/HTML format.
-
Enter recipient email addresses, subject, and attachments:
-
Separate multiple email addresses with commas.
-
Separate multiple attachments with commas. Identify attachments by the full file name and file path.
-
Type the body of the email.
-
Enter the name of the variable into which you'd like to store the result.
-
Customize the codes or error messages for send results.
All of the following fields can include free text and/or variables:
-
Email addresses (To: ,CC:, Bcc:, From:, and Reply to:)
-
Subject
-
Attachments
-
Email body
To include the value of a variable, indicate its name by typing it between dollar signs (e.g., $MyVar$). When the wizard is run, the variable name will be replaced by its value.
Line breaks in rich text emails
When sending an HTML/rich text email that contains "hard" line breaks, create a special character variable named, for example, HTML line break, and set its value to </BR>. Then use this variable to replace actual line breaks in your email text.
Example:
-
Set a variable to define the line break.
/Advanced Commands_195.png)
-
Use this variable to replace the actual line breaks in your rich text-formatted email.
/Advanced Commands_196.png)
Result:
/Advanced Commands_197_280x476.png)
Using Credentials by variable functionality
The Credential by variable functionality allows you to create a dynamic connection to the credentials vault. The credential variable is associated with credential display name(s).
Since the credential variables are dynamic, if you export a wizard to another environment, make sure that the credentials associated with the variable are defined in the new environment's credential vault as well.