Bubbles: Show/Hide properties
The Show/Hide properties for bubbles determine the timing and conditions for displaying and hiding bubbles and their anchors. You can manage these settings from the Show/Hide /Studio_230.png) tab in the Properties pane:
tab in the Properties pane:
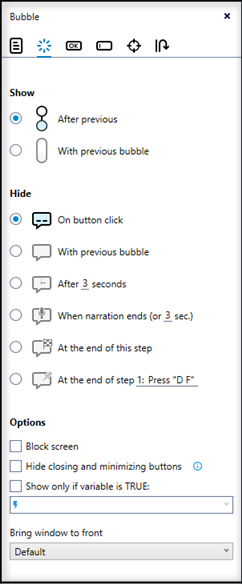
Choose from these options to determine when the bubble should appear:
-
After previous: The bubble appears after the previous bubble closes.
-
With previous bubble: The bubble appears at the same time as the previous bubble.
Choose from these options to determine when the bubble should hide:
-
On button click: The bubble hides when the user clicks one of its buttons. (Only applies to bubbles and anchored bubbles)
-
With previous bubble: If the bubble was shown with the previous bubble, both bubbles hide together.
-
After [X] seconds: The bubble hides after a specified number of seconds. (Only applies to bubbles and anchored bubbles)
-
When narration ends: The bubble hides when audio narration ends; if no narration is set, the bubble hides after the specified time.
-
At the end of this step: The bubble hides at the end of the current step.
-
At the end of step [X]: The bubble hides at the end of a specified future step. (Applies to bubbles, anchored bubbles, and tooltips)
If the bubble is set to hide On button click, it uses user-controlled timing — meaning the bubble remains visible until a button within it is clicked. All other Hide options use robot-controlled timing, where the robot controls the bubble’s display duration, allowing it to disappear automatically without manual interaction.
-
Block Screen: Select this checkbox to block the entire screen while the bubble is displayed. A grayed-out screen will appear around the bubble, preventing any interaction with elements outside of it.
/Studio_232_586x355.png) This option is available only for bubbles set to hide on button click.
This option is available only for bubbles set to hide on button click.If the bubble is anchored and has a highlight box enabled, the entire screen around the highlighted area will be blocked.
/Studio_233_590x472.png)
-
Hide closing and minimizing buttons: This option allows the "Close" (X) and "Minimize" buttons on the bubble to be hidden. This ensures the focus stays on the bubble and users have to explicitly click any available action button before proceeding. For example, this can be used when users need to agree to a set of terms and conditions.
Be cautious when enabling both Hide and closing minimizing buttons and Block screen options simultaneously as this can completely prevent users from proceeding. This may occur, for example, if the bubble lacks any actionable buttons and the rest of the screen is blocked. -
Show only if variable is TRUE: Select this checkbox to display the bubble only if a specific variable’s value is True. If the variable is False, the bubble will not be displayed.
The specified variable gets its value through a logical sequence set earlier in the wizard, typically using advanced commands or the Read from screen action.
Example: You want a bubble to appear only if a particular field on the screen is empty. For this example, assume that the field being checked is a form's date field.
-
Determine if the date field is empty by setting the step's core action to read from screen using the Is Empty value type.
-
If the date field is empty, the value
Truewill be returned in the Read from screen variable (let's say that we've assigned this variable the name/Studio_21.png) Date Field Empty).
Date Field Empty). -
Add a bubble after the core action and set the bubble's Show/Hide properties to show the bubble only if the
Date Field Empty variable has a value of True.
-
-
Bring window to front: Choose from the following options to control the visibility of the window related to the bubble:
-
Default: The robot automatically decides whether to bring the window to the front.
-
Always: The robot always attempts to bring the window to the front.
-
Never: The robot will not attempt to bring the window to the front but will still show the bubble if the window is detected.
-