Custom Dynamic Advanced Command (SDK)
Custom dynamic commands allow you to extend the functionality of Nintex RPA with actions tailored to your needs. Create custom commands that read system registry settings, change operating system configurations, perform other system tasks, or integrate with third-party systems, and then add these commands to your automation workflows.
Nintex RPA custom commands use JSON-RPC calls to perform tasks. You can create custom commands in .NET using the provided custom command SDK. This topic demonstrates how to use the SDK to create a custom command to edit a Windows Registry setting.
Note: This guide is intended for intermediate developers who are familiar with developing in the .NET environment.
You can also create custom commands with other frameworks such as Python, Java, and Node.js, by implementing the JSON-RPC calls yourself. SDKs for these frameworks are not yet available. See Custom commands with JSON-RPC.
Nintex RPA .NET SDK for custom commands
The Nintex RPA .NET SDK handles all the JSON-RPC functionality for you, so you can focus on implementing your command logic. The SDK structures a custom command into three components:
- The command definition:
- Defines the command's name, the input parameters it takes, and the output it returns to the calling environment.
- Links the command definition to the command's functionality and the user interface to configure the command, which are implemented in other components.
- Contains the manifest.json file.
See the Manifest.json schema.
- The command execution:
- Contains the functionality or business logic of your command.
For example, the command in this guide is reading registry values. The code to read and return the values will be implemented in this component. - Must adhere to the interface (name, input and output) defined in the command definition.
- Contains the functionality or business logic of your command.
- The command editor:
- Defines the user interface for configuring the command, so that users can provide input arguments or make use of the output.
- Must adhere to the parameters and outputs defined in the command definition.
Nintex RPA .NET SDK Packages
The three SDK components are provided as three NuGet packages:
- Kryon.AdvancedCommands.Sdk.Definition
- Kryon.AdvancedCommands.Sdk.ExecutorPlugin
- Kryon.AdvancedCommands.Sdk.EditorAdapter
Packages are listed for download here.
Each package may have multiple versions. When downloading the packages:
- Ensure you download the same version for all packages.
- Confirm you are using the appropriate version for the version of RPA you want to develop for. If in doubt, choose the latest available version.
Create a custom command with the Nintex RPA .NET SDK
In this guide, we will create a custom command using the Nintex RPA .NET SDK that reads values from the Windows registry. You can follow these steps to create your own custom command using your own properties and values where noted, or download the completed command code here.
We will develop our command in Visual Studio IDE, but you can use any development environment that supports .NET 6
Note: This example uses the WPF Framework to create the user interface for configuring the command in RPA Studio. If you want to use the WPF Framework, install the Visual Studio .NET desktop development component (or the equivalent for your IDE) before continuing. See Before you start
- Download the packages and check you've met all the prerequisites.
- Step 1: Create the solution structure and configure the projects for the three command components.
- Step 2: Define the command interface that allows the RPA Wizard to use the command.
- Step 3: Add the command functionality to be executed when your command is invoked.
- Step 4: Create the command user interface used to configure the command in RPA Studio.
- Step 5: Add the command to RPA Studio.
- Step 6: Test the command.
Before you start
To develop custom commands with the Nintex RPA .NET SDK, make sure you have installed:
- The .NET Software Development Kit.
The Nintex RPA .NET SDK is intended for use with .NET 6. - A development environment that supports .NET 6, such as Visual Studio 2022, or a compatible version of Visual Studio Code.
This guide uses Visual Studio IDE 2022. - The Nintex RPA .NET SDK NuGet packages.
Make sure that:- You download the appropriate version for the version of RPA you are developing for.
- All three packages are of the same version. See Nintex RPA .NET SDK Packages.
- Optional: the Visual Studio .NET desktop development component.
The example in this guide uses the WPF framework to create the user interface for editing the command instructions in RPA. The WPF framework is included in the Visual Studio .NET desktop development component. If you plan to follow the example in this guide, install the Visual Studio .NET desktop development component.
Step 1: Create the solution structure and configure the projects
In this step, we create a solution with a new project for each of the three command components (Executor, Definition, Editor), and in each project, we add a reference to the relevant Nintex RPA .NET SDK package and some project configurations.
- Step 1.1: Create the Executor component
- Step 1.2: Create the Definition component
- Step 1.3: Create the Editor component
Step 1.1: Create the Executor component
- In Visual Studio, create a new project for the Executor component.
- Use the Class Library template with .NET Standard 2.1 as the target framework.
- In the Project name field, type the project name.
- In the new Executor project file:
- Add a package reference to the Kryon.AdvancedCommands.Sdk.ExecutorPlugin NuGet package you downloaded earlier.
- Find the <PropertyGroup> section and add the following line:
<CopyLocalLockFileAssemblies>true</CopyLocalLockFileAssemblies>.
This configures the project to include all the command dependencies in the build output.
Note: We recommend using the following naming convention for your custom commands: <CompanyName>.Commands.<CommandName>. For example, AcmeCompany.Commands.RegistryRead.
Step 1.2: Create the Definition component
- Create a new project for the Definition component.
- Use the Class Library template with .NET Standard 2.1 as the target framework.
- In the Project name field, type <ExecutorComponentProjectName>.Definition.
For example, if your Executor component project was named MyCompany.Commands.RegistryRead, name this project MyCompany.Commands.RegistryRead.Definition.
- In the new Definition project file:
- Add a package reference to the Kryon.AdvancedCommands.Sdk.Definition NuGet package you downloaded earlier.
- Find the <PropertyGroup> section and add the following line:
<CopyLocalLockFileAssemblies>true</CopyLocalLockFileAssemblies>.
-
In the Definition project, add the icon you want to use for the command in RPA Studio toolbox:
- Add a folder called Icons to the project.
- In the Icons folder, add the icon file:
- The file extension must be .ico.
- The icon should be 16px by 16px.
- Set the icon file's BuildAction to Embedded Resource.
Step 1.3: Create the Editor component
- Create a new project for the Editor component.
- Use the WPF Application template with .NET 6.0 (Long Term Support) as the target framework.
If you do not want to use the WPF Framework for your user interface, choose a template suitable for your chosen framework. - In the Project name field, type <ExecutorComponentProjectName>.Editor.
For example, if your Executor component project was named MyCompany.Commands.RegistryRead, name this project MyCompany.Commands.RegistryRead.Editor.
- Use the WPF Application template with .NET 6.0 (Long Term Support) as the target framework.
- In the new Editor project file:
- Add a package reference to the Kryon.AdvancedCommands.Sdk.EditorAdaptor NuGet package you downloaded earlier.
- Add a project reference to the Definition project you created earlier.
- Find the <PropertyGroup> section and:
- Add the following line:
<CopyLocalLockFileAssemblies>true</CopyLocalLockFileAssemblies>. - Remove the following line: <OutputType>WinExe</OutputType> .
This project does not need to create an executable file when it builds.
- Add the following line:
- In the Editor project, remove the following files:
- App.xaml
- AssemblyInfo.cs
- MainWindow.xaml files
These files were automatically created for your project but are not needed.
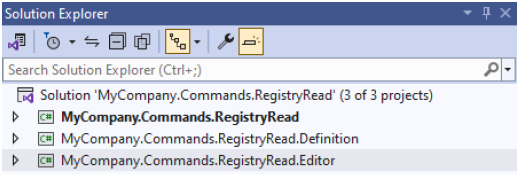
Your solution should now have three projects, each linked to the appropriate Nintex RPA .NET SDK package, with some basic project configurations, and an icon for your custom command:
- MyCompany.Commands.RegistryRead (Command Executor)
- MyCompany.Commands.RegistryRead.Definition (Command Definition)
- MyCompany.Commands.RegistryRead.Editor (Command Editor)
Step 2: Define the command interface
In this step, we define the command interface in the Definition project. We add:
- The manifest.json file that defines the parameters the command requires as input, and the data the command returns as output.
See Step 2.1: Create the manifest file. - A C# class to load the manifest file.
See Step 2.2: Create the definition class
Step 2.1: Create the manifest file
The manifest file defines the interface between RPA Studio and the custom command: the parameters required as input, the data returned as output, and some additional information about the command.
In the MyCompany.Commands.RegistryRead.Definition project:
- Add a JSON file named manifest.json.
- Set the BuildAction of the file to Copy if Newer.
This ensures any updates to the file are copied to the output folder when the project is built. - In the manifest.json file, add the following properties to describe the command:
- name: The unique name of your command. Use text only with no spaces.
Use the same company and command name as your solution. For example, MyCompany.RegistryRead. - version: The version number identifying this version of your command.
Use the following pattern for version numbers: YYYY.M.PATCH, where PATCH is a number starting from 1000000001. For example:- 2022.8.1000000001
- 2024.5.1000000001
- 2024.5.1000000002
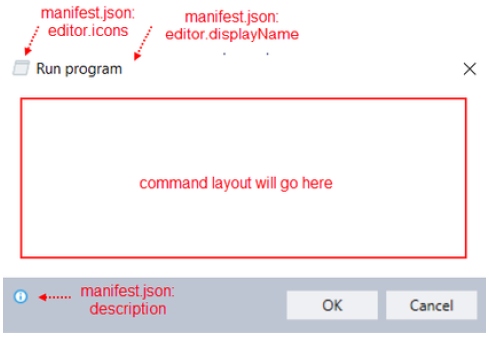
- description: A description of what your command does.
- publisher: Your company or organization name.
- name: The unique name of your command. Use text only with no spaces.
- Paste the following properties to extend the Nintex RPA command SDK:
- "extends": {"dotnet-dc-execution-host": "^1.0.0"}
- " executionType": "remote"
- "extensionType": "activity"
- Add an editor object with properties to connect the user interface we will define in the Editor component:
- editorSchema: The relative path to the built output of the Editor component.
This is the name of the Editor component project followed by .dll.
For example, ./MyCompany.Commands.RegistryRead.Editor.dll - displayName: The name of the command to display in the RPA Studio toolbox and command user interface dialogue box.
- designerTemplate: The description of the command in the designer area of RPA Studio.
Use <$.fieldnames> to add placeholders for command input values.
For example, "designerTemplate": "Read From Registry:<$.registryKey>" would show Read from Registry: followed by the name of the registry key requested.
Use dot notation to navigate the JSON path to the value you want to use. For example, <$.field1.fieldA.fieldB3>. - icons: Add an array of a single object that contains a property of name and the name of the icon file you added earlier.
For example: icons: [ { "name" : "RegisteryGet.ico" } ]
- editorSchema: The relative path to the built output of the Editor component.
-
Add a definition object with:
- A property of executionSchema with a value of the name of the Executor project followed by .dll.
For example, ./MyCompany.Commands.RegistryRead.dll. - A property of definitionSchema with a value of the name of the Definition project followed by .dll.
For example, ./MyCompany.Commands.RegistryRead.Definition.dll
- A property of executionSchema with a value of the name of the Executor project followed by .dll.
- In the definition object, add an input array and an output array.
These will contain the input parameters and output value definitions. - Inside the input array, define each input parameter with the following properties:
- name: The name of the property.
Property names must be unique to the command and contain letters only, with no spaces. Use camelCase where property names contain multiple words. - description: A description of the property to display in the Editor when the user is configuring the command.
- type: The data type of the property. Available values are:
- text: A string value.
- textWithVariable: A string value that may contain a variable from the wizard execution.
When run as part of the wizard execution, the value of this parameter may include variables. For example, "Email subject: <subject>", where <subject> is a variable from earlier in the wizard execution. The command retrieves and interpolates the value of the variables before executing the command.
In our example, we create the input parameters registryRoot, registrykey and registryValue that can be selected or defined by the user when configuring the command. We also create the input parameter generalError, to allow the user to provide a custom error message if their command fails during wizard execution.
- Inside the output array, define each value the command will pass back to the wizard during execution as an object with the following properties:
- name: The name of the property.
Property names must be unique to the command and contain letters only, with no spaces. Use camelCase where property names contain multiple words. - description: A description of the property to display in the Editor when the user is configuring the command.
- type: The data type of the property. Use a data type of variable to pass values from the command to the wizard execution.
When executing the command, the wizard creates a variable with the name you specify and assigns it the value returned by your command functions.
In our example, we define two output variables:
outputVariable for the result of the registry read.
errorVariable, which is returned if there is an error executing the command. It will contain the error message the user configured.
- name: The name of the property.
- name: The name of the property.
Example manifest.json file
{
    "name": "MyCompany.RegistryRead",
    "version": "2024.5.1000000001",
    "description": "Retrieve the value data for a Windows Registry key you specify and place it into a new or existing variable.",
    "publisher": "My Company",
    "extends": {
        "dotnet-dc-execution-host": "^1.0.0"
    },
    "executionType": "remote",
    "extensionType": "activity",
    "editor": {
        "editorSchema": "./MyCompany.Commands.RegistryRead.Editor.dll",
        "displayName": "Read From Registry",
        "designerTemplate": "Read From Registry:<$.registryKey>",
        "icons": [
            {
                "name": "RegistryGet.ico"
            }
        ]
    },
    "definition": {
        "executorSchema": "./MyCompany.Commands.RegistryRead.dll",
        "definitionSchema": "./MyCompany.Commands.RegistryRead.Definition.dll",
        "input": [
            {
                "name": "registryRoot",
                "description": "The root of the registry key you want to retrieve data from",
                "type": "text"
            },
            {
                "name": "registryKey",
                "description": "The registry key you want to retrieve data from",
                "type": "textWithVariable"
            },
            {
                "name": "registryValue",
                "description": "The registry value you want to retrieve. When entered, the wizard will retrieve both the value name and value data from the key you have specified",
                "type": "textWithVariable"
            },
            {
                "name": "generalError",
                "description": "A predefined error text that will be returned as 'errorVariable' output argument value in case general error occur during registry read. Default value: Error",
                "type": "text"
            }
        ],
        "output": [
            {
                "name": "outputVariable",
                "description": "A name of the variable to store the value data for the registry key you specify",
                "type": "variable"
            },
            {
                "name": "errorVariable",
                "description": "A name of the variable that will contain predefined with 'generalError' and 'keyNotFoundError' input arguments error text in case error occurs during registry read.",
                "type": "variable"
            }
        ]
    }
}
Step 2.2: Create the definition class
In the MyCompany.Commands.RegistryRead.Definition project:
- Add a C# class to the project that inherits the AdvancedCommandDefinition type from the Nintex RPA .NET SDK.
This class will read the parameters and output from the manifest.json file and store them as variables.
Give the class a descriptive name, such as ReadFromRegistryDefinition.cs. - Add public properties for each of the parameters and outputs you defined in the manifest file.
The property names must match the properties used in the manifest file.
In our registry reader example, we add properties for all the input parameters and output variables we added in the manifest file:- registryRoot
- registryKey
- registryValue
- the generalError message (with a default value of "Error")
- the outputVariable and errorVariable to return data from the command to the wizard.
- Add definitions for any constants, enums, or custom data types needed by the command.
In our registry reader example, we add a public enum of RegistryRoots to provide a selection list for the user.
Note that the first parameter definition in the example class is a data type of RegistryRoots instead of a string, so that it can make use of this enum.
Example C# definition class
public class ReadFromRegistryDefinition: AdvancedCommandDefinition{
    #region Input Parameters
    public RegistryRoots RegistryRoot { get; set; }
    public string RegistryKey { get; set; }
    public string RegistryValue { get; set; }
    public string GeneralError { get; set; } = "Error";
    #endregion
    #region Output Parameters
    public string OutputVariable { get; set; }
    public string ErrorVariable { get; set; }
    #endregion
}

public enum RegistryRoots{
    HKEY_CLASSES_ROOT,
    HKEY_CURRENT_CONFIG,
    HKEY_CURRENT_USER,
    HKEY_LOCAL_MACHINE,
    HKEY_PERFORMANCE_DATA,
    HKEY_USERS
}
Step 3: Add the command functionality
The command functionality is defined in a class that implements the IAdvancedCommand<T> interface from the Nintex RPA .NET SDK. Your class must implement the interface's Execute method, which accepts an instance of your Definition class with the populated input parameters, and a parameter of IExecutionContext type. Return your command's output in a VariableResult object from the Nintex RPA .NET SDK.
If your command requires additional libraries or class definitions, you can use the dependency injection feature provided by the Nintex RPA .NET SDK. You can also add advanced logging to improve the logging information recorded by your command. See Add advanced logging and Add dependency injections.
Define basic command execution
In the MyCompany.Commands.RegistryRead project:
- Create a C# class that implements the IAdvancedCommand<T> interface from the Nintex RPA .NET SDK, where T corresponds to the Definition class you created in Step 2.2: Create the definition class.
Give your class file a name that corresponds to your command's functionality. For example, ReadFromRegistryExecutor.cs. - Add a public method Execute that takes a parameter of the same Definition type you created earlier, and another parameter of type IExecutionContext, and returns a variable of type IExecutionResult.
Execute is the function the wizard calls to execute your command. The Definition parameter contains the properties you defined in the Definition class, populated with appropriate values from the wizard execution. This is the only method you need to implement in the IAdvancedCommand<T> interface.
In our example, the method signature would be:
public IExecutionResult Execute(ReadFromRegistryDefinition definition, IExecutionContext context) - Add the functionality your command needs to complete before returning a result to the wizard execution.
Use the Definition parameter to access the command's input parameters. For example, definition.registryKey. - Add the code to return the command's output values to the wizard execution:
- In the Execute method, declare a variable of type VariableResult().
The VariableResult type is from the Nintex RPA .NET SDK. It contains a method called Set that assigns values to the variable names in your command Definition.
An example declaration: var result = new VariableResult(). - Use the VariableResult's Set method to store values to your command's output variables: Set(<variableName>, <valueToAssign>).
The variable name parameter should be one of the output variables defined in your Definition class.
In our example:- We defined two output variables in our Definition class: OutputVariable to store the registry value, and ErrorVariable to store an error message.
- We also defined an input parameter GeneralError, where the user could configure the error message to use.
- The Definition parameter in our Execute method signature was called definition.
- So in our Execute method, we add result.Set(definition.OutputVariable, registryValue) to set the registry value to OutputVariable.
- We also add result.Set(definition.ErrorVariable, definition.GeneralError) to set the GeneralError error message the user configured to ErrorVariable.
- Return the VariableResult object.
- In the Execute method, declare a variable of type VariableResult().
Example execution class
using Kryon.AdvancedCommands.Sdk.Executor;
using MyCompany.Commands.RegistryRead.Definition;
using System;

public class ReadFromRegistryExecutor : IAdvancedCommand<ReadFromRegistryDefinition> {

  public static readonly object NoValueMarker = new object();

  public IExecutionResult Execute(ReadFromRegistryDefinition definition, IExecutionContext context){
    var result = new VariableResult();
    try{
      var registryValue = GetValueFromRegistry(definition);
      if (registryValue == definition.GeneralError) {
        result.Set(definition.ErrorVariable, definition.GeneralError);
      }else{
        result.Set(definition.OutputVariable, registryValue);
      }
    }catch (Exception e){
      result.Set(definition.ErrorVariable, definition.GeneralError);
    }
    return result;
  }

  private string GetValueFromRegistry(ReadFromRegistryDefinition definition){
    object registryValue = Microsoft.Win32.Registry.GetValue(definition.RegistryRoot + "\\" + definition.RegistryKey, definition.RegistryValue, NoValueMarker);
    if (registryValue == null || ReferenceEquals(NoValueMarker,registryValue)){
      return definition.GeneralError;
    }else{
      return Convert.ToString(registryValue);
    }
  }
}
This completes the command functionality for a basic command. If you need additional libraries or logging, you can:
- Use dependency injection to include other libraries.
See Add dependency injections. - Use the Microsoft.Extensions.Logging package to improve your command log messages.
See Add advanced logging.
Step 4: Create the command user interface
The Nintex RPA .NET SDK creates a basic user interface structure that mimics the configurations of other commands in RPA Studio. This means your user interface only needs to define the layout needed for configuring the command itself.
To create the user interface:
- Step 4.1: Create a view model
- Step 4.2: Define the layout markup
- Step 4.3: Connect the markup and view model
Step 4.1: Create a view model
Add a view model to connect to the user control and read, validate, and accept the user's input.
The Nintex RPA .NET SDK provides the AdvancedCommandEditorBase<T> class that creates a basic command configuration user interface with OK and Cancel buttons, and the ability to validate and accept user input in the defined fields.
We'll create a class that inherits from AdvancedCommandEditorBase<T>, add properties for all the input parameters and output variables in our Definition class, and override the Validate and AcceptChanges methods to check for missing fields and save the user's input to our Definition class properties.
In the MyCompany.Commands.RegistryRead.Editor project:
- Create a C# class that inherits from AdvancedCommandEditorBase<T>, where T is the Definition class you created earlier.
For example, AdvancedCommandEditorBase<ReadFromRegistryDefinition>.
Give your class a name to indicate it is reading from your command editor. For example, ReadFromRegistryEditor.cs. - Define private properties that match each of the input parameters and output variables you created in the Definition class earlier.
The property names must match exactly. For our example, we will create properties for the input parameters of RegistryRoot, RegistryKey, RegistryValue, GeneralError, and our two output variables OutputVariable and ErrorVariable. - Add getters and setters for all your properties.
- In your constructor, assign all the values from the definition object to your private properties.
- Override the Validate() method.
This method controls whether the OK button is enabled to allow the user to save their configuration and close the command editor.
Define your method to:- Return a new ValidationResult object if the user input isn't valid.
In our example, we return new ValidationResult(string.Empty) if any of the configuration fields are empty or contain only whitespace. - Call the base Validate() result if it is valid.
- Return a new ValidationResult object if the user input isn't valid.
- Override the AcceptChanges() method.
The AcceptChanges() method is a callback activated when the user clicks the OK button to save their command configuration.
Override the method to:- Trim any extra whitespace and store the current value of the class's private properties back to the Definition object.
- Call the base AcceptChanges() method.
Example view model class:
using Kryon.AdvancedCommands.Sdk.Editor;
using MyCompany.Commands.RegistryRead.Definition;
using System.ComponentModel.DataAnnotations;

namespace MyCompany.Commands.RegistryRead.Editor{
  public class ReadFromRegistryEditor : AdvancedCommandEditorBase<ReadFromRegistryDefinition>{
    private RegistryRoots _registryRoot;
    private string _registryKey;
    private string _registryValue;
    private string _outputVariable;
    private string _errorVariable;
    private string _generalError;

    public RegistryRoots RegistryRoot{
      get => _registryRoot;
      set => SetProperty(ref _registryRoot, value);
    }

    public string RegistryKey{
      get => _registryKey;
      set => SetProperty(ref _registryKey, value);
    }

    public string RegistryValue{
      get => _registryValue;
      set => SetProperty(ref _registryValue, value);
    }

    public string OutputVariable{
      get => _outputVariable;
      set => SetProperty(ref _outputVariable, value);
    }

    public string ErrorVariable{
      get => _errorVariable;
      set => SetProperty(ref _errorVariable, value);
    }

    public string GeneralError{
      get => _generalError;
      set => SetProperty(ref _generalError, value);
    }

    public ReadFromRegistryEditor(ReadFromRegistryDefinition definition) : base(definition){
      RegistryRoot = definition.RegistryRoot;
      RegistryKey = definition.RegistryKey;
      RegistryValue = definition.RegistryValue;
      OutputVariable = definition.OutputVariable;
      ErrorVariable = definition.ErrorVariable;
      GeneralError = definition.GeneralError;
    }

    public override ValidationResult Validate(){
      if (string.IsNullOrWhiteSpace(RegistryKey))
        return new ValidationResult(string.Empty);
      if (string.IsNullOrWhiteSpace(RegistryValue))
        return new ValidationResult(string.Empty);
      if (string.IsNullOrWhiteSpace(OutputVariable))
        return new ValidationResult(string.Empty);
      return base.Validate();
    }

    public override void AcceptChanges(){
      Definition.RegistryRoot = RegistryRoot;
      Definition.RegistryKey = RegistryKey?.Trim() ?? string.Empty;
      Definition.RegistryValue = RegistryValue?.Trim() ?? string.Empty;
      Definition.OutputVariable = OutputVariable?.Trim() ?? string.Empty;
      Definition.ErrorVariable = ErrorVariable?.Trim() ?? string.Empty;
      Definition.GeneralError = GeneralError?.Trim() ?? string.Empty;
      base.AcceptChanges();
    }
  }
}
Step 4.2: Define the layout markup
This example uses the WPF Framework to create the user interface, but most user interface frameworks are compatible.
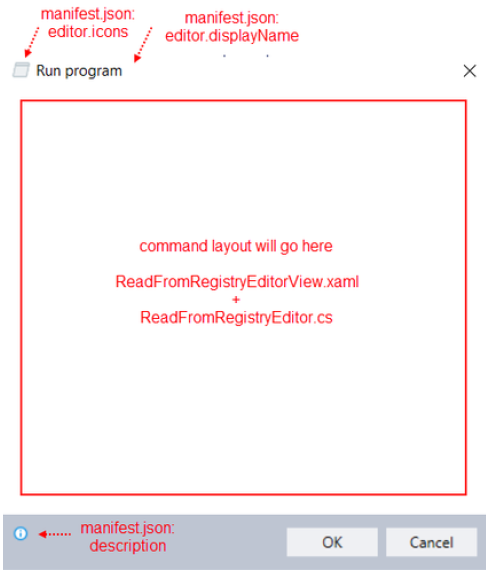
For our example, we will define the following layout:

In the MyCompany.Commands.RegistryRead.Editor project:
- Add a WPF User Control to contain the UI markup.
Name the User Control file to indicate it is a user interface markup. For example, ReadFromRegistryEditorView.xaml. - In the XAML file, create the markup for your layout:
- To fetch data such as enums or predefined values from your Definition class:
- Create a UserControl.Resources element with a ResourcesDictionary element.
- In the ResourcesDictionary element, define an ObjectDataProvider element for each method you want to access from your Definition class.
- In the ObjectDataProvider element, add the properties of:
- MethodName with the name of the GetValues.
- ObjectType to define the data type of the data you're retrieving.
- x:Key to define a handle for the returned data.
- Inside the ObjectDataProvider element, child element of ObjectDataProvider.MethodParameters element.
- Inside the ObjectDataProvider.MethodParameters element, add a child element of x:Type TypeName with a mapping to the value you're retrieving.
- To add user interface components for your proprties:
- Add the appropriate element for the user interface control, such as a ComboBox for drop-down lists or TextBox for text input.
- In the properties of the user control, add the value of Binding with:
- Path the name of the property in your view model to bind this control to.
- Mode either OneWay or TwoWay.
- UpdateSourceTrigger of PropertyChanged to trigger a notification callback when this control is updated.
The name of the property depends on which user control you are defining.
- To fetch data such as enums or predefined values from your Definition class:
Example user interface markup:
<UserControl x:Class="MyCompany.Commands.RegistryRead.Editor.ReadFromRegistryEditorView"  xmlns="http://schemas.microsoft.com/winfx/2006/xaml/presentation" xmlns:x="http://schemas.microsoft.com/winfx/2006/xaml" xmlns:mc="http://schemas.openxmlformats.org/markupcompatibility/2006" xmlns:d="http://schemas.microsoft.com/expression/blend/2008" xmlns:local="clr-namespace:MyCompany.Commands.RegistryRead.Editor" xmlns:system="clr-namespace:System;assembly=System.Runtime" xmlns:definition="clr-namespace:MyCompany.Commands.RegistryRead.Definition;assembly=MyCompany.Commands.RegistryRead.Definition" mc:Ignorable="d" Width="450" d:DataContext="{d:DesignInstance local:ReadFromRegistryEditor}">
  <UserControl.Resources>
    <ResourceDictionary>
      <ObjectDataProvider MethodName="GetValues" ObjectType="{x:Type system:Enum}" x:Key="RegistryRoots">
        <ObjectDataProvider.MethodParameters>
          <x:Type TypeName="definition:RegistryRoots" />
        </ObjectDataProvider.MethodParameters>
      </ObjectDataProvider>
    </ResourceDictionary>
  </UserControl.Resources>
  <StackPanel Grid.IsSharedSizeScope="True">
    <Label Content="Read data from registry" Margin="0,0,0,0" Padding="0,5"/>
    <Grid Margin="0,5,0,0">
      <Grid.ColumnDefinitions>
        <ColumnDefinition Width="Auto" SharedSizeGroup="group"/>
        <ColumnDefinition Width="*"/>
      </Grid.ColumnDefinitions>
      <Label Content="Root" Margin="0,0,5,0" Padding="0" VerticalAlignment="Center"/>
      <ComboBox Grid.Column="1" SelectedValue="{BindingPath=RegistryRoot, Mode=TwoWay}" VerticalAlignment="Center" ItemsSource="{Binding Mode=OneWay, Source={StaticResource RegistryRoots}}" />
    </Grid>
    <Grid Margin="0,5,0,0">
      <Grid.ColumnDefinitions>
        <ColumnDefinition Width="Auto" SharedSizeGroup="group"/>
        <ColumnDefinition Width="*"/>
      </Grid.ColumnDefinitions>
      <Label Content="Key:" Margin="0,0,5,0" Padding="0" VerticalAlignment="Center"/>
      <TextBox Grid.Column="1" Text="{Binding RegistryKey, Mode=TwoWay, UpdateSourceTrigger=PropertyChanged}" />
    </Grid>
    <Grid Margin="0,5,0,0">
      <Grid.ColumnDefinitions>
        <ColumnDefinition Width="Auto" SharedSizeGroup="group"/>
        <ColumnDefinition Width="*"/>
      </Grid.ColumnDefinitions>
      <Label Content="Value:" Margin="0,0,5,0" Padding="0" VerticalAlignment="Center"/>
      <TextBox Grid.Column="1" Text="{Binding RegistryValue, Mode=TwoWay, UpdateSourceTrigger=PropertyChanged}"/>
    </Grid>
    <Label Content="Return the result in the variable:" Padding="0,5" />
    <TextBox Text="{Binding Path=OutputVariable, Mode=TwoWay, UpdateSourceTrigger=PropertyChanged}" />
    <Border BorderThickness="0,1,0,0" BorderBrush="LightGray" Margin="0,15,0,0" Padding="0,5,0,0" SnapsToDevicePixels="True">
      <Expander IsExpanded="False">
        <Expander.Header>
          <StackPanel Orientation="Horizontal">
            <Label Content="Error Handling" Padding="0" />
          </StackPanel>
        </Expander.Header>
        <Grid Margin="25,8,0,0">
          <Grid.RowDefinitions>
            <RowDefinition Height="Auto" />
            <RowDefinition Height="5" />
            <RowDefinition Height="Auto" />
            <RowDefinition Height="5" />
          </Grid.RowDefinitions>
          <Grid.ColumnDefinitions>
            <ColumnDefinition Width="Auto" />
            <ColumnDefinition Width="5" />
            <ColumnDefinition Width="*" />
          </Grid.ColumnDefinitions>
          <Label Grid.Row="0" Grid.Column="0" Padding="0" Content="Error variable:" VerticalAlignment="Center" />
          <TextBox Grid.Column="2" Grid.Row="0" Text="{Binding Path=ErrorVariable, UpdateSourceTrigger=PropertyChanged,Mode=TwoWay}"/>
          <Label Grid.Row="2" Grid.Column="0" Padding="0" Content="General error value:" VerticalAlignment="Center" />
          <TextBox Grid.Row="2" Grid.Column="2" Text="{Binding Path=GeneralError, UpdateSourceTrigger=PropertyChanged,Mode=TwoWay}" />
        </Grid>
      </Expander>
    </Border>
  </StackPanel>
</UserControl>
Step 4.3: Connect the markup and view model
RPA Studio needs to know how to find the markup and view model we just created. We'll create a small resource to connect these files to our project.
In the root of the MyCompany.Commands.RegistryRead.Editor project:
- Create a XAML Resource Dictionary file called Generic.xaml.
Make sure the file is at the root level of the project. - Open the XAML file and add a DataTemplate element with a DataType property of {x:Type local:<classname>}, where <classname> is the name of the view model class you created.
In our example, that would be DataType="{x:Type local:ReadFromRegistryEditor}" - Inside the DataTemplate element, add <local:<controlname> />, where <controlname> is the name of the user control you defined in your markup file.
In our example, that would be <local:ReadFromRegistryEditorView />. - Save and close the file.
Example Generic.xaml dictionary file:
<ResourceDictionary xmlns="http://schemas.microsoft.com/winfx/2006/xaml/presentation" xmlns:x="http://schemas.microsoft.com/winfx/2006
/xaml" xmlns:local="clr-namespace:MyCompany.Commands.RegistryRead.Editor">
  <DataTemplate DataType="{x:Type local:ReadFromRegistryEditor}">
    <local:ReadFromRegistryEditorView />
  </DataTemplate>
</ResourceDictionary>
Step 5: Add the command to RPA Studio
Note: This step requires your Advanced Command folder path. You can find the location of your Advanced Command path in your RPA Studio or RPA Robot configuration.
- Build your projects.
- Create a command folder.
- Copy the built output from the Executor component project to your command folder.
- Copy the built output from the Editor component project to your command folder.
If prompted, choose Replace the files in the destination. - Navigate to the Advanced Command folder.
- Inside the Advanced Command folder, navigate to the /execution-host-x.x.x/extensions folder.
- Copy the command folder into this folder.
- If RPA Studio is currently running, restart it.
Note: We recommend you use a naming scheme of <companyName>-<commandName>-<versionNumber>. For example: mycompany-registry-read-2024.5.1000000001.
Step 6: Test the command
You can test your command using RPA Studio.
Note: Before testing your command, we recommend configuring your log levels to assist with debugging. See Custom command logs .
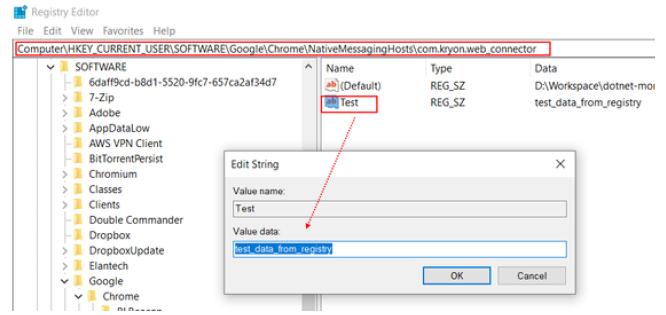
Create any test data you need. For this example, create a registry entry for the command to read:
- Open the Windows Registry Editor.
- In the Registry Editor, navigate to HKEY_CURRENT_USER\Software\Google\Chrome\NativeMessagingHosts.
- Create a new registry key com.kryon.web_connector with a value of Test.
To test your command:
- Launch RPA Studio.
- Navigate to the Wizard Edit view.
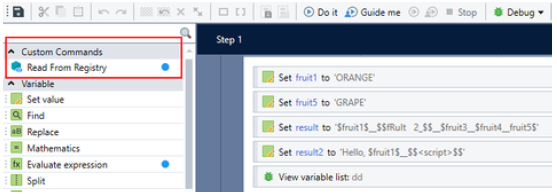
- In the Commands Toolbox panel on the left, find the Custom Commands category.
Your command is listed in this category. - Drag the command into the Wizard.
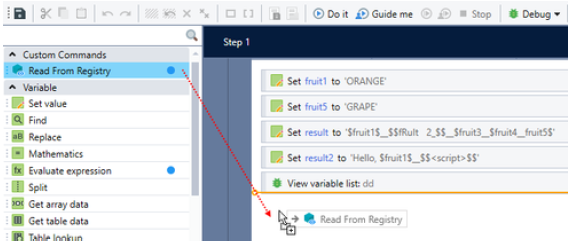
The user interface you designed in the Editor component is displayed.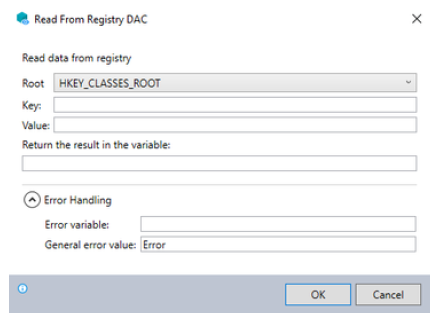
- Configure your command to read the com.kryon.web_connector registry key you created.
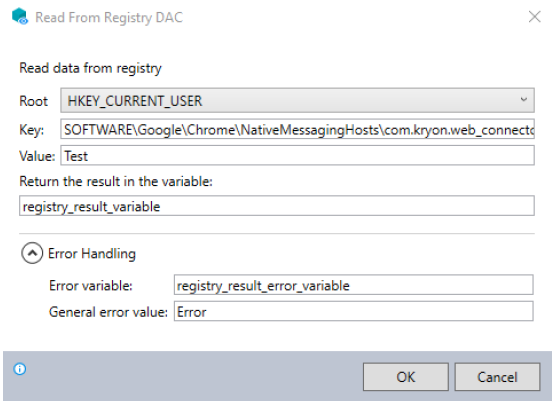
- Click Do it to run the Wizard in RPA Studio.
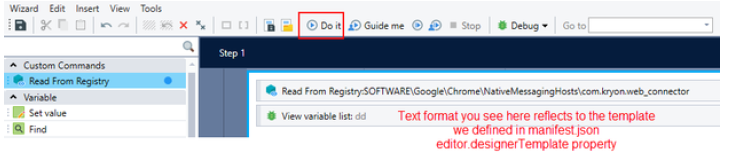
If your test is successful, a popup appears with the name of the registry key and the registry key's value.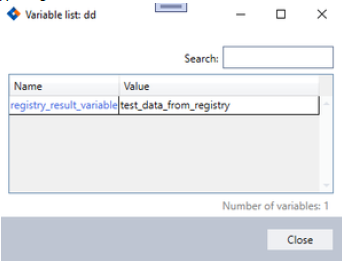
Troubleshooting
The most common issue with custom commands is the Command does not exist error. When troubleshooting other issues with your command, you may find it helpful to:
- View your Custom command logs or adjust the level of detail in your logs.
- Add advanced logging within your custom command.
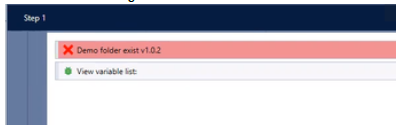
Command does not exist
You may see error messages stating the command or folder does not exist while editing or running a wizard.

To resolve this error:
- Check that your custom command appears in the Advanced Commands folder.
- Remove and re-add the command to the folder.
Custom command logs
Nintex RPA creates logs of commands as they execute on a system. Logs are located in the following folders:
- %localappdata%\Nintex\Studio
- %localappdata%\Nintex\Player
Each log entry has a prefix identifying what it relates to in the execution of the command:
- [KDC]: General command infrastructure.
- [KDC HOST]: The command execution host, which is a separate process handling command plugins.
For example: [KDC HOST] Starting command 'MyCompany.RegistryRead v2024.5.1000000001' edit. - [KDC EDITOR APP]: The command UI component.
For example: [KDC EDITOR APP] Starting command 'MyCompany.RegistryRead v2024.5.1000000001' edit. - [KDC PLUGIN]: The command executor component.
For example: [KDC PLUGIN] Starting command 'MyCompany.RegistryRead v2024.5.1000000001' execution.
Configure logging levels
You can configured the level of logging:
- Error: report errors only.
- Warning: report errors and warnings.
- Information: report errors, warnings, and basic events.
- Debug: report errors, warnings, and additional information about events.
- Verbose: report all possible information.
To configure the logging level:
- Navigate to the RPA Studio/Robot installation folder.
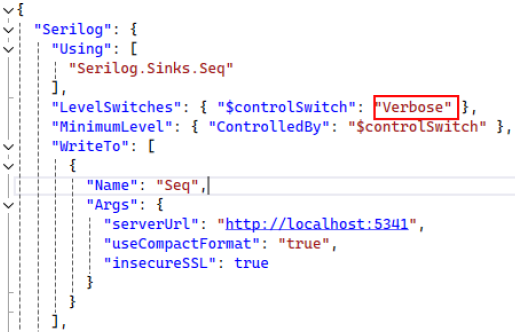
- Open the serilog.json file.
- Find the LevelSwitches property in the file.
- Change the value of the $constrolSwitch property inside to the level of logging you prefer.
Quick reference
- Manifest.json schema
- Nintex RPA .NET SDK classes and interfaces
- Additional user interface controls
- Add advanced logging
- Add dependency injections
Manifest.json schema
Also see an example in Step 2.1: Create the manifest file
| Property | Type | Description | |
|---|---|---|---|
| name | string | Name of the command. | |
| version | string | Version of the command. | |
| description | string | Description of the command. | |
| publisher | string | Name of the company publishing the command. | |
| extends | object | Object defining | |
| executionType | string | Use the value "remote". | |
| extensionType | string | Use the value "activity". | |
| editor | object | Object with four properties defining the appearance of the command in RPA Studio. | |
| editorSchema | string | Relative location of the command editor .dll file. | |
| displayName | string | Name of the command to display in RPA Studio | |
| designerTemplate | string |
Template of the command to be used in the user interface, may use dynamic labels to indicate the current configuration. For example: "designerTemplate": "Read From Registry:<$.registryKey>". |
|
| icons | array |
Array of icons to use, where each icon is defined as an object with a single "name" property with the value of the file name of the icon. Copy
|
|
| definition | object | Object with four properties defining the command's definition, execution, input parameters and output. | |
| executorSchema | string | Relative location of the command execution .dll file. | |
| definitionSchema | string | Relative location of the command definition .dll file. | |
| input | array |
Array of input parameters, where each parameter is defined as an object with the string properties of name, description, and type. Copy
|
|
| output | array |
Array of output values, where each value is defined as an object with the string properties of name, description, and type. Copy
|
Nintex RPA .NET SDK classes and interfaces
If you are familiar with developing custom commands, use the following reference for the interfaces, classes, and methods you need:
| Component | Implementation |
|---|---|
|
Command Definition:
Kryon.AdvancedCommands.Sdk.Definition |
The definition loader class inherits from AdvancedCommandDefinition. Also see the Manifest.json schema. |
|
Command Execution:
Kryon.AdvancedCommands.Sdk.ExecutorPlugin |
The command execution class implements the Execute method of the IAdvancedCommand<T> interface. The Execute method:
Use VariableResult's Set() method to store output values. Also see Add advanced logging and Add dependency injections. |
|
Command Editor:
Kryon.AdvancedCommands.Sdk.EditorAdapter |
The command view model class inherits from AdvancedCommandEditorBase<T> and overrides:
Also see Additional user interface controls. |
Additional user interface controls
Nintex RPA .NET SDK contains some predefined UI controls that can be used in custom commands development. For example:
<UserControl x:Class="MyCompany.Commands.RegistryRead.Editor.ReadFromRegistryEditorView" xmlns:krcv="http://schemas.kryonsystems.com/xaml/controls/variables" mc:Ignorable="d" d:DataContext="{d:DesignInstance local:ReadFromRegistryEditor}">
                <Label Content="Key:" Margin="0,0,5,0" Padding="0"VerticalAlignment="Center"/>
                <krcv:VariablesTextBox Grid.Column="1" Text="{Binding RegistryKey, Mode=TwoWay,UpdateSourceTrigger=PropertyChanged}" Autofocus="True" />
            </UserControl>
Add advanced logging
You can log additional information from within the execution of your command to help with troubleshooting or improving your command's performance:
- Add the Microsoft.Extensions.Logging declaration to your execution class.
- Add a private property of type ILogger.
- Ensure the logger property is defined in your class constructor.
- Use the ILogger property's LogError method to log informative error messages.
-
You can use the ILogger interface from the Microsoft.Extensions.Logging package to improve the logging messages recorded for your command by RPA.
Example executor class with advanced logging:
using Kryon.AdvancedCommands.Sdk.Executor;
using Microsoft.Extensions.Logging;
using MyCompany.Commands.RegistryRead.Definition;
using System;

public class ReadFromRegistryExecutor : IAdvancedCommand<ReadFromRegistryDefinition> {

  private readonly ILogger<ReadFromRegistryExecutor> _logger;
  public static readonly object NoValueMarker = new object();

  public ReadFromRegistryExecutor(ILogger<ReadFromRegistryExecutor> logger = null){
    _logger = logger;
  }

  public IExecutionResult Execute(ReadFromRegistryDefinition definition, IExecutionContext context){
    var result = new VariableResult();
    try{
      var registryValue = GetValueFromRegistry(definition);
      if (registryValue == definition.GeneralError) {
        result.Set(definition.ErrorVariable, definition.GeneralError);
        _logger?.LogError($"[{nameof(ReadFromRegistryExecutor)}] - Error, Key not found");
      }else{
        result.Set(definition.OutputVariable, registryValue);
      }
    }catch (Exception e){
      result.Set(definition.ErrorVariable, definition.GeneralError);
      _logger?.LogError(e, $"[{nameof(ReadFromRegistryExecutor)}]- Error, value type is out of range");
    }
    return result;
  }

  private string GetValueFromRegistry(ReadFromRegistryDefinition definition){
    object registryValue = Microsoft.Win32.Registry.GetValue(definition.RegistryRoot + "\\" + definition.RegistryKey, definition.RegistryValue, NoValueMarker);
    if (registryValue == null || ReferenceEquals(NoValueMarker,registryValue)){
      return definition.GeneralError;
    }else{
      return Convert.ToString(registryValue);
    }
  }
}
Add dependency injections
You can add functionality from other libraries and classes into your execution class using the dependency injection feature provided by the Nintex RPA .NET SDK. Dependency injection is based on Autofac containers and Autofac modules.
To inject dependencies:
- Add a C# class to the Executor project that inherits from Autofac.Modules.
- Override the Load method:
- Call the original Load method, passing the ContainerBuilder parameter through.
- Call RegisterType<T>().As<T> on the ContainerBuilder parameter with your dependent class and its relevant type to register the dependency.
The defined type will be available in your Executor class.
Our basic example command used the Microsoft.Win32.Registery NuGet package to read the registry. To keep our example simple, we will:
- Define a wrapper interface called IRegistryWrapper for the Microsoft package, and add a class to implement that interface.
- Define a class called ReadFromRegistryModule to register the dependency injection.
- Update our execution class to use that new class instead of Microsoft.Win32.Registry.
Example IRegistryWrapper interface and implementation:
public interface IRegistryWrapper {
  public object GetValue(string keyName, string valueName, object noValueMarker);
}

public class RegistryWrapper : IRegistryWrapper {
  public object GetValue(string keyName, string valueName, object noValueMarker) {
    return Microsoft.Win32.Registry.GetValue(keyName, valueName, noValueMarker);
  }
}
Example ReadFromRegistryModule class to register dependencies:
using Autofac;

public class ReadFromRegistryModule : Module {
  protected override void Load(ContainerBuilder builder){
    base.Load(builder);
    builder.RegisterType<RegistryWrapper>().As<IRegistryWrapper>();
  }
}
Example executor class updated with dependency injection:
using Kryon.AdvancedCommands.Sdk.Executor;
using Microsoft.Extensions.Logging;
using MyCompany.Commands.RegistryRead.Definition;
using System;
public class ReadFromRegistryExecutor : IAdvancedCommand<ReadFromRegistryDefinition> {
private readonly ILogger<ReadFromRegistryExecutor> _logger;
private readonly IRegistryWrapper _registryWrapper;
public static readonly object NoValueMarker = new object();
public ReadFromRegistryExecutor(IRegistryWrapper registryWrapper, ILogger<ReadFromRegistryExecutor> logger = null){
_registryWrapper = registryWrapper ?? throw new ArgumentNullException(nameof(registryWrapper));
_logger = logger;
}
public IExecutionResult Execute(ReadFromRegistryDefinition definition, IExecutionContext context){
var result = new VariableResult();
try{
var registryValue = GetValueFromRegistry(definition);
if (registryValue == definition.GeneralError) {
result.Set(definition.ErrorVariable, definition.GeneralError);
_logger?.LogError($"[{nameof(ReadFromRegistryExecutor)}] - Error, Key not found");
}else{
result.Set(definition.OutputVariable, registryValue);
}
}catch (Exception e){
result.Set(definition.ErrorVariable, definition.GeneralError);
_logger?.LogError(e, $"[{nameof(ReadFromRegistryExecutor)}]- Error, value type is out of range");
}
return result;
}
private string GetValueFromRegistry(ReadFromRegistryDefinition definition){
object registryValue = _registryWrapper.GetValue(definition.RegistryRoot + "\\" + definition.RegistryKey, definition.RegistryValue, NoValueMarker);
if (registryValue == null || ReferenceEquals(NoValueMarker,registryValue)){
return definition.GeneralError;
}else{
return Convert.ToString(registryValue);
}
}
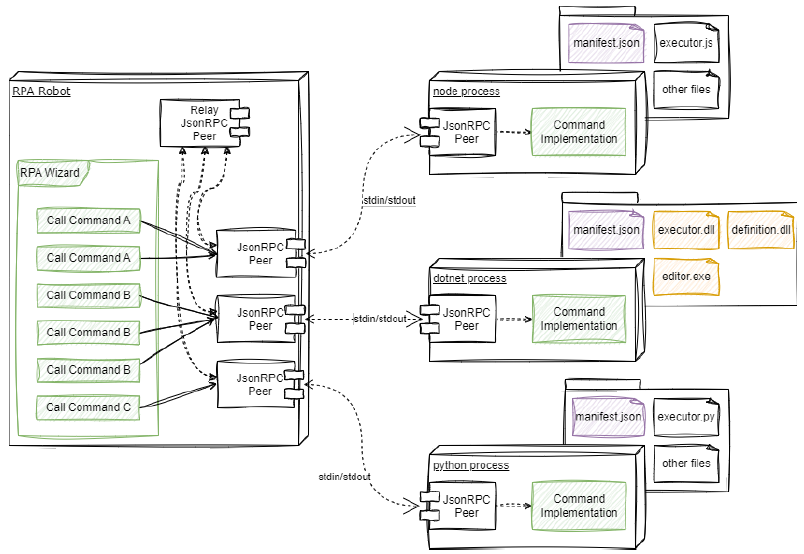
}Custom commands with JSON-RPC
Each custom command is a standalone application that is invoked by a JSON-RPC call over stdin/stdout. If you are implementing a custom command in a language other than .NET, you will need to implement the JSON-RPC processes yourself. Most programming languages and frameworks provide this functionality either out of the box, or with well-supported libraries.
Note: If you create your custom command using the Nintex RPA .NET SDK, the SDK provides much of the JSON-RPC functionality for you, so you can focus on implementing the command logic.
You must follow the conventions below for declaring and invoking your commands:
- Declare each command with a manifest.json file.
- Each command is an independent application and must have its own manifest.json file that conforms to the defined JSON schema.
See Manifest.json schema. - The manifest.json file describes the command, the parameters used to invoke it, the output it returns to the calling environment, and other information about the command.
- Each command is an independent application and must have its own manifest.json file that conforms to the defined JSON schema.
- Implement a JSON-RPC peer over stdin/stdout to handle the functions you declared in the manifest.
- The peer will receive the request, execute the command function, and return any output as a response.
- Create a JSON-RPC proxy to make your commands discoverable.
- The proxy will pass incoming requests to the appropriate peer.
- List the manifest files, load your command declarations, and ensure the proxy conforms to the command signatures you defined.
When a command is invoked, the command proxy launches the corresponding command with command arguments, configures any environment variables for the child process, and establishes a JSON-RPC peer over the stdin/stdout of the child process, enabling two-way communication between RPA and the remote command. Incoming requests are relayed to the appropriate peer, which dispatches them to the corresponding remote or local functions.
For performance efficiency, you can launch function processes in advance, and re-use them in multiple calls.