Preparing the Nintex Database Server
For information relating to this topic, see the topic Data Store and Backup Strategy
Preparing the Nintex Database Server consists of 2 main steps:
-
Install SQL Server Management Studio (if not previously installed); and
-
Prepare SQL Server instance by following the instructions relevant to your situation:
-
The supported database engine for the Nintex database server is SQL Server 2012 and above
-
The Nintex database server can be installed on the same machine as the Nintex RPA server if machine resources are sufficient
SQL Server Management Studio is required in order to work with the Nintex database schema. If not yet installed:
-
Download Microsoft SQL Server Management Studio.
-
Run the installation package using the default installation options.
You may be prompted to restart the sever after installation of SQL Server Management Studio. It is important to do so or an automatic restart will occur during Nintex RPA server installation.
The Nintex RPA Server installation package which automatically installs the Nintex RPA Server utilizes 2 databases: the application database and the authentication platform database. Both of these database schema must reside in the same SQL Server instance (though it's perfectly fine if other schema also exist in this instance).
If an SQL Server instance is not yet installed
-
When installing the Nintex RPA Server, you can choose to install a local instance of Microsoft SQL Server 2017 Express. If you select this option, skip the remainder of this topic and proceed to Nintex RPA Server installation.
-
If you wish to manually install SQL Server, do so and proceed to the next section when SQL Server installation is complete.
If an SQL Server instance is already installed
If an instance of SQL Server is already installed on a machine that will be accessible over the network to the Nintex RPA Server, proceed with the instructions in:
Configure SQL Server instance
Open SQL Server Configuration Manager (a tool installed with SQL Server), and follow these steps to configure the database instance:
-
Enable and configure TCP/IP
-
Under SQL Server Network Configuration > Protocols for {Instance Name}, enable TCP/IP
/Installation and Upgrade_53.png)
-
Double click TCP/IP to open its configuration
-
On the IP Addresses tab, scroll down to IPAll
-
Remove the
0value from TCP Dynamic Ports (so that it now appears blank) -
In TCP Port, enter the port number used to communicate with this database instance
-
To use the default value, enter
1433
-
-
Click the OK button to save your changes
/Installation and Upgrade_54.png)
-
-
In SQL Server Services, right-click the SQL Server service for the relevant instance and select Restart
/Installation and Upgrade_55.png)
-
Configure and start the SQL Server Browser
-
In SQL Server Services, double click the SQL Server Browser service to open its configuration
-
On the Service tab, set the Start Mode value to
Automatic -
Click the OK button to save your changes
/Installation and Upgrade_56.png)
-
Right-click the SQL Server Browser service and select Start
/Installation and Upgrade_57.png)
-
Create a login to the SQL Server
Create a login by which the Nintex RPA Server will access the database:
-
Open SQL Server Management Studio and connect to the database server
-
In the Object Explorer, right-click Security and select New > Login
-
Enter the following data to create the login:
-
If you are using SQL authentication as your database authentication method:
-
Authentication: SQL Server authentication
-
Login name: set as desired
-
Password: set as desired (the following special characters aren't supported
For password, the special characters
\ ; & "aren't supported. -
Enforce password policy: disabled
-
-
If you are using Windows authentication as your database authentication method:
-
Authentication: Windows authentication
-
Login name:the user with rights to run Nintex services on the Nintex RPA server
-
-
-
Ensure that
sysadminis enabled on the Server Roles page of this login properties.What if I can't grant
sysadminrights to this login?The Nintex RPA Server installation package executes certain tasks that require
sysadminrights (e.g., creating database schema and building database tables). If the database doesn't havesysadminrights at the time of installation, follow the additional steps in Creating Database Manually prior to the installation.
Hold on to that info!
Make your life easier when installing the Nintex RPA server by making note of:
-
the FQDN of the database server
-
the database instance name
-
login credentials
You can encrypt your database for a more secured database setup. You will need to use a security certificate for this.
While encrypting your database, you will make many non-RPA modifications. You are advised to make frequent backups of your system and files, and proceed with caution as these modifications are not supported by Nintex.
To encrypt your database, do the following:
-
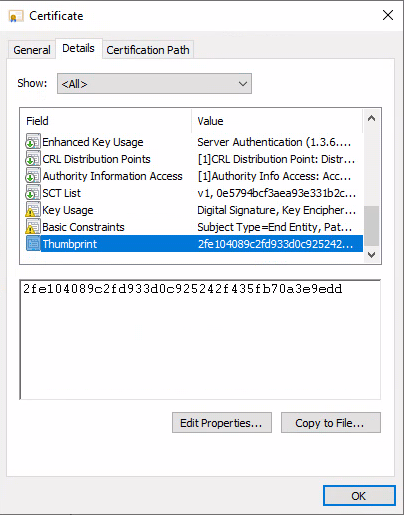
Use the Windows
certlmfeature: Retrieve your certificate's Thumbprint value. -
In Windows search, search for "manage computer certificates" to launch the feature.
-
Go to Personal > Certificates to list your certificates.
-
Double click the relevant certificate then click Details tab. Get the value from the Thumbprint field.
-
In Windows registry: Set the Force Encryption and Certificate values.
-
In Windows search, search for "registry" to launch the Windows Registry Editor.
-
Go to Computer\HKEY_LOCAL_MACHINE\SOFTWARE\Microsoft\Microsoft SQL Server\[your installed MSSQL]\MSSQLServer\SuperSocketNetLib.
-
In the Certificate field, make sure the Thumbprint value is filled up and identical to the one used by your certificate.
-
In the ForceEncryption field, make sure the value is "1".
-
-
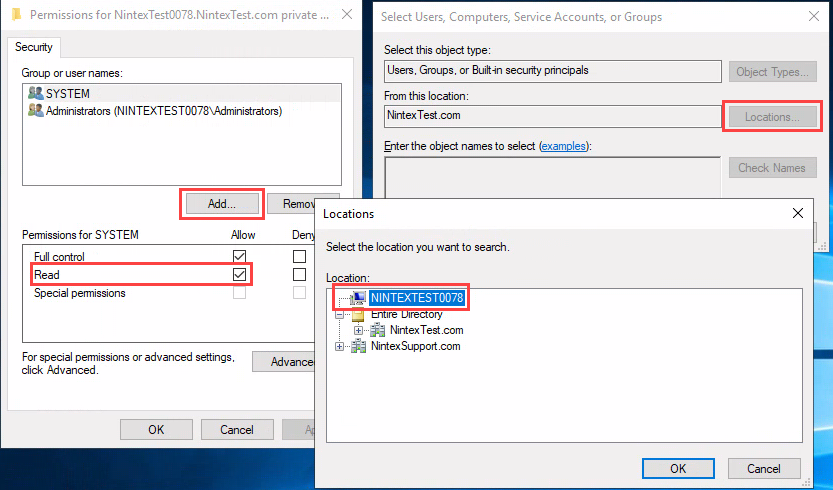
Use the Windows
certlmfeature again: Ensure the mssql user has Read permissions so it can read the certificate private keys.-
First, use Windows PowerShell to retrieve the value of StartName of the database's service user. Use the following command in PowerShell for this:
Get-WmiObject -Class Win32_Service | Where-Object { $_.Name -like 'MSSQL*' } | Select-Object Name, DisplayName, StartName, State
-
You will need to grant the relevant StartName with Read permission. Launch certlm to do this.
-
In certlm, go to Personal > Certificates.
-
Right-click the relevant certificate and select All Tasks > Manage Private Keys....
-
Click Add... to start adding the mssql user.
-
Click Locations to find the mssql user in the relevant domain.
-
Type the StartName that you retrieved from PowerShell in the Enter the object names to select: field and click OK.
-
The mssql user will be listed in the Security tab. Select it and make sure the Read option is set to Allow.
-
-
In SQL Server Configuration Manager, complete the encryption process:
-
Restart SQL Server service for the changes to take effect.
-
Go to SQL Server Services, right-click SQL Server [SQL edition] > Restart.
-
-
Specify Force Encryption value and check that the correct certificate is used:
-
Go to SQL Server Network Configuration.
-
Right-click Protocols for [SQL edition] > Properties.
-
At the Flags tab, make sure the Force Encryption field is set to Yes.
-
Also, at the Certificate tab, specify the certificate to use at the Certificate field.
-
-
-Take me to the relevant step in the Nintex RPA Server Installation Guide-