Queue Settings and Calendars
A queue is a customizable category that can represent different units or teams within an organization. For example, a company might create a queue for each department such as Sales, Marketing, Customer Service, or IT. Once a queue is created, tasks, triggers, and robots can be assigned to it.
The purpose of a queue is to function as a management group, organized by Teams, that can help you efficiently manage your automation processes. By grouping related tasks or processes together, you can more easily prioritize and manage them. In addition, you can set operational hours and priorities to better optimize the use of available bots and ensure that tasks are completed within specified timelines. This can result in improved efficiency, reduced costs, and better utilization of resources.
You can use this menu item to create queues, define their operational hours, and delete them as needed.
-
Go to the Settings tab in the Nintex RPA Console Plus.
-
Click Add / Edit queues from the Queue settings section.
/Console_84.png)
-
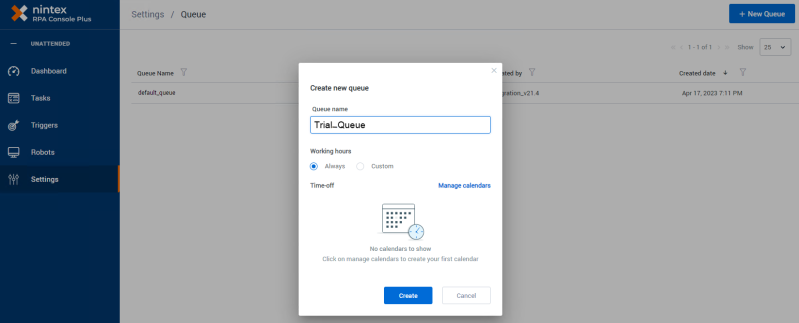
On the Queue page, click + New Queue.
-
Enter the desired Queue name and click Create.

The newly created queue appears in the list.

You can create calendars and determine a queue's active time or off time. This can be used for nightly system shutdowns, prioritizing one queue over the other, setting specific working hours, and shutting down for weekends and holidays.
Configure the operational hours of your automation and then assign it to the relevant queue.
Configure calendars and events for queue off-time
-
Go to the Settings tab in the Nintex RPA Console Plus.
-
Click on Manage Calendars.
-
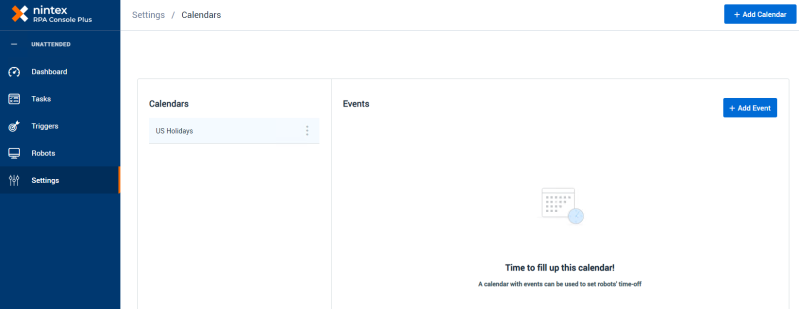
Click + Add Calendar to create your first calendar.
-
Insert a unique calendar name (for example, "US Holidays"), and click Add.
The new calendar appears on the list.

-
Click + Add Event to configure the calendar's operational hours. You can add more than one event.
For example, you can create a list of events for all US Holidays.
-
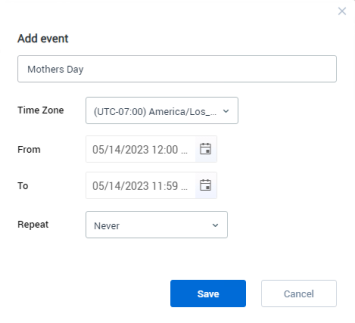
Fill in the fields:
-
Insert an event name (for example, "Mother's Day").
-
Set the date range of the event.
-
Select the frequency of the event recurrence: never, daily, weekly, monthly, or yearly.

-
-
Once you have completed these steps, you can set the operational hours of the queue.
Set the operational hours of a queue
-
Go to the Settings tab in the Nintex RPA Console Plus.
-
Click Add / Edit queues from the Queue settings section.
-
Add a new queue or edit an existing queue, and configure its operational hours by clicking the
 .
. -
Click Edit.
-
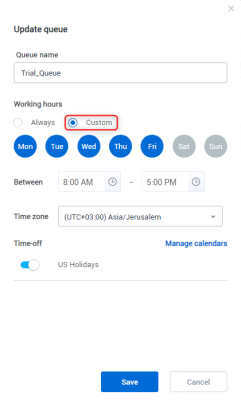
You can choose to schedule the event during your working hours, or customize the timing to suit your preferences.
-
To specify that the event should occur at all times, select Always.
-
To specify the days and times of your working hours, select Custom.

To set periods of time during which the event should not occur, use the 'Time-off' feature.
The 'Time-off' feature is optional and will be automatically populated with details of the calendars and events you have created.
To edit or add events or calendars, click Manage calendars.
-
-
Go to the Settings tab in the Nintex RPA Console Plus.
-
Click Add / Edit queues from the Queue settings section.
-
Click the
 next to the queue that you want to delete.
 -
Click Delete.

-
Confirm the deletion.

Deletion of queues is not possible if there are assigned elements present. Remove the required elements to complete the deletion process.
/Console_88_369x154.png)