Copy from Excel
Copy the specified cell values from an Excel file and store them in a new or existing variable.
-
You don't need Excel installed to use or to run this command unless you are using 'select range' in the command editor.
-
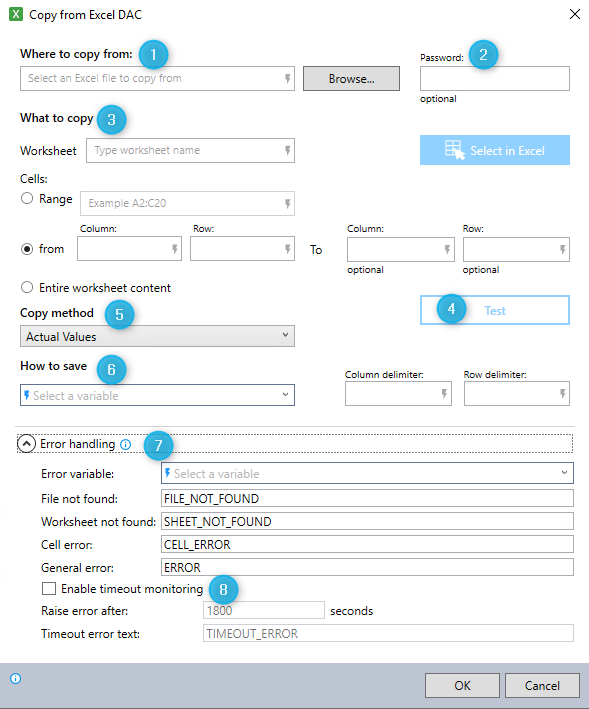
The greyed-out fields and options become enabled after a file is selected.
-
Enter the name of the Excel file from which you want to copy cell values:
-
Enter a variable.
To use a variable in this field, enclose its name between two $ signs (e.g.,$MyVar$). When the wizard is executed, the variable name will be substituted with its corresponding value. -
Enter text.
-
Click Browse and select the Excel file from which you would like to copy cell values.
-
-
If the selected Excel file is password protected, enter the password.
-
Specify the worksheet and cells from which to copy values:
 Select in Excel
Use this method to select the cells that you want to use from the Excel sheet for your Advanced Command or DAC.
-
Click Select in Excel to invoke the Excel selector.
The Select from Excel window appears with the selected Excel file open behind it.
-
Click directly in the Excel file and select the worksheet (tab) and cells you want to use in your Advanced Command or DAC.
The worksheet name and cell range you have selected will appear in the selector window's Current selection fields.
If the selector window interferes with viewing or selecting the cells you need, simply drag the window to a more convenient location on the screen.
-
When you are satisfied with your selection, click OK.
/Advanced Commands_236.png)
/Advanced Commands_237.png)
The Advanced Command or DAC window appears with the Worksheet and Range fields populated by your selections.
If you want to make modifications to your selections, you can do so either manually or by repeating the Select in Excel process.
/Advanced Commands_238.png) Enter Excel data selection manually
Enter Excel data selection manually
Use this method to manually select the worksheet content to be used in your Advanced Command or DAC.
This approach can be particularly useful when you want to use variable values to select cells.
-
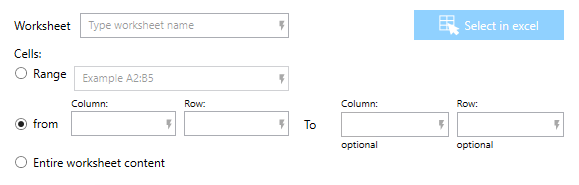
Specify the worksheet (tab) where the cells containing the desired values for your Advanced Command or DAC selection are located.
-
Choose one of three methods for specifying the cells you want to use from the Excel sheet:
-
Range: Designate the range using a "standard" Excel format (e.g., the range from Column A Row 1 to Column D Row 8 is designated as
A1:D8). -
From/To: Designate the starting column and row, using numbers and/or letters (e.g., cell C5 could be designated as Column
3, Row5or ColumnC, Row5).(Optional) Designate the ending column and row, using numbers and/or letters.
-
If you don't designate an ending column, the robot will copy data from all columns until it detects that it has reached the last column in the range (by reading 20 consecutive empty columns).
-
If you don't designate an ending row, the robot will copy data from all rows until it detects that it has reached the last row in the range (by reading 20 consecutive empty columns).
-
-
Entire worksheet: The robot will copy data from the entire worksheet until it detects it has reached the last row and column in the sheet (by reading 20 consecutive empty rows/columns).
-
-
Click Test to display a sample of the data that will be copied based on your selections.
/Advanced Commands_235.png)
-
Select whether to copy the values as Actual Values or Formatted Text.
Should you use Actual Values or Formatted Text as the copy method?
It's important to use the Formatted Text option when the relevant cells are formatted as dates. Otherwise, the values returned will be the sequential serial numbers for the dates in the Excel sheet. (For example:
January 1, 2008= serial number39448because it is 39,447 days after January 1, 1900 (serial number 1).For reading all other cells, use the Actual Values option.
Also, Formatted Text provides the exact same text as in Excel. To avoid having fields presented as ####, the columns need to have the proper length - which you can do directly in Excel or by using Macro. You can also use the Run Macro Advanced Command to perform this action.
-
Specify options for saving the data:
-
Enter the name of the variable into which you'd like to store the copied values.
-
Enter the delimiters to be used for separating each column and row in the returned data.
-
-
Expand the Error handling option to provide instructions to the wizard on how to manage encountered errors.
For more information on error handling, see Error handling.
-
(Optional) Select Enable timeout monitoring.
For more information on timeout monitoring, see Timeout Monitoring.