Send Email Message
Send an email message.
The settings available on the Email account tab vary for SMTP and Exchange servers.
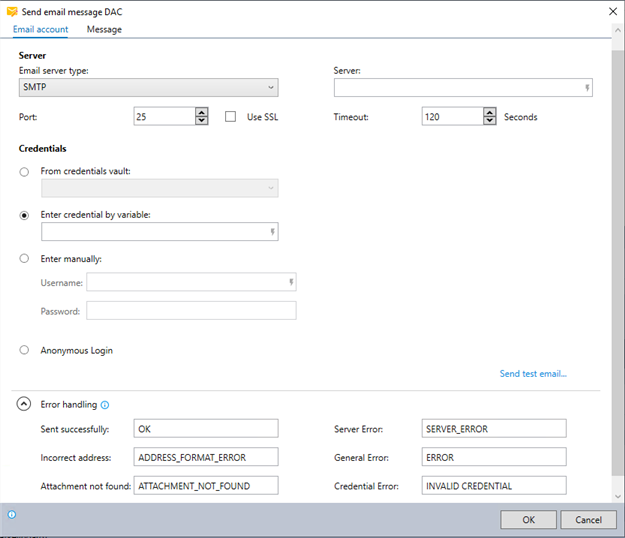
SMTP servers
-
Enter the settings for your email server.
-
Email server login credentials:
Enter from the Nintex Credentials Vault; or
Enter a credential by variable; or
Enter manually; or
Use anonymous login (for email accounts that allow this option)
The login credentials used will provide the default From: and Reply to: addresses for the message. These addresses can be overridden by utilizing advanced address options in the Message tab.
-
(Optional) Click Send a test email.
-
Expand the Error handling section to customize the error codes and messages for any errors, or choose the default values.
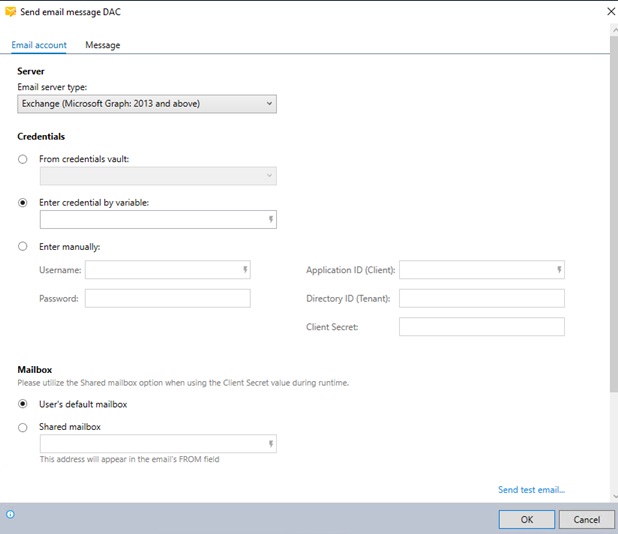
Exchange servers
-
Select Exchange (Microsoft Graph 2013 and above) as the Email server type.
-
Choose how to input credentials:
-
From credentials vault: Select this option if you want to get credentials from the Nintex Credentials Vault.
-
Enter credential by variable: Use this option if you want to input credentials using variables.
-
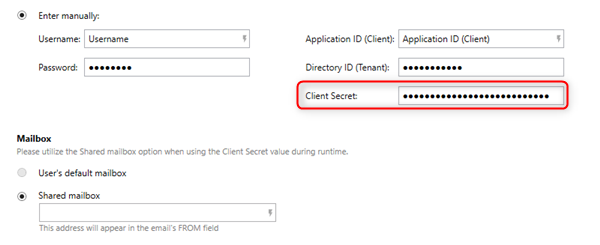
Enter manually: If you choose this option, enter the username, password, application ID, tenant ID, and client secret manually.
-
-
If you select Enter manually, enter the Application ID and Directory ID of the Microsoft Exchange. You can get these from Microsoft Azure under the Email application settings.
-
Working with the Microsoft Office 365 new authentication method? You can set the Application ID and Team ID directly into the Credentials Vault settings in the Nintex Admin Tool.
-
Once IDs are entered, they cannot be removed - only edited. To remove the IDs, you need to delete the trigger and re-create it. Read more about Working with Microsoft 365 Exchange and Modern Authentication.
-
Application ID isn't sensitive information and isn't encrypted.
-
Directory ID is sensitive information and is encrypted.
-
Client Secret is sensitive information and is encrypted.
Inputting a client secret locks the Mailbox option to Shared mailbox without an option to change it back to the User's default mailbox.
-
-
Select a mailbox to send the email message from:
-
User's default mailbox: Using the credentials entered above.
-
Shared mailbox: Enter the mailbox address.
The mailbox data entered will provide the default From: and Reply to: addresses for the message. These addresses can be overridden by using advanced address options in the Message tab.
-
-
(Optional) Click Send a test email....
-
Expand the Error handling section to customize the error codes and messages for any errors, or choose the default values.
Message tab
/Advanced Commands_192.png)
-
(Optional) Click the
/Advanced Commands_193.png) button to access advanced address options for the email.
button to access advanced address options for the email.Advanced address options:
-
Click the
/Advanced Commands_194.png) icon to:
icon to:-
Enter a long list of addresses (or addresses with display names) on the To: ,CC: ,or Bcc: lines
-
Enter addresses with display names on the From: or Reply to: lines
-
-
-
Choose whether to send the email in Plain Text or Rich Text/HTML format.
-
Enter recipient email addresses, subject, and attachments:
-
Separate multiple email addresses with commas
-
Separate multiple attachments with commas
-
Identify attachments by the full file name and file path
-
Enter the body of the email.
-
Enter the name of the variable into which you'd like place the send result.
-
Customize the codes/error messages for send results.
All of the following fields can include free text and/or variables:
-
Email addresses (To: ,CC:, Bcc:, From:, and Reply to:)
-
Subject
-
Attachments
-
Email body
To include the value of a variable, indicate its name by typing it between dollar signs (e.g., $MyVar$). When the wizard is run, the variable name will be replaced by its value.
Line breaks in rich text emails:
When sending an HTML/rich text email that contains "hard" line breaks, create a special character variable named, for example, HTML line break, and set its value to </BR>. Then use this variable to replace actual line breaks in your email text.
Example:
-
Set a variable to define the line break.
/Advanced Commands_195.png)
-
Use this variable to replace the actual line breaks in your rich text-formatted email.
/Advanced Commands_196.png)
Result:
/Advanced Commands_197_280x476.png)
Using Credentials by variable:
The Credential by variable functionality allows you to create a dynamic connection to the credentials vault. The credential variable is associated with credential display name(s).
Since the credential variables are dynamic, if you export a wizard to another environment, make sure that the credentials associated with the variable are defined in the new environment's credential vault.