Get Email Messages
Identify all email messages matching a specified filter or a single message matching a key for the purpose of performing a sequence of actions on the message(s).
- Due to a recent upgrade in Microsoft, multi-factor authentication (MFA) is now necessary. To configure Microsoft 365 authentication in Azure without MFA, see Modern Authentication in Azure.
- Known Issue: When using the Get email messages DAC configured with POP3 on a mailbox, emails are incorrectly marked as Read instead of remaining Unread. This behavior is due to a limitation of the POP3 protocol. Currently, there is no workaround available. Monitor email statuses manually or consider using IMAP configuration if possible.
Step 1: Identify the messages
The first step in using the Get Email Messages command is to identify the messages on which the specified actions will be performed.
The settings available on the Email account tab vary for Exchange and IMAP/POP3 servers.
Exchange servers
-
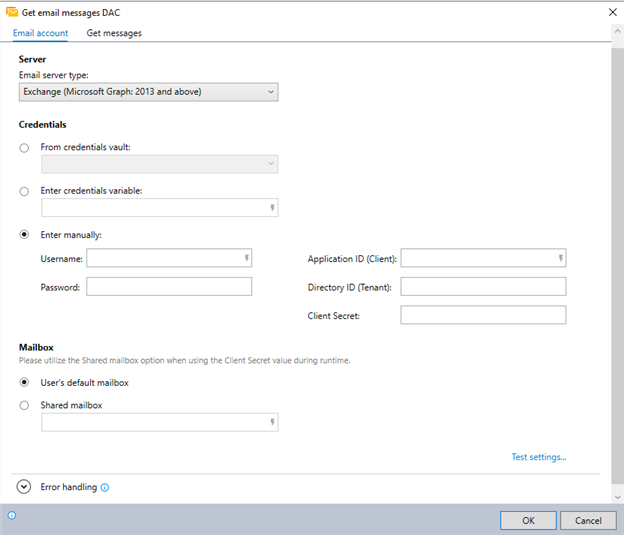
Select Exchange (Microsoft Graph 2013 and above) as the Email server type.
-
Choose how to input credentials:
-
From credentials vault: Select this option if you want to get credentials from the Nintex Credentials Vault.
-
Enter credential by variable: Use this option if you want to input credentials using variables.
-
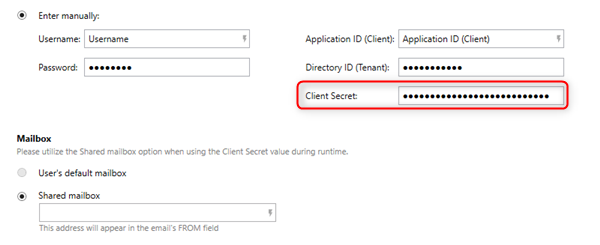
Enter manually: If you choose this option, enter the username, password, application ID, tenant ID, and client secret manually.
-
-
If you select Enter manually, enter the Application ID and Directory ID of the Microsoft Exchange. You can get these from Microsoft Azure under the Email application settings.
-
Working with the Microsoft Office 365 new authentication method? You can set the Application ID and Team ID directly into the Credentials Vault settings in the Nintex Admin Tool.
-
Once IDs are entered, they cannot be removed - only edited. To remove the IDs, you need to delete the trigger and re-create it. Read more about Working with Microsoft 365 Exchange and Modern Authentication.
-
Application ID isn't sensitive information and isn't encrypted.
-
Directory ID is sensitive information and is encrypted.
-
Client Secret is sensitive information and is encrypted.
Inputting a client secret locks the Mailbox option to Shared mailbox without an option to change it back to the User's default mailbox.
-
-
Select which mailbox to get the email message from:
-
User's default mailbox: Using the credentials entered above.
-
Shared mailbox: Enter the mailbox address.
-
-
(Optional) Click Test settings... to test the email account settings.
-
Expand the Error handling section to customize the error codes and messages for any errors, or choose the default values.
IMAP/POP3 servers

-
Select IMAP or POP3 as the Email server type.
-
(Optional) Select Use SSL and select one of the following from the dropdown:
-
Auto: Automatically determines whether to use SSL based on the server configuration.
-
SSL Implicit: Uses SSL without explicit encryption negotiation between the client and the server.
-
SSL Explicit: Initiates SSL encryption after explicit negotiation between the client and the server.
-
-
Enter the Server details.
-
Enter the Port details.
-
Choose how to input credentials:
-
From credentials vault: Select this option if you want to get credentials from the Nintex Credentials Vault.
-
Enter credential by variable: Use this option if you want to input credentials using variables.
-
Enter manually: If you choose this option, enter the username, password, application ID, tenant ID, and client secret manually.
-
-
If you select Enter manually, enter the Application ID and Directory ID of the IMAP or POP3. You can get these from the Microsoft Azure portal, typically under the settings or configuration section related to your application or service.
-
Application ID isn't sensitive information and isn't encrypted.
-
Directory ID is sensitive information and is encrypted.
-
Client Secret is sensitive information and is encrypted.
-
-
(Optional) Click Test settings... to test your email account settings.
-
Expand the Error handling section to customize the error codes and messages for any errors, or choose the default values.
IMAP and POP3 servers don't send mail!
IMAP and POP3 are internet mail protocols designed for retrieving emails, not for sending. As a result, if your Email Server Type is set to IMAP or POP3, the following commands are not supported within the Get Email Messages command:
POP3 servers don't support all of Nintex RPA capabilities
-
When defining the filter for the specific mail messages that will be retrieved, POP3 servers do not support searching by the following fields:
-
Message contains
-
Status
-
Folder
-
-
POP3 servers do not support the following commands within the Get Email Messages command:
Get messages tab
/Advanced Commands_200.png)
-
(a) Define the filter by which the messages will be identified and retrieved; or
(b) Enter the name of the variable into which you have set an email key. (For more information, see Get Email Trigger Input.)
To define search From, enter the email address (for example,
gilgolan@yahoo.com). To define search To, enter the display name only. (for example, if the complete email isMike Smith <mikesmith@yahoo.com>, enterMike Smith) -
Enter the name of the variable into which you'd like place the result (the number of messages matching the filter criteria).
-
Indicate if you would like retry the search until at least one message is found and, if applicable, specify retry settings.
-
Instruct the wizard how to handle any errors encountered. Read more about error handling.
Step 2 - Define the actions
Upon adding the get email messages command to your wizard, you will notice that it becomes an empty "container" within the Editor Pane, waiting for you to fill it with instructions:
/Advanced Commands_201.png)
-
Enter the action(s) the wizard should take on each matching email message
-
You can do this by dragging the required Advanced Command(s) directly into the container
-
Loop-the-loop
The wizard performs the actions defined within the container by looping through each retrieved message (i.e., it will perform the complete sequence of actions on a single message, then move on to perform the sequence on each remaining message in turn).
No limits
You can use any available Advanced Command within the Get Email Messages container (i.e., don't feel limited to using just the Email commands!)
Break that loop!
Under certain conditions, you may want to break and/or restart the loop created by the Get Email Messages container. Make this happen by using the Loop: Break and/or the Loop: Restart command (usually within an If Else command).
Using Credentials by variable:
The Credential by Variable functionality allows you to create a dynamic connection to the credentials vault. The credential variable is associated with credential display name(s).
Since the credential variables are dynamic, if you export a wizard to another environment, make sure that the credentials associated with the variable are defined in the new environment's credential vault.