Authenticating with AD FS
You can configure K2 Mobile to authenticate users from Active Directory Federation Services (AD FS).
AD FS support requires K2 Five or later.
K2 Mobile requires OAuth 2.0 which was added in AD FS 3.0.
Follow the steps below configure AD FS for K2 Mobile:
- Configure AD FS in your environment.
- Configure AD FS for K2.
- Configure a relying party in AD FS Manager called Mobile API.
- Open the AD FS Manager and click Add Relying Party trust...

- Click Start.
- Select Enter data about the relying party manually.

- Enter the display name Mobile API and click Next.

- Select AD FS profile and click Next.

- Optionally specify a token encryption certificate. Since SSL is used for the site, it is not necessary to also encrypt the token unless your security policy requires it. Click Next.
- Check Enable support for the WS-Federation Passive protocol.
Specify your Mobile API site URL (for example, https://k2.denallix.com/k2api), then click Next.

-
On the Configure Identifiers page, enter https://graph.windows.net as a relying party trust identifier and click Add.

- Click Next on the Add Relying Party Trust Wizard page.
- Click Next on the Configure Multi-Factor Authentication Now? page.
- Select the Issuance authorization rules option and click Next.
- Click Next and Close.
- Click Add Rule... on the Edit Claims for Mobile API page.

- Click Next on the Choose Rule Type page.
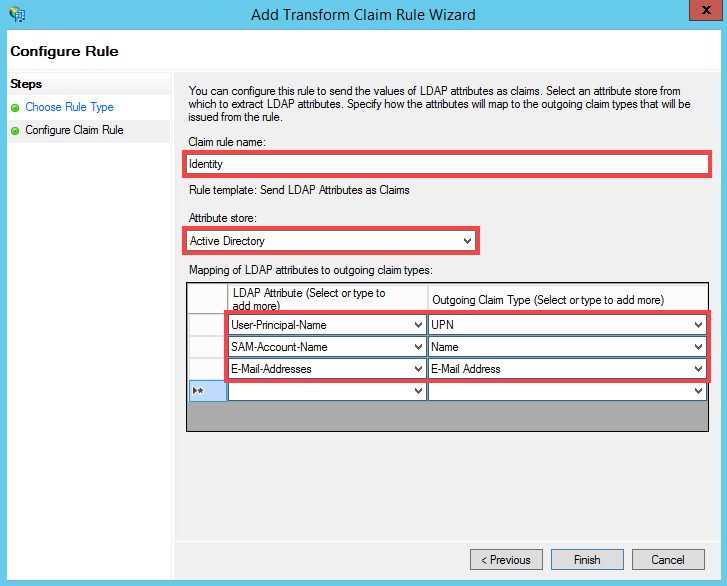
- Add a rule called Identity to the Mobile API relying party. Select Active Directory as the Attribute Store. Configure the Mapping of LDAP attributes to outgoing claim types section as shown below:
- Click Add Rule....
- On the Choose Rule Type page, select Send Claims Using a Custom Rule and click Next.
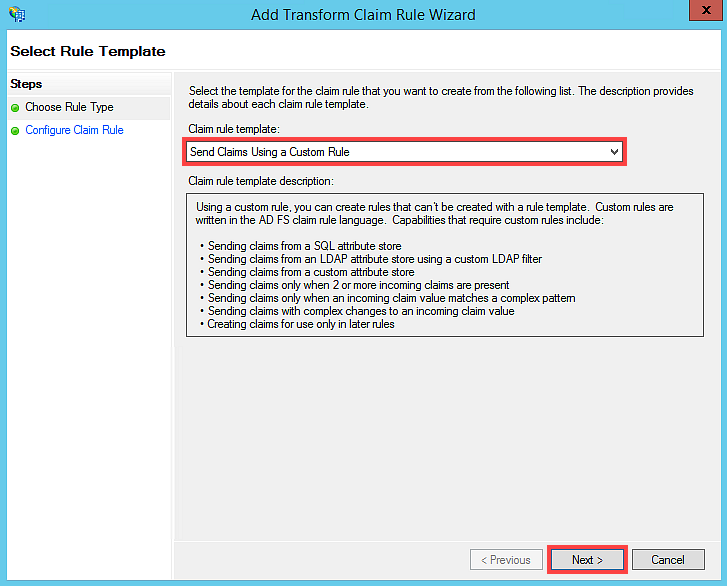
- Enter Identity Provider as the Claim rule name. Enter the following text in the Custom Rule section:
=> issue(Type = "http://schemas.microsoft.com/identity/claims/identityprovider", Value = "ADFS");
- Click Finish.
- Click Apply, and then OK.
- Configure the K2 API. See Authenticating with AAD for more information.
- Register the K2 Mobile app client id with AD FS by running the following command in PowerShell:
Add-AdfsClient -Name "K2 Mobile" -ClientId "0b4a3d52-0730-4c72-b661-a45334a9adf0" -RedirectUri "https://www.k2.com/msomobile" -Description "Mobile app for K2"
- Open the K2Api web.config file from the following location:
"%ProgramFiles%\ K2\ WebServices\K2Api" - Next, configure step 5 and 6 of the Authenticating with AAD topic before continuing to the next step.
- Add the following app setting in the web.config of the K2 API app (located at [Disk Drive]:\Program Files (x86)\K2\WebServices\K2Api) for the AD FS metadata endpoint:<add key="metadataEndpoint" value="https://[SiteName].com/federationmetadata/2007-06/federationmetadata.xml" />
- Specify the following AAD authorization URL, replacing Site Name with the :
<add key="AADAuthorizationURL" value="https://[SiteName].com/ADFS" />
- Set the default impersonation label in the web.config to your ADFS label:<add key="K2.Workflow.DefaultImpersonationLabel" value="K2ADFS" />
- Sign in to the K2 Mobile app with your credentials and server name.
- You are redirected to your AD FS login page. Enter your credentials and tap Sign In.

- You are signed in via AD FS and your K2 Mobile app is opened.
Ensure the UPN claim is mapped to the LDAP field that you configured as the ID field in your K2 LDAP User Manager. See Step 3 in Configure SmartForms for Active Directory Federation Services (AD FS) topic to configure the UPN claim.
Reduce Log In Prompts when using AD FS Authentication
When using AD FS authentication and the
- Open PowerShell and execute the following scripts:
- Set-AdfsRelyingPartyTrust -TargetName "Mobile Api" -IssueOAuthRefreshTokensTo AllDevices
- Set-AdfsRelyingPartyTrust -TargetName "Mobile Api" -TokenLifetime 60
- Set-AdfsProperties -SSOLifetime 1440
The Mobile API in this example is the relying party trust's name. Add your relying party trust name you configured in Step 7 to the above PowerShell commands. - The numbers are in minutes. In this example the token (session) is valid for 60 minutes and a refresh token that allows the app to renew the session is available for 1440 minutes (24 hours).