5. Create the Contact List View
In this step, you will create a read-only list view that displays a list of contacts. You will configure the list to automatically sort by the contact's last name, then first name. You will enable filtering so that you can easily find a contact by filtering a column, for example, friends or co-workers. You will also enable paging so that a limited number of records load - this keeps the list manageable and improves server performance, especially when working with large lists.
-
Design a new list view from the Contact SmartObject. Name the view Contact List View then change the category to Views.
- Begin by designing the list view from the Contact SmartObject, in the SmartObjects category. Right-click the Contact SmartObject and select Design View.
- Next, you will name the view and move it to the Views category to keep your artifacts organized. On the GENERAL tab, name the new view
Contact List View
then change the category to Views. Confirm List View is the view type. Confirm the Contact SmartObject method is Get List. Confirm the option to Call this method when the form loads option is CHECKED. Click CREATE. (See the note box below the image for more details on the Call this method when the form loads option.)
The SmartObject settings should be correct by default since you designed this view from the SmartObject. If they are not for some reason, you can use the Data Source ellipses to launch the explorer, then select the Contact SmartObject.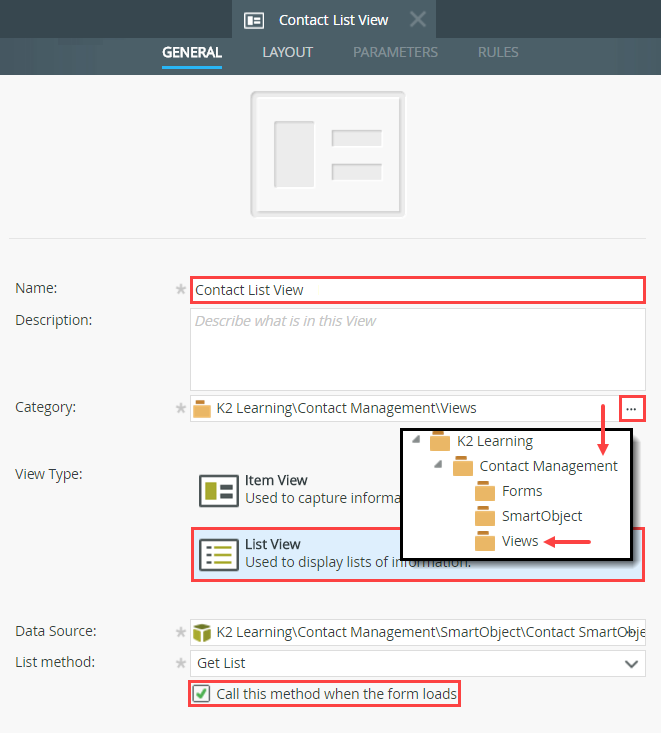 When you associate a list view with a SmartObject, K2 loads all SmartObject records when the view opens (by default). In some cases, this may be the desired view behavior. If you need to filter the list content before it loads, uncheck the Call this method when the form loads option. You can configure a rule that loads specific content instead. For example, you may only want to load the "details" or child records that are associated with a "header" or parent record.
-
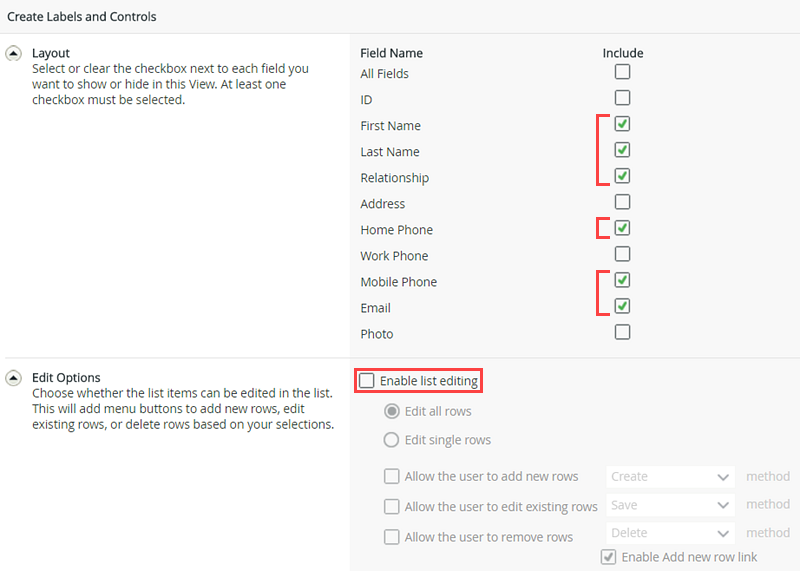
Choose the Create Labels and Controls option with the following fields (do not enable list editing): First Name, Last Name, Relationship, Home Phone, Mobile Phone, Email.
- Next, you will let K2 create the list view table by selecting the Create Labels and Controls link.
- On the Create Labels and Controls screen, select the following fields: First Name, Last Name, Relationship, Home Phone, Mobile Phone and Email. Do not enable list editing, because this will be a read-only list view. Click OK.
-
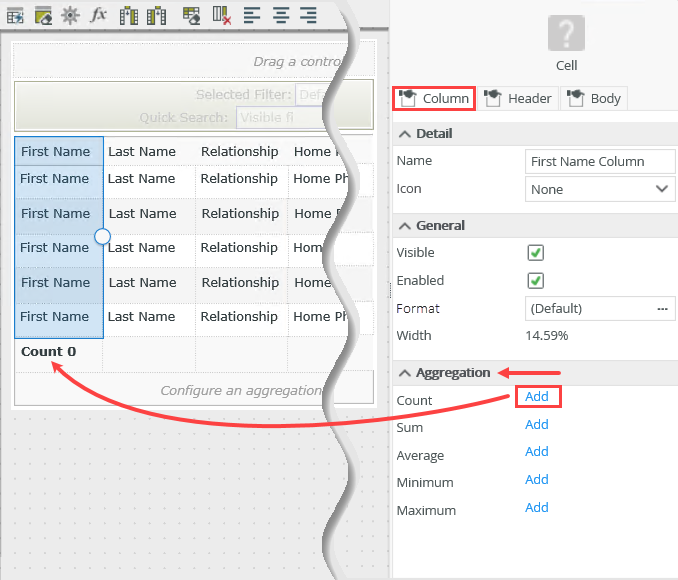
To improve the flow of the list, adjust the column widths so that the Email column has more room. As a convenience, add a Count aggregate to the First Name column. The count aggregate tells you at a glance how many records exist.
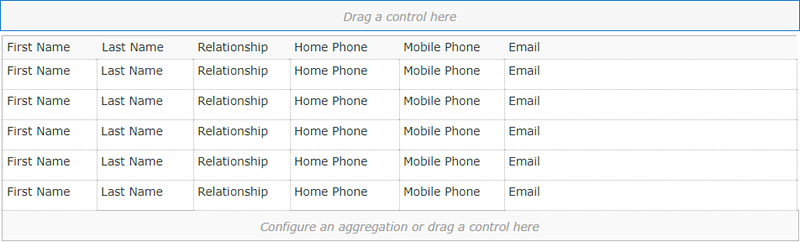
- Begin by adjusting the column widths. The goal is to give the Email column more room. Email addresses can be long and this will help to keep the email address all on one line. Highlight a column, then drag the resize bar to adjust the widths. Use the image below as a reference.
- Next, you will add a count aggregate to the First Name column. The count aggregate displays the number of records returned when the view loads. Click to highlight the First Name column. In the Properties pane, click the Column tab. Locate the Aggregation heading, then click Add next to the Count aggregate.
- Begin by adjusting the column widths. The goal is to give the Email column more room. Email addresses can be long and this will help to keep the email address all on one line. Highlight a column, then drag the resize bar to adjust the widths. Use the image below as a reference.
-
Next, you will edit a rule to sort the list by Last Name, First Name. This makes reviewing the contacts more convenient. Edit the view initialize rule, Get List action. Add a Sort function so that the list is sorted by Last Name, then First Name when the view loads.
- If your contact list has a large number of records, sorting them by last name makes reviewing the list easier. In this step, you will edit a rule and add a sort function. Click the RULES button in the breadcrumb bar. Click to highlight the View executed Initialize rule. Click Edit Rule. (You may see the rule name as When the View executed Initialize.)
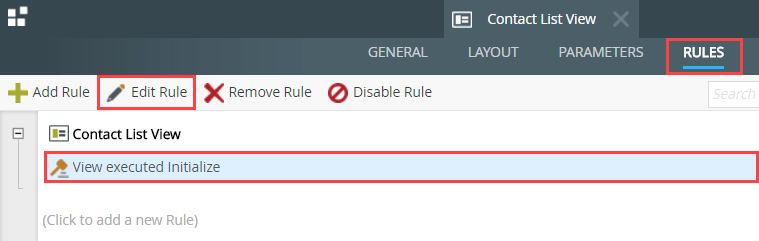
- In the rule definition pane, notice the Get List action. Because you designed this view from the Contact SmartObject, K2 generated the rule necessary to automatically load the list. You will edit this action so that the list sorts by Last Name, then First Name. Click (configure).
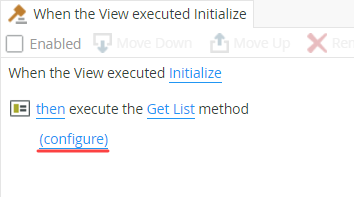
- Click the SORT tab. Click Add. Change the SORT COLUMN value to Last Name. Click Add once again. Change the second SORT COLUMN to First Name. Click FINISH. Click OK to close the rule designer.
- If your contact list has a large number of records, sorting them by last name makes reviewing the list easier. In this step, you will edit a rule and add a sort function. Click the RULES button in the breadcrumb bar. Click to highlight the View executed Initialize rule. Click Edit Rule. (You may see the rule name as When the View executed Initialize.)
-
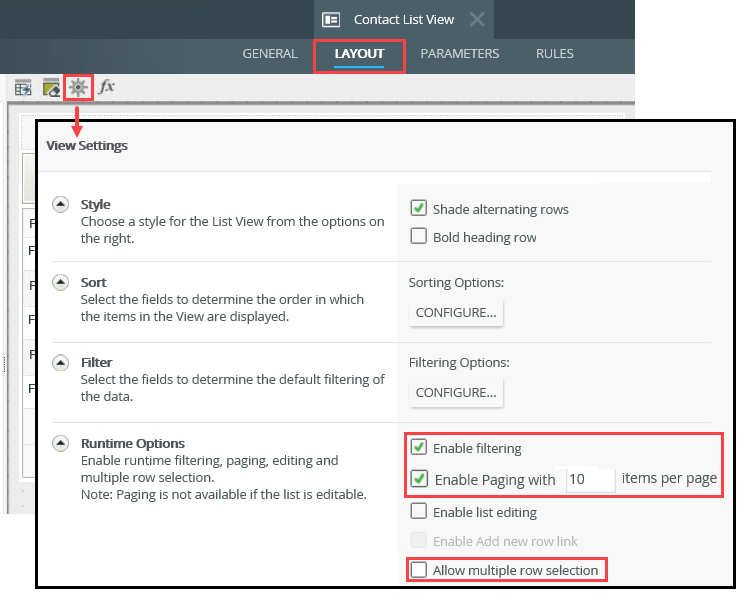
Complete the view by enabling filtering and paging. This allows users to filter the list by any column. Paging returns a set number of records. This is especially helpful if the list is long. You will remove the option to allow multiple row selection. In a later step, you will add a rule that launches the contact details form when you click a row. Therefore, you must click one row at a time. Edit the Layout > Settings. Enable filtering. Enable paging (with 10 items per page). Do not allow multiple row selection.
The last few edits you will make to this view are to enable filtering , enable paging, and disable multiple row selection. Filtering a column allows you to return only the column results you need. For example, you may want to filter the records to only show "friend" relationships. Paging returns the specified number of records when the form loads. This is helpful with server performance, especially when working with large lists. You will also disable the multiple row selection. In a later step, you will configure a rule that opens the contact's details when a row is clicked. Therefore, you can only have one row at a time highlighted.
- Click the LAYOUT button. Click the Settings icon. On the View Settings screen, make the following adjustments under the Runtime Options heading:
- CHECK Enable filtering
- CHECK Enable paging with 10 items per page
- UNCHECK Allow multiple row selections
- Click OK to continue.
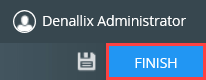
- Finish the view to save and exit the view designer.
- Click the LAYOUT button. Click the Settings icon. On the View Settings screen, make the following adjustments under the Runtime Options heading:
Review
In this step, you created the read-only list view that will list contacts. This list displays the contacts sorted by last name, then first name. You enabled filtering, which allows users to return only the contacts they need, for example, friends or co-workers. Finally, you enabled paging so that a limited number of contacts load, which is helpful when working with potentially large lists of data. In the next step, you will create Contact Notes and Attachments List View. This view is editable, and is the details portion of the contact form.