Decision step
Use the Decision step to create decision results within a workflow that represent your business decisions. The custom rules created on the Decision step control the flow of the workflow.
Use the Decision step to create branches in the workflow or to represent business decisions.
There are two ways to add decision results to a Decision step:
- Manual - Manually add to the decisions list in the properties panel of the Decision step.
- Automatic - Link the Decision step to a Task step containing actions. In this case, the decision step uses the preceding task's results as decisions.
Drag the Decision step from the Logic category, Favorites bar, or the Recent category onto the canvas.
Example of a Decision step in a workflow
See the following resources for more information:
- See How To: Configure and use the "Wait for External System" option in a workflow for an example of using the Decision step to follow different paths based on a response from an external system.
- See How To: Filter and Update List Items for an example of adding decision rules to different decision steps.
- From the Toolbox click the Logic category, and then click and drag the Decision step onto the canvas.

- Select the added step and click the expand / collapse toggle to expand the Configuration Panel. You can also double click the step to expand the panel.

- Notice the error indicator on the Decision step. This indicator shows that some configuration is missing. Click the error indicator (located at the bottom right of the canvas) to open and view a description of the errors in the Error Console. In here, you find a description of the error and on which step the error occurs. In this example, the Decision step rules has one or more rules with empty Condition fields and the Decision step's Decision tab requires one or more Decision fields.
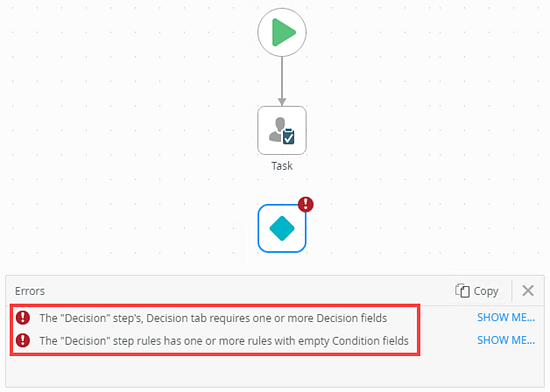
- Click the Show Me links to configure.
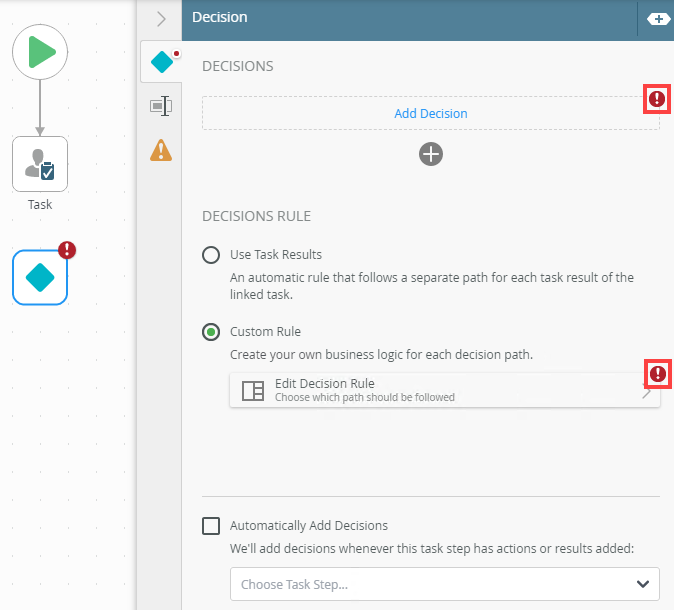
- Click and drag a line from the Task step to the Decision step to connect them. Notice the actions automatically show on the Decision step and the errors go away. The orange dots are ports.

-
When you configure a decision step, yellow dots show on the step. These yellow dots are known as "ports". Typically, you would connect a line to a port to define the workflow's 'flow'. Ports are used to connect incoming lines as well as outgoing lines. A step has a maximum of 12 ports. When you configure a step, keep the 12-port limit in mind; you can use up to 12 ports to connect to and from the step. If you created more than 12 decisions/actions in the decision step, you won't be able to connect all of the decisions/actions in the step since there is a maximum of 12 ports in total.
You need to cater for both incoming and outgoing lines, and make sure the total does not exceed 12 ports. For example: If you connect one incoming line from another step, 11 of the 12 ports are still available for connecting outgoing lines. If you connect two incoming lines, 10 ports are still available for outgoing lines.
- Select the Decisions tab.

- The following table explains the available options:
- Specify which decision is followed when this step is evaluated
- Specify whether one or more lines are followed
- Use this option if you do not want to duplicate logic or add inverse logic for mutually exclusive lines.,
- To add a decision, click Add. Double click the added decision to edit the label.

- Notice the decision port on Decision step. This decision is not linked to any of the current task actions.

- The Decision rule is automatically configured when linking the Decision step to the Task step. To view or configure, select the Custom Rule option and click on the Edit Decision Rule link.

- The Rules Designer displays and you can configure the Decision rule.

- Click the Edit Decision Rule button to expand the Rules Designer. The new decision is available as a result.

- Click the collapse / expand toggle to collapse the Rules Designer.

- The Automatically Add Decisions section shows the task the decision is linked to. This option is enabled by default if the decision step is linked to a task. The linked task name shows in the menu. Any other tasks placed on the canvas show in this menu.

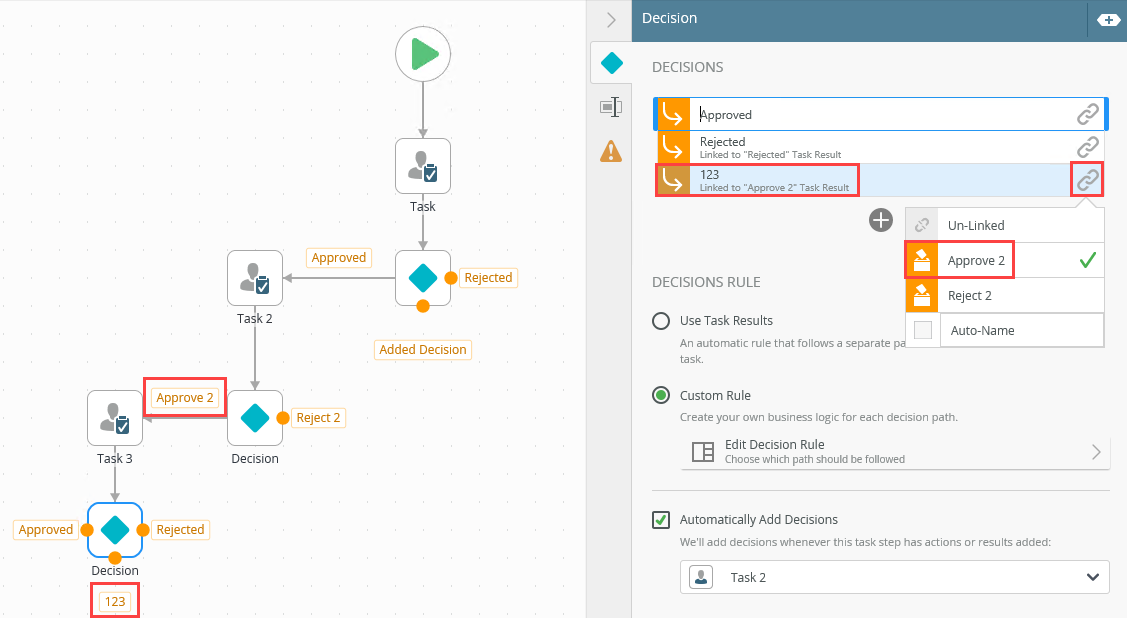
- You can use Task Actions from another task and link them to a Decision step. In this example, you want to add the decisions from Task 2 to the decisions on the Decision step linked to Task 3. This is a easy way to add actions and decisions from other Task steps without having to add or retype them. Select the Decision step linked to Task 3. Notice the Approved and Rejected decisions.

- From the Automatically Add Decisions menu, select Task 2.

- To add the decisions, click Add to add a new decision. Click the link to link the new decision to a Task 2 decision. Notice the Task 2 actions show in the menu.

- Select Approve 2. Notice the new port on the Decision step. Also notice the error indicator on the decision step and the Use Task Results.
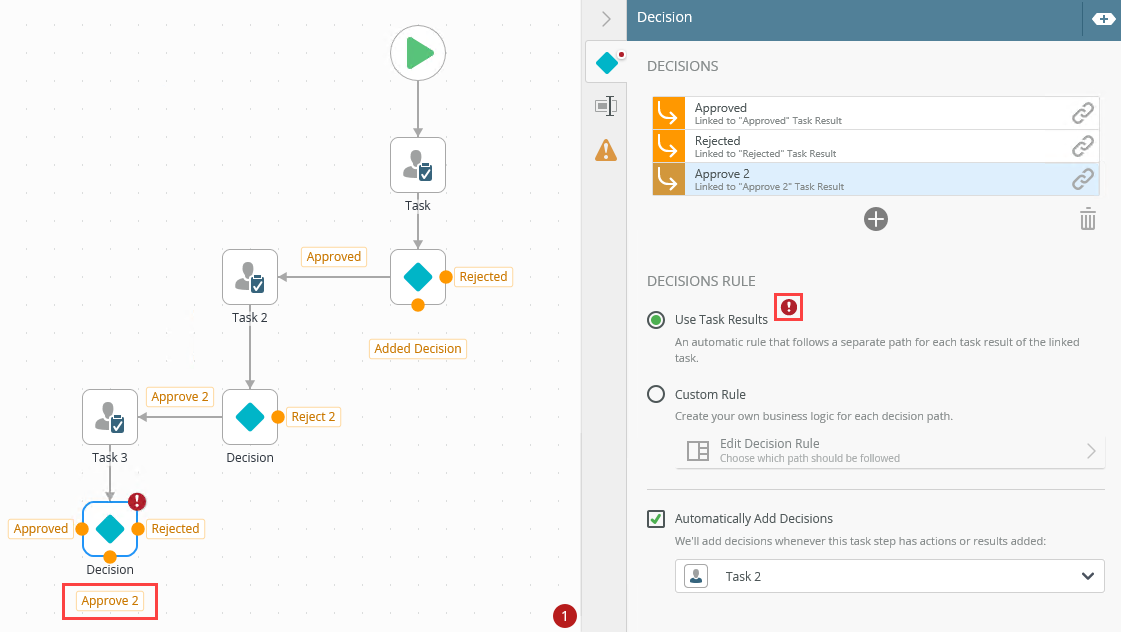
- Due to the new decision, you can no longer use the Use Task Results decision rule. You must select the Custom Rule radio button and create your own custom Decision Rule using the Rules Designer.
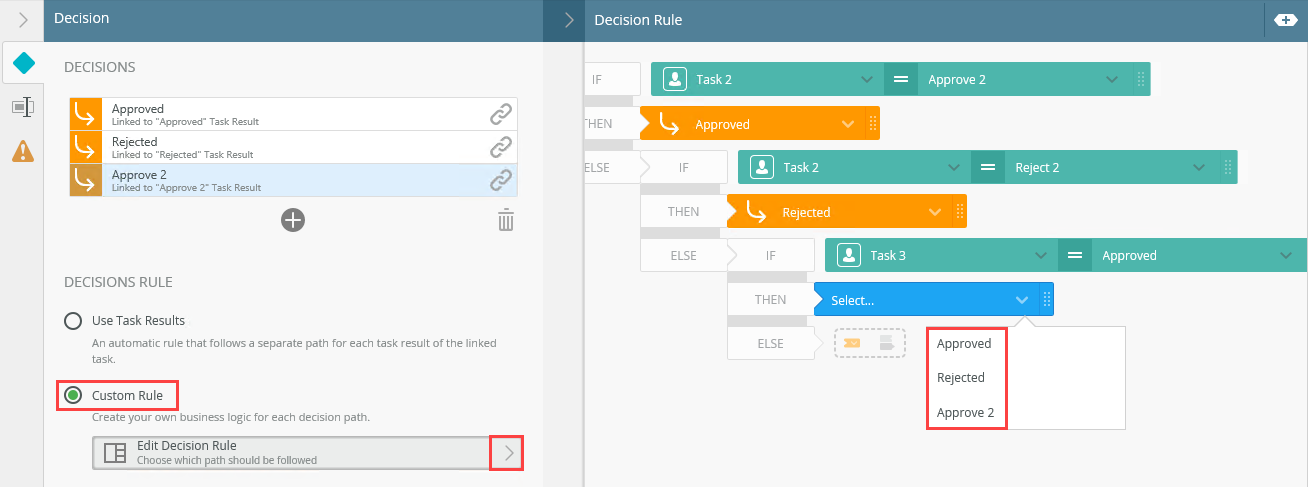
- Changing the name of the new decision does not affect the decision or action it is linked to.
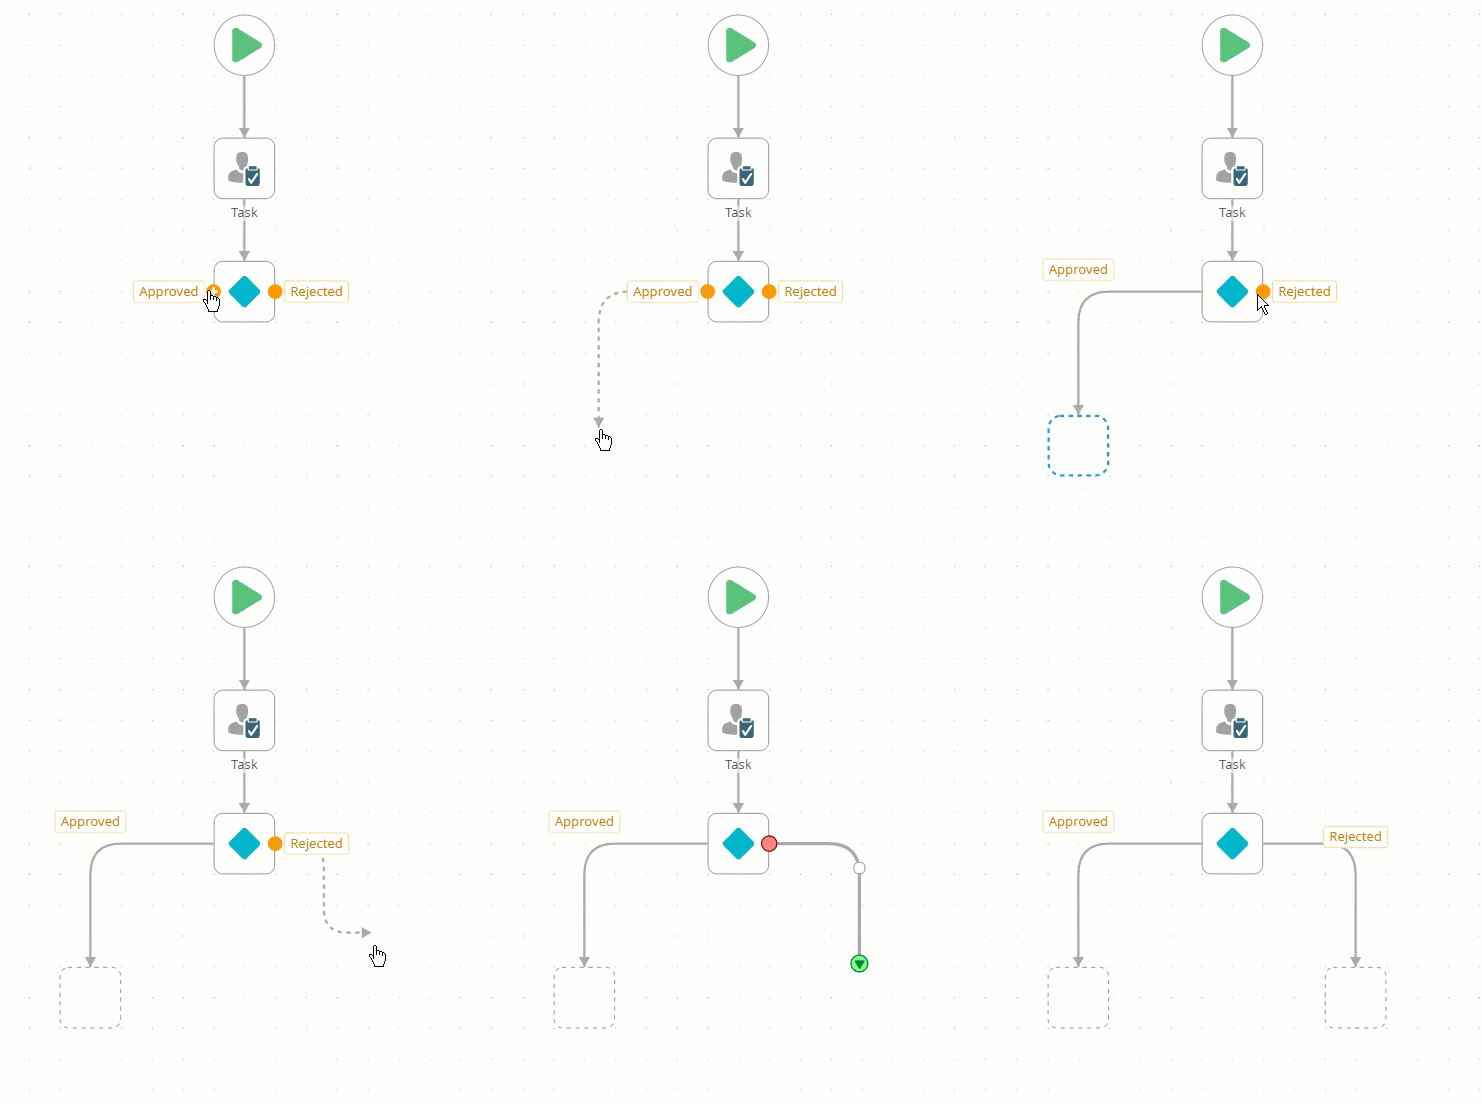
- Click and drag the result ports to create a Placeholder step. You can replace these placeholders with actual steps later.
- With the step selected, select the Properties tab.

- Click the Errors tab.

-
Your changes are automatically saved.
| Option | Explanation | How to Use |
|---|---|---|
| Decisions | Displays defined decisions for the selected step. When a decision step is linked to a task step, the actions from the task show in this section. The names can be edited but the changes only apply to the decision step (not in the linked Task step). |
Select a decision and edit the value. Click the link to view link setup from the task action result. Select Un-Linked from the link menu select to unlink a action / result from the task. Select Auto-Name from the link menu to reset any name changes for the selected decision. This resets the name. |
| Add button | Allows you to add additional decisions. You may want to add all decisions as task actions, but you can also add unlinked decisions. | Click Add to add a decision. |
| Trash bin | Allows you to delete a decision. | Select a decision and click the Trash bin icon to delete it. |
| Use Task Outcomes | Allows you to use task results and automatically create a rule which follows a separate path for each result of the linked task. When the decision step is linked to a task step, this option is on by default. | Click to select this option. |
| Custom Rule |
Allows you to create your own logic for each of the decisions. |
Click to select this option. Click the Edit Decision Rule link to expand the Rules Designer to create or edit a custom decision rule. |
| Automatically Add Decisions |
When a decision is linked to a task this option is on by default. The menu shows which task it is linked to. The menu shows a list of all available tasks in the workflow, if more than one exist on the canvas. |
Check to enable this option. Select the task from the menu. Uncheck the check box to disable this function. |
The following table explains the options available on this tab:
| Option | Explanation | How to Use |
|---|---|---|
| Title / Name | By default, each step on the canvas has a step title. You can change this title to suit your workflow logic and show it on the canvas by checking the Show Label box. | Enter a value into the Title/Name field. |
| Reset link | Use the link to reset any changes to the title. | Click the Reset link to reset the Title/Name field to default value. |
| Show Label | Allows you to see the step label on the canvas. The label shows the value of the title. | Check the check box to display step label on the canvas. |
| Description | Allows you to add a detailed description for the step. | Enter a value into the Create New field. |
| Notes | Allows you to add additional notes for the step. | Enter a value into the Notes field. |
Different types of exceptions can occur on a step, such as:
| Type | Description |
|---|---|
| Known exceptions | Any SmartWizard or standard wizard that has Boolean options for handling known exceptions have these options displayed as check boxes in the Known exceptions section of the Exceptions tab. |
| Unhandled exceptions | Any unknown runtime exceptions. |
The tab contains the following unhandled exceptions:
| Exception | Explanation |
|---|---|
| Log Exception | Logs the exception to the error log. |
| Force error when required SmartObject inputs are missing | Will forcefully throw an error if a SmartObject method has input missing. |
| Continue on error | Will force the workflow to continue running the SmartObject method, even if it runs into an error. |
When working with the Decision step keep in mind the following considerations:
- A Decision links to a Task step. This means that the actions (and, in turn, results) you configure on the Task step are automatically created as decisions in the Decision step.
- Whenever Task step actions are added and a Decision step is linked to a Task, new voting results are added
- When you change a linked task action or result, the Decision step decision name is changed as well (but not the reverse)
- If you delete the linked Decision step's Task step, the decision result remains, but the step becomes unlinked
- If you delete a line connecting a Task and Decision step, the decision result remains but the Decision step becomes unlinked
- If you reroute a line connecting a Task and Decision step to a different step other than a Decision step, the decision result remains but the Decision step becomes unlinked
- If you reroute a line connecting a Task and Decision step to start from a different step other than a Task step, the decision result remains but the Decision step becomes unlinked
- If you reroute a line connecting a Task and Decision Step to start from a different Task step, the decision result remains but is unlinked. You must relink the results.
- The result from the new Task step is also linked to the Decision step
- You can use a Decision step without linking it to a Task step in your workflow. However, the recommendation is to use a Split step. When creating a custom Split rule, you can assign multiple paths to the IF or ELSE outcome. The Decision step only allows one path per decision result.