Toolbox Overview
The K2 Workflow Designer Toolbox contains steps you can drag and drop onto the canvas to build your workflow. Once you drag a step onto the canvas, you can use the Configuration Panel and the Context Browser to configure the step. You can drag steps from the Toolbox categories, Favorites bar or from the Search results area.
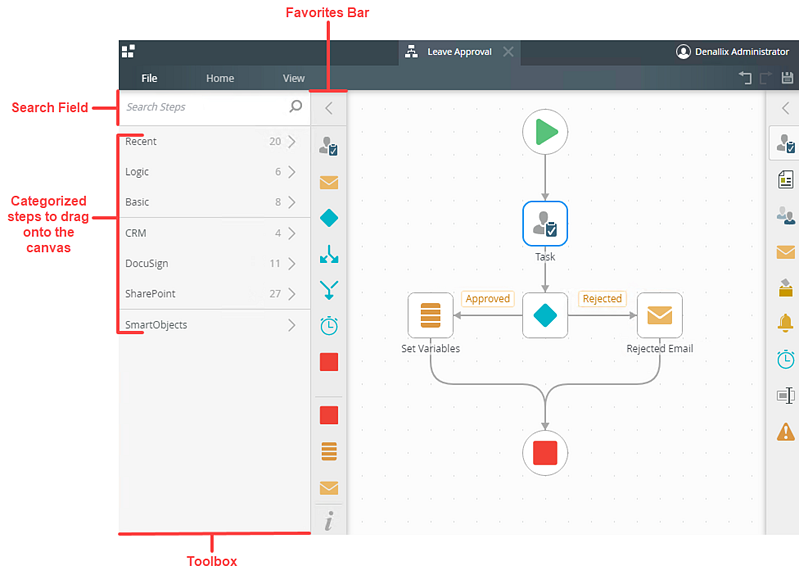
The Toolbox is divided into categories. See the table below for a brief description of the categories, the steps available in categories, and links to additional content about the steps.
| Category | Step | Description |
|---|---|---|
| Logic
This category contains steps to represent and automate business decisions and paths to be followed within your workflow. These steps will generally connect user tasks with system tasks and vice versa. |
Decision
|
Use the Decision step to represent a decision/branching logic in a workflow. This step is often auto-created in conjunction with a user task step to evaluate participant responses, but you can also manually add a decision step and configure custom rules to make a decision about a path to follow in the workflow. |
End
|
Use the End step to terminate a path in your workflow. Use it as a visual indicator to show the completion of a single path within the workflow, or of your entire workflow. | |
Merge
|
Use the Merge step to merge parallel paths within the workflow back together into a single path. This step requires a previous Split step within the workflow. It is also a quick way to identify where parallel paths converge in the workflow diagram. | |
Split
|
Use the Split step to branch a workflow into parallel paths. This step is a quick way to identifying where a workflow splits into parallel paths within the workflow diagram. Use the Merge step when your multiple paths need to merge at a later point in the workflow. | |
Timer
|
Use the Timer step to pause a path in the workflow for an amount of time, or until a specific date and time. | |
Loop
|
Use the Loop step to perform a looping action in a workflow. For example, you can create a reference that returns a list of items from a data source, and then loop through those items and perform one or more steps for each item. The step uses References to retrieve each item's values from the SmartObject when it starts each loop. When there are no more items in the reference, the loop completes. | |
| Basic
This category contains common steps used in workflows, such as assigning tasks to people, setting data values, interacting with SmartObjects and sending Emails. |
Task
|
Use the Task step to add tasks for one or more users. These tasks appear on the user's task list, and the workflow will wait until the configured number of responses are completed. This step is often used in conjunction with the Decision step; K2 will automatically add a Decision step for you, and you can then configure the Task and Decision per your requirements. |
Send Email
|
Use the Send Email step to send an email in a workflow. You can format the email, add links, attachments, and data from the workflow, SmartObjects, and other systems. | |
Set Folio
|
Use the Set Folio step to set and update the workflow folio value. The folio provides a unique label for each instance of a workflow. This value shows on task lists and reports, and provides a helpful mechanism to identify different instances of the same workflow. | |
Set Variables
|
Use the Set Variables step to update process variables. You can set values manually or set values dynamically by using inline functions, SmartObject data, and context from the workflow. | |
Call Sub Workflow
|
Use the Call Sub Workflow step to start another workflow. You can call the sub workflow and either wait for it to complete, or call it and continue with your main workflow. | |
Placeholder
|
Use the Placeholder step as a temporary step when building the workflow. It can be replaced by another step at a later point when you are ready to replace the placeholder with a different step. This step needs no human interaction, and no action is performed on the K2 server. | |
Create Reference
|
Use the Create Reference step to generate dynamic references to a SmartObject. A reference contains information about loading records from a SmartObject. The step binds the SmartObject data to the workflow, making it easier to reuse the SmartObject reference and properties of the SmartObject throughout your workflow. | |
SmartObject Method
|
Use the SmartObject Method step to call a SmartObject method in a workflow. This is a generic step that you can use to integrate your workflow with different systems, as long as a SmartObject exists that connects to the target system. | |
| CRM
This category contains steps used to configure CRM actions to perform and interact with the CRM Server when running the workflow. |
Create CRM Entity
|
Use the Create CRM Entity to create a Microsoft Dynamics CRM entity item in a step in your workflow. For example, create a new CRM contract entity for the client after filling out and approving a client intake form in a workflow task step. |
Delete CRM Entity
|
Use the Delete CRM Entity step to delete an entity item. For example, you want to delete a Client entity item after approving the deactivation of the client. Before you add this step to a workflow, you first need to create a reference to the item that you want to delete. Use the Create CRM Entity step or the Get CRM Entity Reference step to create a reference. |
|
Get CRM Entity Reference
|
Use the Get CRM Entity Reference step to create a reusable reference to an entity item. Add this step ahead of an Update or Delete CRM entity item step in your workflow. | |
Update CRM Entity
|
Use the Update CRM Entity step to update an existing CRM entity. For example, you want to update a Client entity item after verifying their contact information changes. Before you add this step to a workflow, you first need to create a reference to the item that you want to update. Use the Create CRM Entity step or the Get CRM Entity Reference step to create a reference. |
|
| DocuSign
This category contains steps that allow your workflow to manage DocuSign envelopes and their collective artifacts for a DocuSign Instance. See How To: Create a Workflow with DocuSign Events for more information about creating an end-to-end solution with DocuSign functionality to automate the signing of a document stored in SharePoint |
Add Document
|
Use the Add Document step to add a document to a DocuSign envelope. To send the envelope for signature, use the Send Envelope step. |
Create Tab in Document
|
Use the Create Tab in Document step to add a signature indicator in the document. | |
Remove Document
|
Use the Remove Document step to remove a document from a DocuSign envelope. | |
Create Envelope
|
Use the Create Envelope step to create a new DocuSign draft envelope. This step is typically the starting point when building a workflow containing DocuSign steps. | |
Delete Envelope
|
Use the Delete Envelope step to delete a DocuSign envelope. | |
Move Envelope to Folder
|
Use the Move Envelope to Folder step to move a previously-created envelope to a specific folder in DocuSign. | |
Resend Envelope
|
Use the Resend Envelope step to resend a DocuSign envelope to a recipient. | |
Send Envelope
|
Use the Send Envelope step to send a DocuSign envelope containing documents to sign. | |
Void Envelope
|
Use the Void Envelope step to cancel a DocuSign envelope that is no longer needed. | |
Add Recipient
|
Use the Add Recipient step to add recipients to a DocuSign envelope. You can select different types of recipients. Based on the selected type, the recipient receives the envelope and is requested to perform an action. For example, select a Signer recipient to electronically sign documents contained in the envelope. | |
Remove Recipient
|
Use the Remove Recipient step to remove a recipient from a DocuSign envelope. | |
| SharePoint
This category contains steps that enables your workflow to interact with a SharePoint environment. The category is divided into the Document, Libraries, List Items, Lists and Sites sub categories. See K2 for SharePoint for more information on using the K2 for SharePoint App to integrate K2 and SharePoint. |
Add Document to Library
|
Use the Add Document to Library step to add or upload a document to a SharePoint site. |
Check In Document
|
Use the Check In Document step to check in a document to SharePoint. You can, for example, use the Check In Document step in a business application to check in a document that you checked out during an earlier step within your workflow. | |
Check Out Document
|
Use the Check Out Document step to check out a document from SharePoint for modification. To commit the changes to the document, you need to also add a the Check In Document step to check the document back in to SharePoint. | |
Copy Document
|
Use the Copy Document step to copy a document from one SharePoint library to another. Copying the document creates an independent copy of the document. | |
Delete Document
|
Use the Delete Document step to delete a document from a SharePoint library. | |
Discard Document Check Out
|
Use the Discard Document Check Out step to discard/undo a check out of a SharePoint document. | |
Get Document Reference
|
Use the Get Document Reference step to create a reusable reference to a SharePoint document. You can reuse a document reference throughout a workflow. | |
Move Document
|
Use the Move Document step to move a document to another SharePoint library or folder within the same library. | |
Update Document Properties
|
Use the Update Document Properties step to update the properties of a document. | |
Create Library
|
Use the Create Library step to create a new SharePoint library in a SharePoint site. During this step in a workflow, K2 creates a K2 application on the library if it's not already integrated with K2. This allows you to use other SharePoint-related steps, such as Add Document, in the same workflow without having to manually create an application for the library. | |
Delete Library
|
Use the Delete Library step to delete a library from a SharePoint site. | |
Get Library Reference
|
Use the Get Library Reference step to create a reusable reference to a SharePoint library. You can reuse a library reference throughout a workflow. | |
Update Library
|
Use the Update Library step to update a SharePoint library. | |
Copy List Item
|
Use the Copy List Item step to create a copy of an existing list item from one SharePoint site, list, or folder, to another. You can copy the list item to a list in a SharePoint site where you've registered the K2 for SharePoint app. | |
Create List Item
|
Use the Create List Item step to create a new item in a SharePoint list. You can add one or more list items to a list. | |
Delete List Item
|
Use the Delete List Item step to delete an item from a SharePoint list. | |
Get List Item Reference
|
Use the Get List Item Reference step to create a reusable reference to a SharePoint list item. You can reuse a list item reference throughout a workflow. Creating a list item reference allows you to access values from the reference instead of locating it in each step. | |
Move List Item
|
Use the Move List Item step to move a SharePoint list item to another list or folder. You can move the list item to a list in a SharePoint site where you've registered the K2 for SharePoint app. Use the Get List Item Reference step to first identify the List Item you need to move. | |
Update List Item
|
Use the Update List Item step to update a SharePoint list item. | |
Create List
|
Use the Create List step to create a new SharePoint list in a SharePoint site. During this step in a workflow, K2 creates a K2 application on this list if it's not already integrated with K2. This allows you to use of SharePoint-related steps such as the Create List Item step in the same workflow without having to create a K2 Application for this list beforehand. | |
Delete List
|
Use the Delete List step to delete a list from a SharePoint site. | |
Get List Reference
|
Use the Get List Reference step to create a reference to a SharePoint list. You can reuse a list reference throughout a workflow. You create and use a list reference once and use the reference for each subsequent step that adds a new item. | |
Update List
|
Use the Update List step to update a SharePoint list. | |
Create Subsite
|
Use the Create Subsite step to create a new SharePoint subsite. You can use this step in a workflow to create the new subsite and then add lists and libraries to it in subsequent workflow steps. | |
Delete Subsite
|
Use the Delete Subsite step to delete a SharePoint site that you no longer need. | |
Get Subsite Reference
|
Use the Get Subsite Reference step to create a reusable reference to a SharePoint site. You can reuse a site reference in other workflow steps. | |
Update Subsite
|
Use the Update Subsite step to update a SharePoint site. You can use this, for instance, to update a site name or description with values retrieved from a SmartObject. | |
| SmartObjects
This category contains Standard and custom SmartObjects steps. |
SmartObject Method
|
Use the SmartObject Method to call a SmartObject method in a workflow. This is a generic step that you can use to integrate your workflow with different systems, as long as a SmartObject exists that connects to the target system. The SmartObjects category is made up out of sub-categories, which in turn contains SmartObjects to drag onto the canvas, and use in your workflows. |