How To: Add and View Workflow Comments
This article illustrates one method for adding and viewing workflow comments using a system SmartObject. You can use the out-of-the-box system SmartObject in a workflow to list all comments added to the workflow throughout its lifetime. This is especially useful when you need to gather comments from more than one person and at different stages of the workflow, but see them in a single place.
To learn about adding and viewing attachments using a system SmartObject, see How To: Add and View Workflow Attachments.
Comments from multiple users in a single workflow instance
Scenario
You work in Human Resources. You create online forms for employees to submit leave requests and for their managers to action the requests. Your forms include a view for adding and viewing questions or comments. You have a workflow that includes two tasks: one for approving the request and the other for reworking it.
Steps
For this scenario, you create a SmartBox SmartObject to store request details, then use a system SmartObject to add and store comments. You create views from both SmartObjects, then a form that contains the views. Finally, you create a workflow with two task steps for approving and reworking the request.
Setup Steps
The following steps set up the scenario from start to finish. If you want to skip the setup steps and view the topic step, go to Create views from the Workflow Comment system SmartObject.
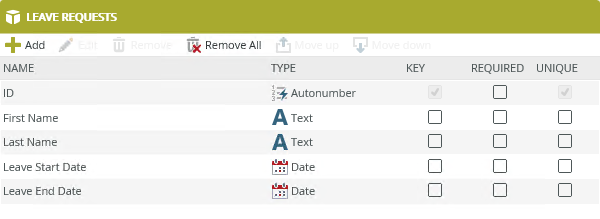
- From K2 Designer, create a SmartBox SmartObject called Leave Requests. Use the table below as a guide for adding properties. (Optional: create categories first to keep your work organized. All Items > How To > Leave Requests)
Property Type First Name Text Last Name Text Leave Start Date Date Leave End Date Date - Launch K2 Designer. On the designer landing page, click Browse.If you do not know how to access K2 Designer, see Accessing K2 Sites.
- Create new categories to keep your work organized. Expand the All Items node. Right-click All Items and select New Category. Name the category
How To
then right-click How To and select New Category once again. Name the category
Leave Requests.Categories are folders you create to keep your work organized. If you are working in a shared environment, consider adding your initials or some other unique identifier to separate your work from others.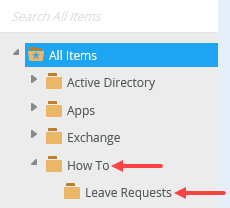
- Right click the Leave Requests category and select New SmartObject.
- Name the SmartObject
Leave Requests
then confirm the SmartBox option is active. Click Create.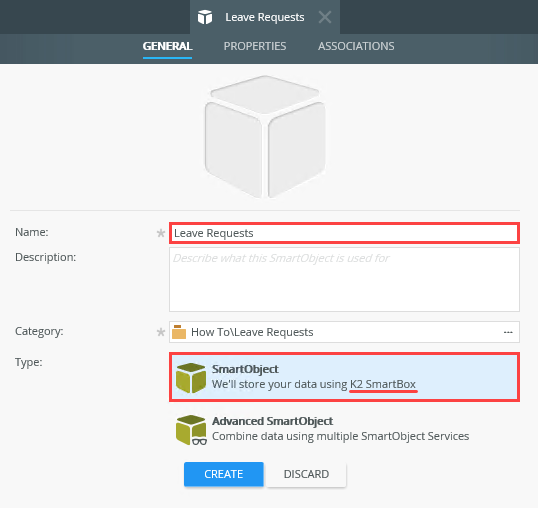
- Now you are ready to add properties. Properties are like the columns in a table. You define the property name and data type. Click Add. For the first property, enter
First Name
then keep the default type, Text. Click <Add property> to add the next item.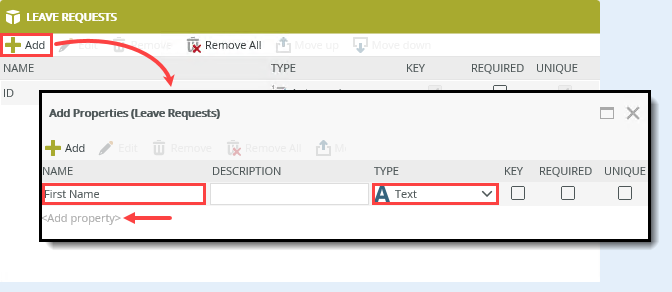
- Use the table below as a guide for adding the remaining properties. Click OK to save your work.
Property Type Last Name Text Leave Start Date Date Leave End Date Date - Your Leave Requests SmartObject should look like the image below. Click Finish (located near the upper right corner of your screen) to save and exit the SmartObject.
- Launch K2 Designer. On the designer landing page, click Browse.
- Generate an item view from the Leave Requests SmartObject. Name it Leave Requests Item.
Next, you generate a view from the SmartObject. Generating a view from a SmartObject binds it to the SmartObject and makes the properties available for use in the view. The properties become the view controls for entering data. Because the controls are bound to the SmartObject, K2 knows to save view content to its corresponding data source property.
- Right-click the Leave Requests SmartObject and select Generate Views.
- Check the Item box, then name the view
Leave Requests Item
and click OK.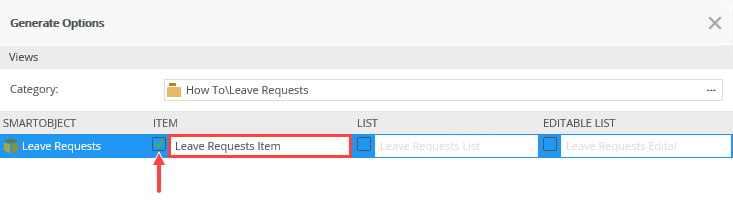
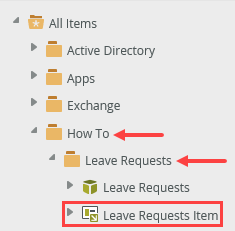
The view appears in your category. (Your categories may not match the image below if you gave them different names. This demonstration assumes the category names below.)
Create views from the Workflow Comment system SmartObject
Using the Workflow Comment system SmartObject, create an item view for adding comments and a list view for displaying them.
- Generate an item view from the Workflow Comment system SmartObject. Name the view Comment Item. Save the view to your Leave Requests category.
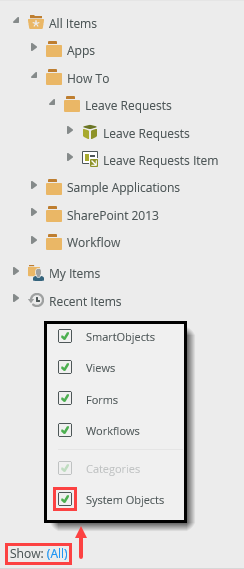
- You use the same steps as above to generate views from system SmartObjects. Depending on your environment, you may need to expose system objects first. Review your categories. You should see a category called System. If you do not, click the All link at the bottom of your screen. Check the box to show System Objects.
- Expand the System category, then expand Workflow > Comments. You see the Workflow Comment SmartObject.
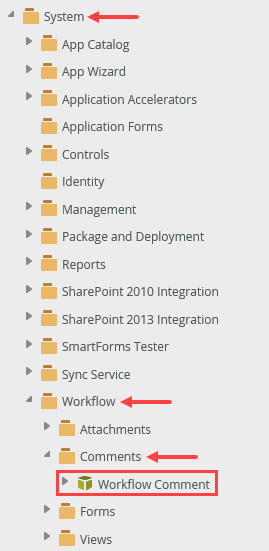
- Right-click the SmartObject and select Design View.
- Name the view
Comment Item
then click the ellipses to change the Category to Leave Requests. You want to save all your work in the same category. Confirm Item View is the View Type. Click Create.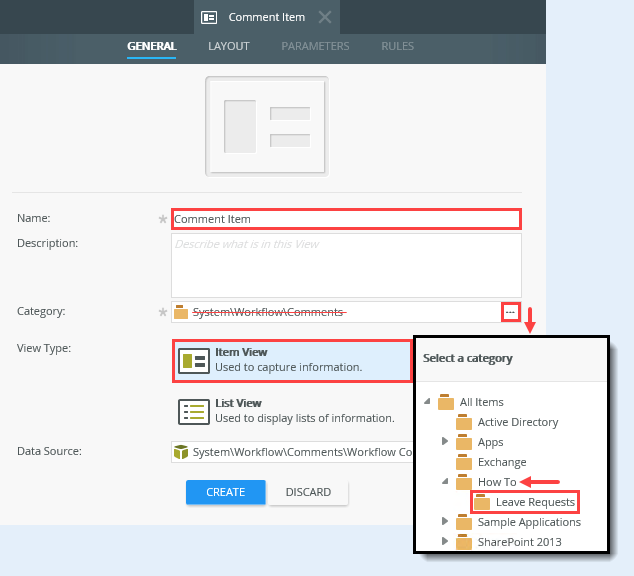
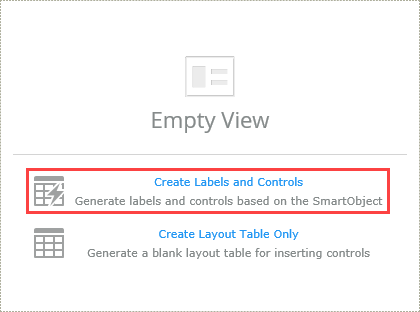
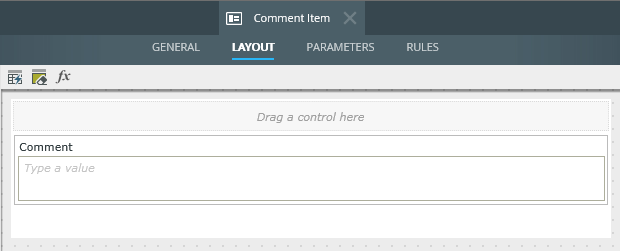
- Click Create Labels and Controls.You have two options for your view layout. K2 can create a layout table and add controls that you specify next, or K2 can create a layout table only and you add controls yourself. The first option is the quickest, while the second option gives you full control over the layout of your view.
- On the Create Labels and Controls screen, change the Columns value to
1.
For the included Fields, check the Comment box and click OK. You only need one control for adding a comment.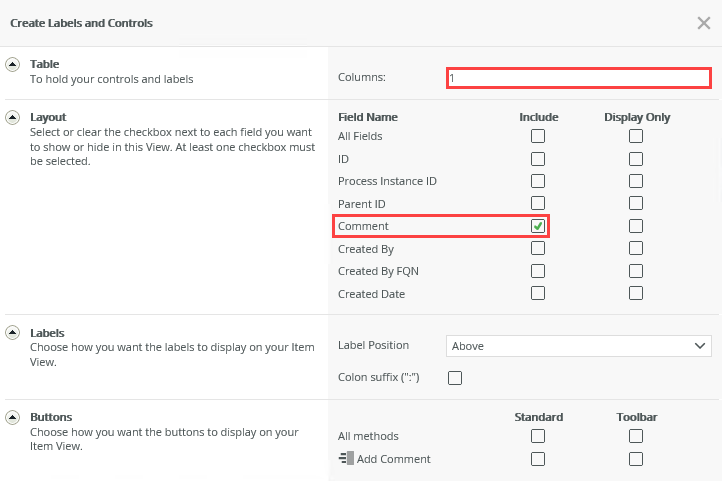
- Your view should look like the image below. Click Finish to save and exit. (If your view format and style is different from the image, it's OK to continue. You can change it later.)
- You use the same steps as above to generate views from system SmartObjects. Depending on your environment, you may need to expose system objects first. Review your categories. You should see a category called System. If you do not, click the All link at the bottom of your screen. Check the box to show System Objects.
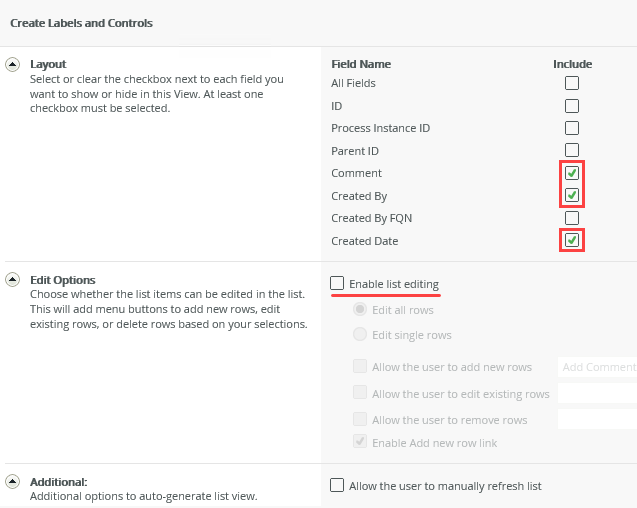
- Create a list view from the Workflow Comment system SmartObject. Name the view Comment List. Save the view to your Leave Requests category. Uncheck the option to Call this method when the form loads. Create Labels and Controls for Comment, Created By, and Created Date.
You have generated the view used to add new comments. Next, you generate a list view that displays all the comments added during this workflow.
- Right-click the Workflow Comment SmartObject and select Design View.
- Name the view
Comment List
then change the View Type to List View. Change the Category to Leave Requests. Uncheck the option to Call this method when the form loads. This option loads all records from the SmartObject when the view launches. Instead, you add a rule action later that populates the list with the current workflow comments. Click Create.
- Click Create Labels and Controls.
- On the Create Labels and Controls screen, include the following fields: Comment, Created By, and Created Date. Do not enable list editing. You want this list read-only. Click OK.
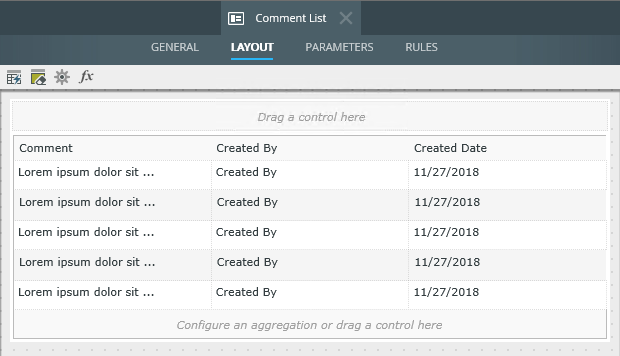
- Your view should look like the image below. Click Finish to save and exit.
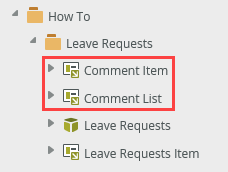
You now see the two new views saved to your Leave Requests category.
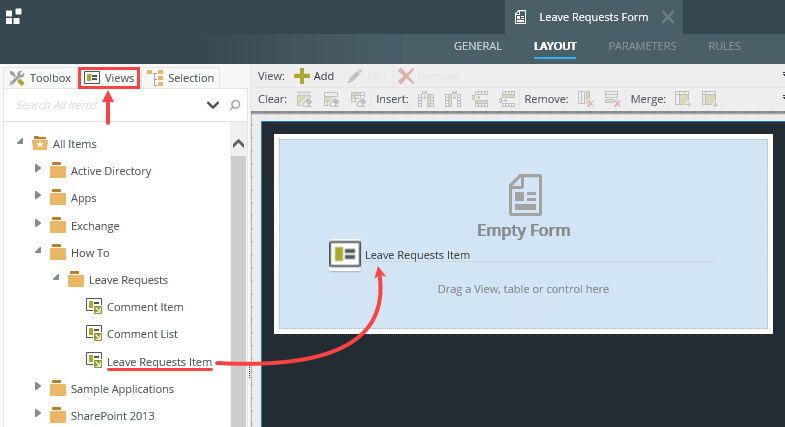
- From the Leave Requests category, create a new form called Leave Requests Form. Add the three views in this order: Leave Requests Item, Comment Item, and Comment List. Add a Parameter called ProcInstID. Finish the form.
- Right-click the Leave Requests category and select New Form.Views are not accessible on their own. You must contain them within a form. Forms are the public facing interface that you open with a browser. You can use a view in more than one form and one form can contain more than one view.
- Name the form
Leave Requests Form
then click Create.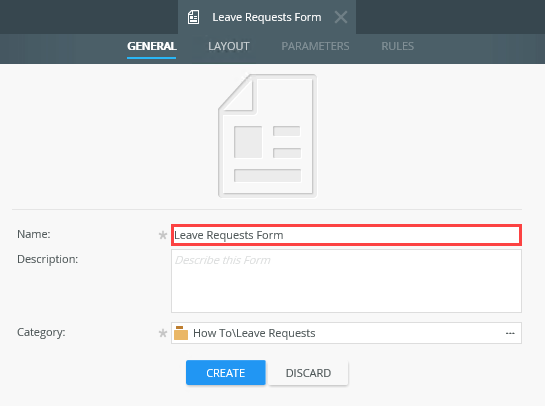
- Click the Views tab on the left side of your screen. Navigate to the Leave Requests Item view, and drag it onto the design canvas.
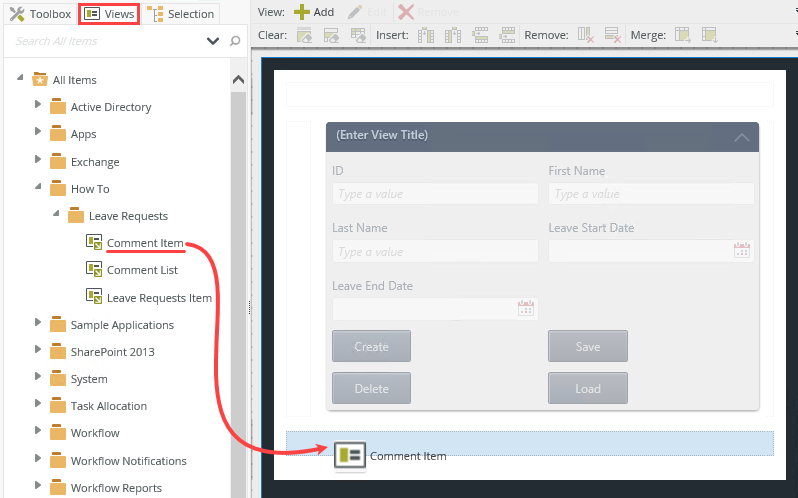
- Next, add the Comment Item view to the design canvas. As you drag the view onto the canvas, placeholders appear. Drop the view into the placeholder below the Leave Requests Item view.
- Add the Comment List view below the Comment Item view.
- (Optional) Change the view titles so they match the view functions. For the first view, click (Enter View Title) and change it to
Leave Details
then press <ENTER> to set the title.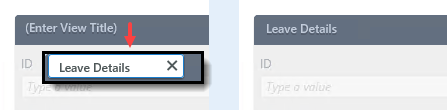
- Change the second view title to
Add Comment
and the third view title to
Saved Comments.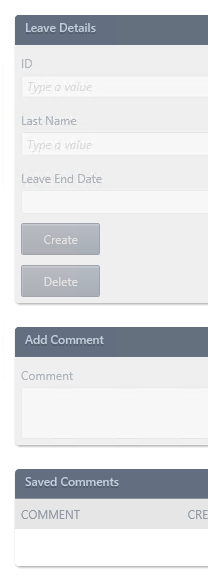
- Before saving your form, create a parameter that stores the ID of the current workflow instance. The ID is required by the Workflow Comment SmartObject for adding and showing comments. Click the Parameters tab. Click Add Parameter. Name the new parameter
ProcInstID
and change the Data Type to Number. Click Finish to save and exit.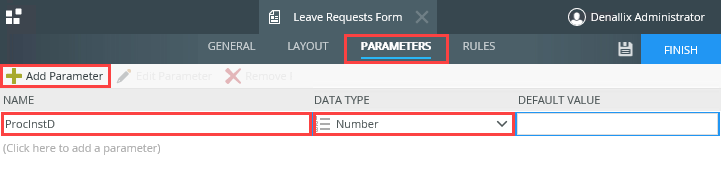
You may see a different format and style on your screen from the images in this article. This difference is most likely due to the theme you are using. To match the images in this article, click the Properties tab on the right side of your screen, and change the Theme property to Lithium.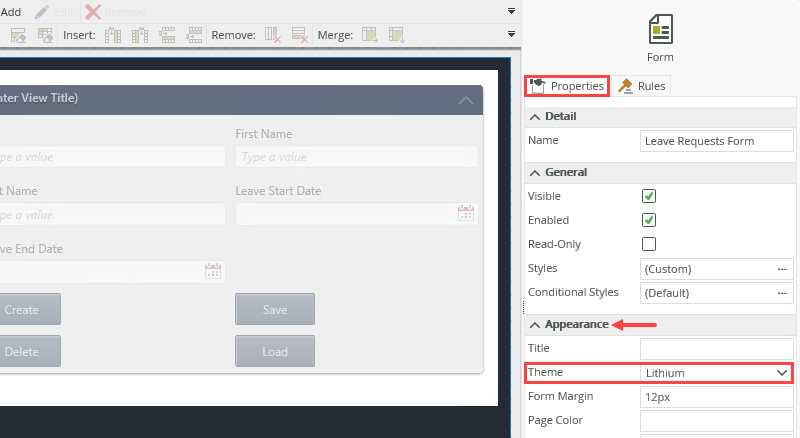
Your three views should look like the image below.

- Right-click the Leave Requests category and select New Form.
- Create a workflow from the Leave Requests Form called Leave Requests. Configure the Start step so that the workflow starts when you click the Save button. (You can use the Do it for me! option to set the start rule actions.)
Next, you create a workflow that contains two task steps. The first task is to approve the request and the second task is to rework it. Of course, in the real world, a workflow for leave requests is more complicated, but the purpose of this demonstration is to show you how comments added during multiple tasks appear in one list view.
- Right-click the Leave Requests Form and select Design Workflow.
- The K2 Workflow Designer launches. Name the workflow
Leave Requests
then click Create.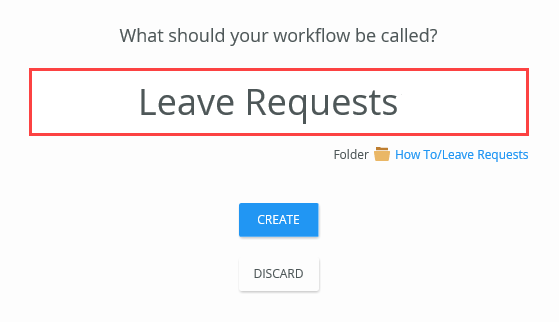
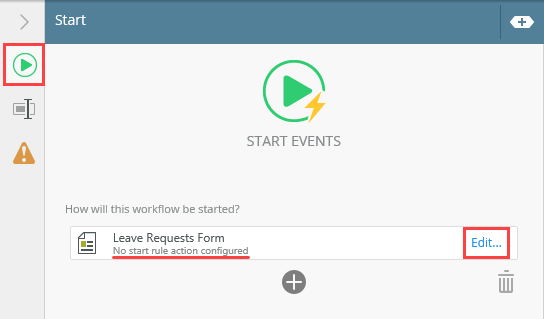
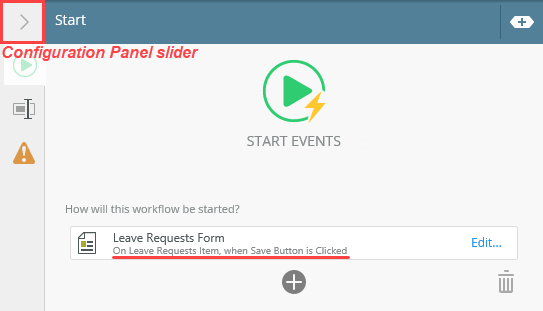
- Click the Start step to select it. (Selected steps have a blue border.) Expand the Configuration Panel.The Configuration Panel allows you to configure and customize the steps you add to your workflow.
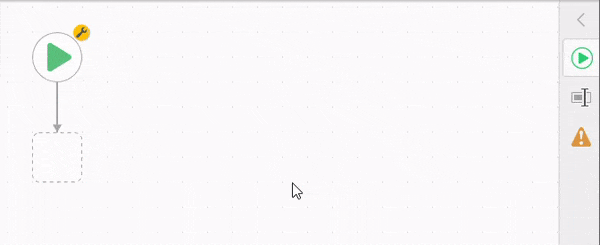
- Notice the Start Events indicate which form to use, but there is no start rule action. You want to configure the workflow to start when you click the Save button. Click Edit.
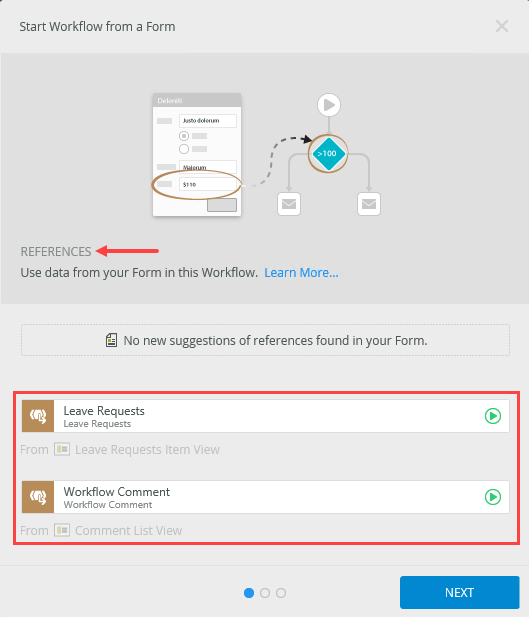
- On the References screen, notice K2 discovered the Leave Requests SmartObject and the Workflow Comment SmartObject. (Click the references bar to expand it if necessary.) Both SmartObjects are bound to views in the Leave Requests form, so K2 creates a reference to them. You can use the references while building your workflow. Click Next.
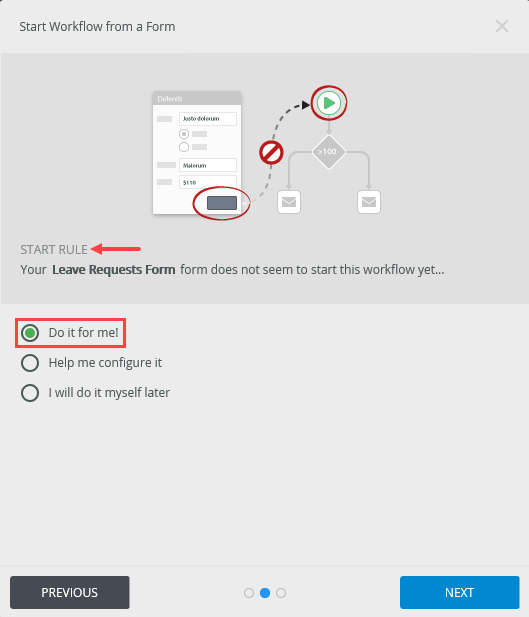
- On the Start Rule screen, click Do it for me!. With this option, K2 configures the start rule action for you. You can walk through each setting and make your own configurations by clicking the Help me configure it option. Click Next.
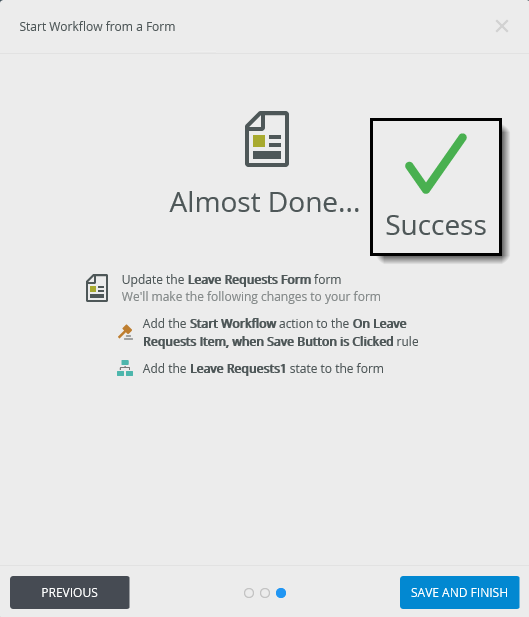
- The summary screen gives an overview of the changes K2 makes to the Leave Requests form to integrate it with the workflow. Notice that K2 adds a rule action to start the workflow when you click the Save button. You edit this rule action in a later step. Click Save and Finish. When you see the success check, click OK.
- Back on the Start Events screen in the Configuration Panel, notice the start rule now exists. Collapse the Configuration Panel by clicking the slider.
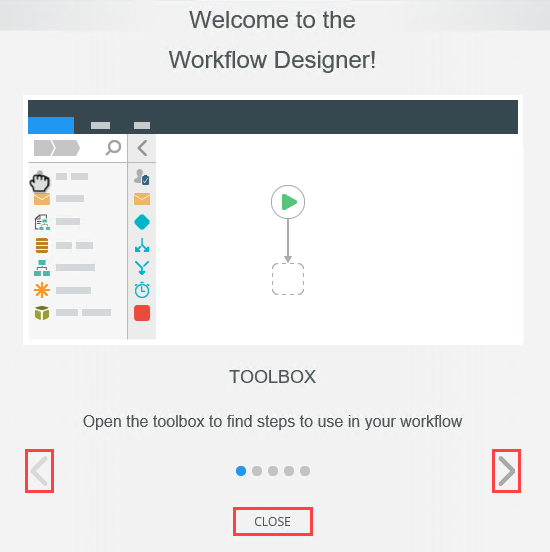
You see a Welcome screen with an interactive panel. You can click the right and left arrows to learn more about the workflow designer. Click Close to proceed to the design canvas.
You may see additional interactive pop-ups while using the designer. Click Got It or Close to continue.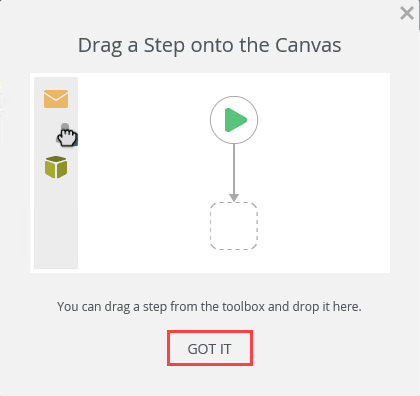
Begin by configuring the rule that starts the workflow. In this case, you want the workflow to start when you click the Save button.
The Start Workflow from a Form wizard launches.
- Complete the workflow steps using the table below as a guide. Deploy the workflow. Grant Everyone > Start and View rights.
Step > Property Value Task Instructions A leave request requires your approval. Select an action from the drop-down list, and click Submit to send your decision. Actions Approved
Rejected
ReworkForm SmartForm > Leave Requests Form
The wizard launches. Select Do it for me! to let K2 configure the form settings.Parameters Map the Context Browser > Workflow > Workflow > ID to the ProcInstID parameter. Recipients Assign the task to Bob Maggio (or search for and select a different user who can help you test later). You can use Originator Manager if you have access to their email notifications. Properties Manager Approval Decision Connect this step to the Manager Approval step. Task Instructions Your request requires rework. Actions Rework Complete Form SmartForm > Leave Requests Form
The wizard launches. Select Do it for me! to let K2 configure the form settings.Parameters Map the Context Browser > Workflow > Workflow > ID to the ProcInstID parameter. Recipients Originator Properties Originator Rework Decision Connect this step to the Originator Rework step. Placeholders Add three placeholders and connect them to the following outcome lines: Approved, Rejected, Rework Complete. You are now ready to add the first task step. This step assigns a task to the request approver, where they can choose to approve, reject, or rework the request. The rework option sends the workflow back to the requester.
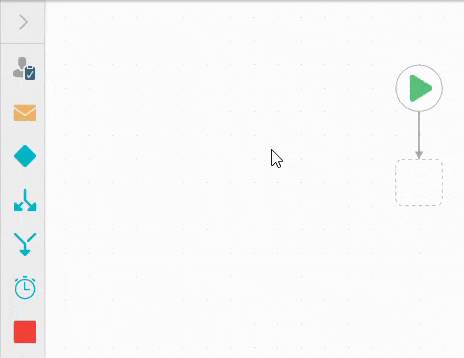
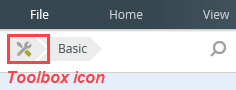
- From the Toolbox > Basic node, drag a Task step into the empty placeholder below the Start step.
- Click the Task step and expand the Configuration Panel. Click the Task tab to make it active (if it is not already). For the instructions, enter
A leave request requires your approval. Select an action from the drop-down list, and click Submit to send your decision.
For the Actions, click the Add(+) icon. Enter
Approved
then click the Add(+) icon once again. Enter
Rejected.
Add a third action,
Rework.
The task recipient chooses one of the actions you specify for their decision on the leave request.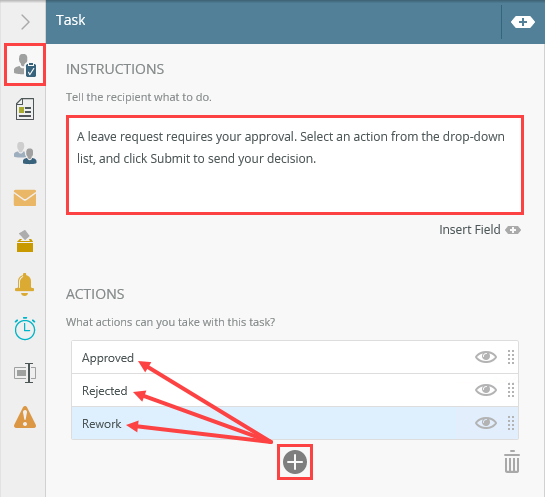
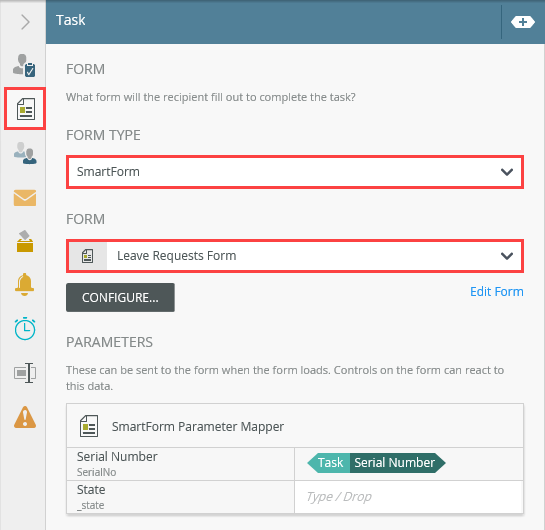
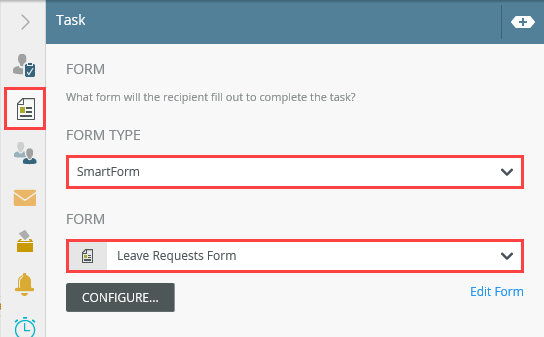
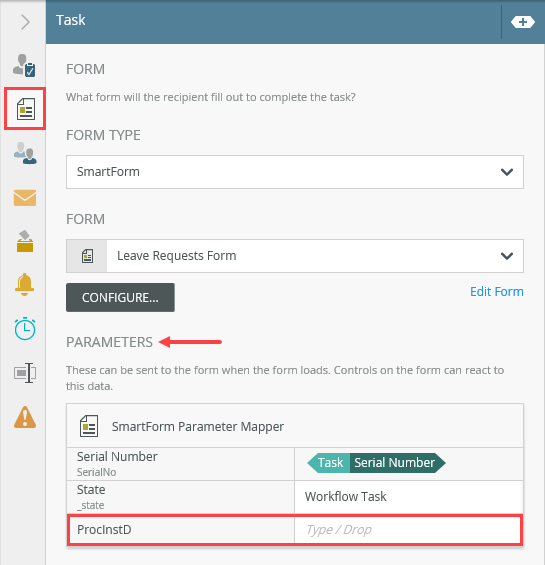
- Click the Form tab. For the Form Type, select SmartForm. For the Form, select Leave Requests Form. (If you do not see the form in the drop-down list, click Browse, then navigate to where you saved the form.)
- On the References screen, click Next.
- On the Open Task screen, keep the default Do it for me! and click Next.
- On the summary screen, review the changes K2 makes to your form. Click Save and Finish. When you see the success check, click OK.
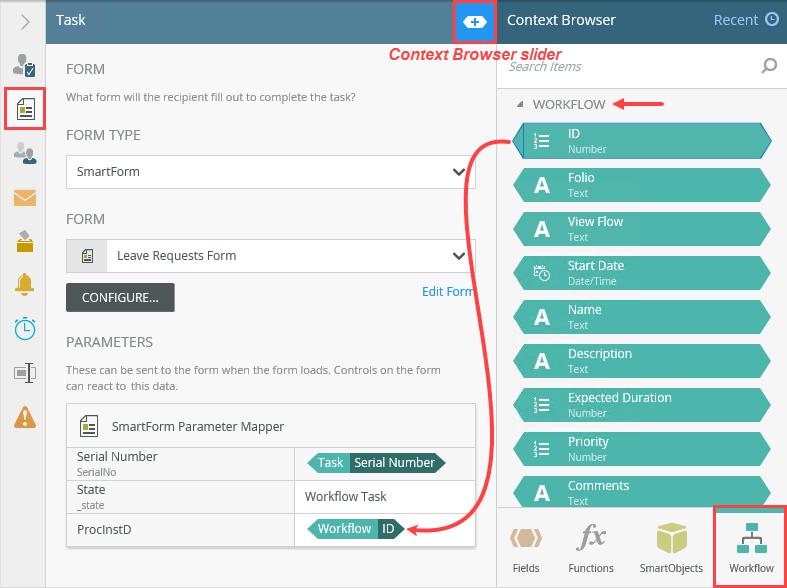
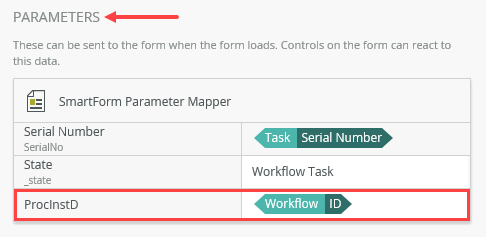
- Expand the Context Browser.The Context Browser contains references, variables, functions, and SmartObject properties. At runtime, K2 replaces references and variables with live data. For example, K2 replaces the ProcInstID parameter with the ID of the current workflow instance.
- Click the Workflow tab. Expand the Workflow node. Drag the ID property into the ProcInstID text box. Collapse the Context Browser by clicking the slider.
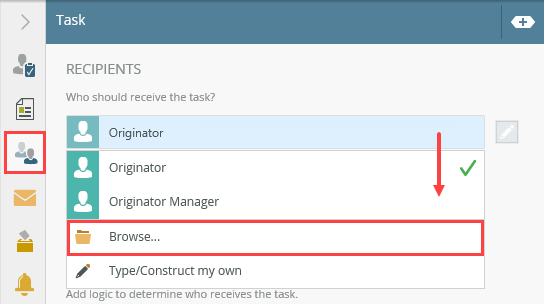
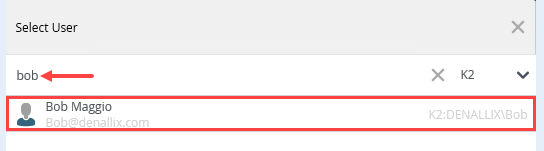
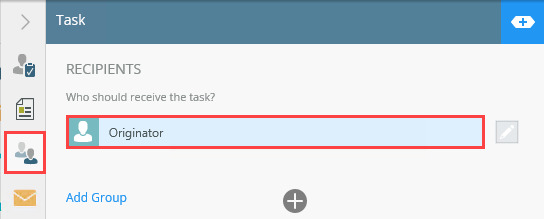
- Click the Recipients tab. Click the Originator bar and select Browse. Search for Bob Maggio. Select Bob's name in the results pane, then click OK. (If working in your own environment, search for a user who can help you test later. You can also use Originator Manager if you have access to their email notifications.)
- Click the Properties tab. Change the step name to
Manager Approval.
Collapse the Configuration Panel.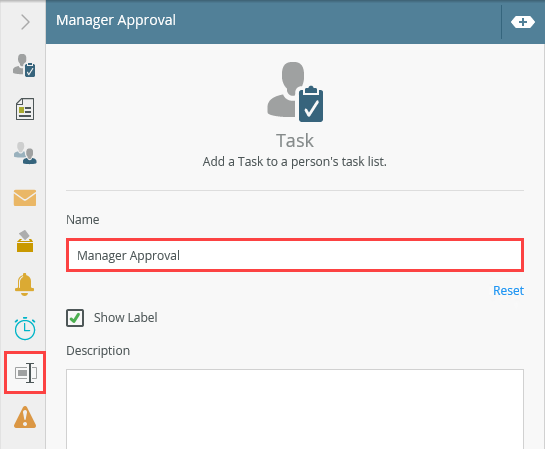
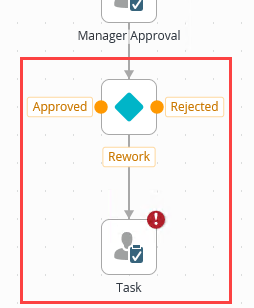
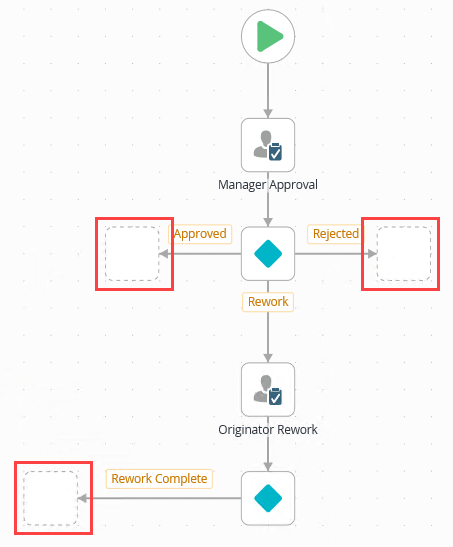
- From the Toolbox > Logic node, drag a Decision step below the Manager Approval step. Connect the two steps. The Decision step generates the outcome lines for each action. In this case, there are three outcomes: Approved, Rejected, and Rework.To return to the main Toolbox menu, click the Toolbox icon in the breadcrumb bar.
 To connect steps, hover over the border of the first step until you see a handle. Click and drag the handle into the second step. Click the canvas to set the line.
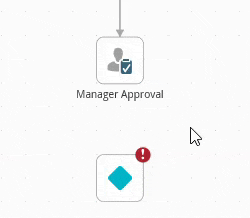
- From the Toolbox > Basic node, add a Task step and align it with the Rework outcome. Connect the outcome line to the step.
- Select the Task step and expand the Configuration Panel. Select the Task tab (if it is not already). For the instructions, enter
Your request requires rework.
then for the Actions, enter
Rework Complete.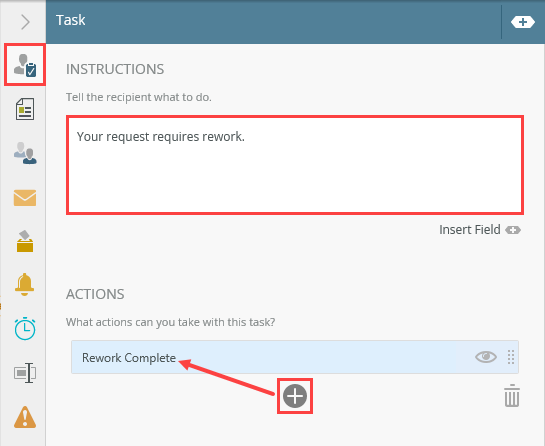
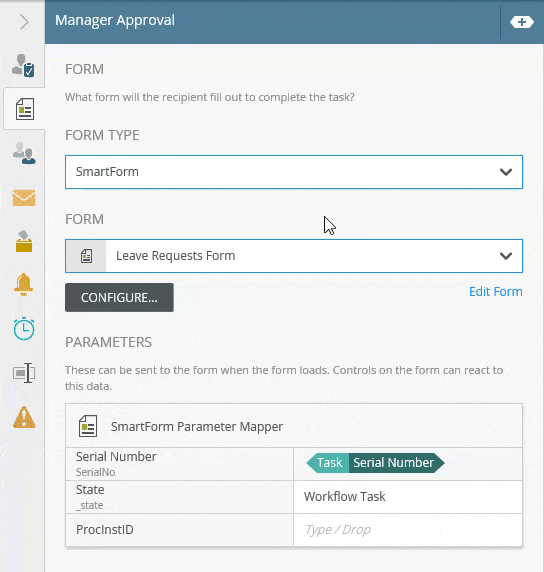
- Select the Form tab. For the Form Type, select SmartForm. For the Form, select Leave Requests Form.
- On the References screen, there are no changes. Click Next.
- On the Open Task screen, keep the default, Do it for me!. Click Next.
- On the summary screen, review the changes K2 makes to the form. Click Save and Finish. When you see the success check, click OK.
- Expand the Context Browser and map the Workflow > Workflow > ID property to the ProcInstID parameter.
- Select the Recipients tab. The task recipient default is Originator (you!); keep this value.
- Select the Properties tab. Change the step name to
Originator Rework
and collapse the Configuration Panel.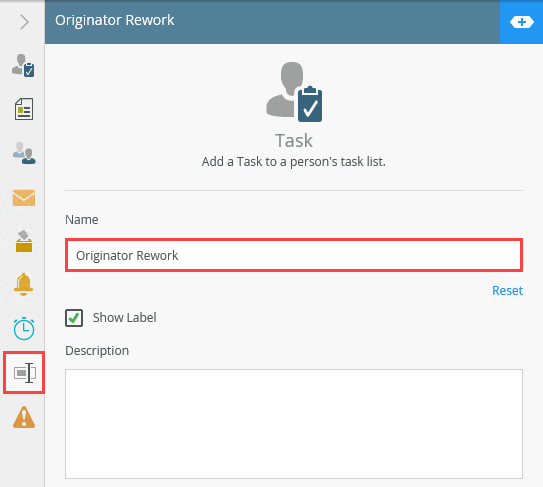
- From the Toolbox > Logic node, add a Decision step and connect it to the Originator Rework step.
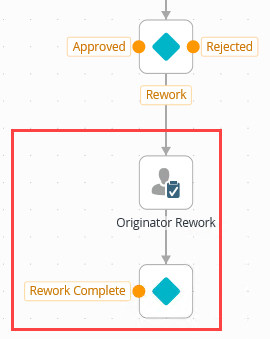
- From the Toolbox > Basic node, drag a Placeholder step onto the canvas and align it with the Approved outcome. Connect the line to the step. Repeat this for the Rejected and Rework Complete steps.
Notice the red warning badge on the Task step. This badge indicates there are required settings in the Configuration Panel. When you expand the panel, you see the same badge next to the required settings.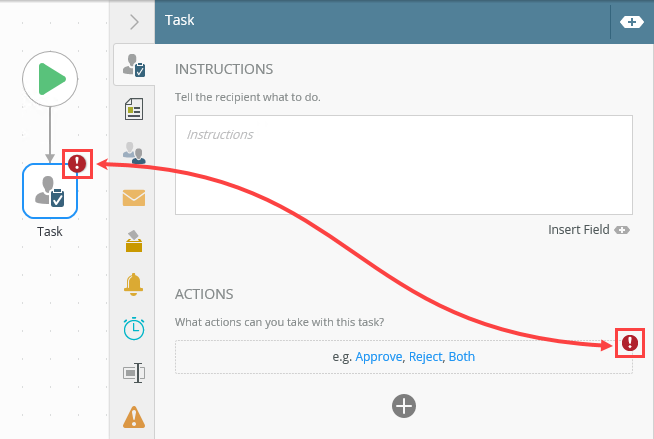
The Open Task on a Form wizard launches.
Notice the ProcInstID parameter under the Parameters heading. This is the same variable you added when you created the form. You must map the ID of the current workflow instance to this parameter so you can use it later to load the correct comments.
Next, you add a second task step for the Rework outcome. The task recipient is the requester (the originator). In the real world, you might add this step so that the requester can respond to any questions the approver might have. For this demonstration, however, you use this step to launch the form once again so that you can review the comments list.
The Open Task on a Form wizard launches.
Notice you have three outcomes not connected to steps: Approved, Rejected, and Rework Complete. If you were to run the workflow at this point, you would see errors due to the incomplete outcomes. You must add placeholders to each outcome to trick K2 into thinking each outcome leads to a step.
- From the Toolbox > Basic node, drag a Task step into the empty placeholder below the Start step.
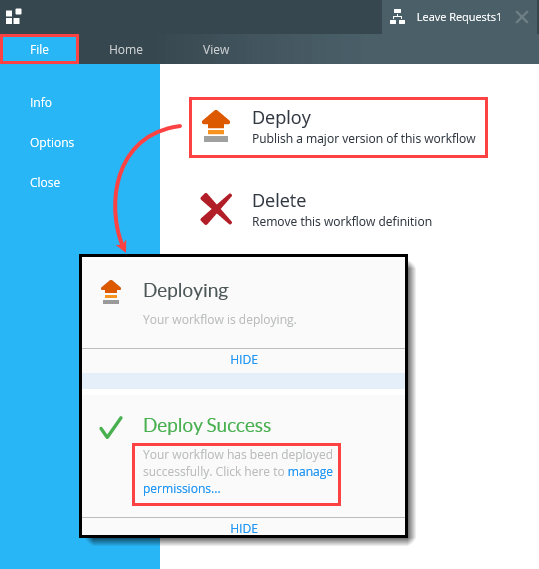
- Deploy the workflow. Add Everyone to Start and View permissions. You must have start permissions at a minimum to add and view system SmartObject comments.
Before continuing, you just must deploy the workflow to the K2 server. Deploying a workflow publishes it and makes it available for use. If you make any changes to the workflow, you must deploy it again so that the K2 server has the latest version.
- Click File > Deploy. You see a success dialog indicating the deployment completed. Next, you adjust permissions so that all authenticated users can start workflows and view reports. The Workflow Comment SmartObject requires start permissions at a minimum to add and view system-stored comments. Click the manage permissions... link.
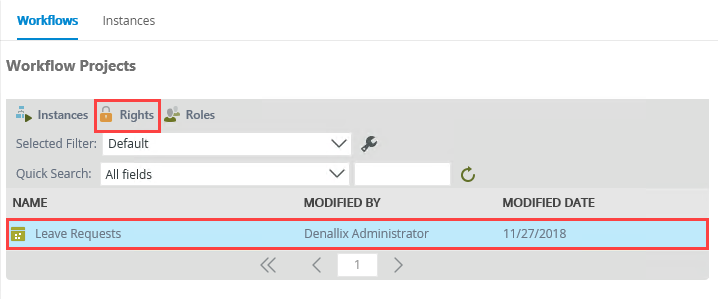
- In the central pane, select the Leave Requests workflow and click Rights.
- You assign rights to Everyone, which includes all authenticated users. Click Add. Change the Search scope to All. In the search text box, enter
everyone
and click the Search button.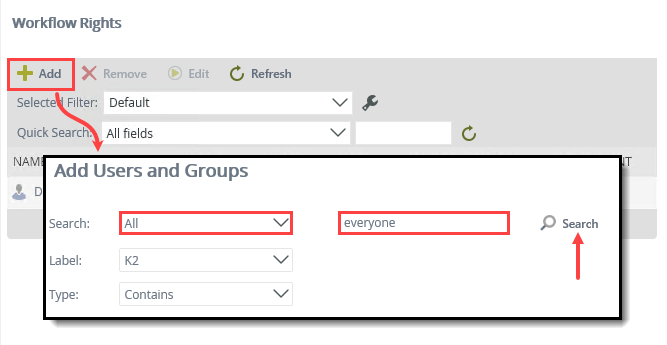
- In the results pane, you see Everyone. Select Everyone and click Add once again. You now see Everyone in the workflow rights pane. Click Next.

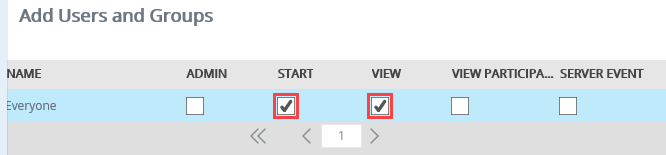
- Check the boxes for Start and View. Click Finish.
- Workflow Rights for the Leave Requests workflow are set. Click Close to exit the rights screen. Switch back to the K2 Designer tab in your browser.
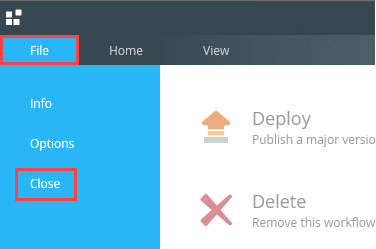
- Your workflow build is complete for this demonstration. To close the workflow designer, click File > Close.
The K2 Management site launches in a new browser tab.
- Click File > Deploy. You see a success dialog indicating the deployment completed. Next, you adjust permissions so that all authenticated users can start workflows and view reports. The Workflow Comment SmartObject requires start permissions at a minimum to add and view system-stored comments. Click the manage permissions... link.
- The last configuration is to edit rule actions on the Leave Requests Form for both the Leave Requests (Default) and Workflow Task states. Edit the Leave Requests Form, then use the table below as a guide for configuring the rule actions.
State Rule Condition/Action Leave Requests (Default) On Leave Request Item, when Save Button is Clicked Output Mappings: Map the Leave Requests > Leave Requests > Workflow > ID to the Parameters > ProcInstID text box. Leave Requests (Default) On Leave Request Item, when Save Button is Clicked Condition: a control on a View contains a value (if on Comment Item, Comment Text Area contains a value)
Action: Execute a View method (then on Comment Item View, execute the Add Comment method)
(configure): Map the Leave Requests Form > Parameters > ProcInstID to the Input Properties > Process Instance ID text box. Map the Comment Item > Controls > Comment Text Area to the Comment text box.
Leave Requests (Default) When the Form is Initializing Actions: Hide a View (then hide the Comment List View) Workflow Task When the Form is Initializing Actions: Add a new action just below then open the Manager Approval worklist item: Execute a View method (then on Comment List View, execute the Get List method)
(configure): Map the Leave Requests Form > Parameters > ProcInstID to the Input Properties > Process Instance ID text box.
Workflow Task When the Form is Initializing Actions: Add a new action just below then open the Originator Rework worklist item: Execute a View method (then on Comment List View, execute the Get List method)
(configure): Map the Leave Requests Form > Parameters > ProcInstID to the Input Properties > Process Instance ID text box.
Workflow Task Add a new rule: After the Workflow action was submitted Condition: a control on a View contains a value (if on Comment Item, Comment Text Area contains a value)
Action: Execute a View method (then on Comment Item View, execute the Add Comment method)
(configure): Map the Leave Requests Form > Parameters > ProcInstID to the Input Properties > Process Instance ID text box. Map the Comment Item > Controls > Comment Text Area to the Comment text box.
Before you test, you must edit rules on the Leave Requests Form. You hide the list view on the initial request form (since you do not have any saved comments yet), and load the attachments on the form used by the approver and originator for rework.
- Right-click the Leave Requests Form and select Edit. After the form loads in the designer, click the Rules tab.

- Events define when the rule should run, such as when a button is clicked, or when the form loads. (Events are optional, you can define "event-less" rules that you can call from other rules.)
- Conditions define whether the rule should run. If the criteria are true, continue the rule, and if the criteria are not met, stop the rule. For example, a condition might evaluate a form to confirm that required fields have content. (Conditions are optional - not all rules will require conditions.)
- Actions define what the rule should do. For example, show a message, start a workflow, or enable a form field. Rules can contain multiple actions that are run in sequence or in parallel.
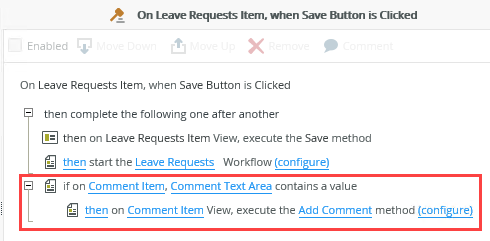
- Select the Leave Requests (Default) state. Select the On Leave Requests Item, when Save Button is Clicked rule. Click Edit Rule. This is the rule that executes when the leave requester clicks the Save button.
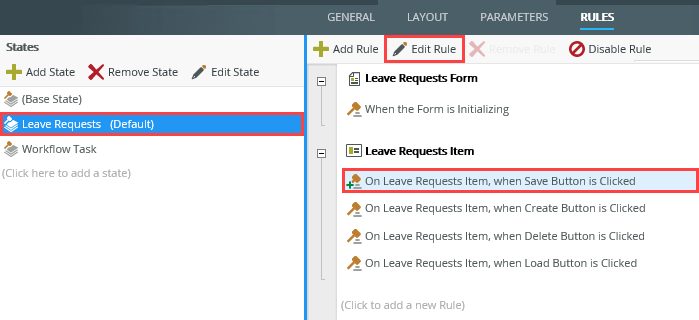
- Locate the action that starts the Leave Requests Workflow. Click (configure).
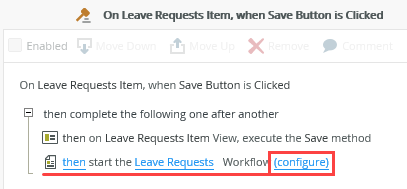
- Click the Output Mappings tab. In the Context Browser, expand the Leave Requests > Leave Requests > Workflow node. Drag the ID into the ProcInstID text box. Click Finish.

- Next, you configure a condition and action that saves the comment to the system SmartObject. Click the Conditions tab. Click once on the condition, a control on a View contains a value, to add it to the rule definition pane. You want to make sure an comment exists before you save it. Otherwise, you may save an empty record.
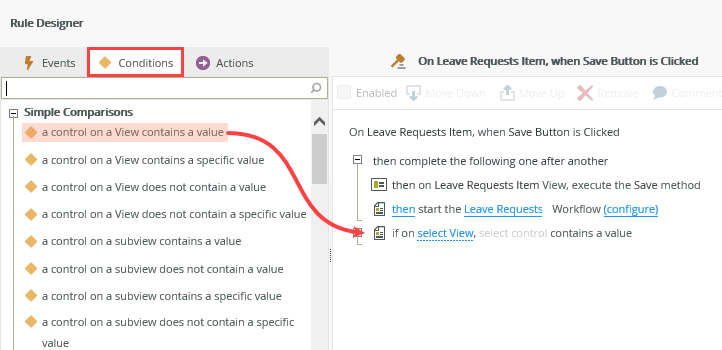
- Click select View and select Comment Item. The control fills in automatically as there is only one control on the view.

- Now, you add the action that saves any comments entered to the SmartObject. Click the Actions tab. Click once on Execute a View method to add it to the rule definition pane. Click select view and select Comment Item. Click select method and select Add Comment.
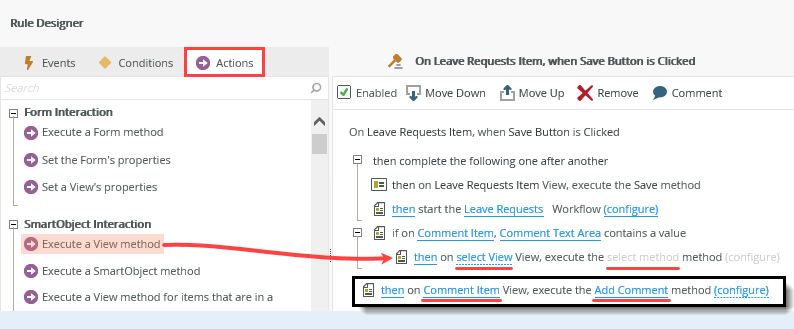
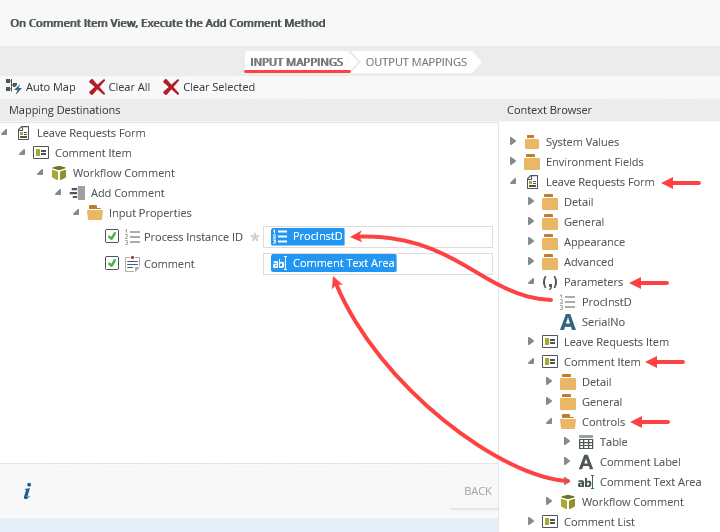
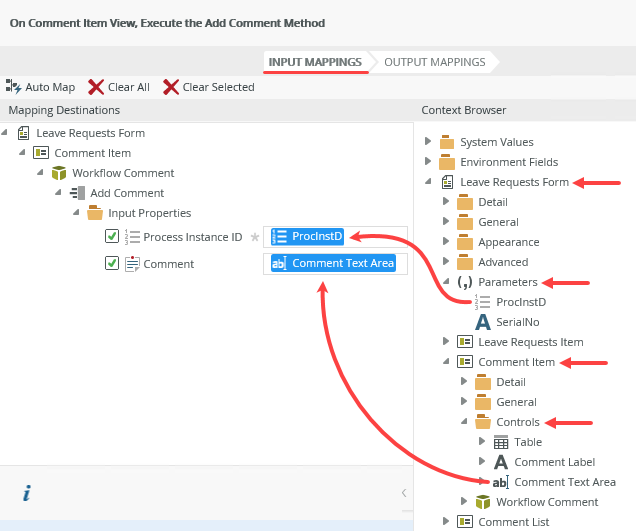
- Click (configure). Map the Leave Requests Form > Parameters > ProcInstID to the Input Properties > Process Instance ID text box. Map the Comment Item > Controls > Comment Text Area to the Comment text box.
- Click Finish to save the action settings. Click OK to save the rule.
- Still on the Leave Requests (Default) state, edit the When the Form is Initializing rule.
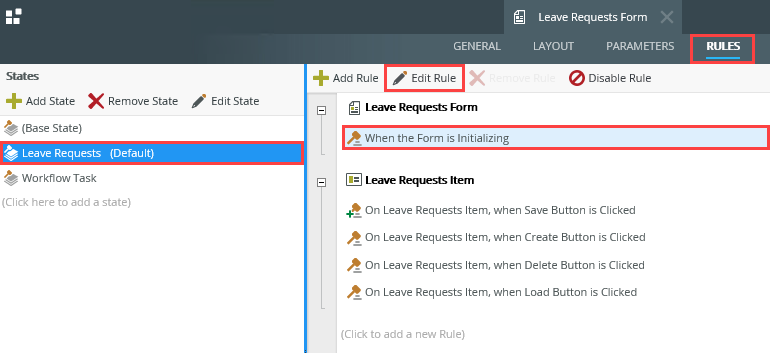
- Select the Actions tab (if it is not already). Search for
hide
and click once on Hide a View to add it to the rule definition pane. Select the Comment List view. Click OK.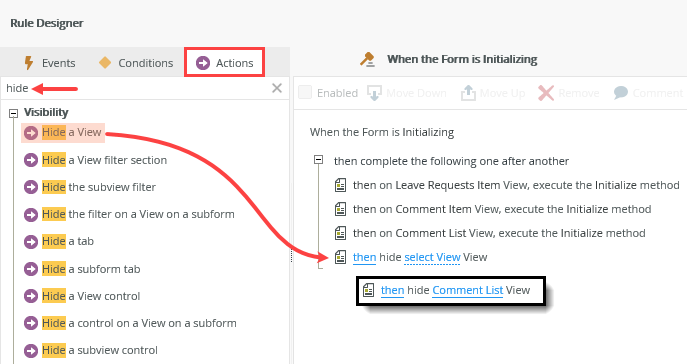
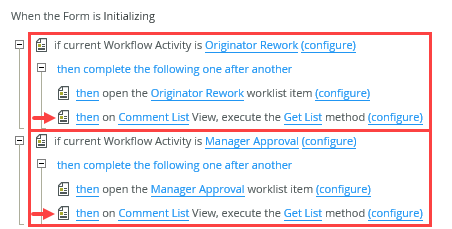
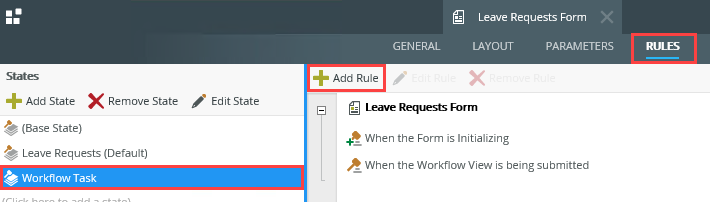
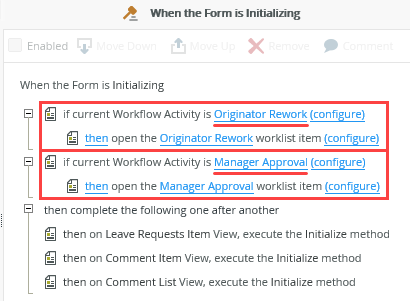
- Select the Workflow Task state. Edit the When the Form is Initializing rule.
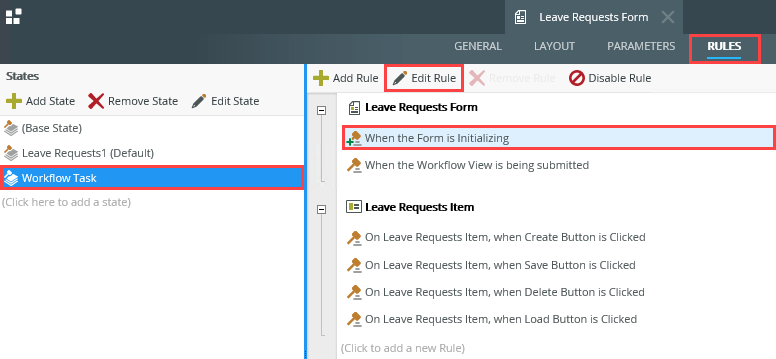
- Click once on the then open the Manager Approval worklist item row.
- On the left side of your screen, confirm the Actions tab is active, then click once on the Execute a View method action to add it to the rule definition pane. K2 places the action just below the row you selected. If you don't select a row, K2 places the action below all the other actions. If this happens, you can hover over the row until you see a toolbar. Click the up or down arrows to move the action into place. Remember, K2 executes each action in a linear fashion from top to bottom, so placement is important!
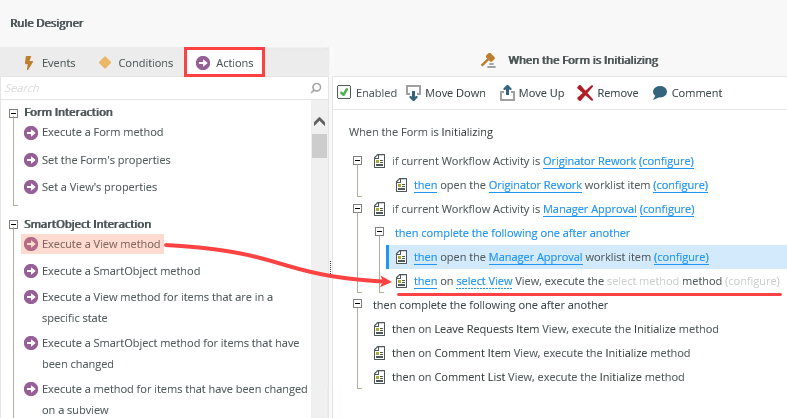
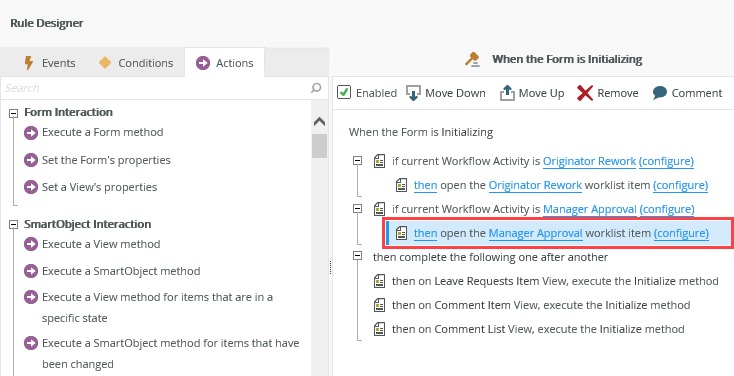
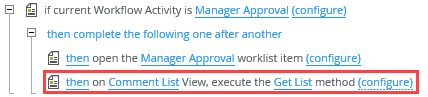
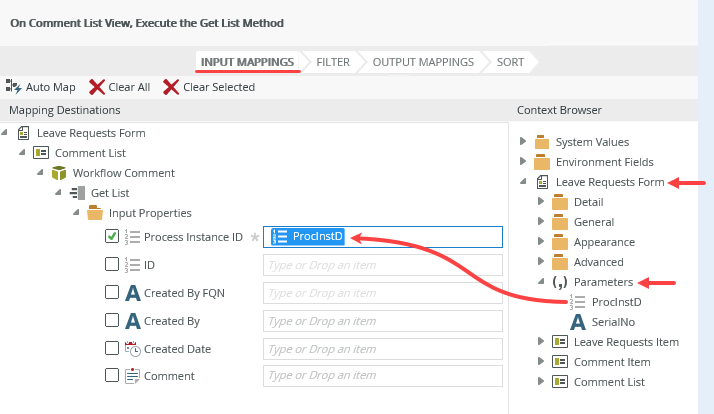
- Click the select View link and select Comment List. Click the select method link and select Get List. Click (configure).
- Map the Leave Requests Form > Parameters > ProcInstID property to the Input Properties > Process Instance ID text box. K2 returns all records with the same process instance ID. Click Finish.
- Select the then open the Originator Rework worklist item row. On the left side of your screen, click once on Execute a View method. Select the Comment List view and the Get List method. Configure the action by mapping the Parameters > ProcInstID to the Input Properties > Process Instance ID. Your actions should look like the image below. Click OK.
- Next, you add a new rule that saves any comments the approving manager adds. Select the Workflow Task state (if it is not already). Click Add Rule.
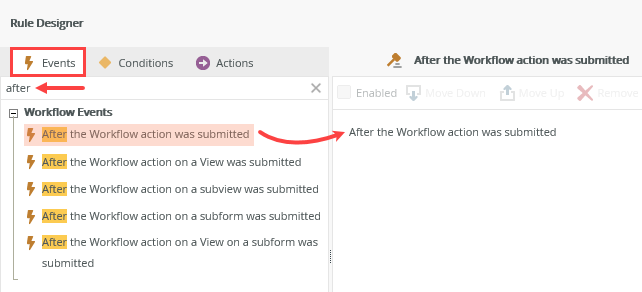
- With the Events tab active, search for and add the After the Workflow action was submitted event.
- Click the Conditions tab. Click once on the condition, a control on a View contains a value to add it to the rule definition pane. For the view, select Comment Item. The Comment Text Area control fills in automatically as it is the only control on the view.

- Now, you add the action that saves the file to the SmartObject. Click the Actions tab. Click once on Execute a View method to add it to the rule definition pane. Click select view and select Comment Item. Click select method and select Add Comment. Click (configure).
- Map the Leave Requests Form > Parameters > ProcInstID to the Input Properties > Process Instance ID text box. Map the Comment Item > Controls > Comment Text Area to the Comment text box. Click Finish, then click OK to save the new rule.
- Click Finish to save and exit the form.
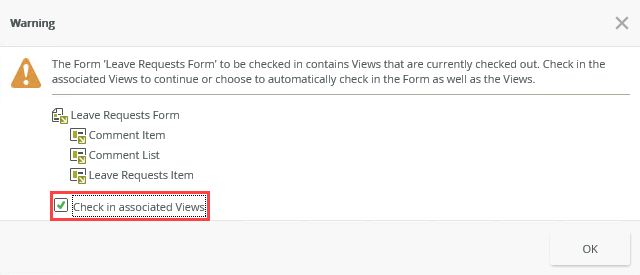
- Check in the form and views. Similar to deploying the workflow, checking in views and forms publishes them to the K2 server and makes the latest version available for use. Right-click the Leave Requests Form and select Check In. When you see the pop-up about associated views, check the box to Check in associated Views. Click OK.
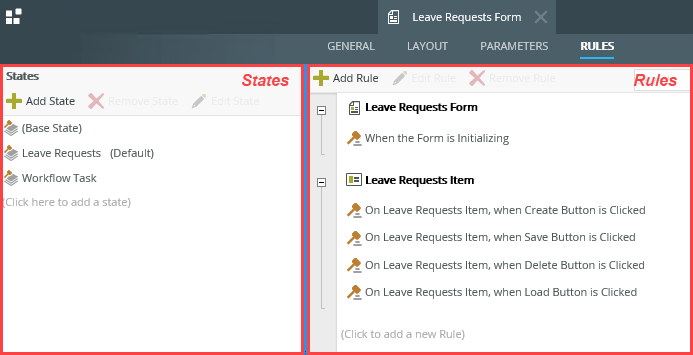
Notice there are two panes. The left side of your screen contains states while the right side of your screen contains rules. In the following steps, you edit rules for both the Leave Requests (Default) and Workflow Task states.
 Rules consist of events, conditions and actions. A valid rule contains at least one action.A state represents the configuration and behavior of a form for a specific use. Generally speaking, you configure states for (user) task steps. Each state has its own set of rules which you can edit depending on the task. For example, you use the same form to submit then approve leave requests. You configure the rules for the submit state to enable all fields so you can enter values. You configure the rules for the approval state to disable fields since you do not need to change field values. Rather than creating two separate forms, you can use one form with different states, then apply rules to control form behavior for each of the states.
The first state you edit is Leave Requests (Default). This is the behavior and configuration for the form used to submit a new leave request. You want to map the ID of the workflow instance for this submittal to the ProcInstID parameter you created. This value is required by the Workflow Comment SmartObject to save or load records.
You have mapped the Workflow ID to the ProcInstID parameter. Now, you use this value on the Leave Requests form, as the system SmartObject requires the workflow ID to save and load records.
Next, you hide the Comment List view when the form loads for the requester. There won't be any comments saved yet, so there is nothing to show.
Next, you add an action that retrieves the comments for the Manager Approval and Originator Rework steps. Both of these steps use the Workflow Task state as their form behavior and configuration.
Notice there are two sets of Workflow Activity actions; one for the Manager Approval step and one for the Originator Rework step. For each of the tasks, you want to load the comments associated with the workflow.
- Right-click the Leave Requests Form and select Edit. After the form loads in the designer, click the Rules tab.
- Next, you see how the system SmartObject saves and displays multiple comments from the same workflow instance. Run the Leave Requests Form. Complete the form fields and add a comment. Click the Save button. Open the form from the task notification email the Manager Approval task recipient receives. Add a comment, then select Rework from the actions and submit the form. From your own task notification email (for the Originator Rework step), open the form and review the records in the Saved Comments list.
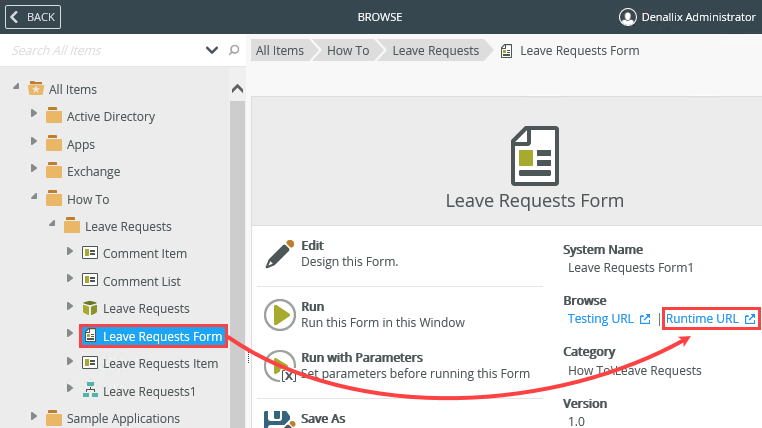
- First, submit a new leave request. Select the Leave Requests Form and click the Runtime URL found in the central pane. (The Runtime URL is the link to the live form and opens in a new browser tab.)
- Complete the fields except ID (which is created when you click Save). To add a comment, click inside the Comment text area box. Click the Save button to start the workflow. (Recall when you configured the Start step, K2 defaulted to the Save button click rule as the event that starts the workflow.) In a real-world process, you would remove or hide any buttons you are not using. This demonstration uses most default settings, which is why you see multiple buttons.)

- You might see the screen flash, but there is no confirmation that your form submitted because you did not configure one. If you do not see an error, it is OK to close the form browser tab to continue.
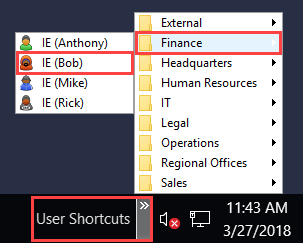
- The first step after the workflow starts is the Manager Approver task step. Bob Maggio is the task recipient. (If you are working in your own environment, this is the person assigned the Manager Approval task.) Open K2 Workspace (Desktop) for Bob. Use the User Shortcuts in the lower right corner of your screen to open IE logged in as Bob. Bob is a member of the Finance group. Internet Explorer launches an instance of K2 Workspace (Desktop) logged in as Bob.
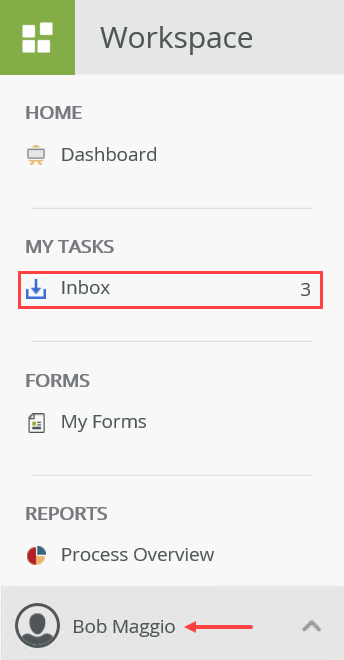
- Click the Inbox. The Inbox in K2 Workspace (Desktop) displays a list of task notification emails that are waiting action from the logged in user. (In the image below, Bob has three task notification emails. Your screen may be different.)
- Locate and click the Manager Approval task notification email.
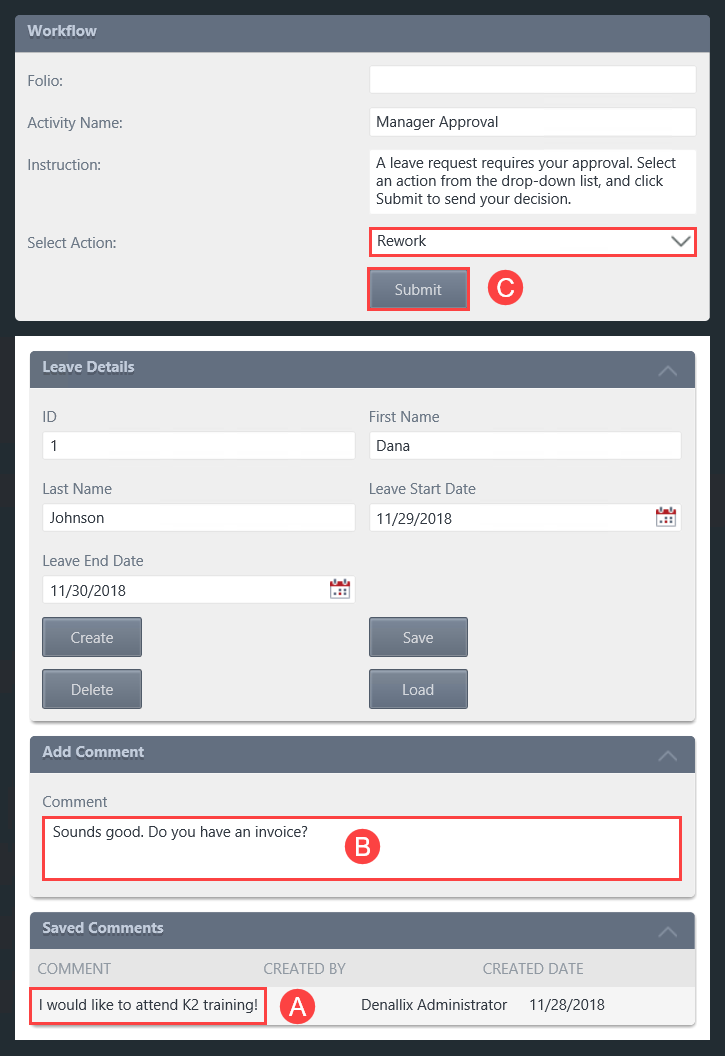
- The Leave Requests Form opens in the central pane. At the bottom of the form (A) is the list of comments for this workflow instance. There is only one (that you added when you submitted the form). As the approver, add another comment. Click inside the Comment text area box (B) and enter your comment. Finally, select Rework from the Actions, and click Submit (C). Make sure you click the Submit button and not one of the buttons on the Leave Details view. (Once again, in a real-world scenario, the buttons are hidden to avoid confusion.) Click OK to close the confirmation pop-up.
- Switch back to the browser with K2 Designer. This is the browser you are logged into (and not Bob). In a new browser tab, open K2 Workspace (Desktop).If you do not know how to access K2 Workspace (Desktop), see Accessing K2 Sites.
- Click the Inbox. Locate and click the Originator Rework task notification email. This launches the form in the central pane.
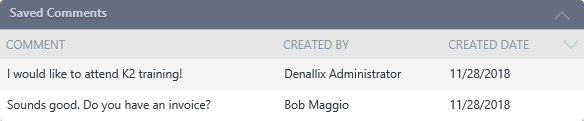
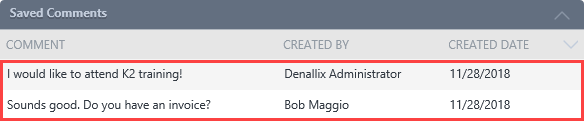
- Scroll down to the bottom of the form. Notice the Saved Comments list now displays the two comments added by two different users.
- First, submit a new leave request. Select the Leave Requests Form and click the Runtime URL found in the central pane. (The Runtime URL is the link to the live form and opens in a new browser tab.)
Review
You often see comments saved during a workflow task using a data source associated with the form. While this is sufficient for most scenarios, in some cases you may want to work with all the comments saved during the entire workflow instance, across multiple tasks. Use the Workflow Comment system SmartObject to add and view comments at the workflow level. In this way, you can manage comments from a workflow (start to finish), regardless of the task assignment or form.
To learn about adding and viewing attachments using a system SmartObject, see How To: Add and View Workflow Attachments.