How To: Manually Integrate a SmartForm with a Workflow
Instead of using the workflow start step configuration or workflow task step configuration to automatically integrate a SmartForm with a workflow, you can manually configure form rules that start a workflow, and open and action a worklist task. You may want to do this to have more granular control over how exactly the form is integrated with a workflow, or to decouple the tight integration between a form and workflow so that you can maintain the form and workflow separately.
You may also not want to use form states to integrate the same form with different steps in a workflow. Instead, you can add conditions that check to see if a specific workflow activity is active when the form is opened, and if so, you add subsequent rule actions to open and complete the worklist item.
This how-to demonstrates how to manually create rules that integrate a form with a workflow, both for starting the workflow and for opening and completing a task in the workflow without using form states to separate the different behaviors of the form.
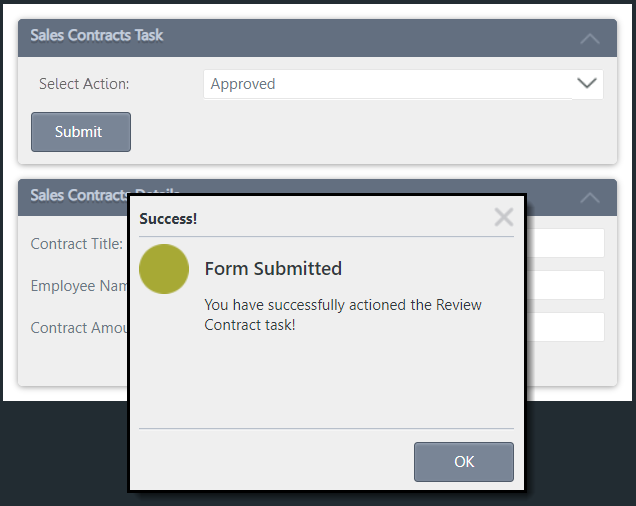
The form you will build in this how-to, with a message displayed after the workflow task is actioned
Scenario
You have created several online forms that employees complete and submit. Some forms are more complex than others and involve workflows that contain many task steps for approving and processing contracts. To maximize performance of forms by reducing form states, and to 'disconnect' the tight, wizard-based integration between the form and the workflow, you opt to not use workflow step wizards or form states for every task step in the workflow. Instead, you manually configure rules with conditions to start the workflow and handle the worklist item interaction.
For this scenario, you create a SmartBox SmartObject (Sales Contracts) that stores sales contract details. You create an item view (Sales Contracts Details) from the SmartObject that allows employees to start a new sales contract approval process. A second item view (Sales Contracts Task - independent of the SmartObject) contains controls that someone uses to approve or reject the contract request. Finally, you create a form (Sales Contracts Form) to contain the views and a workflow (Sales Contracts Approval) that starts when someone submits the form for the first time.
Steps
In this how-to, you create a SmartObject, views, form, and workflow to work with sales contracts, and manually integrate the form with the workflow.
Setup Steps
The following steps set up the scenario from start to finish. If you want to skip the setup steps and view the topic step, go to Configure rules to start a workflow, then open and action a worklist item.
-
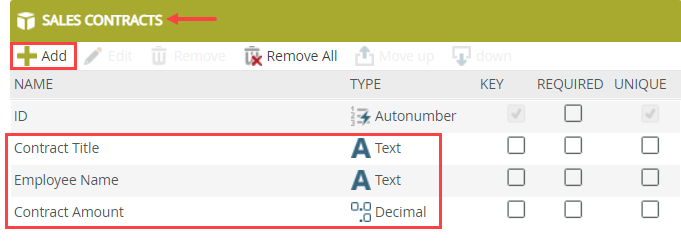
Create a SmartBox SmartObject called Sales Contracts. Add the following properties: Contract Title (Text), Employee Name (Text), Contract Amount (Decimal). (Optional) Create categories first to keep your work organized.
If you are working in a shared environment where there are multiple builds of the same application, consider adding your initials to category and artifact names so that you can easily determine which items are yours. For example, Sales Contracts KL.
- Launch K2 Designer.
If you do not know how to access K2 Designer, see Accessing K2 Sites.
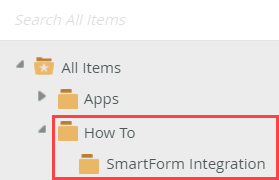
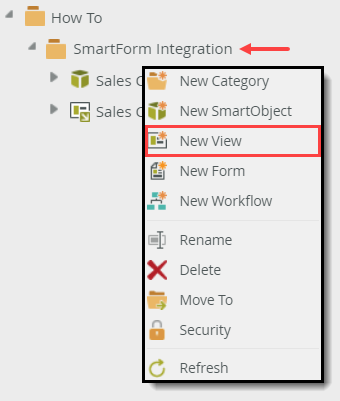
- Create categories to keep your work organized. Right-click All Items and select New Category. Use the image below as a guide to naming your categories, or use your own names.
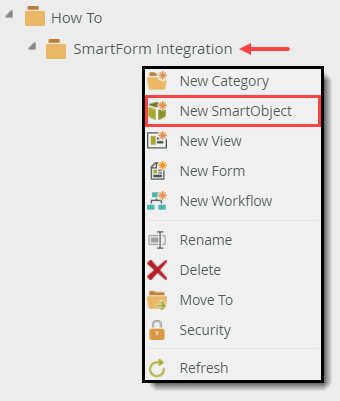
- Right-click the category name and select New SmartObject.
- Name the SmartObject
Sales Contracts
then confirm the SmartBox option is active. Click Create.If you are working in a shared environment where there are multiple builds of the same application, consider adding your initials to artifact names so that you can easily determine which items are yours. For example, Sales Contracts KL.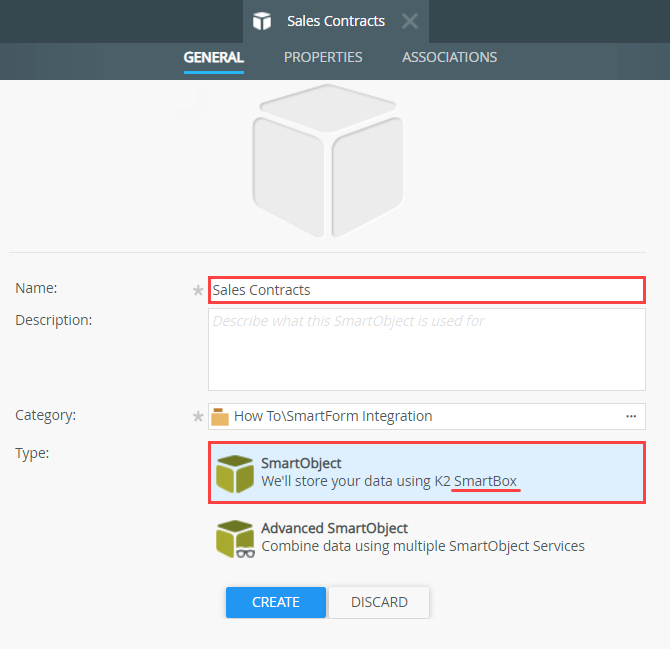
- On the Sales Contracts properties screen, click Add. Add the following properties and data types. Click OK to save the properties. Click Finish to save and exit the designer.
- Contract Title (Text)
- Employee Name (Text)
- Contract Amount (Decimal)
- Launch K2 Designer.
-
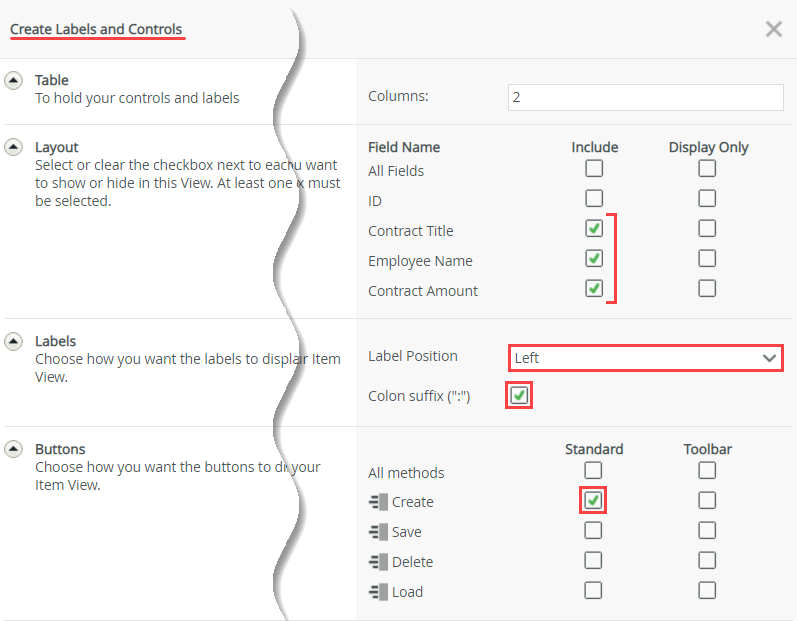
Design a new item view from the SmartObject and name it Sales Contracts Details. Create labels and controls for all fields except ID. Change the label position to left. Include the colon suffix. Include the standard Create button. Finish the view.
- Right-click the Sales Contracts SmartObject and select Design View. Name the view
Sales Contracts Details
and confirm the View Type is Item View. Click Create.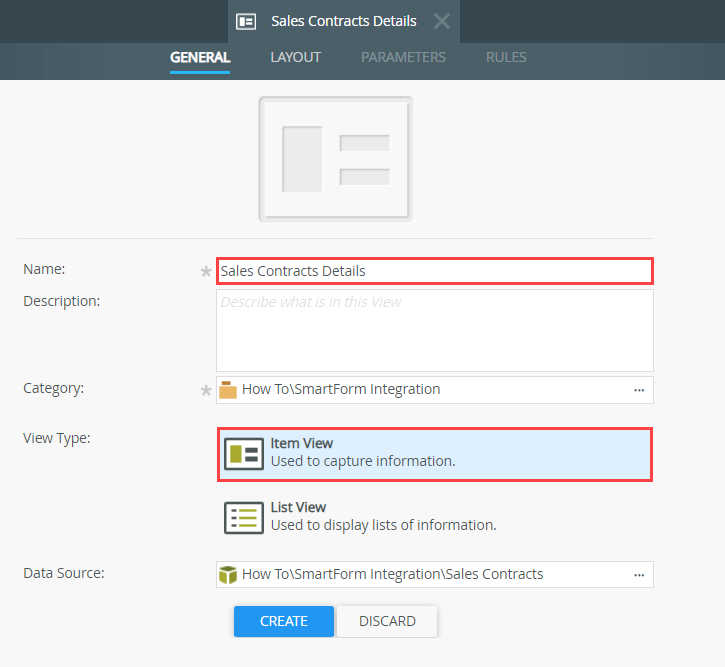
- Click Create Labels and Controls to begin the view layout.
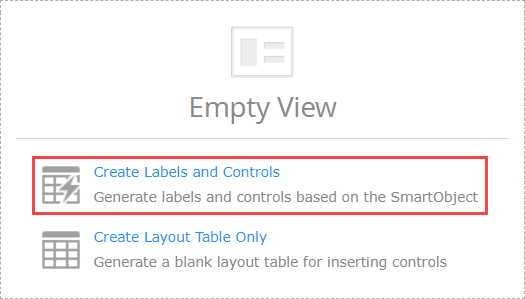
- On the Create Labels and Controls screen, include all fields except ID. Change the Label Position to Left and check the Colon suffix box. Include the standard Create button. Click OK. Click Finish to save and exit the view.
- Right-click the Sales Contracts SmartObject and select Design View. Name the view
-
Design a new item view (independent from the SmartObject) and name it Sales Contracts Task. (This view contains the controls for actioning the task. You hide the view initially, then show the view for the Review Contract task.) Add a layout table with two columns and two rows. Add the controls shown in the table below. Finish the view.
Control Name/Text Notes Label Name: Actions Label
Text: Select Action:Put this control in the first row, first cell. Drop-Down List Name: Actions Drop-Down List Put this control in the first row, second cell. This control gets its values (Approved, Rejected) from the workflow actions. A rule passes the actions to the control so the task recipient can select an action to complete the task. Button Name: Submit Button
Text: SubmitPut this control in the second row, first cell. The task recipient clicks this button to submit their decision. - Right-click your category and select New View.
- Name the view
Sales Contracts Task
and confirm Item View is active. Click Create.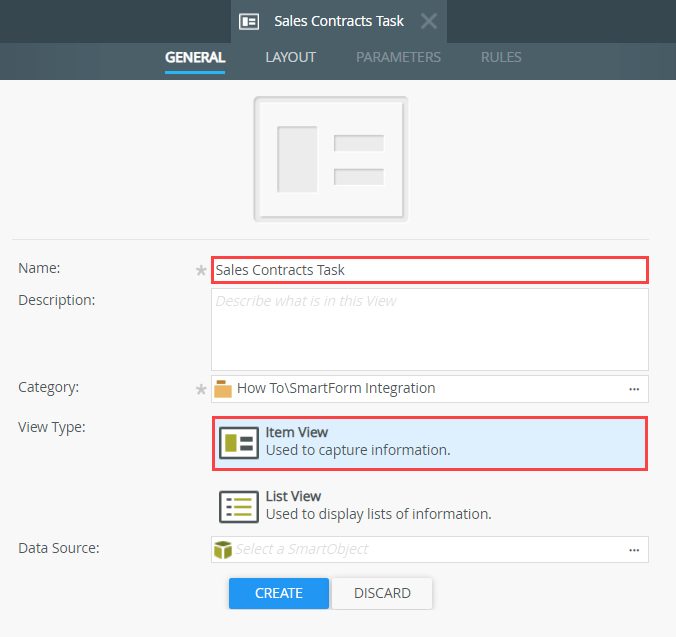
- Click Create Layout Table Only.
- Configure the table with two columns and two rows. Click OK.

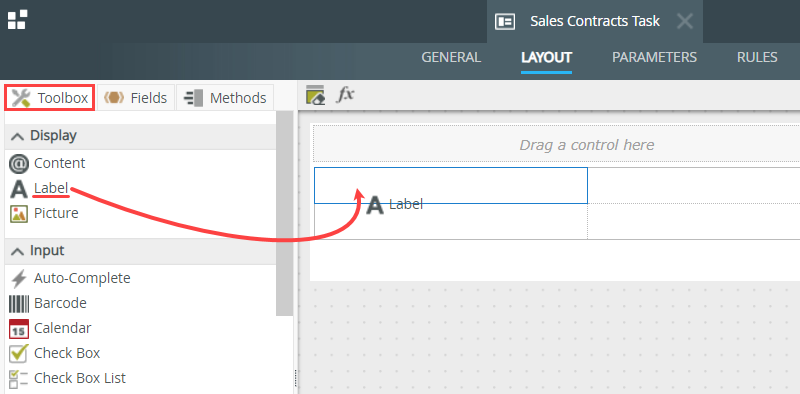
- Drag a Label control into the first row, first cell.
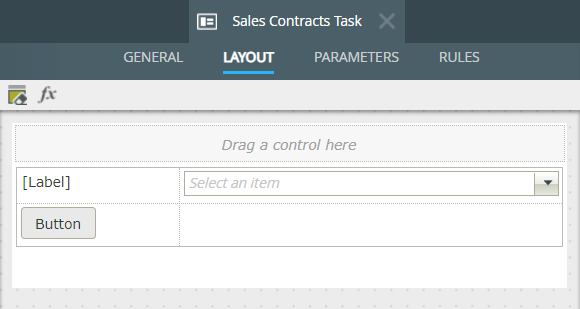
- Drag a Drop-Down List control into the first row, second cell. Drag a Button control into the second row, first cell. Your screen show look like the image below.
- Select the Label control. In the Properties pane on the right side of your screen, change the Name to
Action Label
then enter
Select Action:
for the Text value.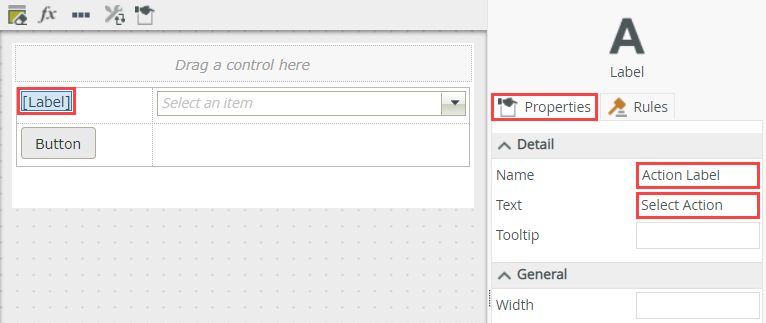
- Select the Drop-Down List control and enter
Action Drop-Down List
for the Name.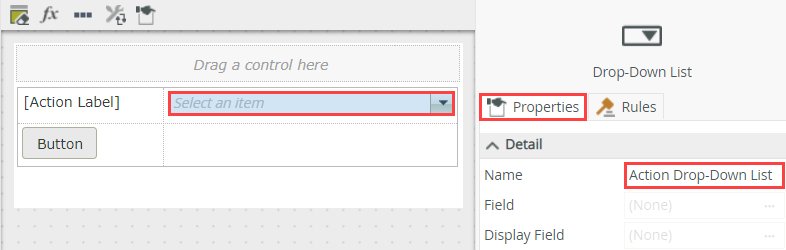
- Select the Button control and enter
Submit Button
for the Name, then enter
Submit
for the Text.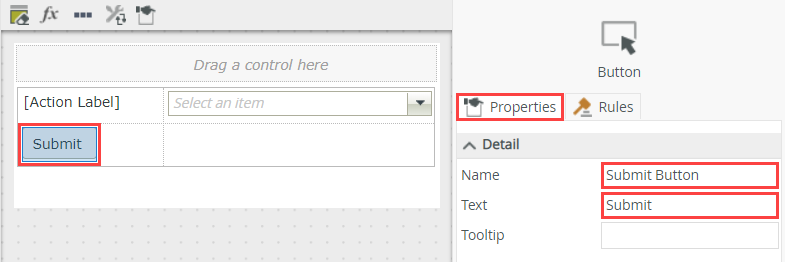
- Click Finish to save and exit the view.
-
Create a form called Sales Contracts Form. Add the Sales Contracts Task and Sales Contracts Details views (with the Task view above the Details view). Add a parameter called SerialNo. Be sure to enter the parameter name exactly as shown because this is how the workflow sends the task serial number parameter to the form. Finish the form.
- Right-click your category and select new New Form. Name the form
Sales Contracts Form
then click Create.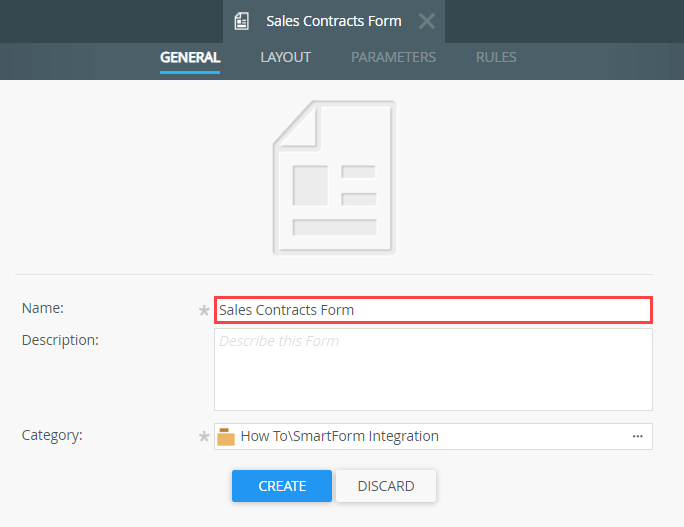
- With the Views tab active (above the left column) drag the Sales Contracts Task view onto the design canvas.
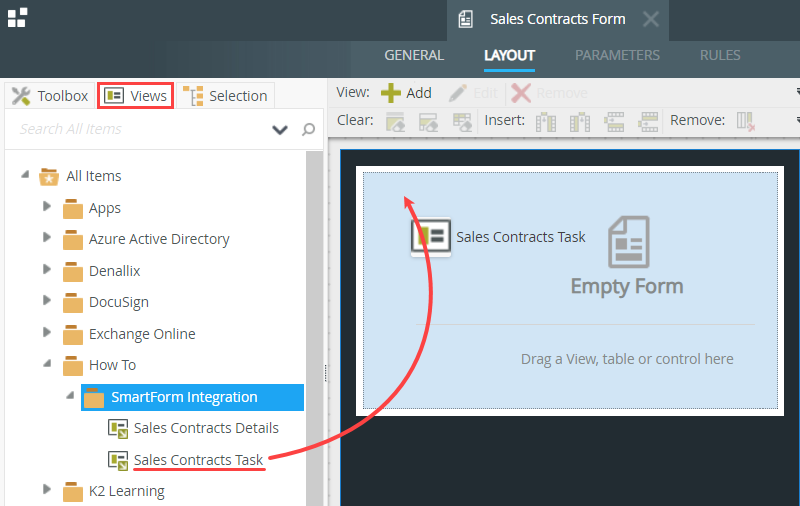
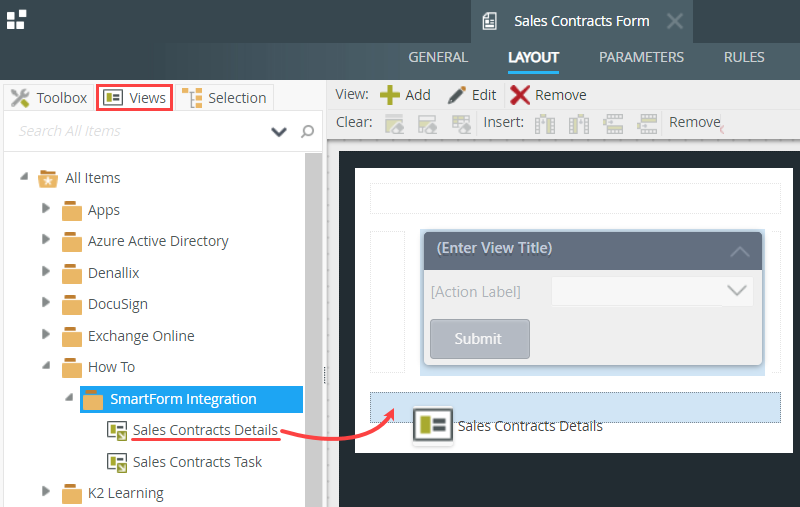
- Drag the Sales Contracts Details view just below the task view. You see a placeholder appear as you drag the view onto the canvas. Drop the view into the placeholder.
- Add titles to your views by clicking the (Enter View Title) link for each view. Change the task view title to
Sales Contracts Task
and the details view title to
Sales Contracts Details.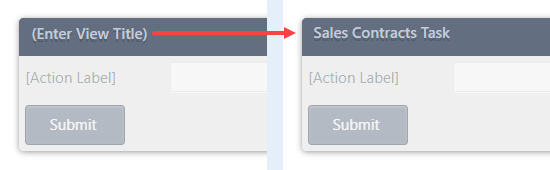
- Click the Parameters tab. Click Add Parameter. Name the parameter
SerialNo
and confirm the Data Type is Text. Make sure to enter the name exactly as shown, since it must match a system parameter for the serial number data transfer to take place. Click Finish to save and exit the form.
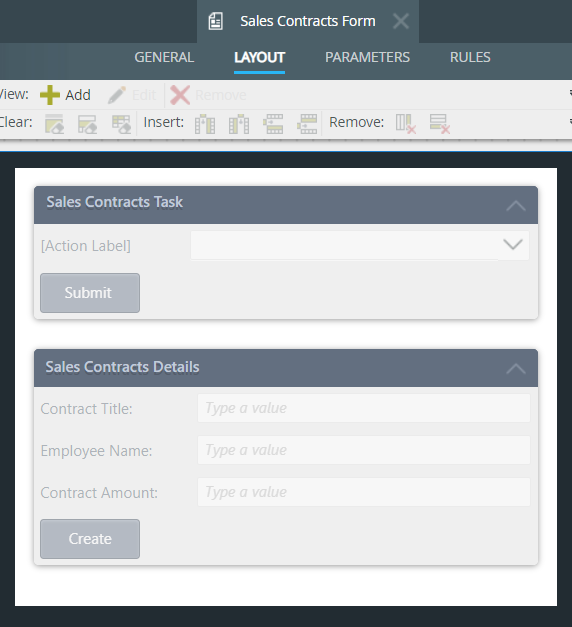
Now you add both the Sales Contracts Details and Sales Contracts Task views to the form. You hide the task view initially because the person submitting the form for the first time doesn't need the task action controls. You show the task view for the Review Contract task recipient. This person uses the task action controls to select and submit their decision (Approved or Rejected).
Your form design canvas should look like the image below.
Next, you add a parameter to the form. (A parameter is a variable which you can use to pass data from one source to another at runtime.) When integrating a workflow task (worklist item) with a SmartForm, the serial number of the current workflow step passes to the form parameter. The serial number becomes the link for integrating the current workflow step with the form rules.
When using workflow wizards for configuring Task steps, K2 automatically creates the SerialNo parameter on the linked form. When manually configuring the integration, the parameter is not automatically created on the form, so you must add it yourself. The parameter name must match the system parameter SerialNo exactly for the data transfer to take place. - Right-click your category and select new New Form. Name the form
-
Create a workflow called Sales Contracts Approval. Edit the Start step with the following settings to link the Sales Contracts Form to the workflow: (In a later step, you edit form rules and add an action that starts the workflow.)
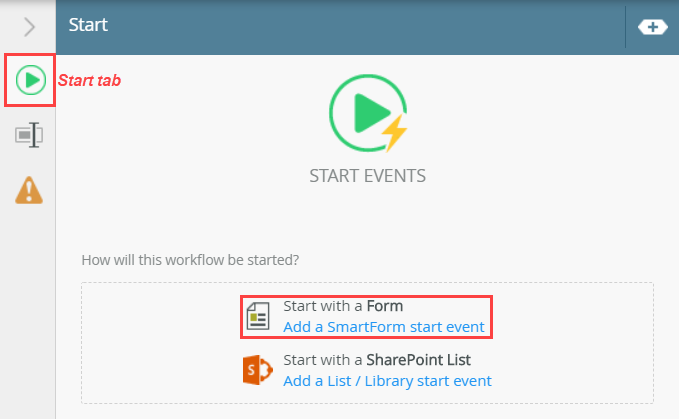
Step Settings Start Step - Add a SmartForm start event
- Form Type: SmartForm
- Form: Sales Contracts Form
- Start Workflow from a Form (wizard)
- References: no changes
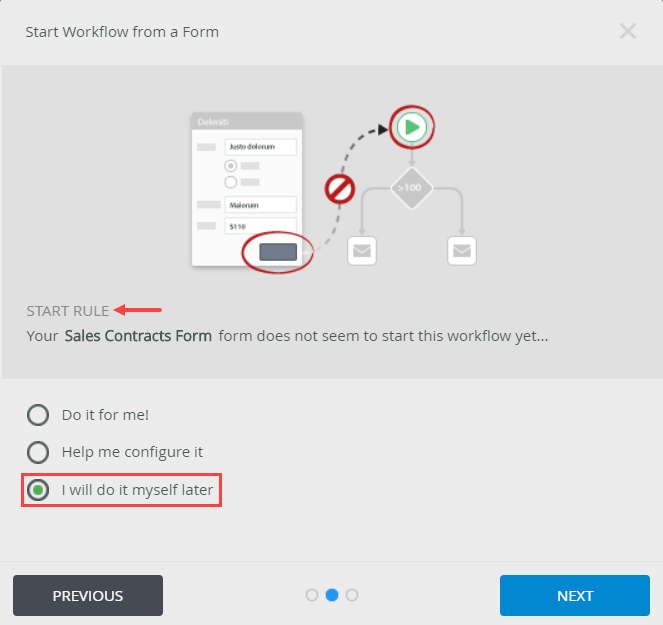
- Start Rule: I will do it myself later
- Start Workflow from a Form (wizard)
- Add a SmartForm start event
- Right-click your category and select New Workflow. Name the workflow
Sales Contracts Approval
and click Create.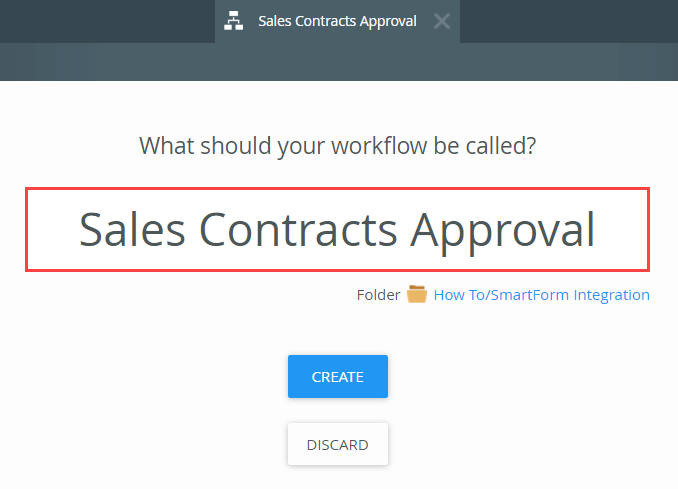
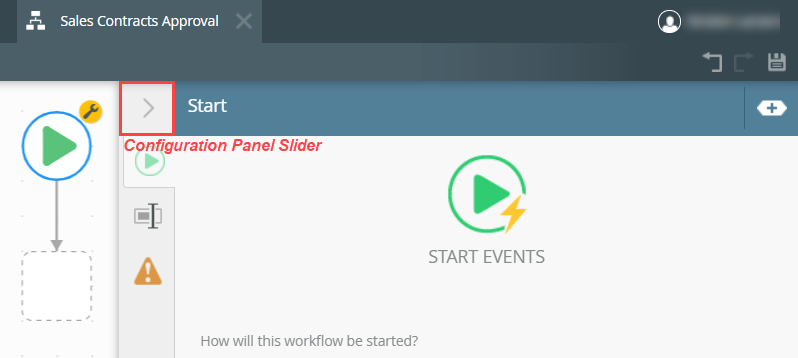
- Click the Start step and expand the Configuration Panel (on the right side of your screen).
- With the Start tab active, click the Add a SmartForm start event link.
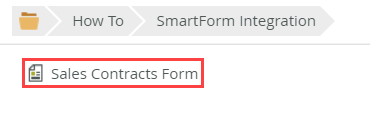
- Navigate to and select the Sales Contracts Form. Click OK. (Your navigation bar may be different from the image below, depending on your naming conventions.)
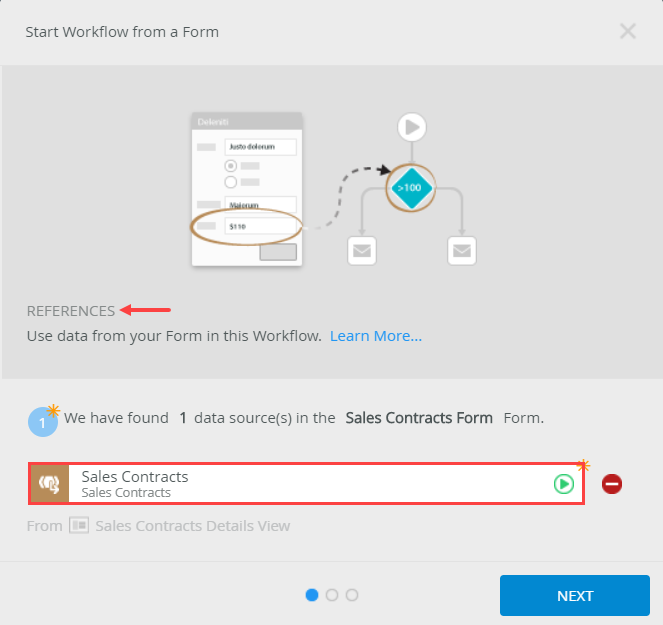
- On the References screen, you see the Sales Contracts SmartObject data source. Click Next.
K2 creates a reference (or a pointer) to data records linked to the form you use for the start event. In this case, the Sales Contracts Form contains a view (Sales Contracts Details) that you based on the Sales Contracts SmartObject. You can use reference properties and methods in your workflow steps to retrieve information about the specific record associated with the workflow instance. For example, you might map a property (such as Contract Title) to the Folio, so that the Folio of each workflow instance is unique, based on the contract title. You can also create additional references in the Context Browser.
- On the Start Rule screen, select I will do it myself later because you want to configure rules for workflow-form integration yourself. Click Next.
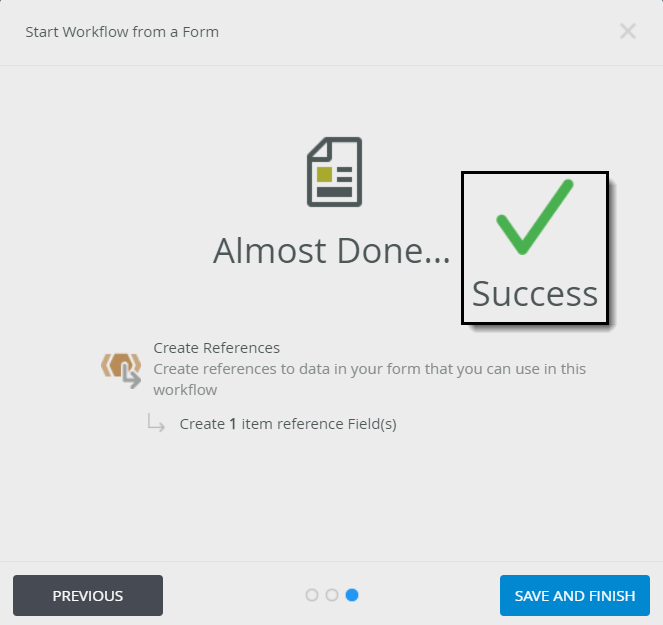
- On the summary screen, you see the reference created. Click Save and Finish. When you see the success check, click OK to exit the wizard. Collapse the Configuration Panel.
- Add a Task step, then add a Decision step. You will link the Sales Contracts Form with the task, then configure form rules later to open and action the task. Edit the task step as follows:
Step Settings Task Step - (Task tab)
- Actions: Approved, Rejected
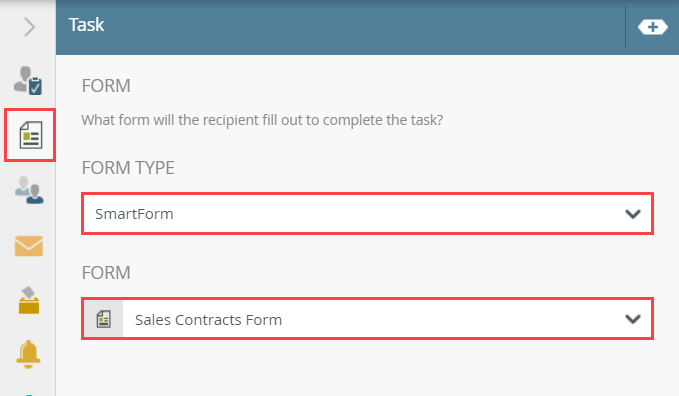
- (Form tab)
- Form Type: SmartForm
- Form: Sales Contracts Form
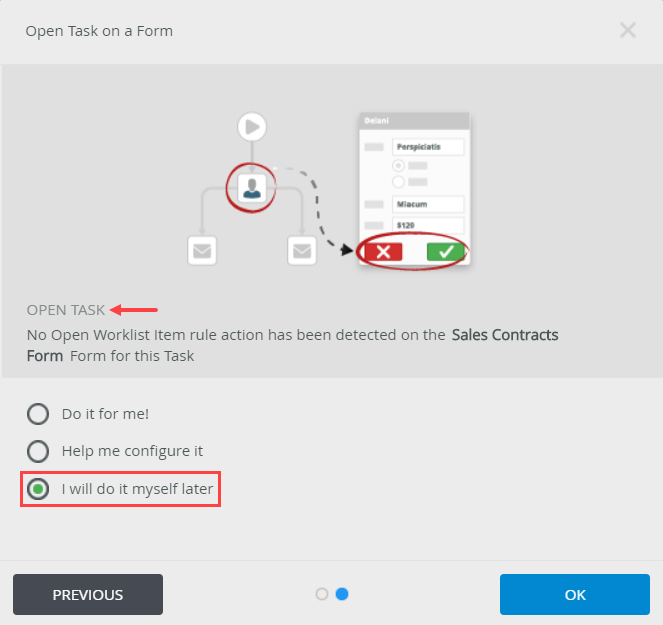
- Open Task on a Form (wizard)
- References: no changes
- Open Task: I will do it myself later
- Open Task on a Form (wizard)
- (Recipient tab)
- To: Keep the default, Originator
- (Properties tab)
- Name: Review Contract
Decision Step - No changes
- Next, you add a Task step. Once again, you will stop the wizard from automatically configuring rule actions on the form that processes the worklist item. Expand the Toolbox (on the left side of your screen). Expand the Basic node, then drag a Task step into the empty placeholder. Collapse the Toolbox.

- Select the Task step and expand the Configuration Panel. With the Task tab active, locate the Actions section. Click the Add(+) icon, then enter
Approved
for the first action. Repeat this step and enter
Rejected
for the second action. Actions are the decision options you provide the task recipient. The recipient must select an action, then submit their decision.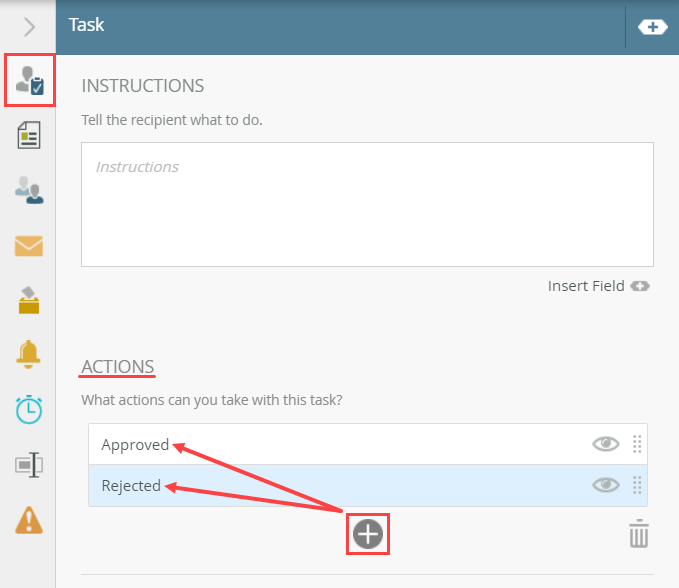
- Click the Form tab. For the Form Type, select SmartForm. For the Form, select Sales Contracts Form.
- On the References screen, you see the Sales Contracts SmartObject reference. There are no changes to the screen, so click Next.
- On the Open Task screen, select I will do it myself later. Click OK to return to the Configuration Panel.
- Click the Recipients tab. The default recipient is Originator - the person who submits the form for the first time.

- Click the Properties tab. Name the step
Review Contract
and collapse the Configuration Panel.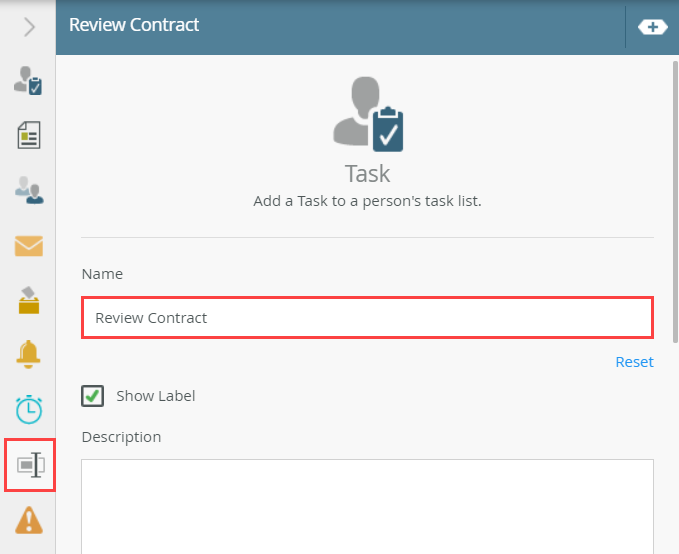
- From the Toolbox > Logic node, drag a Decision step below the Review Contract step. Connect the two steps.
The Open Task on a Form wizard opens.
In the Parameters section, there are two entries: Serial Number and State. Below the Serial Number title is the system name: SerialNo. Recall that you manually created a parameter on the form called SerialNo. The form parameter name must match the workflow parameter system name so that K2 knows where to transfer the workflow instance serial number. The SerialNo parameter links the workflow instance to the form.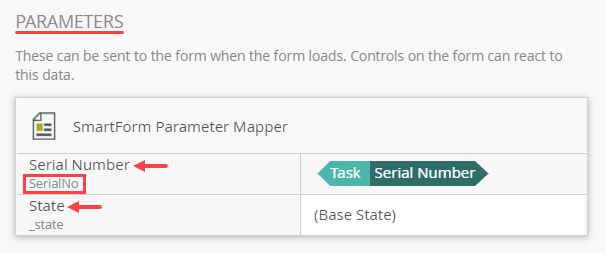
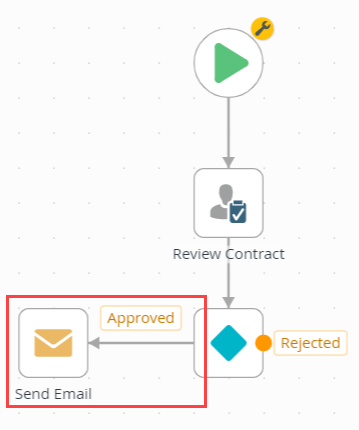
Next, you add a Decision step that generates the outcome lines for each action (Approved, Rejected).
- (Task tab)
- Add two Send Email steps, one for each outcome. Add an End step. Configure the steps as follows:
Step Settings Send Email Step - (Send Email tab)
- To: Originator
- Subject: Enter your own content
- Body: Enter your own content
- (Properties tab)
- Name: Send Email Approved
Send Email Step - (Send Email tab)
- To: Originator
- Subject: Enter your own content
- Body: Enter your own content
- To: Originator
- (Properties tab)
- Name: Send Email Rejected
End Step - From the Toolbox > Basic node, add a Send Email step and connect it to the Approved outcome line. Select the step and expand the Configuration Panel.
- With the Send Email tab active, keep the default To value (Originator). For the Subject line, enter
Contract Approved
and for the message Body, enter
Your contract is approved.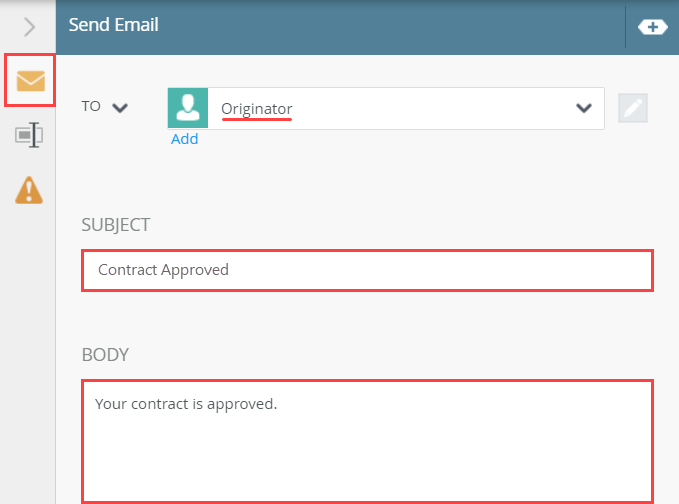
- Click the Properties tab. Change the step name to
Send Email Approved
and collapse the Configuration Panel.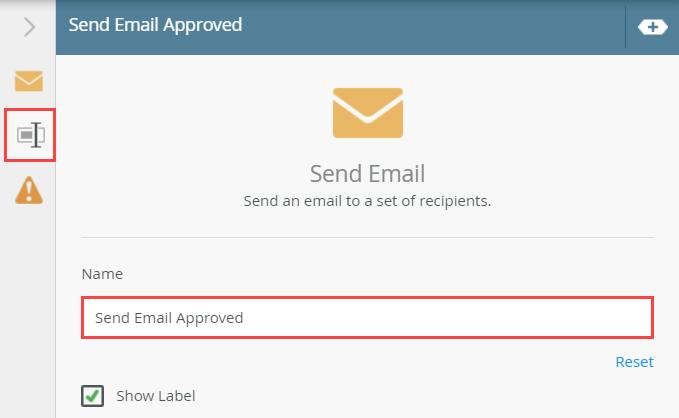
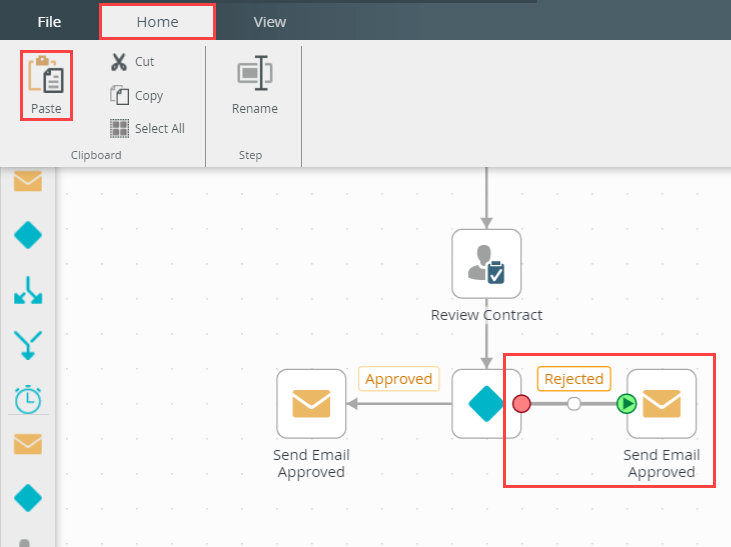
- Select the Send Email Approved step. Click the Home tab, then Copy.
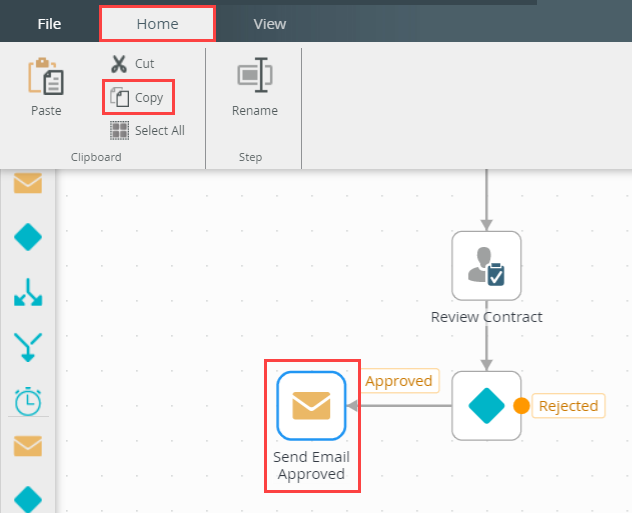
- Click Paste. Drag the step so it aligns with the Rejected outcome. Connect the outcome line to the step. Select the copied step and expand the Configuration Panel.
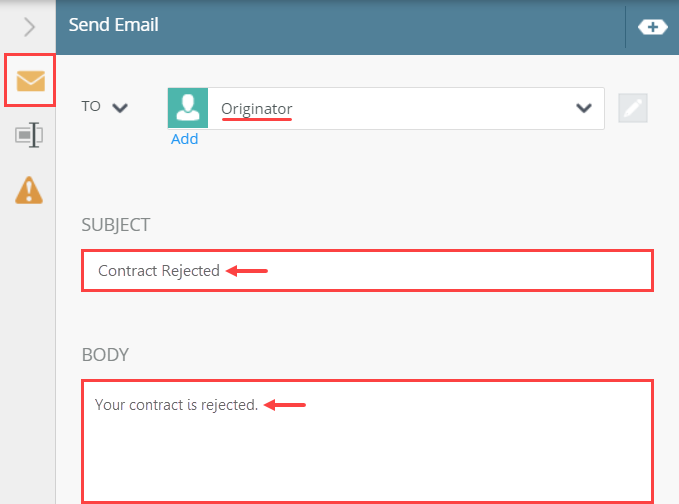
- With the Send Email tab active, change the Subject line and message Body to reflect the rejected decision.
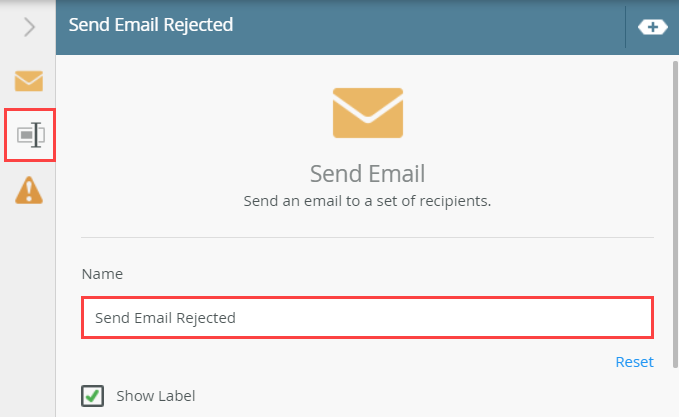
- Click the Properties tab. Change the step name so that it reflects rejected. Collapse the Configuration Panel.
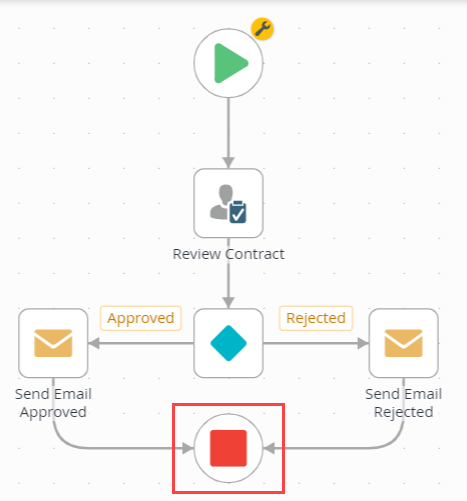
- Finish the workflow build by adding an End step. From the Toolbox > Logic node, drag an End step below the Decision step. Connect the Send Email Approved and Send Email Rejected steps to the End step.
Next, you add a Send Email step for the Rejected outcome line. You can copy and paste the approved email to save some time.
- Deploy the workflow. Return to K2 Designer.
The final step in building a workflow is to deploy it. Deploying a workflow "publishes" it to the K2 server and makes it available to other artifacts, such as SmartForms. If you make any changes to the workflow, you must deploy it again so that K2 has the latest version.
- Click File > Deploy. When you see the deploy success message, click File > Close to return to K2 Designer.
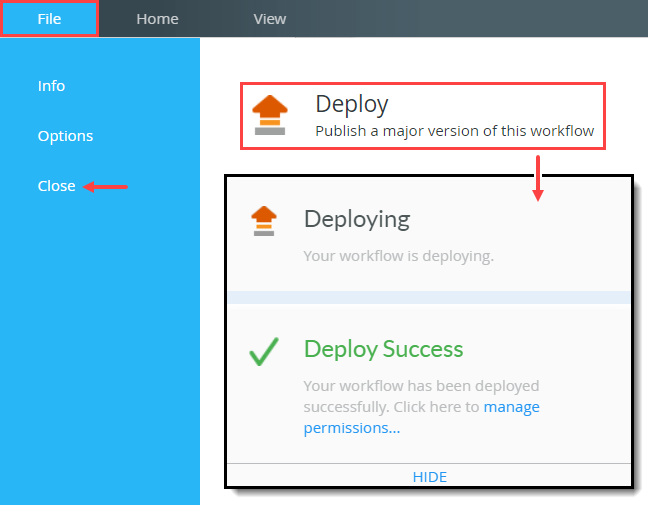
- Click File > Deploy. When you see the deploy success message, click File > Close to return to K2 Designer.
Now you add an item view (not linked to the SmartObject). This view contains controls that the task recipient uses to choose and submit their decision when the form is opened in the context of a workflow task.
Next, you add controls from the Toolbox. The Toolbox is on the left side of your screen. If you do not see it, make sure the Toolbox tab is active at the top of the column.
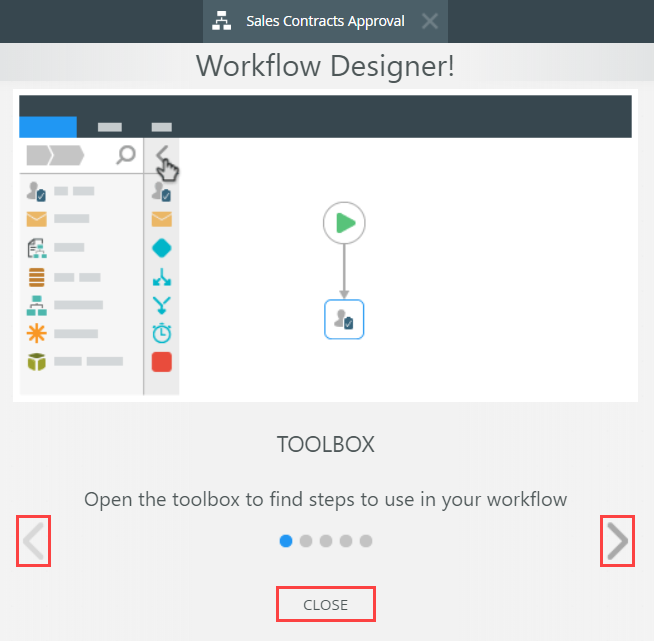
You see a Welcome screen with an interactive panel. You can click the right and left arrows to learn more about the workflow designer. Click Close to proceed to the design canvas.
First, configure the Start step to link the Sales Contracts Form with the workflow. Later, you edit the form rules and add an action that starts the workflow.
The Start Workflow from a Form wizard opens.
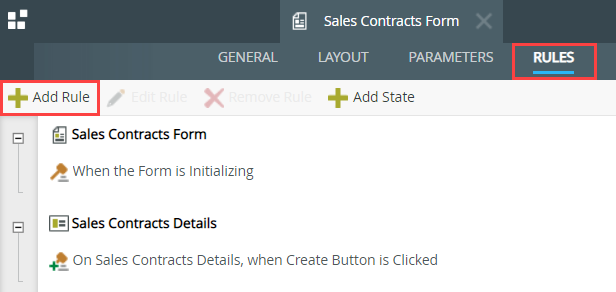
Configure rules to start a workflow, then open and action a worklist item
In the following steps, you edit rules on the form to add a new actions that integrate the Sales Contracts Form with the Sales Contracts Approval workflow.
You will:
- Configure the rules that start the workflow when the form is submitted for the first time
- Configure rules that open the task item when the form is opened for the user task in the workflow
- Configure rules that complete/finish the task item when the form is submitted for the user task in the workflow
- Set up form rules to start the workflow. Edit the When the Create Button is Clicked rule. Add an action to start the Sales Contracts Approval workflow. Map the Sales Contracts (SmartObject) > Contract Title to the Folio text box. Map the Sales Contracts Details (view) > Sales Contracts (SmartObject) to the Item References > Sales Contracts text box. Add an action to show a message indicating the form submitted successfully. Add an action to close the browser window.
In this step, you edit the rule that runs when the originator clicks the Create button to submit their request. K2 has already added a rule action that creates a new record in the Sales Contracts SmartObject. Because you are configuring the workflow rules manually, you must add an action that starts the workflow after the record is created. You will show a message that the form submitted successfully, then close the browser. (The last two actions are not required for the workflow-form integration, but do provide a user-friendly way to complete the form submission.)
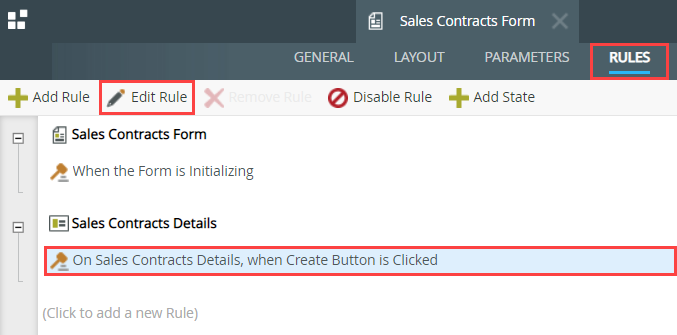
- Open the Sales Contracts Form that you created in step 4. Edit the On Sales Contracts Details, when Create Button is Clicked rule.
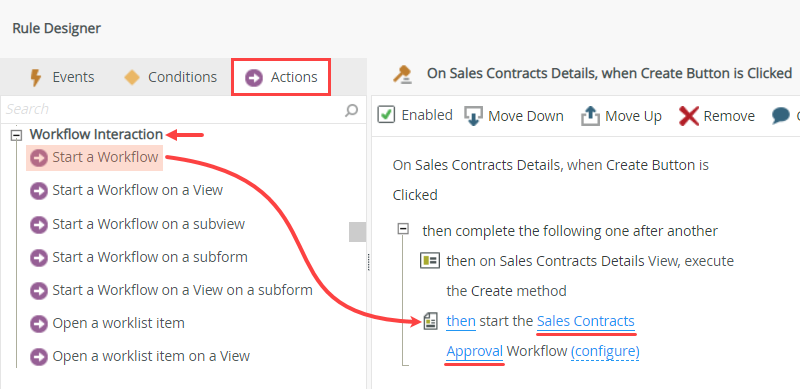
- With the Actions tab active, click Start a Workflow (under the Workflow Interaction heading) to add it to the rule definition pane. Click select Workflow. Navigate to and select Sales Contracts Approval. Click (configure).
- On the Input Mappings screen, map the Sales Contracts Form > Sales Contracts Details (view) > Sales Contracts (SmartObject) > Contract Title property to the Folio text box. The folio appears in reports and is often used to identify one workflow instance from another. In this case, the folio displays the contract title entered by the originator.
Map the Sales Contracts (SmartObject) to the Item References > Sales Contracts text box. You are storing the data from the current SmartObject record back to the workflow, so that you can use the record's data in the workflow.
Click Next.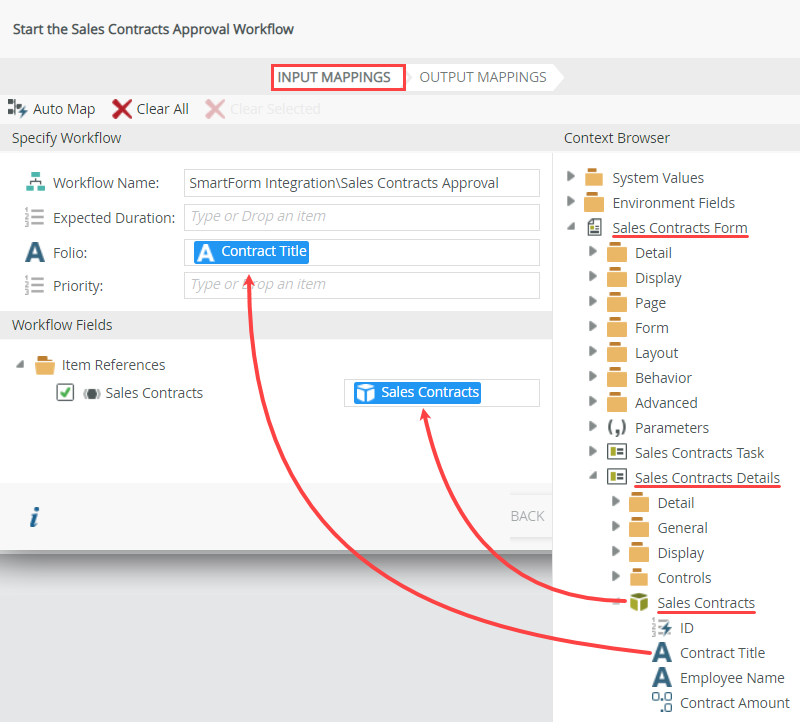
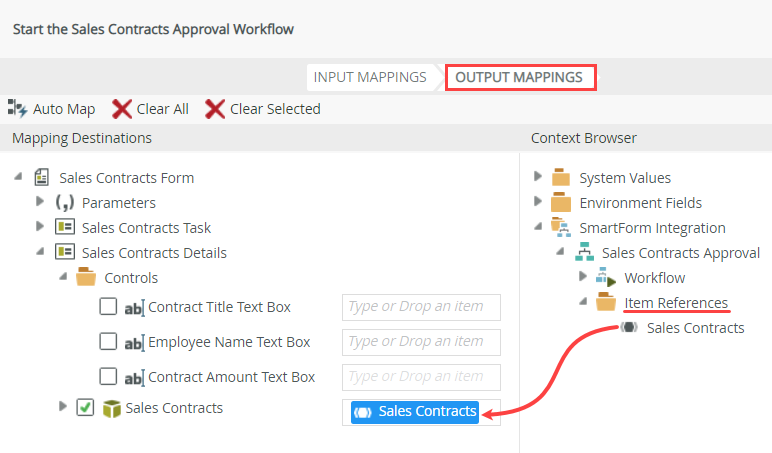
- On the Output Mappings screen, Map the Item References > Sales Contracts reference to the Sales Contracts Details (view) > Sales Contracts (SmartObject). Here, you taking the workflow reference and mapping it back to the SmartObject. Click Finish to save the workflow settings.
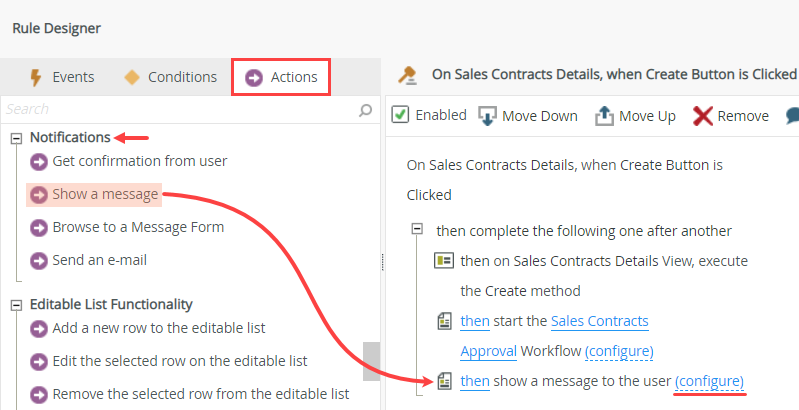
- With the Actions tab active, click Show a message (under the Notifications heading) to add it to the rule definition pane. Click (configure).
- For the Title, enter
Success!
and for the Heading, enter
Form Submitted.
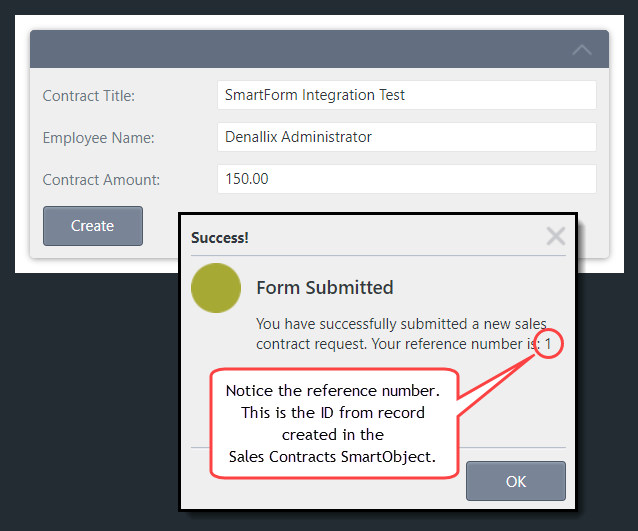
For the message Body, enter
You have successfully submitted a new sales contract request. Your reference number is:
From the Context Browser, drag the Sales Contracts Details (view) > Sales Contracts (SmartObject) > ID and append it to the end of your message. At runtime, K2 replaces the ID variable with the actual SmartObject ID for the record just created. Click OK to save the settings.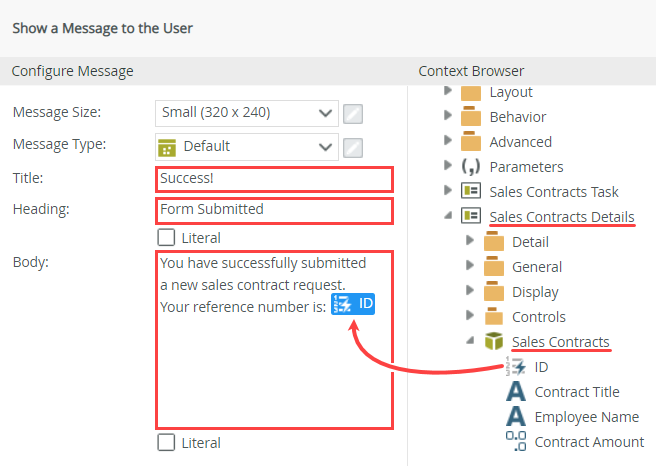
- With the Actions tab active, click Close the browser window (under the Browser Interaction heading) to add it to the rule definition pane. Your rule should look like the image below. Click OK to save and exit.
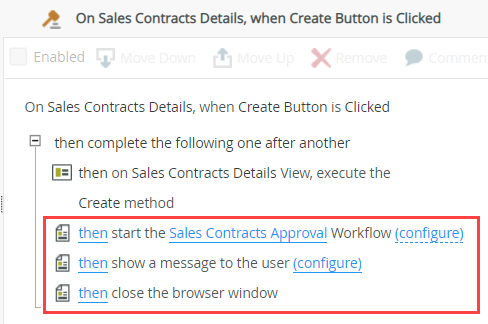
The following two steps are not required to start the workflow, but they do provide a nicer user experience when the form is submitted, by showing a confirmation message and then closing the form.
- Open the Sales Contracts Form that you created in step 4. Edit the On Sales Contracts Details, when Create Button is Clicked rule.
- Set up form rules to open the worklist item. Edit the When the Form is Initializing rule on the Sales Contracts Form. Use the table below as a guide for adding a condition and actions that open the worklist item. Be sure to work through the table rows in order, top to bottom.
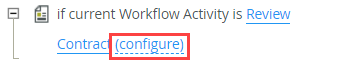
Condition/Action Settings Configuration Condition: a Workflow Activity is specified Select the Sales Contracts Approval (workflow) > Review Contract activity You are checking to see if the form is opening for the Review Contract task. You use the serial number as the common value between the worklist item and the current workflow instance.
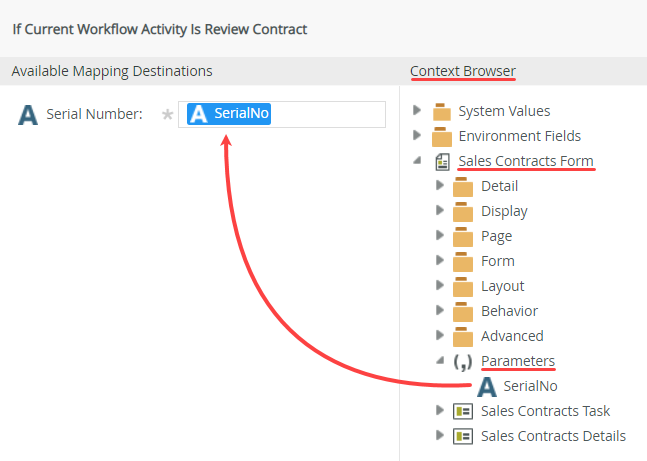
Mapping Destinations
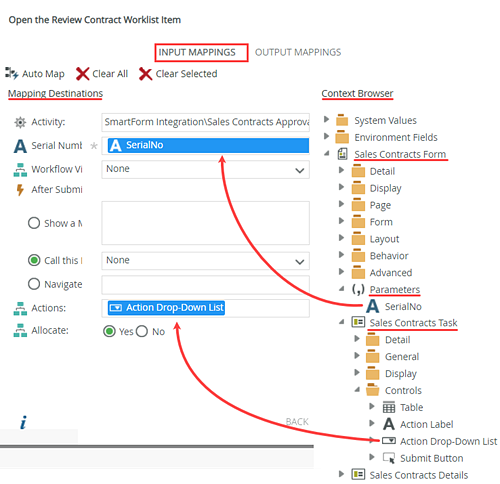
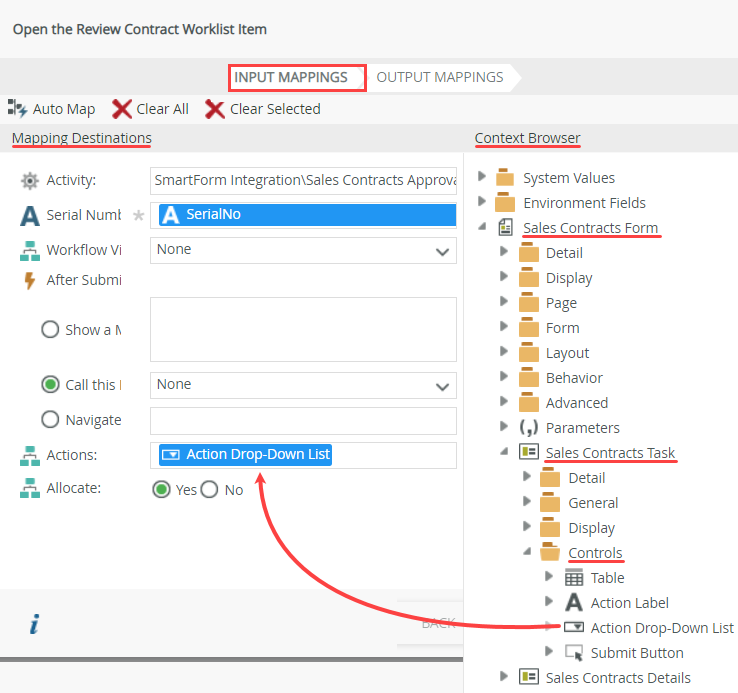
Map the form Parameters > SerialNo to the Serial Number text box.Action: Open a worklist item Select Review Control as the worklist item and set up input mappings Now that you know you have the correct workflow instance, you can open it on the K2 server so that you can action it.
Input Mappings- Serial Number: Map the Parameters > SerialNo to the Serial Number text box.
- Actions: Map the Sales Contracts Task (view) > Controls > Action Drop-Down List to the Actions text box. This link allows the control to get its values from the actions you add on the workflow task step.
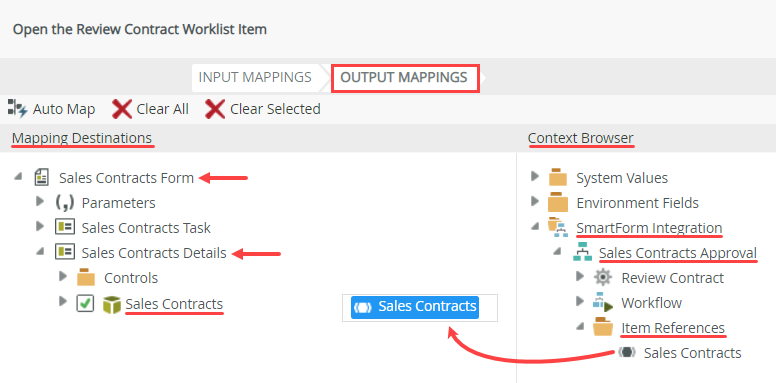
Use Output Mappings to load data from the Sales Contracts Item Reference Output Mappings - Do not skip this step!
Map the Item References > Sales Contracts to the Mapping Destinations > Sales Contracts Details (view) > Controls > Sales Contracts (SmartObject).This mapping loads the record that the workflow is associated with, into the SmartObject associated with the view.
This allows the form to load the data for the specific record associated with the workflow instance.
Add the following action above the a Workflow Activity is specified condition. (Optional)
Action: Hide a ViewHide the Sales Contracts Task view The form originator (or the person who submits the request in the first place) does not need the task action controls. This action is not required to open the worklist item, but instead, it improves the user experience by hiding a view not used in the initial form submittal. Add the following actions below the Open a worklist item action. Action: Execute a View method Execute the Load method for the Sales Contracts Details view Load the record (associated with the workflow instance) data into the details view for the task recipient to review. Map the Sales Contracts Details > Sales Contracts (SmartObject) > ID to the Input Properties > ID text box. Action: Show a View
Show the Sales Contracts Task view The task recipient uses the action controls to select and submit their decision. If you hid the view in the previous step, you must show it now for the user task usage of the form. (Optional)
Action: Hide a View controlOn the Sales Contracts Details view, hide the Create Button. The task recipient does not create new records, so this button may be confusing if it were visible. The task recipient uses the submit button on the task view to send their decision. The form initializing rule executes each time you open the form. Since you can use the same form for different stages of the workflow (starting the workflow or a user task in the workflow), you can use conditions and actions to control the form's look and behavior for the different ways that the form is used. The following is a break-down of the configuration for this rule:
- you add a condition that checks to see if the form is opening for the Review Contract task and if so,
- open the worklist item (for the Review Contract task) and populate the Actions Drop-Down List control (on the Sales Contracts Task view) with the actions you added in the workflow (Approved, Rejected)
- use the Item Reference to pass information about the record associated with the workflow instance back to the view, so that the view can load the information about the specific sales contract being reviewed.
- Additional actions for completing the sales contracts how-to scenario:
- hide the Sales Contracts Task view initially since the contract requester does not need the task action controls (this action takes place when the form opens for the contract requester)
- show the Sales Contracts Task, view as the recipient uses the controls to select and submit their decision (this action takes place when the form opens for the review task)
- hide the Create button, since the task recipient does not need to create new contract request records (this action takes place when the form opens for the review task)
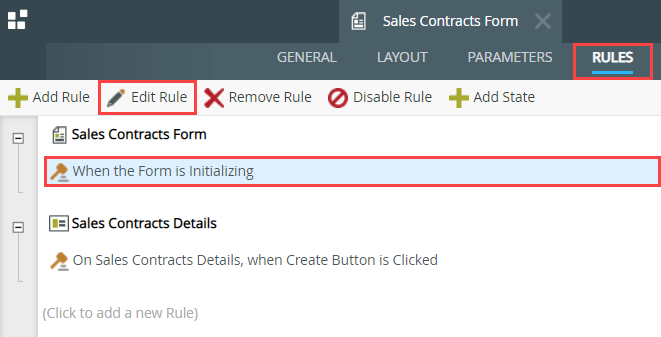
- Edit the Sales Contracts Form. Click the Rules tab and edit the When the Form is Initializing rule.
- Next, you add a condition that checks to see if the form is opening for the Review Contract task.
With the Conditions tab active, click a Workflow Activity is specified (under the Workflow Conditions heading) to add it to the rule definition pane. Click select worklist item. Navigate to and select the Review Contract task. (Your category names may not match the image below depending on where you saved the workflow.)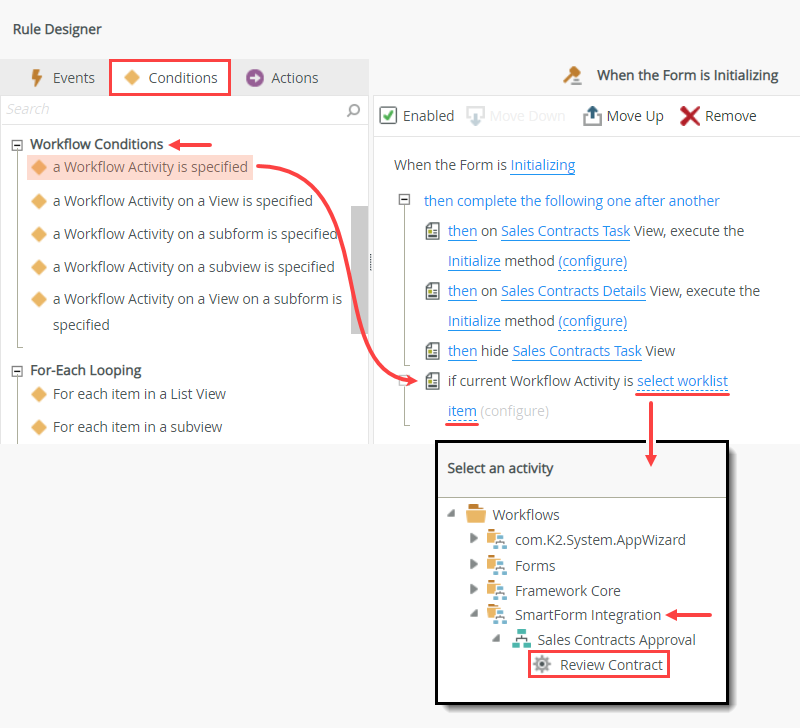
- Next, configure the condition with the serial number of the current workflow instance so that the condition applies to the correct task. Click (configure).
- Expand the Context Browser > Sales Contracts Form > Parameters node. Drag the SerialNo into the Serial Number text box. Click OK. The serial number identifies the specific task for which you are setting the condition. If the result is true, the task is Review Contract. If the result is false, the task is not Review Contract.
The Context Browser contains references, variables, functions, and SmartObject properties. At runtime, K2 replaces references and variables with live data. For example, K2 replaces the SerialNo reference with the serial number of the current workflow instance.
- Next, you open the worklist item. Once again, you use the serial number to identify the worklist item (or task) you want to open. In this way, the task recipient takes action on the correct item for the current workflow instance.
With the Actions tab active, click Open a worklist item (under the Workflow Interaction heading) to add it to the rule definition pane. Click select worklist item and select Review Contract. Click (configure).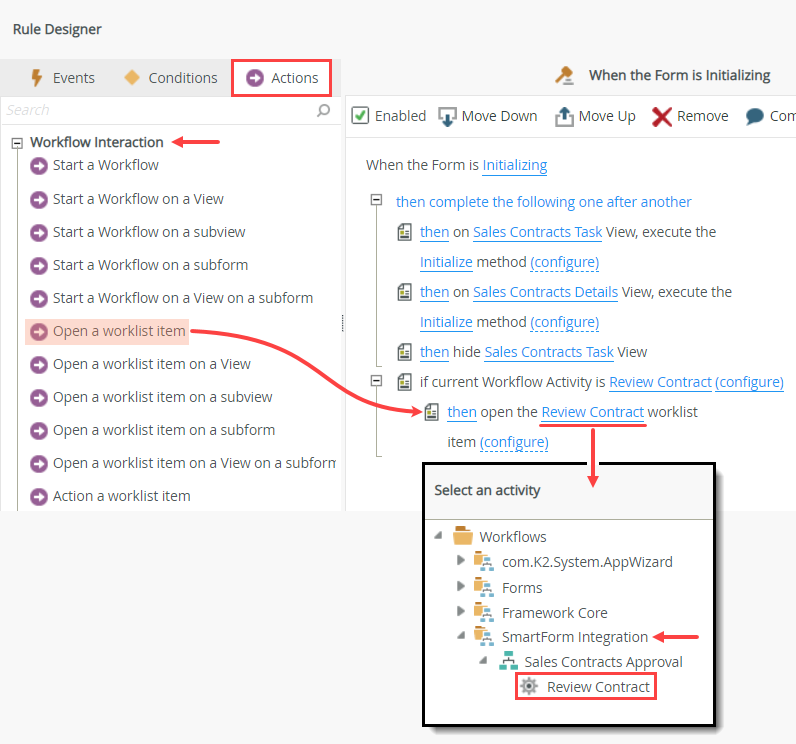
- On the Input Mappings screen, map the Sales Contracts Form > Parameters > SerialNo property to the Mapping Destinations > Serial Number text box.
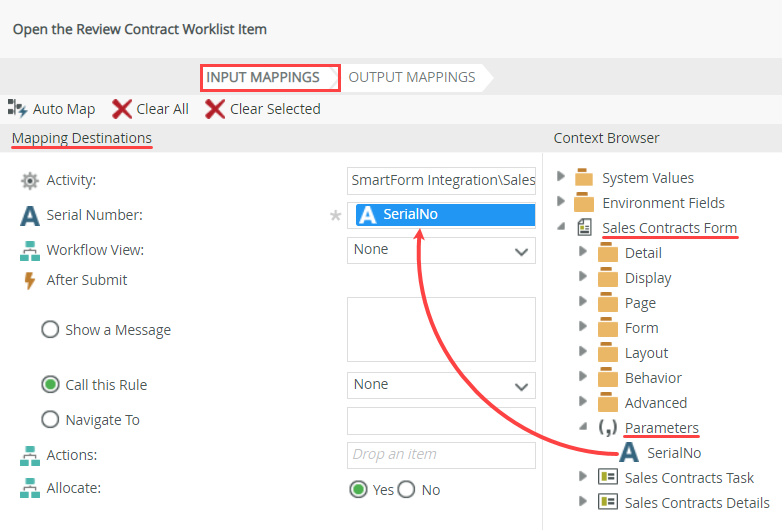
- Map the Context Browser > Sales Contracts Form > Sales Contracts View > Controls > Action Drop-Down List to the Mapping Destinations > Actions text box. Here, you are transferring the actions you configured for the Review Contract task step over to the drop-down list control on the task view. You are creating a dynamic link between the control on the view and the workflow task actions. Click Next.
 You could also configure the Actions Drop-Down List control with static values, e.g. Approve and Reject. But by mapping workflow actions data to the control, you never have to update the control's list of static values. If you update workflow task actions in the workflow, the drop-down list contains whatever available actions are for that step of the workflow.
 - On the Output Mappings screen, map the Context Browser > SmartForm Integration > Sales Contracts Approval > Item References > Sales Contracts reference back to the Mapping Destinations > Sales Contracts Form > Sales Contracts Details > Sales Contracts SmartObject. Click Finish to save the action configuration.
Do not skip this step. You must map the workflow references back to the SmartObject. In a later step, you use the SmartObject load method to populate the Sales Contracts Details view with information from the workflow instance. If you do not map the item references back to the SmartObject, you will see an error due to missing SmartObject property values.
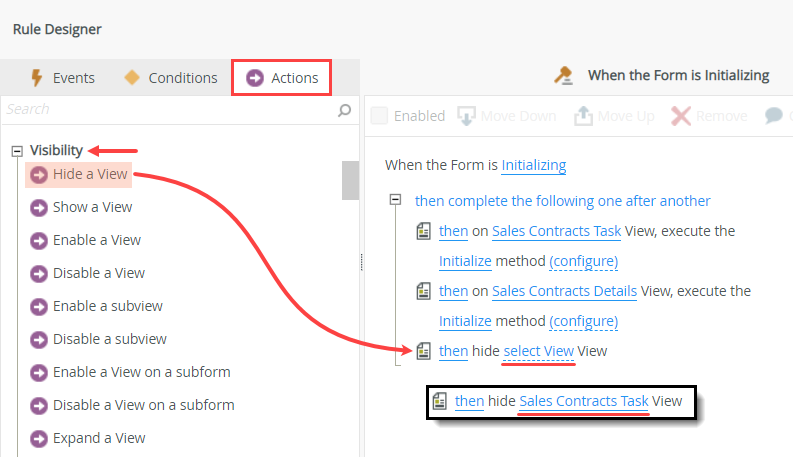
- Hide the Sales Contracts Task view when the form initially opens (to submit the contract request). Add the follow action above the a Worklist Activity is Specified action. With the Actions tab active, click Hide a View (under the Visibility heading) to add it to the rule definition pane. Click select View and select Sales Contracts Task.
- Next, you want to show the task view so the task recipient has the controls they need to make a decision and submit the form, but only when the form is opened in the context of the review task in the workflow.
Add the next action below the then Open a worklist item action. With the Actions tab active, click Show a View (under the Visibility heading) to add it to the rule definition pane. Click select View and select Sales Contracts Task.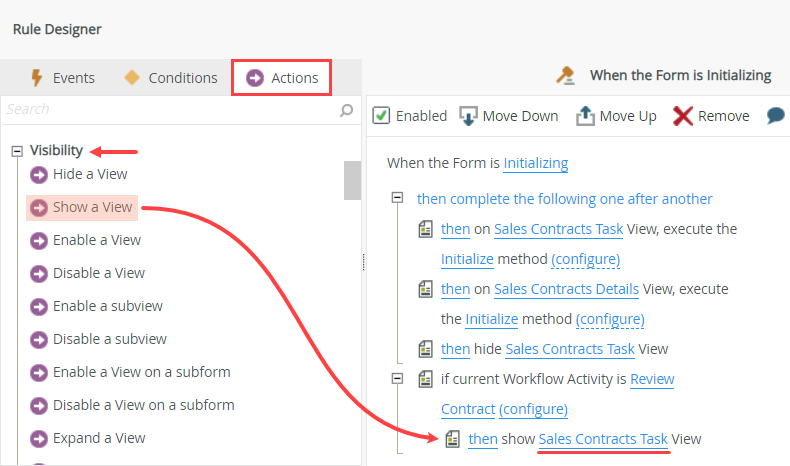
- Next, you hide the Create button on the details view since the task recipient uses the submit button (on the Sales Contracts Task view). The create button may be confusing if it appeared when the form is opened in the context of the review task.
Add the next action below the then show Sales Contracts Task view action: click Hide a View control (under the Visibility heading) to add it to the rule definition pane. Click select View and select Sales Contracts Details. Click select control and select Create Button.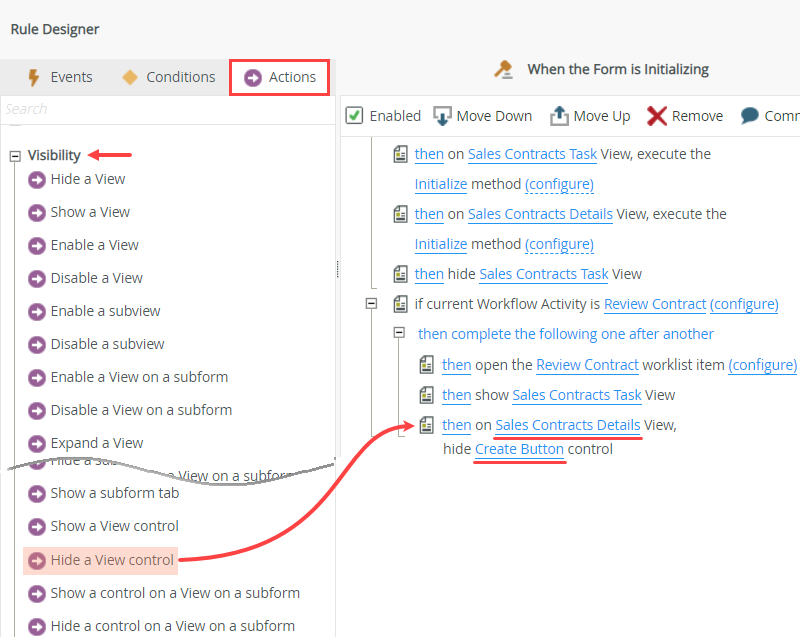
- The last rule action loads the record data into the details view. Remember, you are working with the form that the task recipient uses. The details view is empty until you execute a method to retrieve the record data from the SmartObject.
Add this action below the Hide a view control action: with the Actions tab active, click Execute a View method to add it to the rule definition pane. Click select View and select Sales Contracts Details. Click select method and select Load. Click (configure).
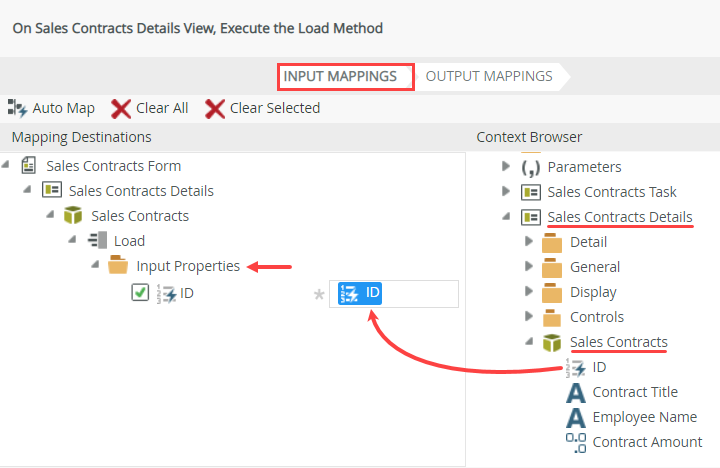
- On the Input Mappings screen, map the Sales Contracts Details (view) > Sales Contracts (SmartObject) > ID to the > Input Properties > ID text box. Click Finish to save the settings.
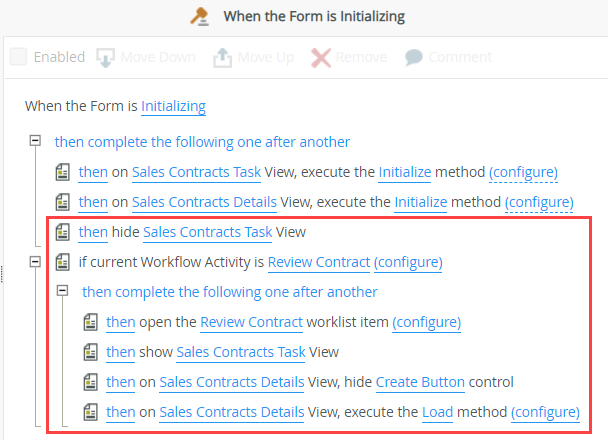
- Your form initializing rule should look like the image below. Click OK to save and exit the rule.
The remaining steps are not required to open a worklist item but instead, they improve the user experience by hiding or showing views and controls and populating a view with the requester's details.
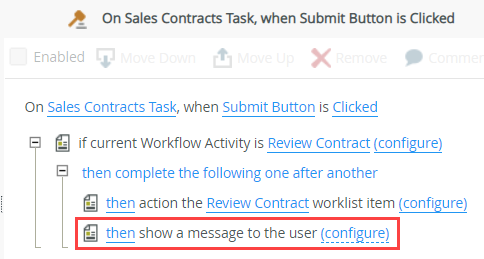
- Set up form rules to action the worklist item. Add a new rule,
When the Submit Button is Clicked. Use the table below as a guide for adding and configuring a condition and actions.
Condition/Action Settings Configuration Condition: a Workflow Activity is specified Select the Sales Contracts Approval (workflow) > Review Contract activity Mapping Destinations
Map the form Parameters > SerialNo to the Serial Number text box.Action: Action a worklist item Select Review Control as the worklist item Work Item Bindings
Serial Number:
Map the Parameters > SerialNo to the Serial Number text box.
Action Name:
Map the Sales Contracts Task (view) > Controls > Action Drop-Down List to the Action Name text box.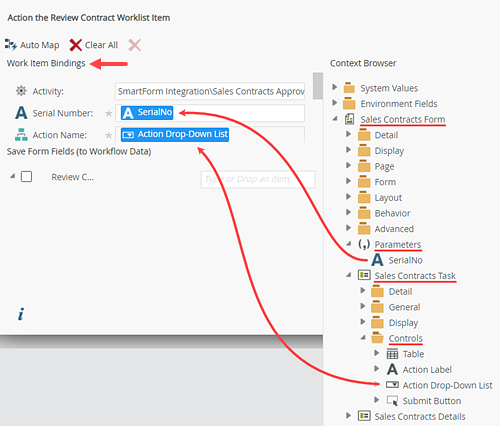
(Optional)
Action: Show a messageThis is an optional action, and it is not required for integrating the form with the workflow. But, it provides a user-friendlier experience to confirm that the action was completed. Enter your own content to indicate that the form submitted successfully. (Optional)
Action: Close the browser windowThis is an optional action, and it is not required for integrating the form with the workflow. But, it provides a user-friendlier experience that closes the form after the confirmation message. The last rule you configure will action/complete the worklist item.
- On the Rules screen, click Add Rule.
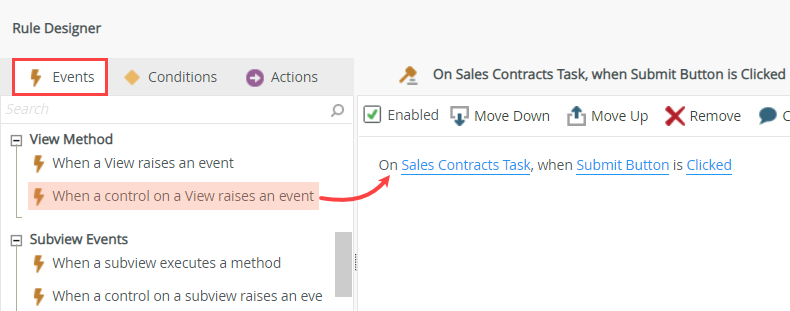
- First, add the event. With the Events tab active, click When a control on a View raises an event (under the View Method heading) to add it to the rule definition pane. Click select View and select Sales Contracts Task. Click select control and select Submit Button. The event method completes automatically (Clicked).
- Next, you add a condition that checks to see if the form is opening for the Review Contract task. This is the same step you configured earlier on the form initializing rule.
With the Conditions tab active, click a Workflow Activity is specified (under the Workflow Conditions heading) to add it to the rule definition pane. Click select worklist item. Navigate to and select the Review Contract task. Click (configure).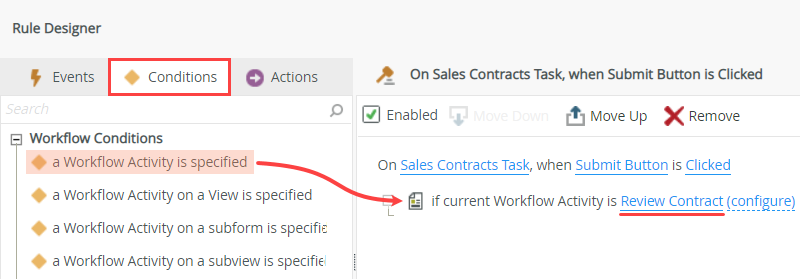
- Expand the Context Browser > Sales Contracts Form > Parameters node. Drag the SerialNo into the Serial Number text box. Click OK.
- Recall that you opened the worklist item (Review Contract) as part of the form initializing rule. Now, you are ready to action the worklist item. The task recipient selects their decision (Approved or Rejected) and submits the form. The workflow proceeds along the outcome line for the action selected.
With the Actions tab active, click Action a worklist item (under the Workflow Integration heading) to add it to the rule definition pane. Select Review Contract as the worklist item. Click (configure).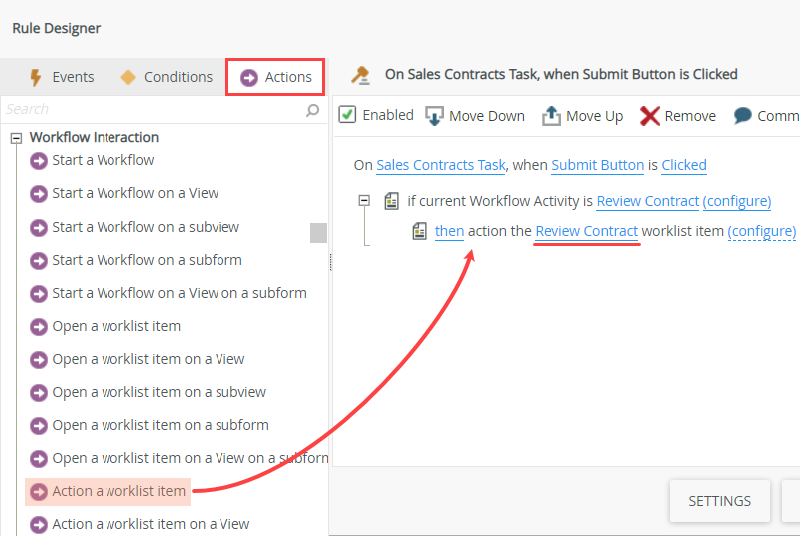
- Map the Parameters > SerialNo to the Serial Number text box. This links the form to the correct workflow instance.
Map the Sales Contracts Task (view) > Controls > Action Drop-Down List to the Action Name text box. Here, you are mapping the user-selected value from the actions drop-down list control as the task decision, so that the workflow will follow the appropriate path.
Finally, click OK.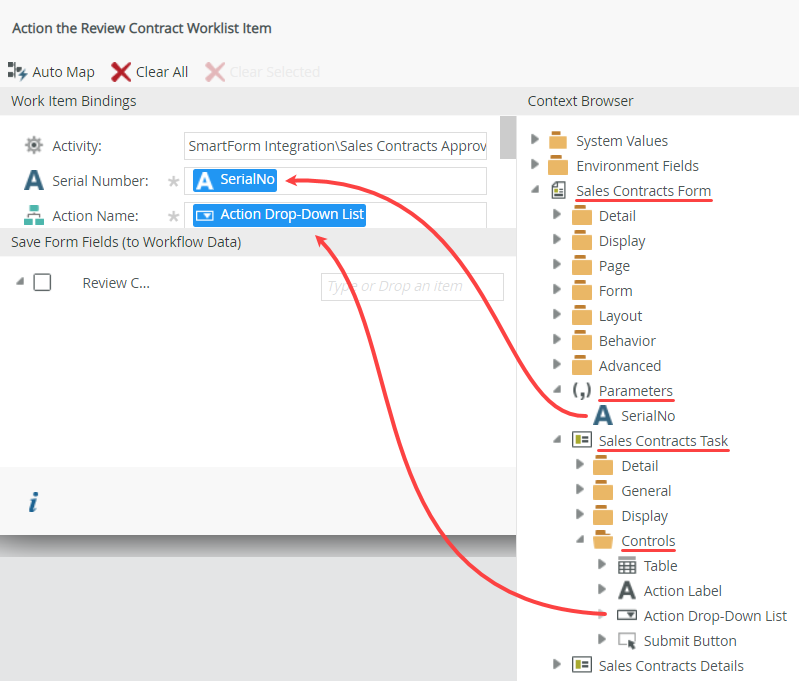
- With the Actions tab active, click Show a message (under the Notifications heading) to add it to the rule definition pane. Click (configure).
- For the Title, enter
Success!
and for the Heading, enter
Form Submitted.
For the message Body, enter
You have successfully actioned the Review Contract task!
Click OK to save the settings.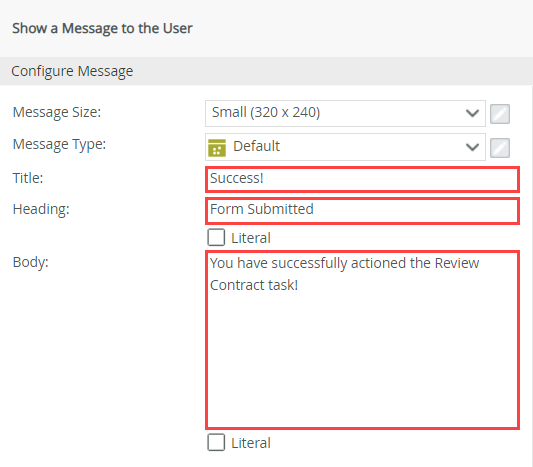
- With the Actions tab active, click Close the browser window (under the Browser Interaction heading) to add it to the rule definition pane. Your rule should look like the image below. Click OK. Click Finish to save and exit the form.
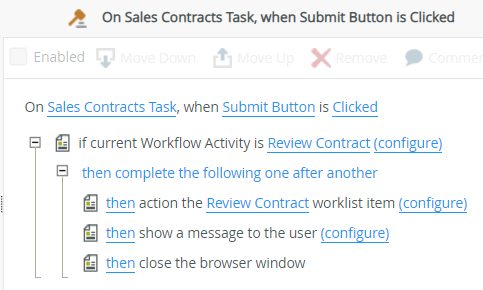
The following actions are not required to action a worklist item, but instead, they improve the user experience by showing a message and closing the browser window.
- On the Rules screen, click Add Rule.
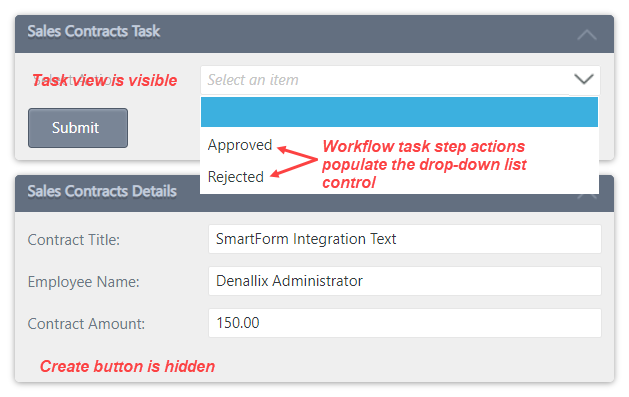
- Test your rules by submitting a contract request. Run the Sales Contracts Form. Confirm the Sales Contracts Task view is hidden. Enter values into the form fields and submit the form. Confirm you see the form submitted message. Open K2 Workspace (Desktop) and confirm you see the task in your Inbox. Open the task form. Confirm the Sales Contracts Task view is visible and the Create button is now hidden. Select an Action and submit the form. Confirm you see the second form submitted message. Open your email client and confirm you see an email reflecting the action decision.
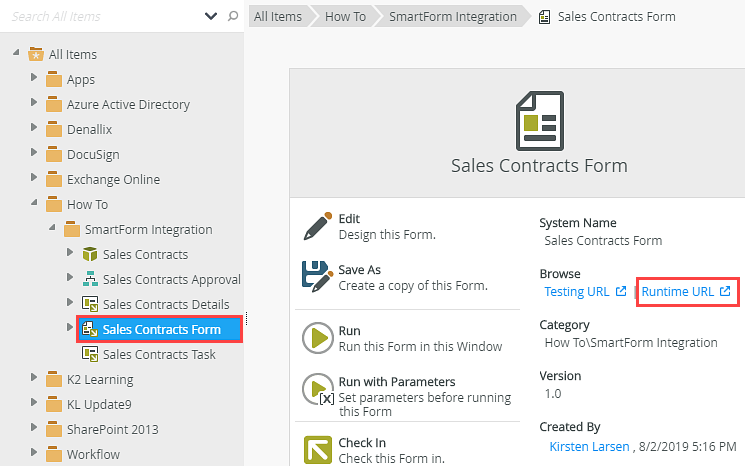
- You test your work by submitting a contract request. Select the Sales Contracts Form and click the Runtime URL found in the central pane.
Use the Runtime URL to launch the form in a web browser. The Runtime URL is the public link to this form. For example, use this link in emails or web pages to provide access to other users.
- The form opens in a new browser tab. Notice the Sales Contracts Task view does not appear. (Remember, you added an action to hide the view on the form initializing rule.) Enter values into the form fields. Click Create. You see the message pop-up and when you click OK, the message and browser window close.
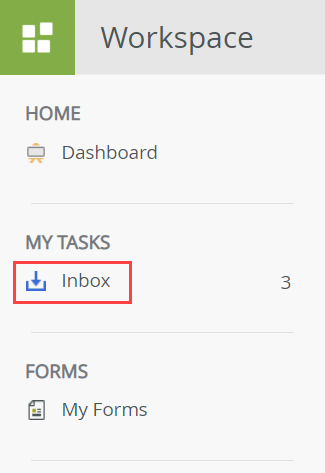
- Open K2 Workspace (Desktop).
If you do not know how to access K2 Workspace (Desktop), see Accessing K2 Sites.
- Click Inbox to open tasks assigned to you.
- You see a task called Review Contract. Because you see this task, you know the workflow started and assigned the task to you (Originator).
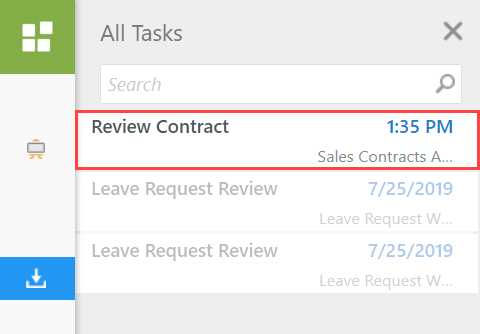
- Click the Review Contract title to open the Sales Contracts Form. (The form opens in the pane on the right side of your screen.) Notice the Sales Contracts Task view is visible, while the Create button on the Sales Contracts Details view is hidden. The Action Drop-Down List contains the actions you configured for the Review Contract task step in the workflow, and the Sales Contract Details view is loaded with the data you captured when submitting the form to start the workflow.
- Select Approved from the drop-down list and click Submit. You see the confirmation message. When you click OK, the form closes.
- Open your email client. Confirm you see an email that reflects the approved decision.
- You test your work by submitting a contract request. Select the Sales Contracts Form and click the Runtime URL found in the central pane.
Review
You can configure integration between SmartForms and workflows without using workflow wizards or form states. When you use wizards to integrate SmartForms with workflows, K2 creates several states and rules behind the scenes. You may want more control of the integration, or need to reduce the number of states on a form for performance reasons. This how-to demonstrated how you can manually integrate a SmartForm and workflow, both for starting a workflow and opening and completing a workflow task, and without using form states.