How to: use a REST Service-based SmartObject in a workflow loop
This article illustrates how to use a REST-based SmartObject in a workflow Loop step. You begin by creating an advanced SmartObject using workflow methods from the REST Service instance. You learn how to chain two methods together so that you can retrieve serialized data and then deserialize the data as a list of workflows. You then create a workflow that sends an email for each item in the list returned by the REST service, where you include workflow details in the email.
A REST-based advanced SmartObject with chained methods
Scenario
This how-to shows you the steps for looping through data from a REST-based endpoint. In this exercise, you work with workflow data stored in K2, but of course there are many other REST services you could use - the concepts described here would be similar for other REST data sources.
Steps
You begin by creating a service instance from the REST Service type. You build an advanced SmartObject based on the REST Service instance. You chain two methods from the service instance together that retrieves serialized workflow data, then deserializes the data as a list. You create a workflow that loops through the list and sends an email for each list item returned.
Setup Steps
The following steps set up the scenario from start to finish. If you want to skip the setup steps and view the steps for creating chained methods in a SmartObject, go to Create an advanced SmartObject with chained methods for converting a serialized string value into a deserialized list. If you want to view the steps for adding and configuring workflow loops, go to Add and configure workflow steps that loop through a deserialized list and sends an email for each item in the list.
- From the K2 Management site, create a new service instance based on the REST service type and name it REST Example. Use the image below as a guide if necessary for completing the credential fields and descriptor location. Generate SmartObjects.See Configuring the Workflow REST API for information on how to enable the REST Service, how to view the Swagger Workflow API page, and how to copy or reference the swagger definition file. You must have the swagger file in place before you can create the service instance.
 See Configuring the Workflow REST API for information on how to enable the REST Service, how to view the Swagger Workflow API page, and how to copy or reference the swagger definition file. You must have the swagger file in place before you can create the service instance.
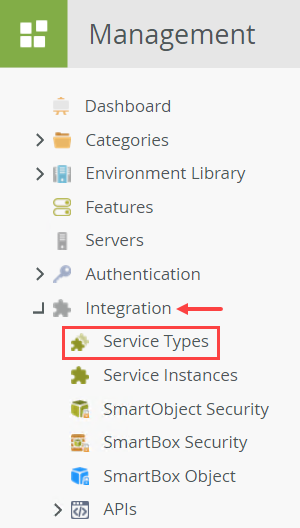
- From the K2 Management site, expand the Integration node and click Service Types.
- In the central pane, navigate to or search for
REST,
then select the REST service type. Click New Instance.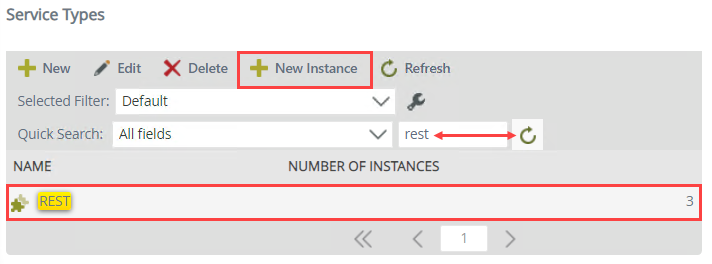
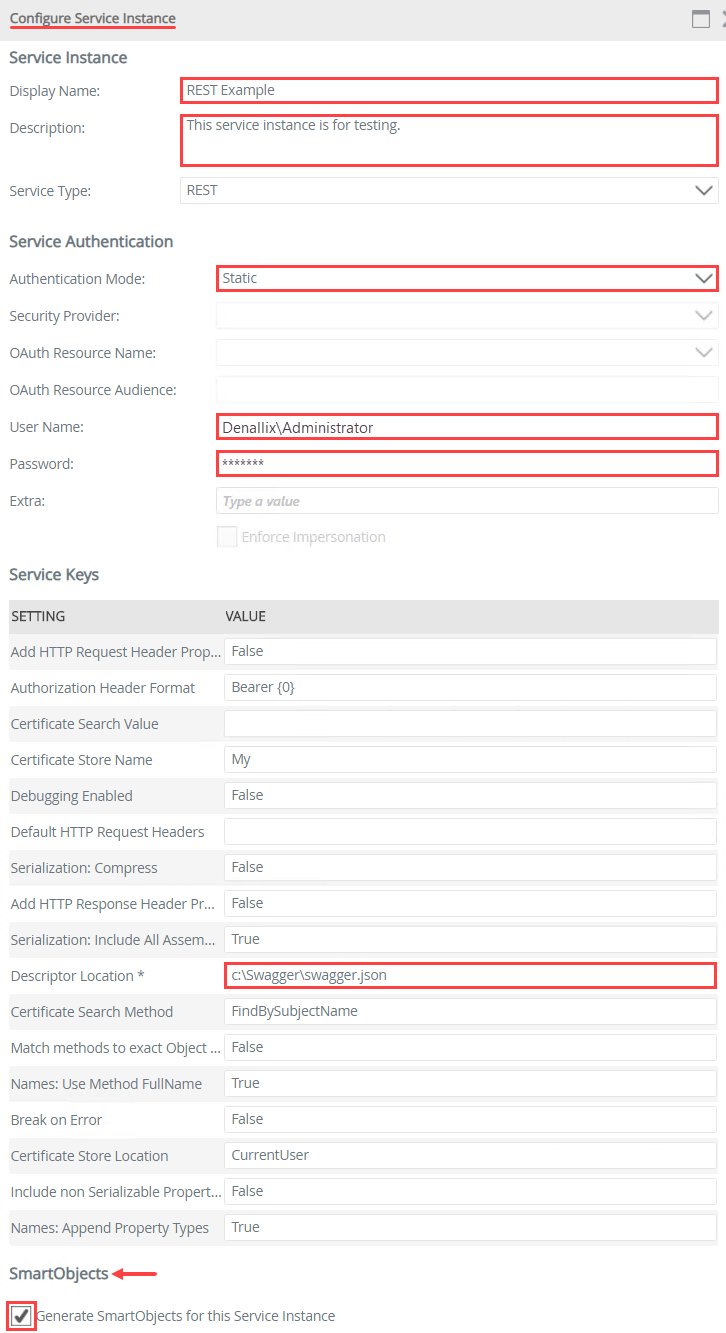
- You are on the Configure Service Instance screen. For the Display Name, enter
REST Example
then enter a description (of your own). Change the Authentication Mode (under the Service Authentication heading) to Static. Enter your credentials. On a K2-provided VM, use the following:
User Name: Denallix\Administrator
Password: K2pass!.
If you are working in your own or cloud environment, enter the credentials for an account that has the necessary permissions to create a REST service instance. Enter the Descriptor (file) Location. In the image below, the swagger file is saved to the c:\ drive. Generate SmartObjects. In a later step, you reference the SmartObjects in an email message. Click OK to create the service instance. Click OK when you see the confirmation dialog.
- From the K2 Management site, expand the Integration node and click Service Types.
Create an advanced SmartObject with chained methods for converting a serialized string value into a deserialized list
In this section, you create an advanced SmartObject. You add two methods and chain them together so that they execute as one. The first method returns a single string containing serialized data on current workflows. The second method converts the string to a deserialized list of workflow data. In a later step, you configure a workflow to loop through this list.
- In this step, you create an advanced SmartObject with chained methods for retrieving serialized workflow data and converting the data to a deserialized list. From K2 Designer, create an advanced SmartObject called Rest Methods. (Create categories first to keep your work organized.) Use the table below as a guide for configuring the SmartObject. If you want to test the method before building the workflow, execute it from the K2 Management site, or create a list view from the REST Methods SmartObject. If you create a list view, keep the Call this method when the view loads option selected. Select the Workflows(WorkflowLabel[]) field as the only field on the view. Run the view.
Name Value Notes Details screen Add method REST Example (service instance) > Service Operations > GetWorkflows(String type) SmartObject > GetWorkflows This method retrieves current workflow data from K2 and outputs the data as a single serialized string. Rename the GetWorkflows method and change the type to List New name: Return Current Workflows
Type: ListYou rename the method for clarity, then change the type to list. In this way, the results are returned as a list you can loop through later. Inputs & Outputs screen Create All K2 replicates the properties it finds in the GetWorkflows(String type) SmartObject - over to the new SmartObject you are creating. ServiceObject Methods screen Add method REST Example (service instance) > Object Types > WorkflowLabel SmartObject > Deserialized Array This method takes the string output from the first method and outputs the data as a deserialized list. Create All K2 replicates the properties it finds in the WorkflowLabel SmartObject - over to the new SmartObject you are creating. Assign Assign the Serialized Array input property to the SmartObject property > Workflows(WorkflowLabel[]) property The Workflows(WorkflowLabel[]) property contains the serialized string from the first method. This is the string you want to convert to a list. Notice the return property, Serialized Item (String). This is the property that contains the deserialized list data. - Open K2 Designer in a new browser tab.
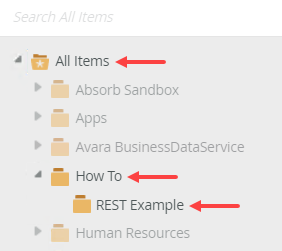
- Create categories to keep your work organized. Use the image below as a guide for category names, if necessary.
- Right-click your category and select New SmartObject.
- Name the SmartObject
REST Methods
and select the Advanced SmartObject option. Click Create.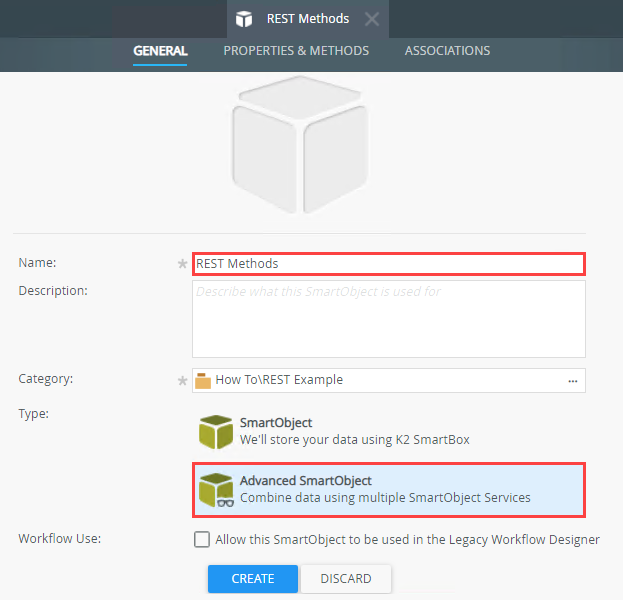
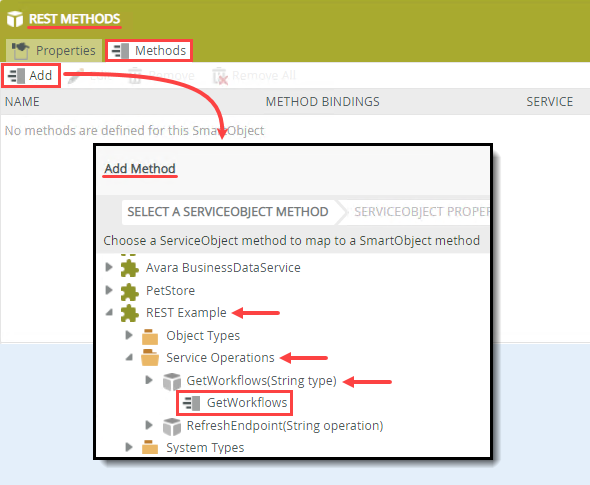
- On the Rest Methods screen, click the Methods tab. Click Add. On the Add Method screen, navigate to and select the REST Example > Service Operations > GetWorkflows(String type) > GetWorkflows method. Click Next.
- On the Details screen, change the default name (GetWorkflows) to
Return Current Workflows
then change the Type to List. Click Next. Because you are chaining methods, you want the primary method's name to be more descriptive of both method's functionality. The list type is the format of the data returned. Click Next.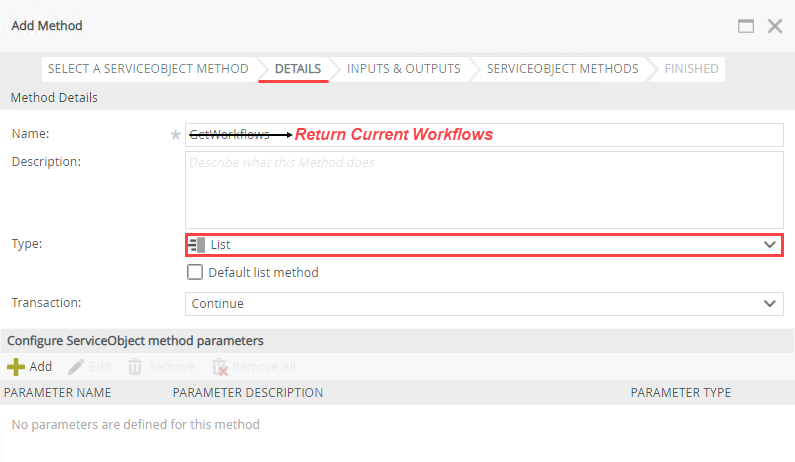
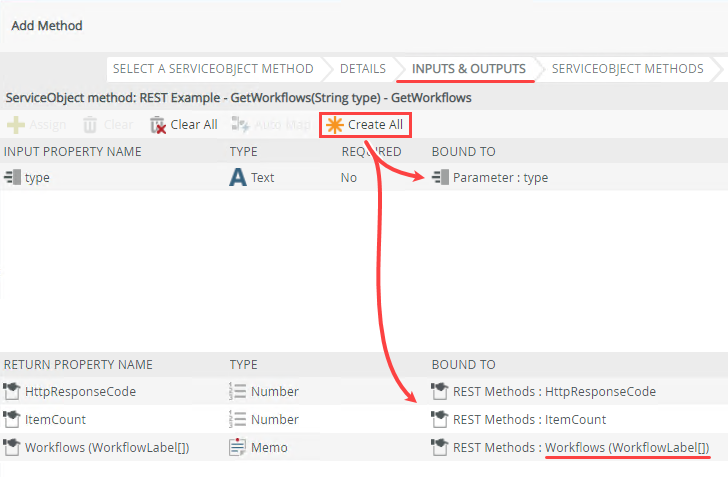
- On the Inputs & Outputs screen, click Create All. K2 replicates the properties it finds in the GetWorkflows SmartObject - over to the new SmartObject you are creating. Review the return properties. The Workflows (WorkflowLabel[]) property contains the string you loop through later in your workflow. Click Next.
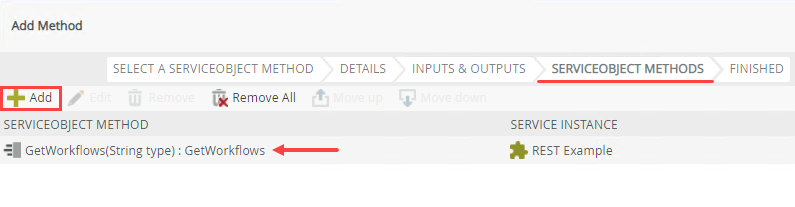
- On the ServiceObject Methods screen, you can see the first method displayed. Click Add to add the second method that converts the string to a deserialized list.
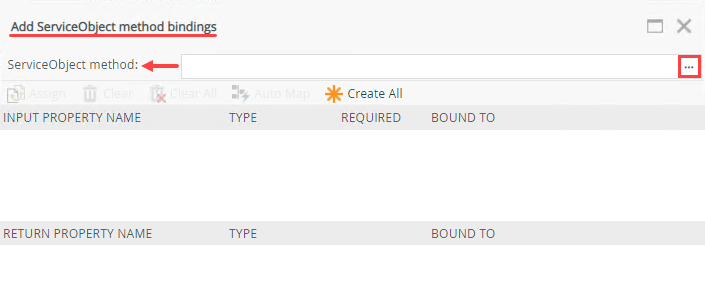
- On the Add ServiceObject method bindings screen, click the ellipses for the ServiceObject method to open the navigator.
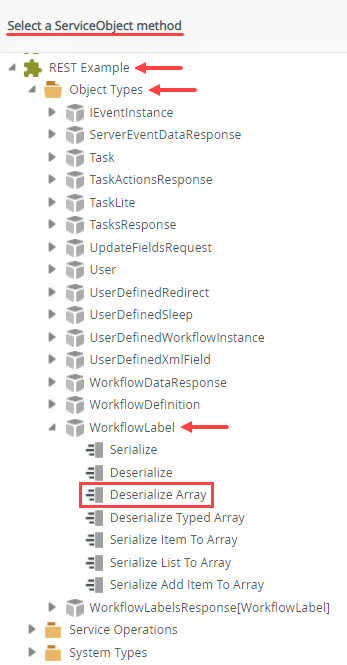
- On the Select a ServiceObject method screen, navigate to and select the REST Example > Object Types > WorkflowLabel > Deserialize Array method. Click OK.
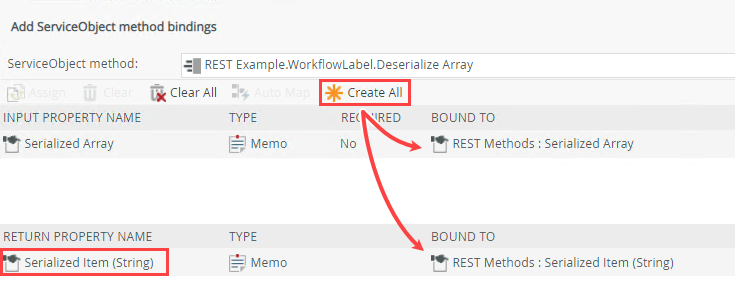
- Click Create All. Once again, K2 replicates the properties it finds for this method - over to the new SmartObject you are creating. Notice the return property, Serialized Item (String). This is the property that contains the deserialized list data.
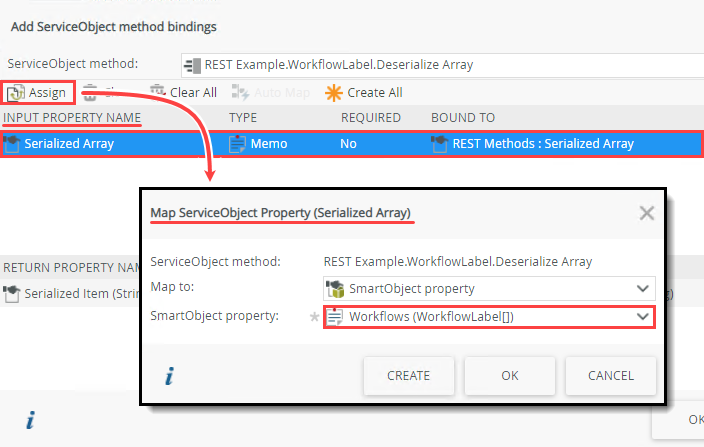
- Select the Input Property > Serialized Array property and click Assign. On the Map ServiceObject Property (Serialized Array) screen, use the SmartObject property drop-list to select the Workflows (WorkflowLabel[]) property. Click OK. Click OK to save the bindings. Click Finish to save the method configuration.
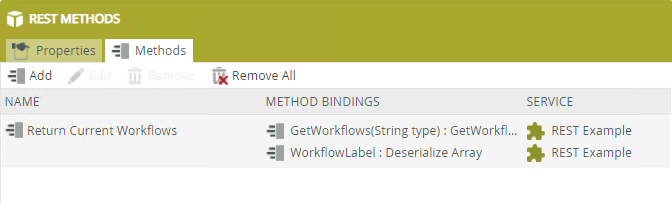
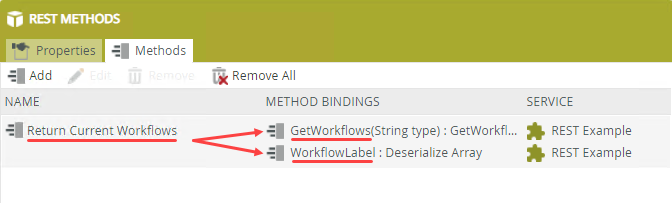
- You should see the Return Current Workflows method with its two chained methods: GetWorkflows and WorkflowLabel. Click Finish to save and exit the SmartObject.
- Right-click the REST Methods SmartObject and select Design View.
- Name the view
REST Methods List
and select the List View type. Keep the Call this method when the view loads option checked. By checking this option, K2 creates the rule that executes the Return Current Workflows method for you. In this way, the rule executes when you open the view. Click Create.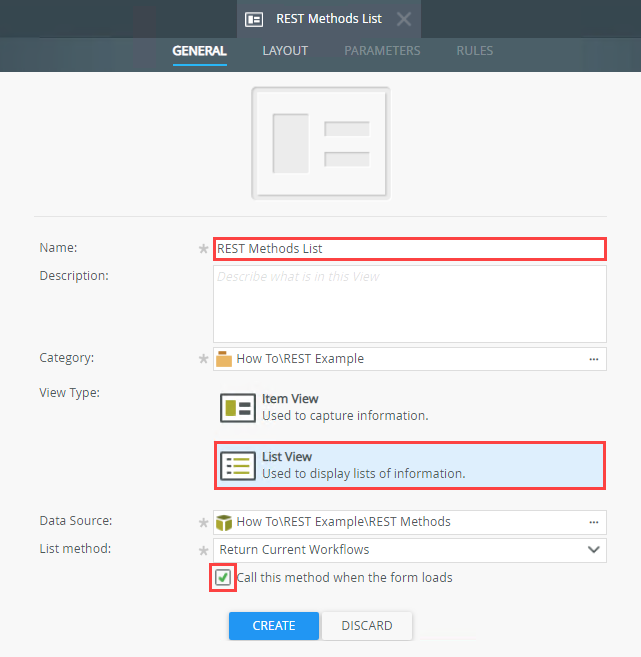
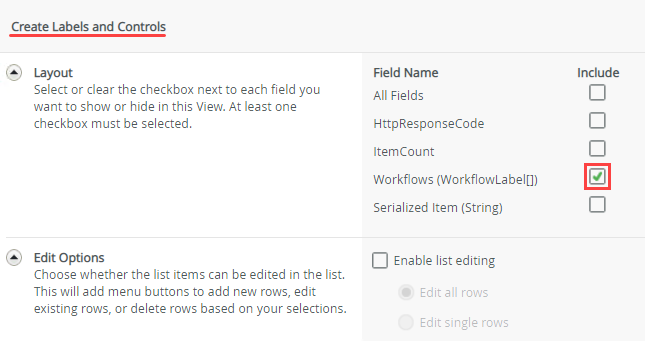
- Click Create Labels and Controls.
- On the Create Labels and Controls screen, include the Workflows (WorkflowLabel[]) field. You do not need to configure list editing. Click OK. Click Finish to save and exit.
- Right-click the REST Methods List view and select Run.
Next, you add the two methods from the REST Example service instance. The first method outputs a serialized string containing information on current workflows, while the second method converts the string to a deserialized list. Later, you loop through the list in a workflow step.
Before you continue, there is one last step. You must link the two methods together so that they are "chained", passing information from one to the other. You are linking the property that contains the serialized string from the first method (GetWorkflows) to the input property for the second method (Deserialize Array). The second method takes the string and converts it to the deserialized list.
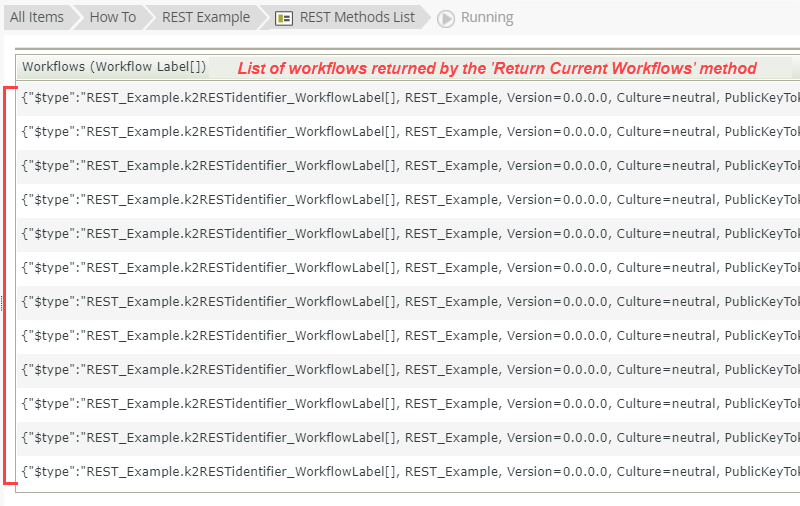
You can test the chained SmartObject methods by executing the SmartObject in the K2 Management site, or by creating a list view. You should see a list of current workflows returned.
The first method outputs a serialized string containing a list of current workflows, their version ID, names, and so forth. The second method deserializes the data and returns it as a list. It's this list you loop through in your workflow.
Add and configure workflow steps that loop through a deserialized list and sends an email for each item in the list
The next part of this how-to focuses on creating a workflow that loops through the list of workflows returned by the Return Current Workflows method. You add steps that send a separate email for each workflow returned.
- Create a workflow called REST List Loop.
- Right-click your category and select New Workflow.
- Name the workflow
REST List Loop
and click Create.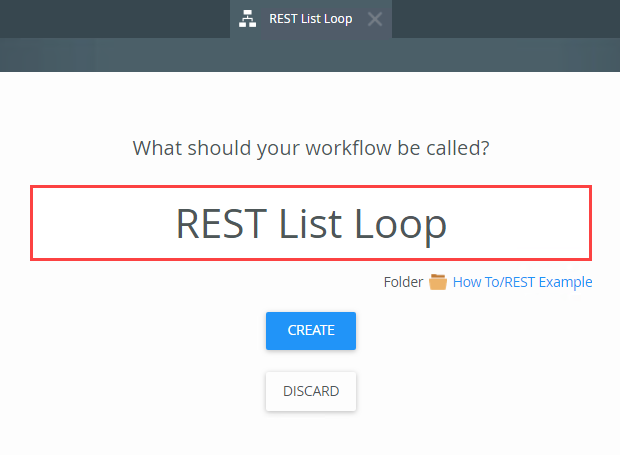
- If you see a welcome screen, click Close to continue.
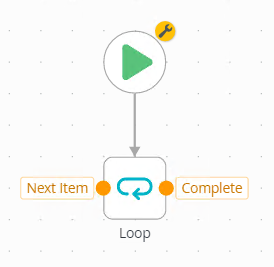
- In this step, you add and configure the looping steps in your workflow. You loop through the deserialized list of workflows, then send an email for each workflow returned. Add a Loop step. Use the table below as a guide for configuring the step.
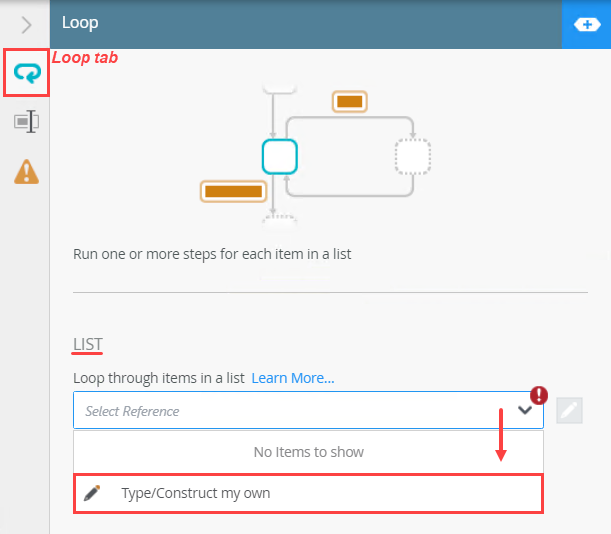
Name Value Notes List Change the drop-down to Type/Construct my own. Drag the SmartObjects (tab) > REST Methods (SmartObject) > Return Current Workflows > Serialized Item (String) into the List text box
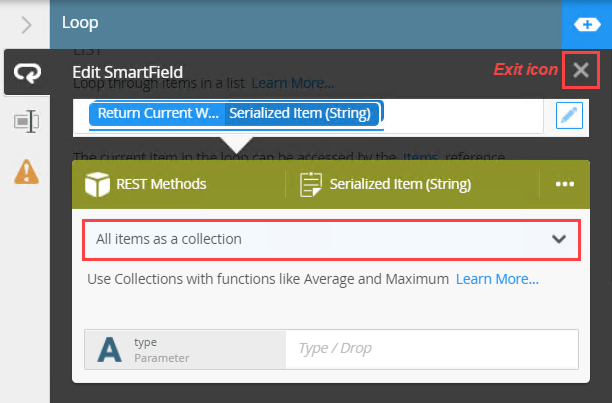
SmartField editor: Change the list scope to Add items as a collectionThe Serialized Item (String) is the property that contains the value from the second method from the Return Current Workflows method. This is the deserialized list of data that you want to loop through.
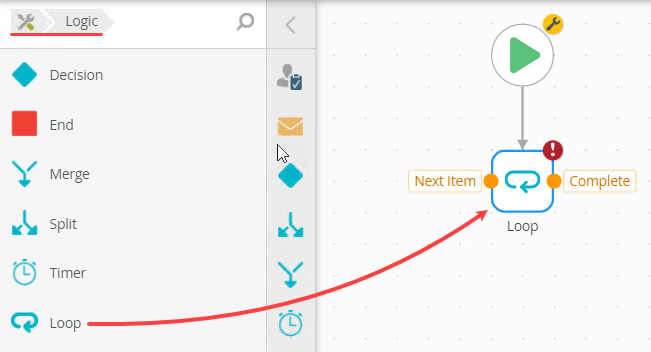
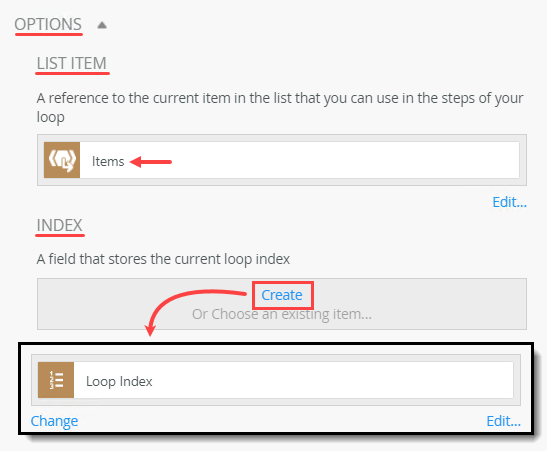
List scope - you want to loop through the entire list.List Item Expand the Options section and confirm you see the Items reference The Items reference creates a "pointer" to the list items so that you can reference them later. Index Create the index (Loop Index) The loop index is a "counter" that keeps track of each list item during the looping process. In this way, you can reference specific list items. - From the Toolbox > Logic node, drag a Loop step into the empty placeholder below the Start step.
- With the Loop step selected, expand the Configuration Panel.
- The Loop tab should be active. Change the List drop-down to Type/Construct my own.
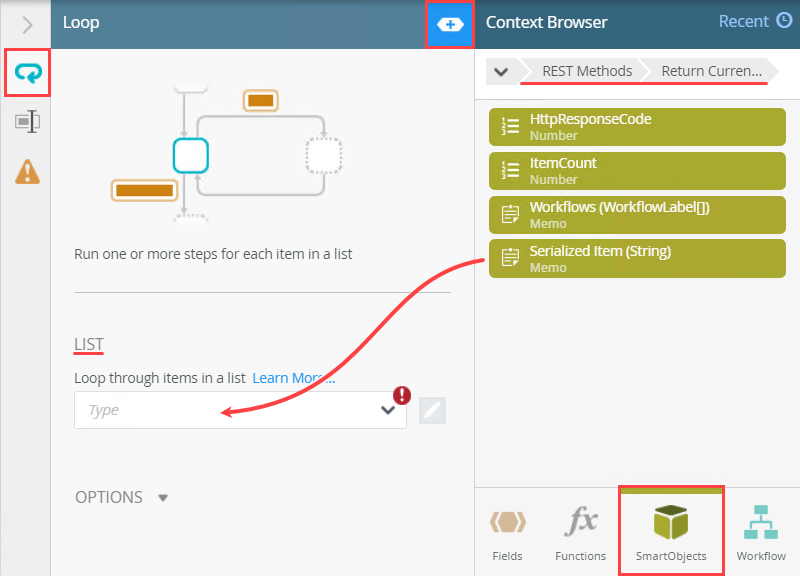
- Expand the Context Browser and click the SmartObjects tab. Navigate to the REST Methods (SmartObject) > Return Current Workflows (method). (If you created additional categories, you may need to expand them first.) Drag the Serialized Item (String) property into the List text box. As soon as you drop the property into the text box, the SmartField editor opens.
- Change the list scope to All items as a collection. This setting loops through the entire list. You do not need any parameters, so click the exit icon to close the editor.
- Expand the Options section. (The Options section is below the List section, you may need to scroll down to see it.) By default, K2 creates a reference to the list called Items (under the List Item heading). Under the Index heading, click Create.
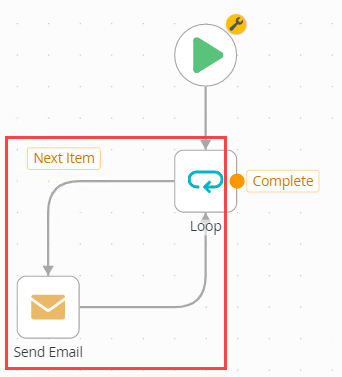
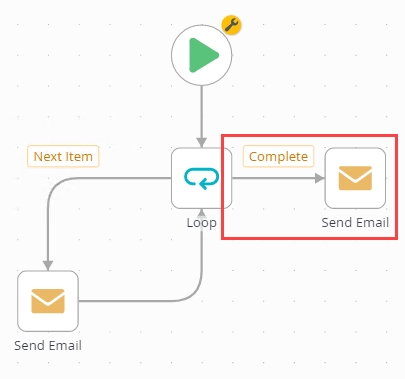
- Collapse the Context Browser and Configuration Panel. Your workflow should look like the image below at this point.
First, you select the list you want to loop through. In this case, you are selecting the output property from the second method (of the Return Current Workflows method), Serialized Item (String). (See Step 2(k) if you need a reminder.)
Next, you create references and an index. References allow you to "point" to a specific item in the list, while the index is a counter of sorts, that keeps track of which list item is in the current loop iteration.
- From the Toolbox > Logic node, drag a Loop step into the empty placeholder below the Start step.
- Add a Send Email step. Connect the Next Item outcome to the Send Email step. Connect the Send Email step to the Loop step to complete the loop. Use the table below as a guide for configuring the step.
Name Value Notes To Keep the default value, Originator Subject Enter Workflow ID: and then append the REST > REST Example > Object Types > WorkflowLabel > Derserialize > DefaultVersionId property Here, you are adding a value that returns the workflow version ID at runtime. As you loop through the workflows returned by the Return Current Workflows method, this value changes to reflect the current workflow (or list item) in the looping process. Body Enter Workflow Name: and then append the REST > REST Example > Object Types > WorkflowLabel > Derserialize > Name property Once again, you are adding a value that returns the current workflow's name. - From the Toolbox > Basic node, drag a Send Email step onto the canvas. Connect the Next Item outcome to the Send Email step. Connect the Send Email step to the Loop step to complete the loop.
- Select the Send Email step and expand the Configuration Panel.
- With the Send Email tab active, configure the email recipient, subject line, and message body. For the recipient, keep the To default value, Originator. For the Subject line, enter
Workflow ID:
and for the message Body, enter
Workflow Name: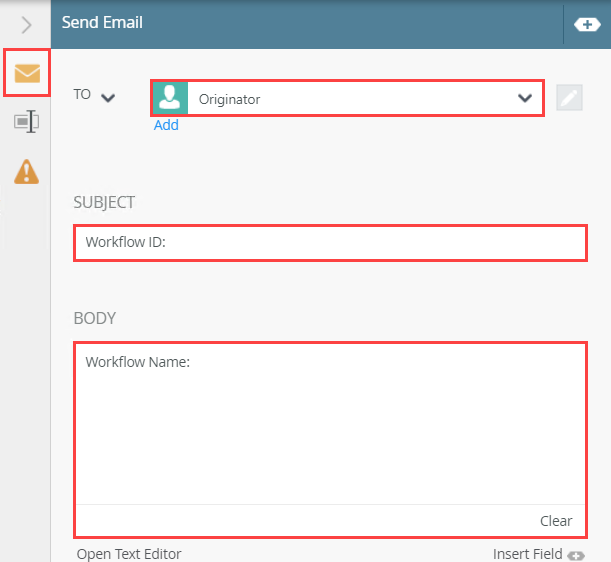
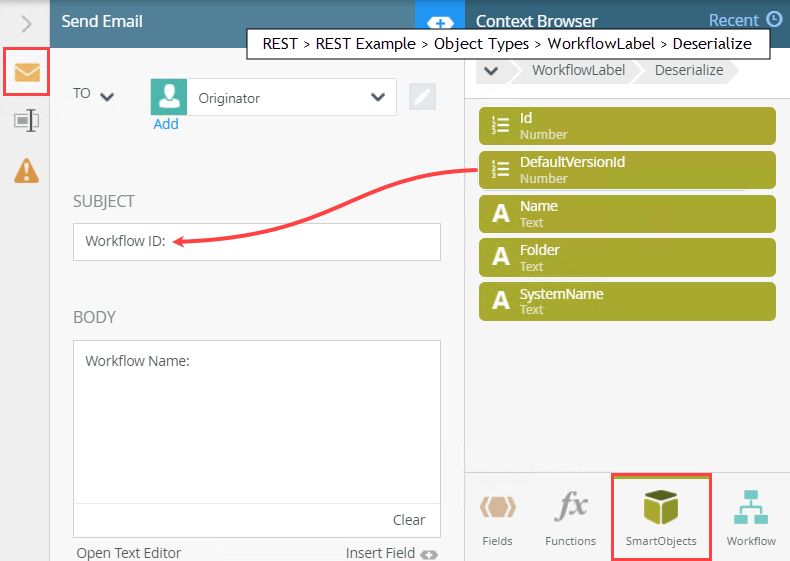
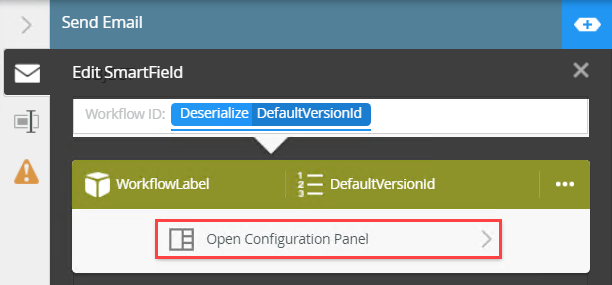
- Expand the Context Browser. Select the SmartObjects tab. Navigate to the REST > REST Example > Object Types > WorkflowLabel (SmartObject) > Deserialize node. Expand the SmartObject and drag the DefaultVersionId property into the subject line. As soon as you drop the property, the SmartField editor opens.
- Click Open Configuration Panel.
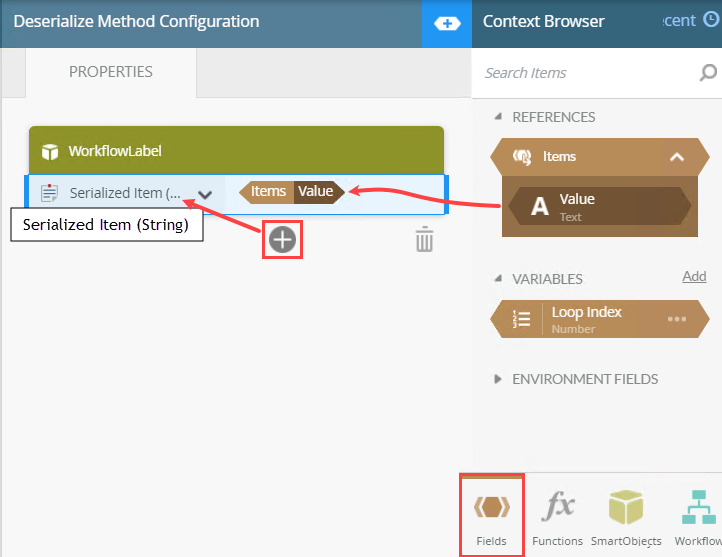
- Click the Add(+) icon to create a new mapping. Check the Serialized Item (String) box. Click the Fields tab. Drag the Items > Value reference into the Serialized Item (String) text box. You are associating the SmartObject property with current list item.
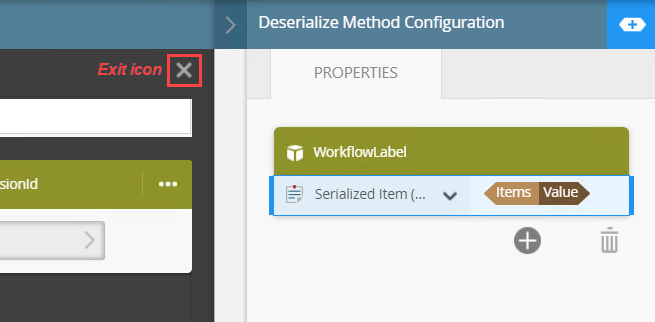
- Click the exit icon to close the SmartField editor.
- Repeat the step above and add the REST > REST Example > Object Types > WorkflowLabel (SmartObject) > Deserialize > Name property to the message body. Once again, use the Items > Value reference for the Serialized Item (String) input property value. Your email configuration should look like the image below. At runtime, you should see one email for each workflow returned by the Return Current Workflows method with a DefaultVersionId and Name unique to it's associated workflow. Collapse the Configuration Panel.
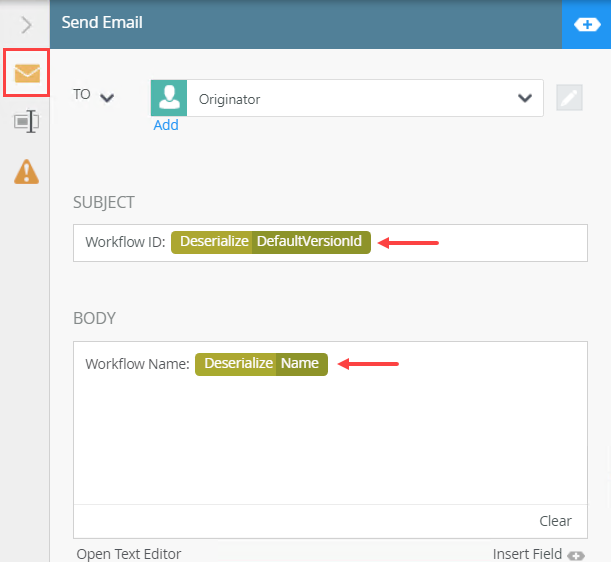
Next, you add the WorkflowLabel SmartObject values (DefaultVersionId and Name) to your email. At runtime, K2 replaces the values with "live" data specific to the current list item in the loop.
- From the Toolbox > Basic node, drag a Send Email step onto the canvas. Connect the Next Item outcome to the Send Email step. Connect the Send Email step to the Loop step to complete the loop.
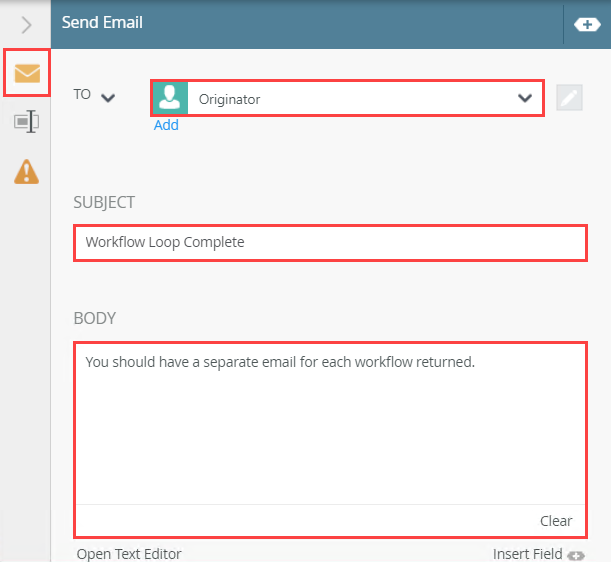
- Add a Send Email step for the "Complete" side and connect it to the Loop step. Keep the To default value, Originator. Add your own content to the subject line and message body that indicates the workflow looping is complete. Add an End step to complete the workflow.
- From the Toolbox > Basic node, drag a Send Email step onto the canvas and align it with the Complete outcome. Use the Complete outcome to connect the new Send Email step to the Loop step.
- With the new Send Email step selected, expand the Configuration Panel.
- Keep the default To value, Originator. Add your own content for the Subject line and message Body. Collapse the Configuration Panel.
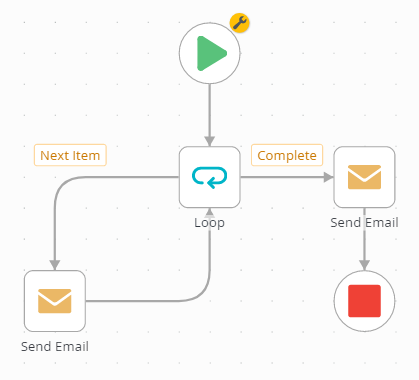
- From the Toolbox > Logic node, drag an End step onto the canvas and connect it to the new Send Email step.Use End steps to complete workflow outcomes. You can configure End steps to terminate the workflow, or use them as visual indicators that there are no more steps to follow. In this demonstration, the End step provides a clean end to the outcome.
Your completed workflow should look like the image below. In the next step, you deploy the workflow to the K2 server.
- From the Toolbox > Basic node, drag a Send Email step onto the canvas and align it with the Complete outcome. Use the Complete outcome to connect the new Send Email step to the Loop step.
- Deploy the workflow.
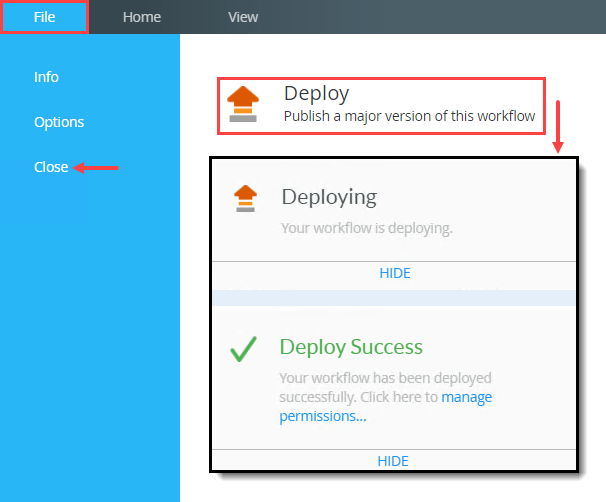
Before you can use the workflow, you must deploy it to the K2 server. Deploying a workflow "publishes" it to the server and makes it available for use. If you make any changes to the workflow, you must deploy it again so that the K2 server has the latest version.
- Click File > Deploy. When you see the success dialog, click File > Close to return to K2 Designer.
- Click File > Deploy. When you see the success dialog, click File > Close to return to K2 Designer.
- Test the workflow by starting a new instance from the K2 Management site. Open your email client. You should see one email for each workflow instance found, plus the final "workflow complete" email.
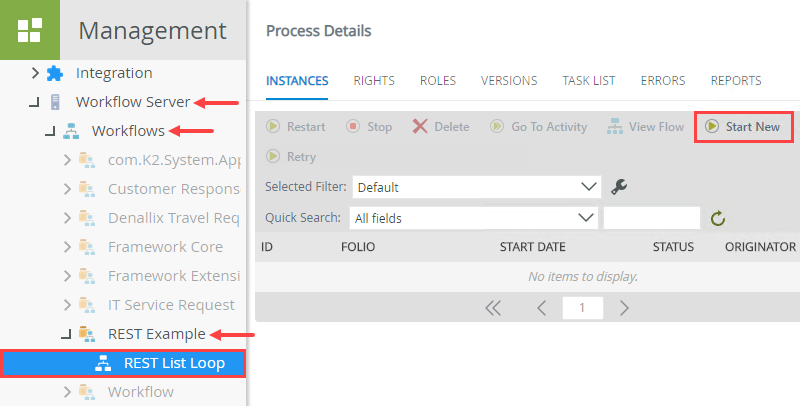
- Return to the K2 Management site.
- Expand the Workflow Server > Workflows node. Navigate to the REST List Loop workflow in your category. (In the image below, the workflow was saved to the REST Example category. Your screen may be different, depending on where you saved the workflow and your naming conventions.) Select the workflow and in the central pane, click Start New.
- On the Start Workflow Instance screen, select the Use Text option for the Folio value. Enter
Looping Test
and click Start. Click OK when you see the confirmation dialog.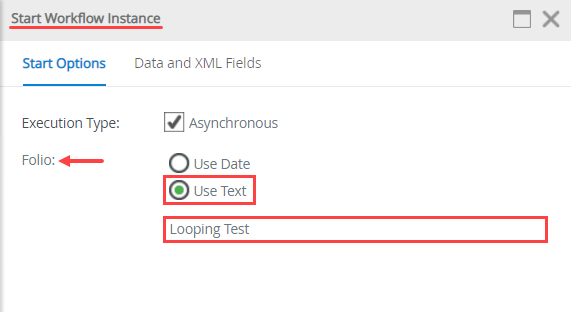
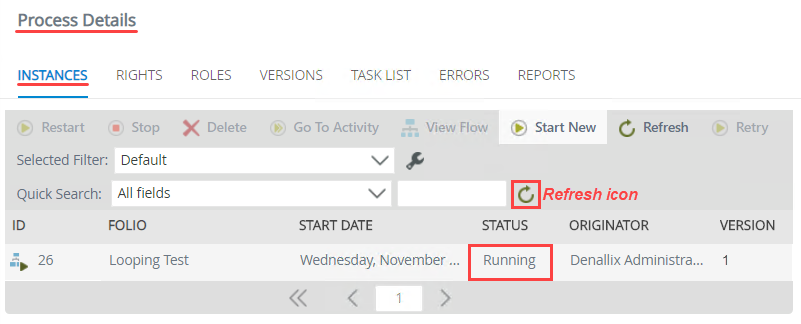
- You see the workflow instance displayed with an initial status of Running. Refresh the list until you no longer see the instance (since the workflow is now complete).
- Open your email client. If you are working on a K2-provided VM, click Outlook (or OWA) in the Favorites bar to launch Outlook. Login with the following credentials:
User Name: Denallix\Administrator
Password: K2pass!
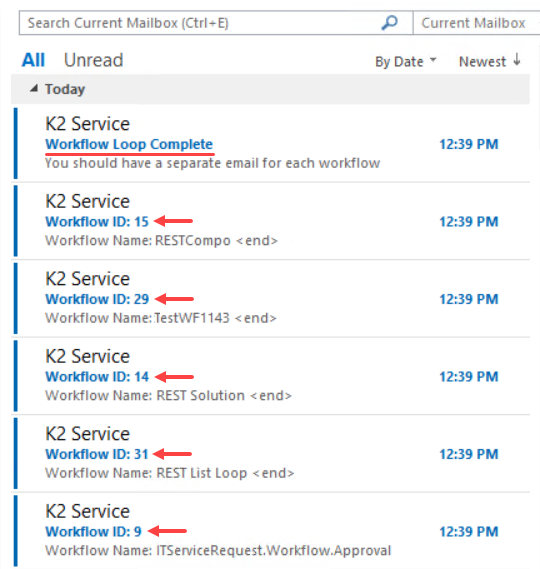
If you are working in your own environment or cloud, open your email client and log in with your own credentials. - You should see a series of emails, one for each workflow returned by the Return Current Workflows method. You should also see the final email indicating the workflow loop completed. Notice that each email subject line contains a unique DefaultVersionId and each message body contains a unique workflow Name. You have successfully looped through a list of REST-based items!
Review
In this how-to, you worked with REST-based data. You learned how to chain methods together in an advanced SmartObject so that you can retrieve serialized data in a string format, then convert it to a deserialized list. You learned how to loop through the list in a workflow by sending an email for each list item. You configured the email so that each email contains data specific to the list item in the looping iteration.