How to: retrieve user details in a form and a workflow
You can retrieve user information in different ways in K2, for example, using the Context Browser in the K2 Designer environment to drag the current user's data from the System Values section, or when building a workflow by dragging user information fields from the Workflow area of the Context Browser. You can also create a SmartObject that leverages the URM service type to retrieve user details, and then use this SmartObject in a SmartForm or workflow.
This how-to illustrates the steps for creating and using a SmartObject to retrieve user information from a URM-based SmartObject. You learn how to create a new SmartObject using the Get Users method of the URM Service, then incorporate the SmartObject in a picker control on a view. You also retrieve details for the current user by using the system value fields from the Context Browser. In addition to the form, you create a simple workflow that sends an email confirmation. The email step uses values from the SmartObject, as well as values from the Workflow section of the Context Browser to insert user information into the email.
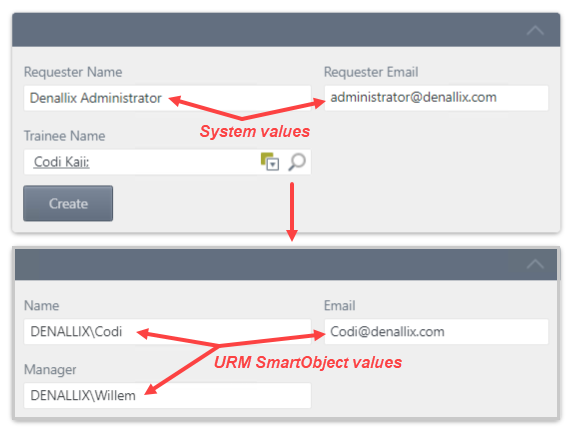
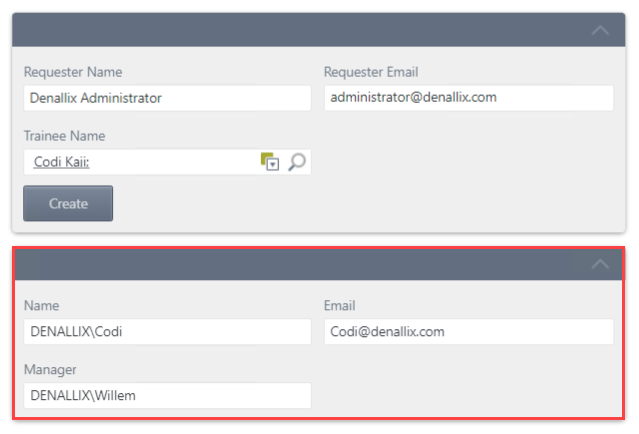
A form displaying system values and URM SmartObject values
Scenario
You work in Human Resources where you are responsible for employee training. You create a training request form that employees can submit for themselves or on behalf of another employee. For example, an administrative support employee submits training requests for all employees in that division. You configure the form so that it retrieves system information for the employee submitting the request, along with user details retrieved from a URM-based SmartObject for populating the trainee details. You also create a workflow that sends a confirmation message that the training request was created. The email includes user information about the requester as well as the trainee.
Steps
For this scenario, you build a SmartBox SmartObject for storing the training request, along with an item view for capturing the request. You create an advanced SmartObject, using the URM > Get Users method. You link the URM SmartObject to a picker control on the item view. Finally, you create a workflow that sends a confirmation email. The email message contains both system values and values from the URM SmartObject.
Setup Steps
The following steps set up the scenario from start to finish. If you want to skip the setup steps and view the picker control and rule configuration steps, go to Link a picker control to a URM SmartObject and configure rules to populate an item view based on the selected user. If you want to view the workflow steps, go to Use system values and values from a URM SmartObject in a workflow step.
- From K2 Designer, create a SmartBox SmartObject called Training Requests. Add the following properties: Requester Name (Text), Requester Email (Text), and Trainee Name (Text). (Be sure to create categories first to keep your work organized.)
In this step, you create the SmartObject that stores training requests.
- Launch K2 Designer.If you do not know how to access K2 Designer, see Accessing K2 Sites.
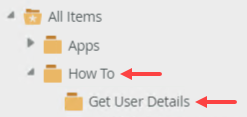
- Create categories to keep your work organized. Right-click the All Items menu and select New Category. Use the image below as a guide if necessary.
- Right-click your category and select New SmartObject.
- Name the SmartObject
Training Requests
and confirm the SmartBox option is selected. Click Create.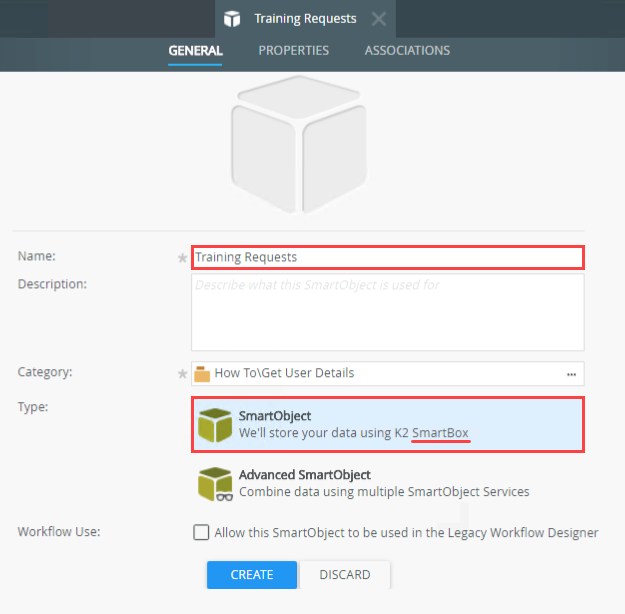
- On the Training Requests screen, click Add. Name the first property
Requester Name
and confirm the type is Text. Click Add property to add the next property.
- Name the property
Requester Email
and confirm the type is Text. Add a third property called
Trainee Name
that is also a Text type. Click OK to save your properties. Your SmartObject should look like the image below. Click Finish to save and exit.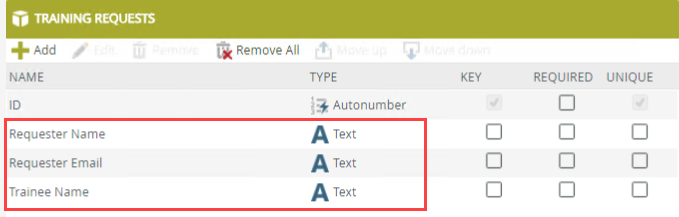
- Launch K2 Designer.
- Create an advanced SmartObject called Trainees. Add the Get Users method from the URM Service instance > User SmartObject. Create all properties.
In this step, you create an advanced SmartObject from the URM Service - service instance. You add the Get Users method that you link to a control on a view (in a later step). The control allows you to search the list of users (to add as trainees).
- Right-click your category and select New SmartObject.
- Name the SmartObject
Trainees
and select the Advanced SmartObject option. Click Create.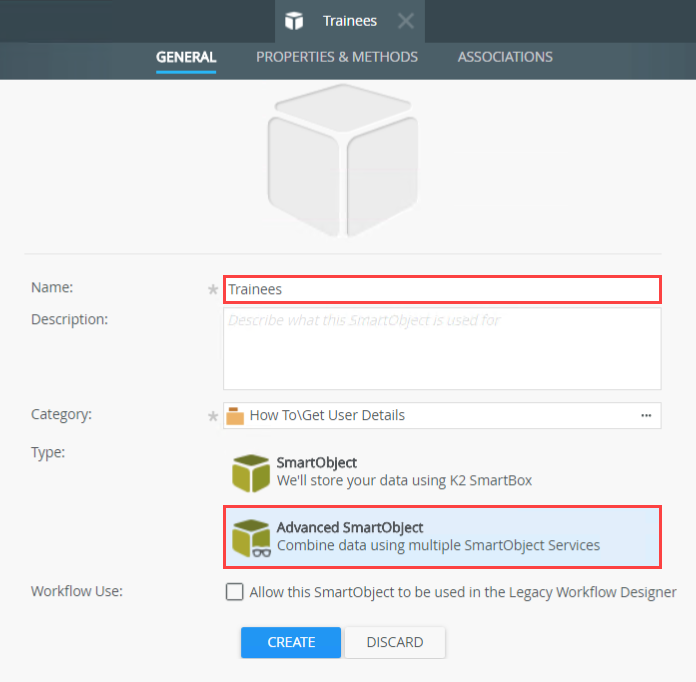
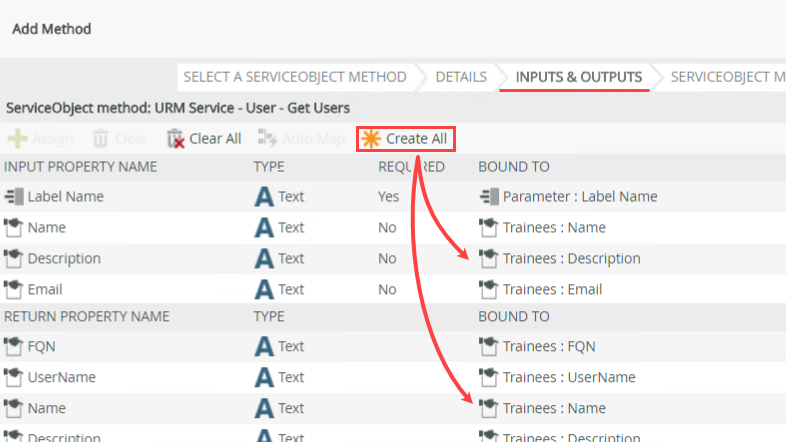
- On the Trainees screen, click the Methods tab. Click Add. Expand the URM Service node. Notice this service instance has SmartObjects: Group, Label, User, and Role. Expand the User node. Select the Get Users method and click Next.This exercise uses the Get Users method that returns a list of users and limited details including name, email, manager, and display name. Depending on your search criteria, you may have more than one result returned. To return a specific user, use the Get User Details method that returns only one record based on a FQN (Fully Qualified Name) value. If you choose to use the Get User Details method, you must provide the user's FQN.

- There are no changes on the Details screen, so click Next.
- On the Inputs & Outputs screen, click Create All. K2 replicates the properties found in the User SmartObject in your new SmartObject.
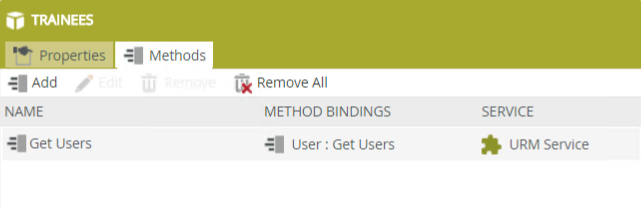
- There are no changes on the ServiceObject Methods screen, so click Finish.
- Your SmartObject should look like the image below. Click Finish to save and exit.
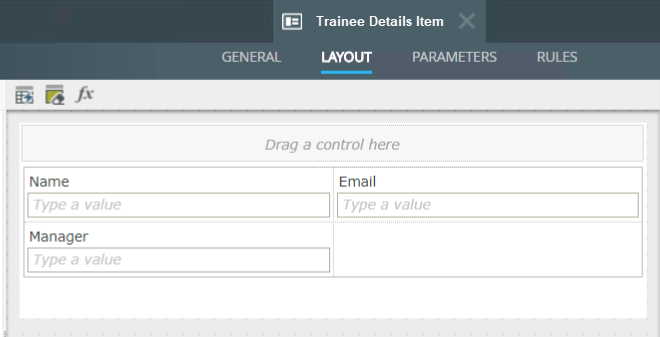
- Create an item view based on the Trainees SmartObject called Trainee Details Item. Include the following fields: Name, Email, and Manager. You do not need to include buttons on this view. This view displays the trainee's details from the URM SmartObject.
In this step, you create an item view that displays the trainee's details. In a later step, you configure a rule that populates this view after you select a user from a picker control.
- Right-click the Trainees SmartObject and select Design View.
- Name the view
Trainee Details Item
and confirm the Item view type is selected. Click Create.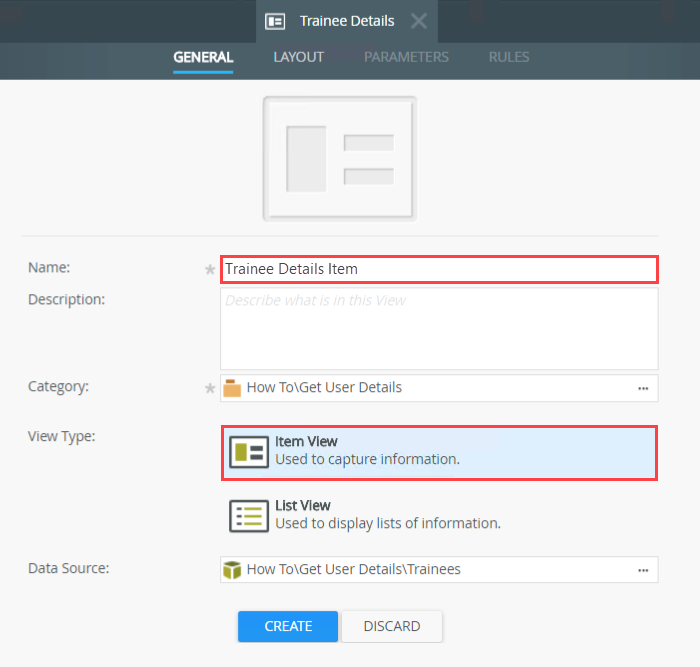
- Click Create Labels and Controls. This option allows you to select which fields you want to include on your view.
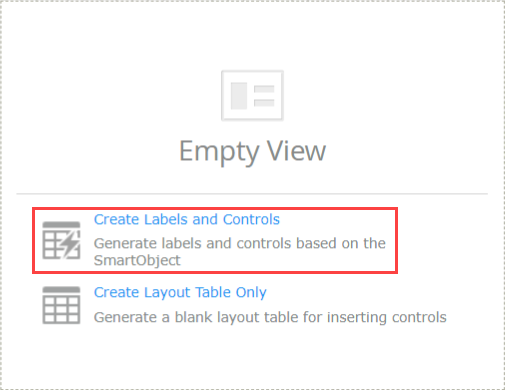
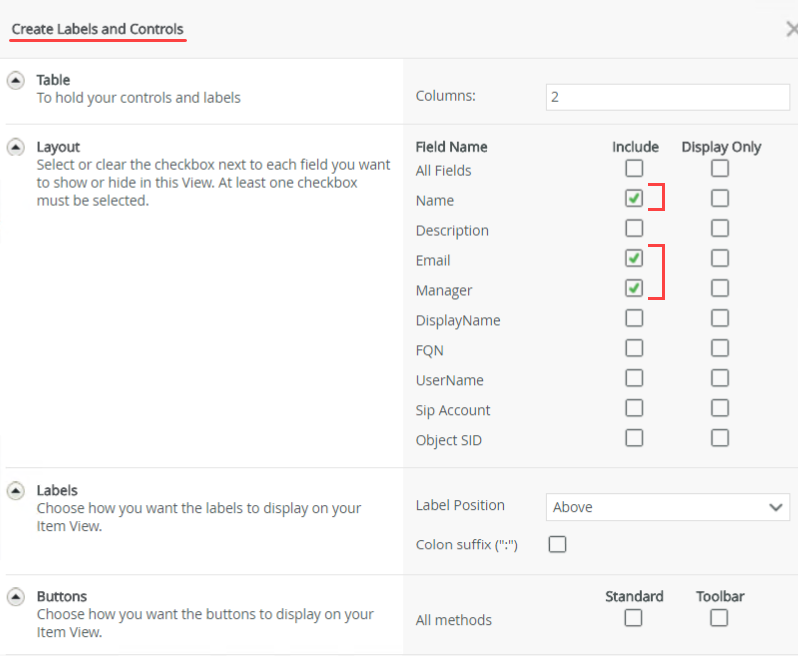
- On the Create Labels and Controls screen, check the boxes to include the Name, Email, and Manager fields. You do not need to add any buttons to this view. Click OK.
- Your view layout should look like the image below. Click Finish to save and exit.
- Create an item view based on the Training Requests SmartObject called Training Requests Item. Include the following fields: Requester Name, Requester Email, and Trainee Name. Include the Standard - Create button.
In this step, you create an item view to capture training requests. This view has a button that when clicked, creates a record in the Training Requests SmartObject.
- Right-click the Training Requests SmartObject and select Design View.
- Name the view
Training Requests Item
and confirm the Item view type is selected. Click Create.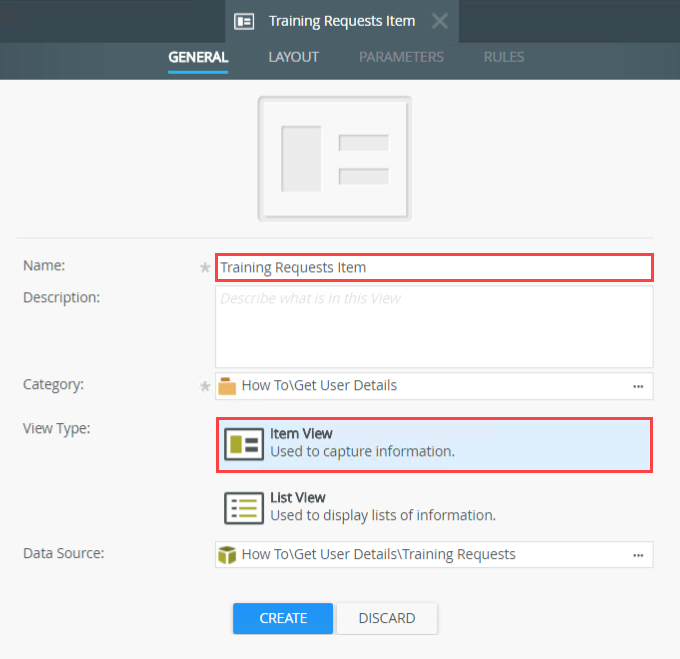
- Click Create Labels and Controls.
- On the Create Labels and Controls screen, include the following fields: Requester Name, Requester Email, and Trainee Name. Check the box to include the Standard - Create button. Click OK.
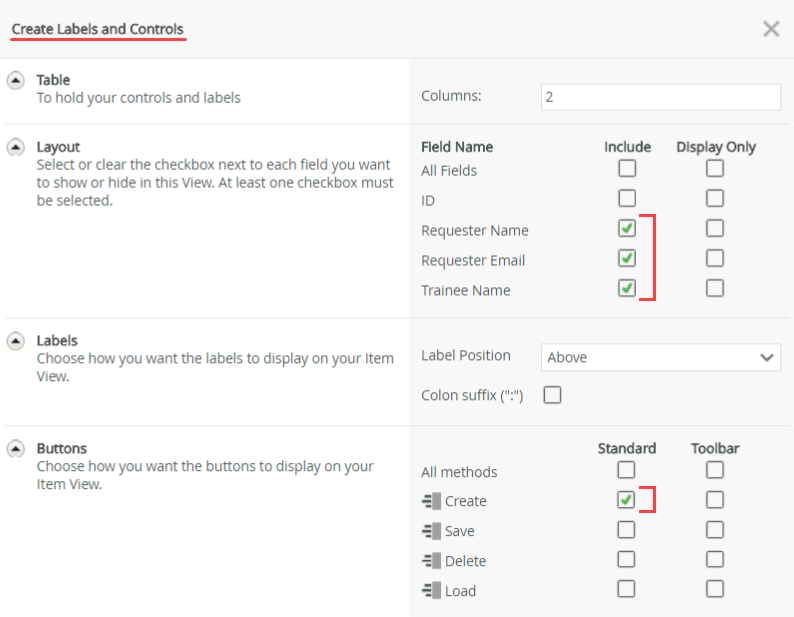
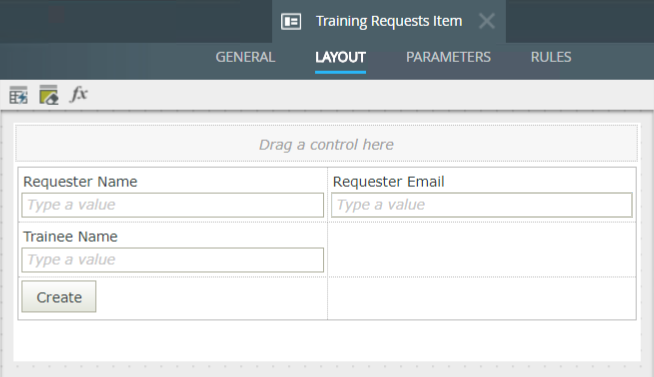
- Your view should look like the image below. In the next step, you convert the Trainee Name Text Box to a picker control, then configure the control to retrieve its values from the Trainees SmartObject. You also work with rules to configure the picker control action.
Link a picker control to a URM SmartObject and configure rules to populate an item view based on the selected user
In this section, you convert a text box to a picker, then link the control to a SmartObject. In this way, the control retrieves its values from the SmartObject. You configure a rule action so that the Requester Name and Requester Email text boxes are populated with the current user's information when the view loads. You add a new rule that populates the Trainee Details Item view with information about the user selected in the picker control.
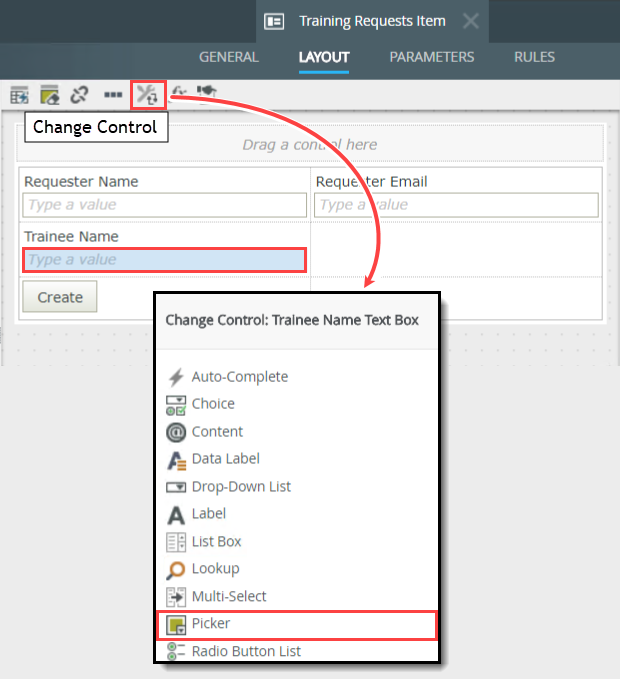
- Convert the Trainee Name Text Box to a Picker control. Configure the picker control to use the Trainees SmartObject. Edit the create button clicked - create record rule action and save the ID back to the SmartObject, then define the security label for the control search. Use the table below as a guide for the configurations.
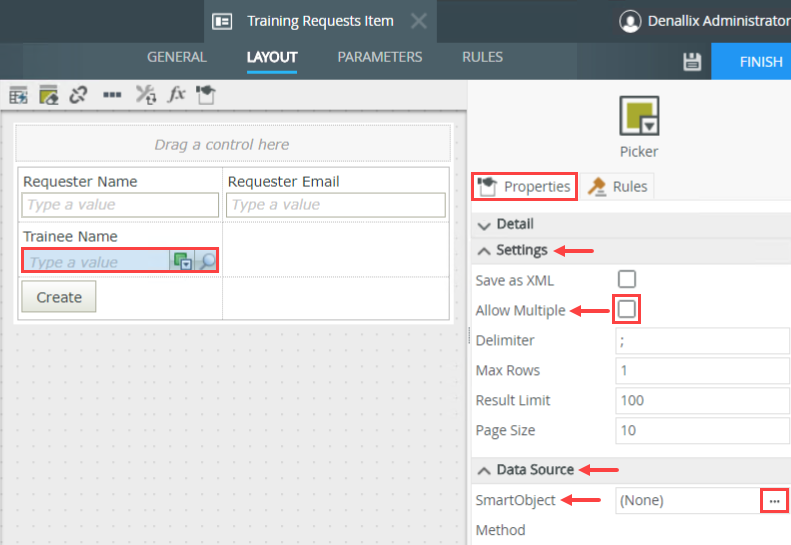
Name Value Notes Trainee Name Picker (convert text box control to picker) Properties > Settings > Allow Multiple Unchecked You do not want to allow multiple selections. You must save one record at a time. Properties > Data Source > SmartObject Configure Data Source: - SmartObject: Trainees
- Method: Get Users
- Filter Properties: Name, Email, DisplayName
- Identifier: Email
- Display: [DisplayName]
You only want to search the Name, Email, and DisplayName properties in the SmartObject. For data sources with extremely large data sets, limiting the search scope can enhance performance. You use the Email as the identifier for this control as it is a unique value. You also use the email to filter SmartObject records later on in a workflow step. Rules (Edit rule) When the Create Button is Clicked - (Configure action) then execute the Create method
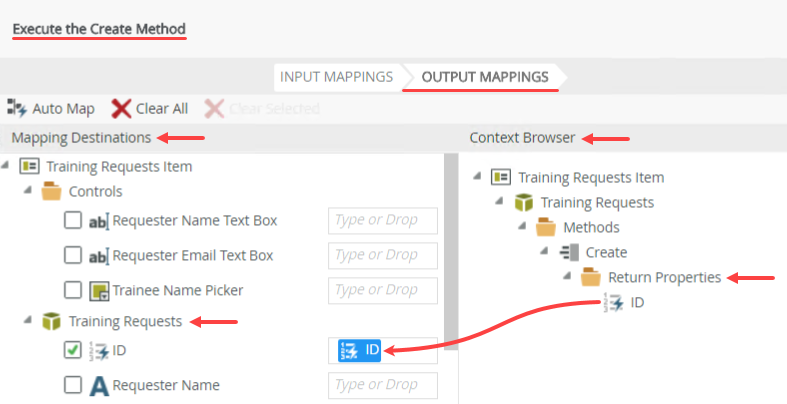
Output Mappings: - Map the Return Properties > ID to the Training Requests > ID text box
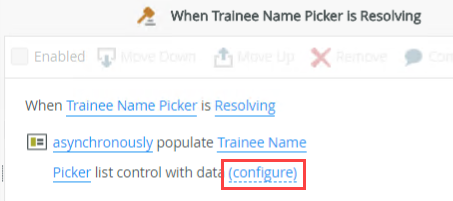
You are saving the ID of the record just created back to the SmartObject so that you can reference it later. (Edit rule) When Trainee Name Picker is Resolving - (Configure action) asynchronously populate Trainee Name Picker list control with data
Input Mappings: - Enter K2 in the Parameters > Label Name text box
This is a required parameter and it sets the security provider you want to search. In this case, you are searching K2 users and groups. In this step, you convert the Trainee Name Text Box to a picker control, then configure the control to retrieve its values from the Trainees SmartObject. You also work with rule actions to save the current record's ID (for future use) as well as define the security label for the picker control.
- Select the Trainee Name Text Box. Click the Change Control icon in the toolbar and select Picker.
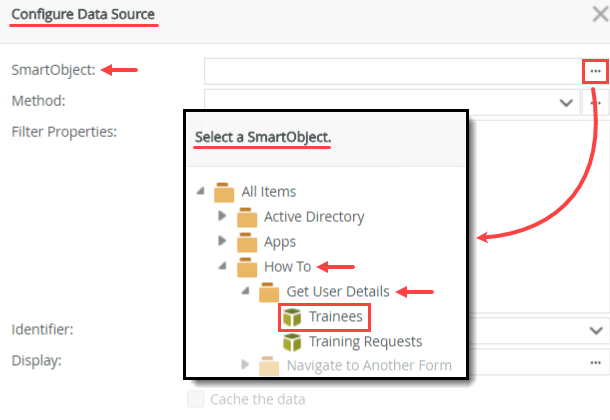
- Select the Trainee Name Picker control (if it isn't already). In the Properties pane, uncheck the Allow Multiple box (under the Settings heading). You want the requester to submit one training request per trainee. Under the Data Source heading, click the ellipses for the SmartObject property. You want to link this control to the Trainees SmartObject.
- On the Configure Data Source screen, click the ellipses for the SmartObject property. On the Select a SmartObject screen, navigate to and select the Trainees SmartObject.
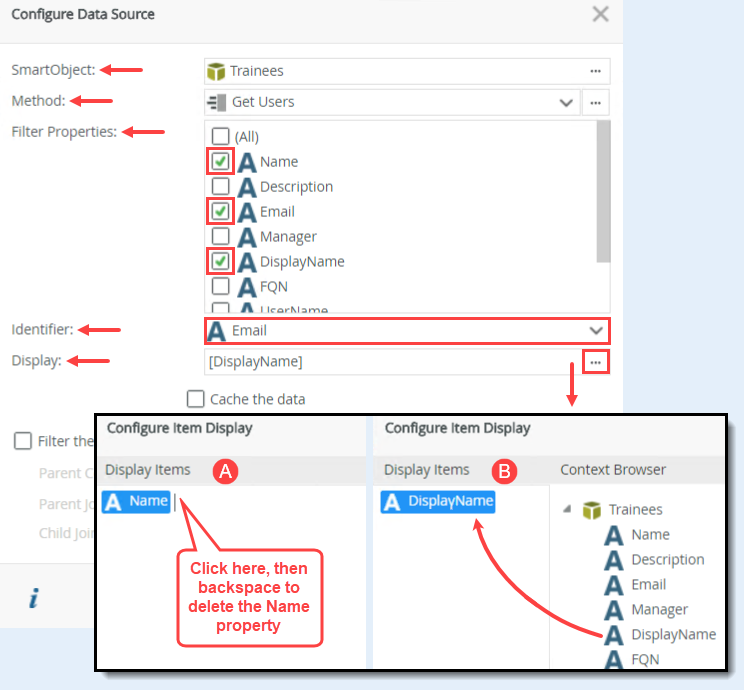
- You are now on the Configure Data Source screen. The SmartObject should reflect Trainees and the Method should reflect Get List. In the Filter Properties pane, uncheck all of the filtering options except Name, Email, and DisplayName. These are the properties K2 searches when resolving a picker control value. Change the Identifier to Email. This is the unique value that distinguishes one URM user from another. (You use the email identifier later in a workflow step.) Change the Display value to Display Name. Click OK.
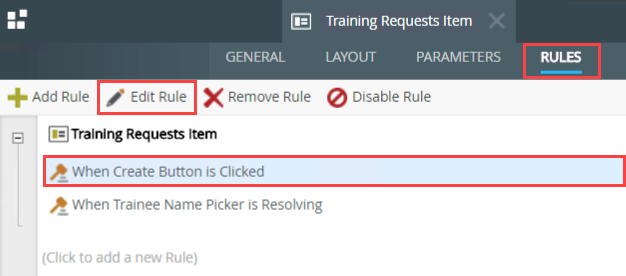
- Click the Rules tab. Select the When Create button is Clicked rule and click Edit Rule.
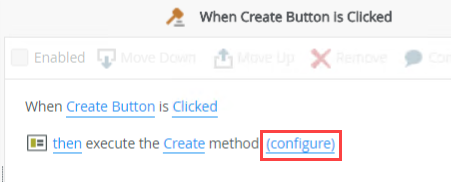
- In the rule definition pane, you see the event that causes the rule to execute (When Create Button is Clicked) and an action (then execute the Create method). This action creates a new record in the Training Requests SmartObject after someone clicks the Create button on the view. You want to save the ID of the new record so that you can reference it later. Click (configure).
- On the Execute a Create Method screen, click the Output Mappings tab. Map the Context Browser > Return Properties > ID to the Mapping Destinations > Training Requests (SmartObject) > ID text box. Click Finish to save the action settings. (If you see the ID already mapped, you can continue to next step.) Click OK to save the rule.
- Edit the When Trainee Name Picker is Resolving rule. This rule executes when you search for a user in the picker control. The rule searches the filtering properties (Name, Email, and DisplayName) and returns all records matching the search term.
- In the rule definition pane, click (configure) to edit the asynchronously populate Trainee Name Picker list control with data action.
- There is one required parameter: Label Name. This value sets the security label you want K2 to search. Security labels correspond to security providers, which store users and groups. Some examples of security providers include K2, Active Directory (AD), and Azure Active Directory (AAD). For this exercise, enter
K2
into the Mapping Destinations > Parameters > Label Name text box. Click Finish to save the action settings. Click OK to save the rule.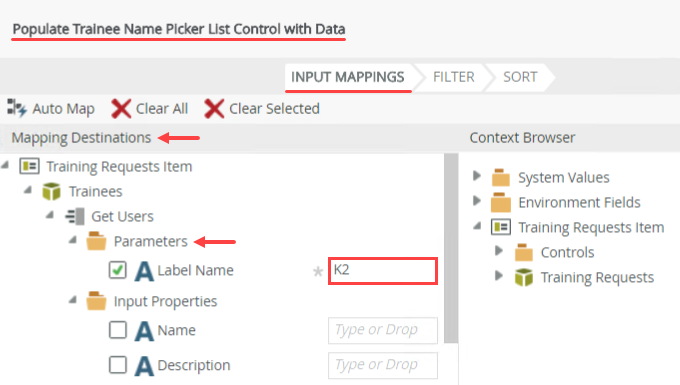
- Click Finish to save and exit the view.
Next, you work with rules. You edit a rule that executes when someone clicks the Create (create a new record) button. You map the ID of the new record back to the SmartObject so that you can reference it later. You also edit a rule that executes when someone enters a value into the picker control. You must specify the Label Name that defines which security label you want K2 to search. For example, you could search K2, AAD, AD, and so forth. In this exercise, you search K2.
- Create a form called Training Requests. Add the Training Requests Item view and the Trainee Details Item view. Configure the rules using the table below as a guide.
Name Value Notes Rules (Edit rule) When the Form is Initializing - (Add and configure action) Transfer data
System Value > Current User - Map the Display Name system value to the Training Requests Item view > Controls > Requester Name text box
- Map the Email system value to the Training Requests Item view > Controls > Requester Email text box
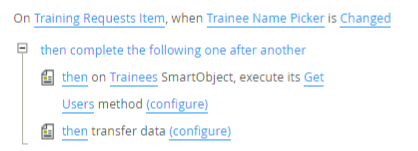
As a convenience, you populate the requester's name and email with the current user's information. (Add Rule) When a control on a View raises an event - (Add event) On Training Requests Item, when Trainee Name Picker is Changed
- (Add and configure action) Execute a SmartObject Method
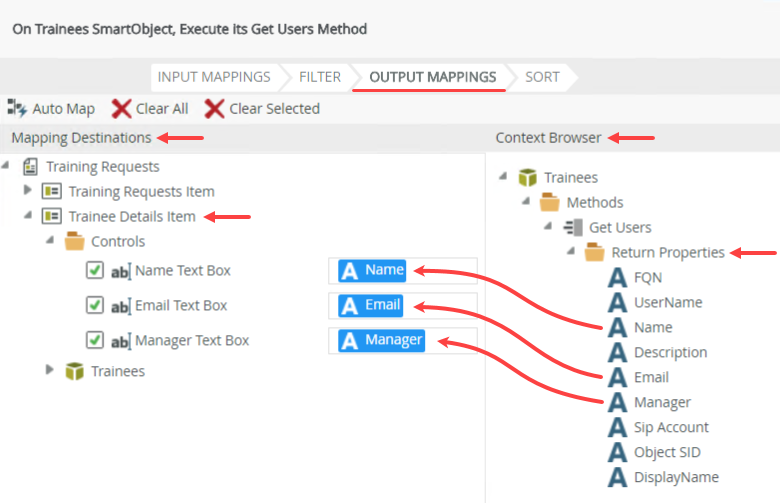
(Configure action) then on Trainees SmartObject, execute its Get Users method - Input Mappings
- Parameters > Label Name value = K2.
- Map the Context Browser > Training Requests Item > Controls > Trainee Name Picker property to the Input Properties > Email text box
- Output Mappings
- Map the Return Properties > Name to the Trainee Details Item view > Name text box
- Map the Return Properties > Email to the Trainee Details Item view > Email text box
- Map the Return Properties > Manager to the Trainee Details Item view > Manager text box
You configure the method to search the K2 security provider, using the email as the search filter. You output the Name, Email, and Manager results to the Trainee Details Item view. In this way, each time the picker control value changes, the details view updates with URM SmartObject data for the selected user.
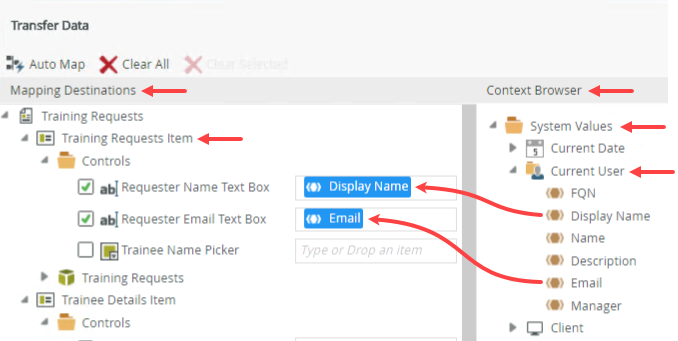
- (Add and configure action) Transfer data
System Value > Current User - Map the Display Name system value to the Training Requests Item view > Controls > Requester Name text box
- Map the Email system value to the Training Requests Item view > Controls > Requester Email text box
Once again, pass the Display Name and Email system values to the Requester Name and Requester Email text boxes. When the picker control resolves, it reloads the view, causing the name and email text boxes to reset. To maintain consistency, you must reload the system values. - Right-click your category and select New Form. Name the form
Training Requests
and click Create.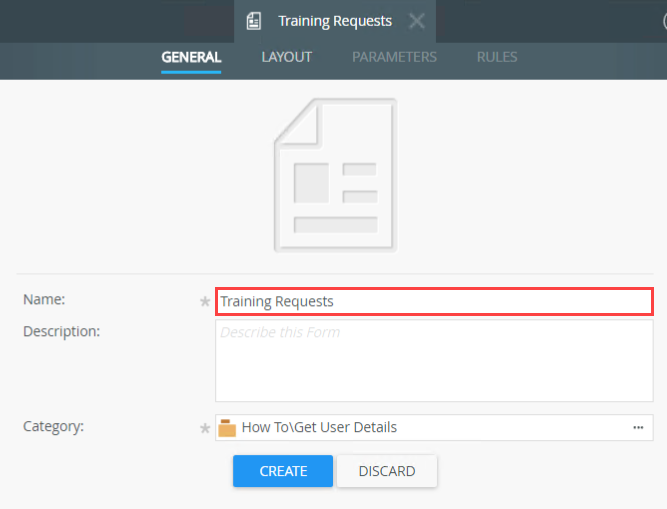
- On the upper left side of your screen, click the Views tab. Drag the Training Requests Item view onto the design canvas. You can find the view in the category folder you created at the beginning of this exercise.
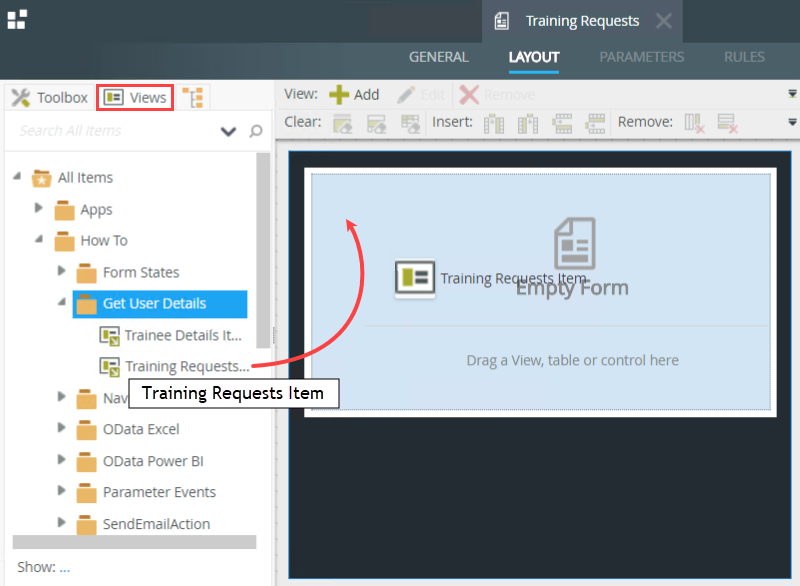
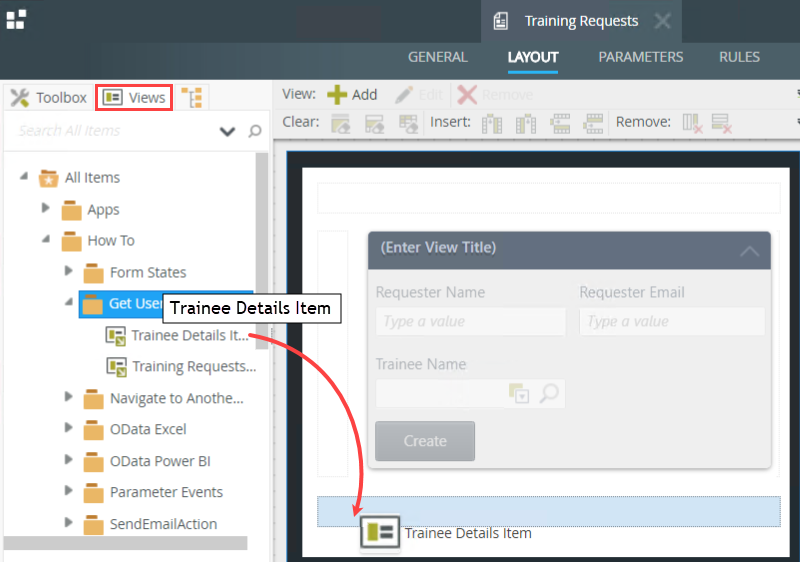
- Drag the Trainee Details Item view below the Training Requests Item view. As you drag the view onto the canvas, a placeholder appears. Drop the view into the placeholder.
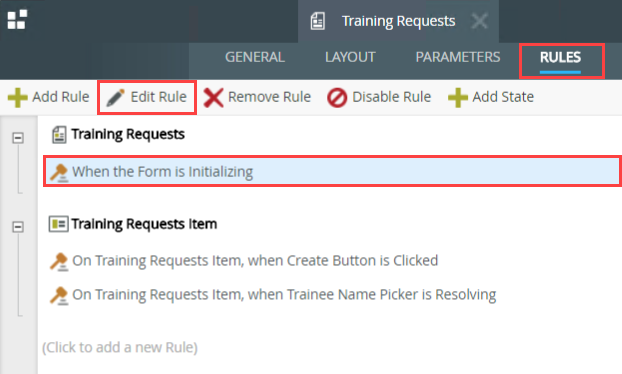
- Click the Rules tab. Select the When the Form is Initializing rule and click Edit Rule. This rule executes when the form loads.
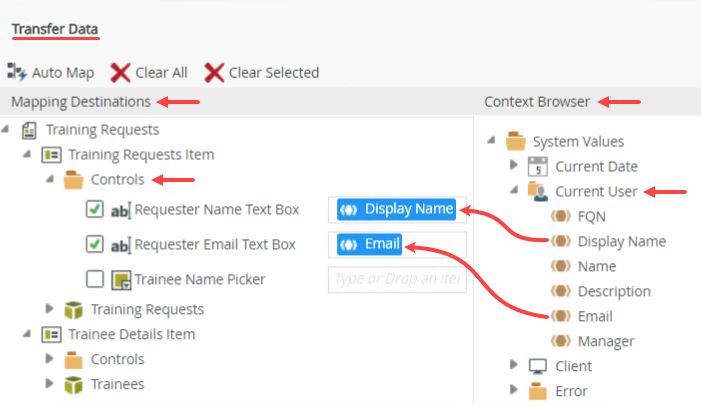
- With the Actions tab active, click Transfer data (under the Data Transfer heading) to add it to the rule definition pane. Click (configure).

- On the Transfer Data screen, expand the Context Browser > System Values > Current User node. Drag the Display Name property into the Mapping Destinations > Controls > Requester Name Text Box. Drag the Email property into the Requester Email Text Box. Click OK to save the action settings. Click OK to save the rule.
- Next, you add a new rule that populates the Trainee Details Item view. This rule executes when the picker control value changes and retrieves the selected user's information from the Trainees SmartObject. On the Rules screen, click Add Rule.
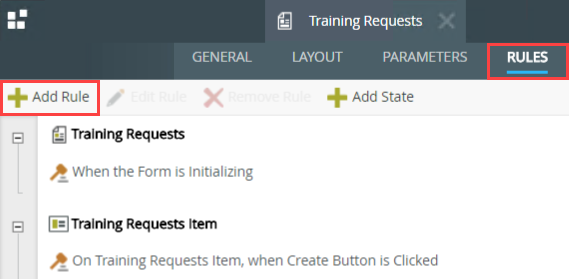
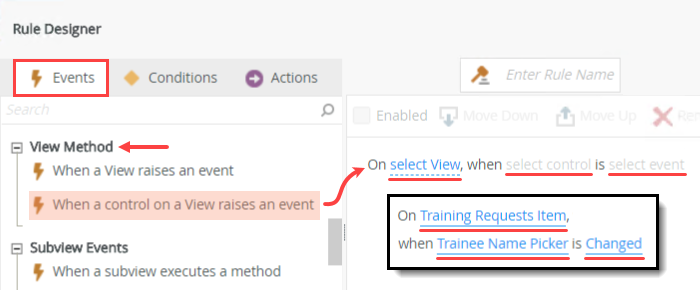
- First, you must add an event. The event is what "triggers" the rule to execute. In this case, it's when the picker control value changes. With the Events tab active, click When a control on a View raises an event (under the View Method heading) to add it to the rule definition pane. Click select View and select Training Requests Item. Click select control and select Trainee Name Picker. Click select event and select Changed.
- Next, you add an action that populates the view with the trainee details. Click the Actions tab. Click Execute a SmartObject method to add it to the rule definition pane. Click select SmartObject and select the Trainees SmartObject. (Your screen may not match the image exactly depending on your categories and naming conventions.) The method value is automatic since there is only one method (Get Users). Click (configure).
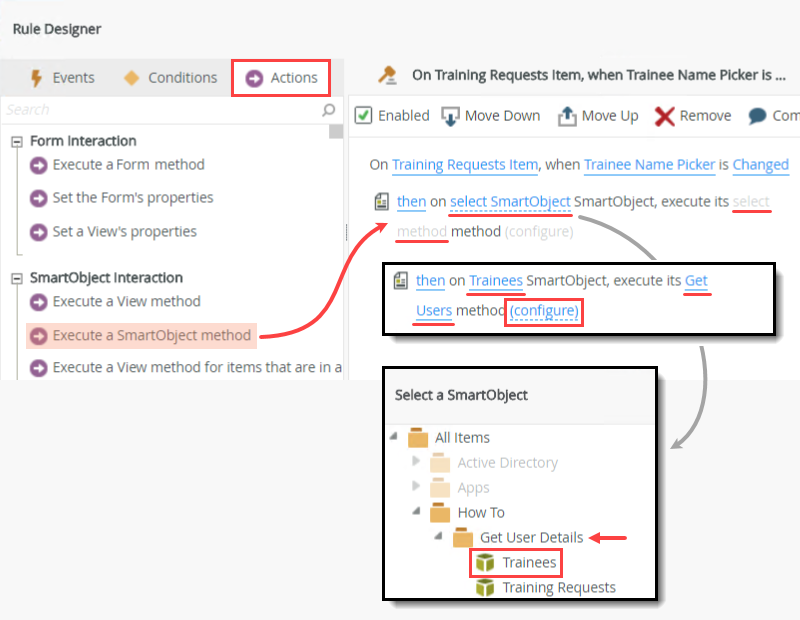
- On the Input Mappings screen, there are two properties you need to enter. First, you must provide a value for the required Label Name, which tells K2 the security provider to search. The second property is the Email, which is the value K2 uses for filtering the records in the Trainees SmartObject. (You are searching for a particular email within the K2 security provider.) For the Mapping Destinations > Parameter > Label Name value, enter
K2
and for the Email, drag the Context Browser > Training Requests (form) > Training Requests Item (view) > Controls > Trainee Name Picker into the Mapping Destinations > Input Properties > Email text box.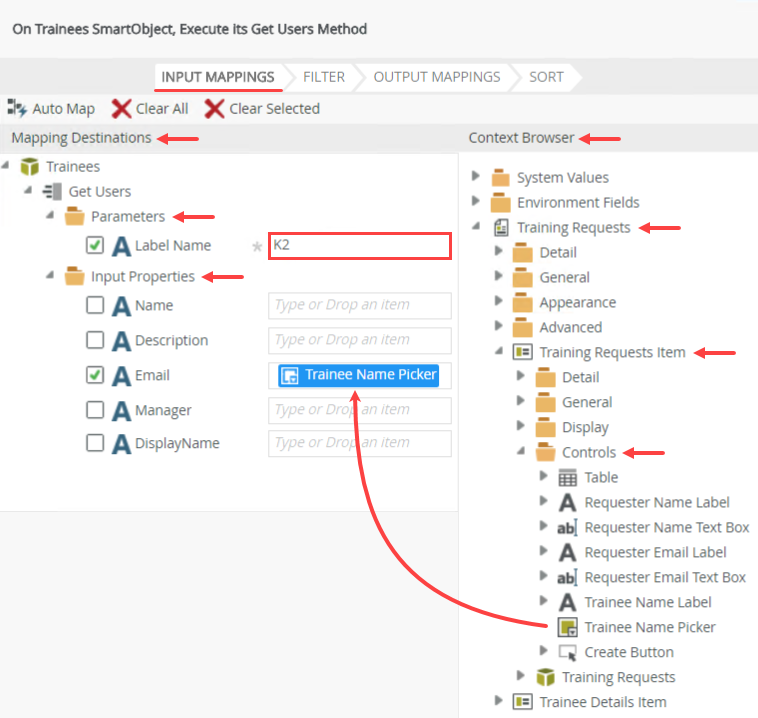
- Next, you map the properties you want to populate on the Trainee Details Item view. Click the Output Mappings tab. Map the Context Browser > Return Properties > Name to the Mapping Destinations > Controls > Trainee Details Item > Name Text Box. Map the Return Properties > Email and Return Properties > Manager to their corresponding text boxes on the details view. Click Finish to save the action settings.
- With the Actions tab still active, click Transfer data (under the Data Transfer heading) to add it to the rule definition pane. Click (configure).
- Map the Context Browser > System Values > Current User > Display Name and Email to the Mapping Destinations > Training Requests Item view > Controls > Requester Name and Requester Email text boxes. Click OK to save the action settings.
- Your rule should look like the image below. Click OK to save the rule. Click Finish to save and exit the form.
- Right-click the Training Requests form and select Run.
- You should see the Requester Name and Requester Email text boxes populated with your (the current logged-in user) information. Click the search icon for the Trainee Name Picker control. If you are working on a K2-provided VM, enter
Codi
then click the search icon once again. If you are working in your own environment or a cloud environment, search for a user in your organization. Click Add to select the name. Click OK to save the name.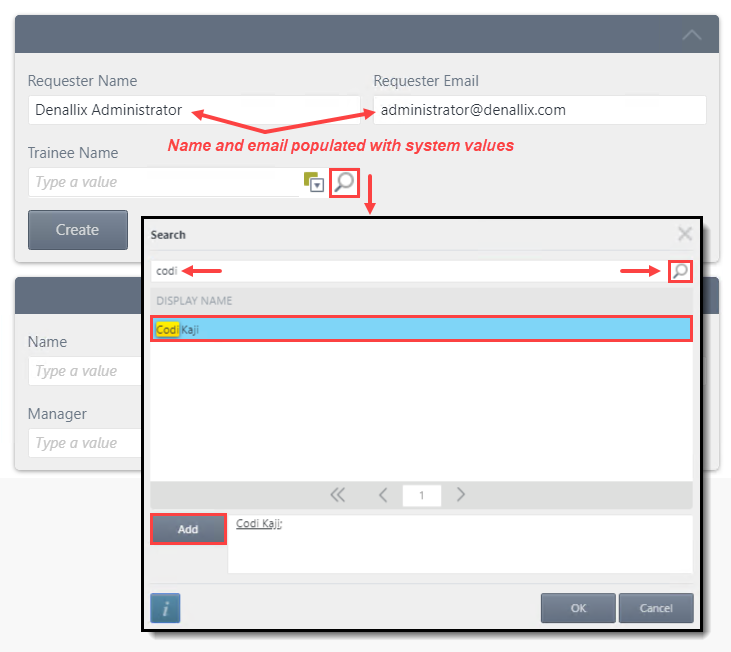
In the next few steps, you work with rules. You edit a rule that executes when you open the form. You add an action that populates the Requester Name and Requester Email text boxes with the current user's information. You add a new rule that executes when the picker control value changes. When the value changes, you populate the Trainee Details Item view with the selected user's information.
In this rule action, you are pre-populating the Requester Name and Requester Email text boxes with system values. K2 keeps track of several system values that you can use as variables in your rules and workflow steps. (Variables are "placeholders" that are replaced with "live" data at runtime. For example, date and time values, and values about the current user.)
There is one last action you must add before you test the form. After the picker control resolves, it refreshes the view with the selected user. When the view reloads, it resets the Requester Name and Requester Email text boxes back to no value. You must transfer the system values once again so that the view remains consistent.
Before you move on to the workflow, test the form to confirm your rules are working correctly.
You should see the selected user's name, email, and manager displayed in the Trainee Details Item view.
Use system values and values from a URM SmartObject in a workflow step
In this section, you create a workflow that starts when you click the create button on the form. The workflow consists of one step - sending an email confirmation. You include trainee details from the Trainees SmartObject in the message body.
- Create a workflow called Training Requests Workflow.
Confirm or configure the Start step to start the workflow when someone clicks the Create button on the Training Requests form.
- Right-click the Training Requests form and select Design Workflow.
- Name the workflow
Training Requests Workflow
and click Create.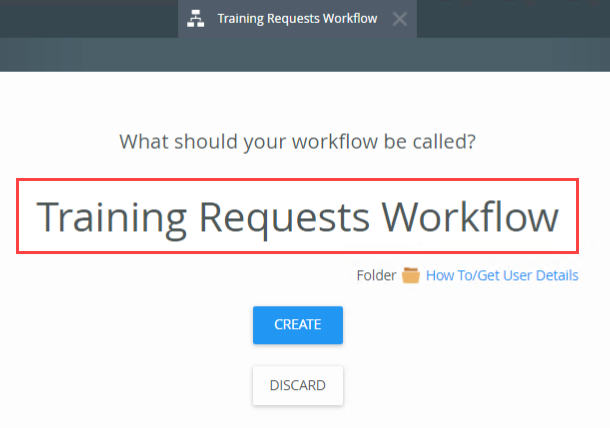
- On the Welcome screen, click Close to continue.
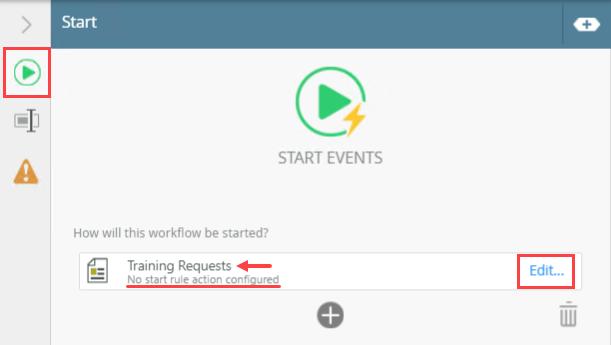
- Begin by confirming or configuring the Start button actions. Select the Start button and expand the Configuration Panel.
- You should the Training Requests form as the starting point for the workflow. If you see the phrase No start rule action configured, you must configure the action. Click Edit... If you see the phrase On Training Requests Item, when Create Button is Clicked, the action is ready to go and you can skip to the next step.
- On the References screen, there are no changes, so click Next.
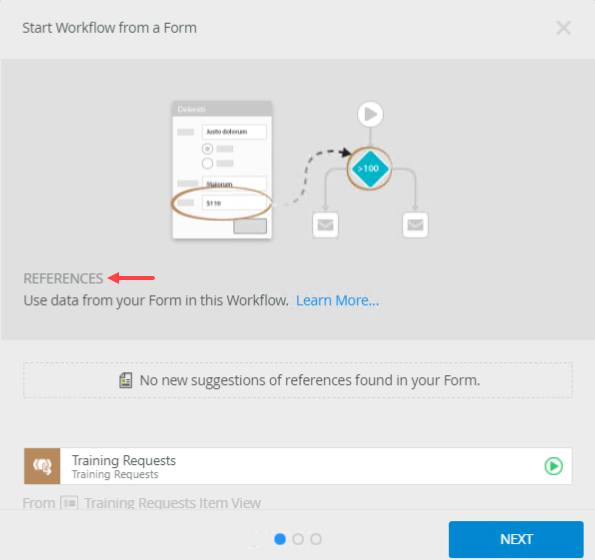
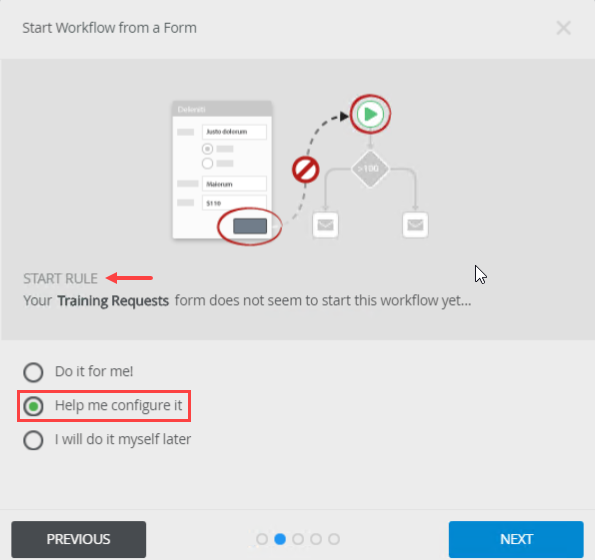
- On the Start Rule screen, select Help me configure it and click Next.
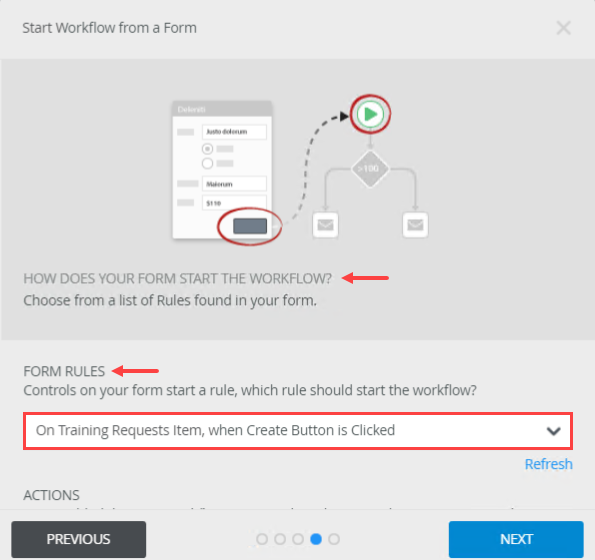
- On the Form State screen, there are no changes, so click Next.
- On the How does your form start the workflow? screen, confirm the Form Rules shows On Training Requests Item, when Create Button is Clicked selected. If it is not, use the drop-down to select the rule. Click Next.
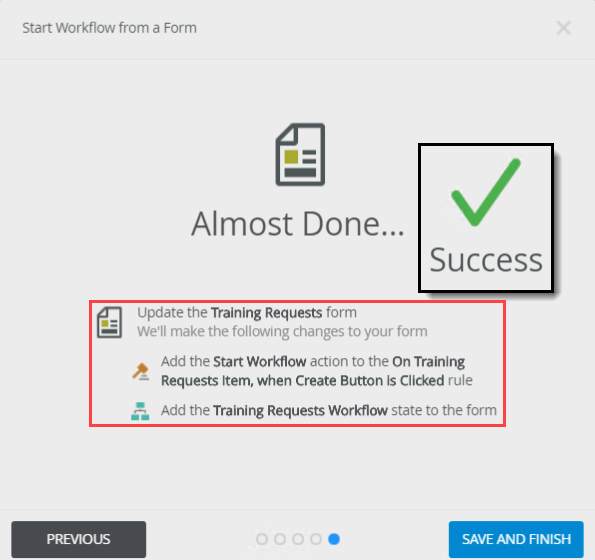
- On the summary screen, review the changes K2 makes to the form rules and click Save and Finish. When you see the success check, click OK.
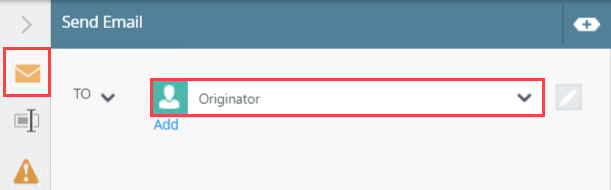
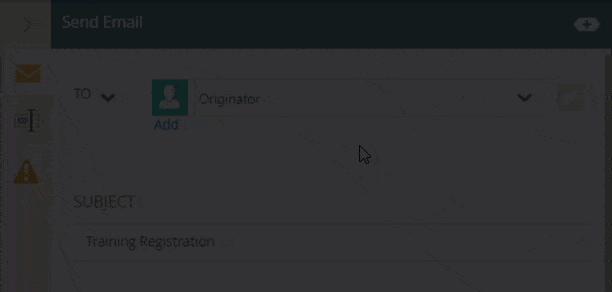
- Add a Send Email step. Keep the default To value, Originator. Configure the message body with variables from the Context Browser, including the Trainees SmartObject. Use the email value from the Trainee Name Picker control to filter the SmartObject records. Deploy the workflow.
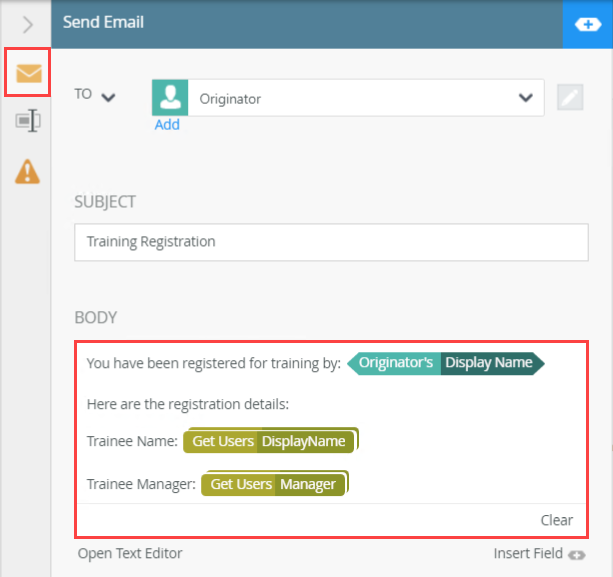
- Expand the Toolbox > Basic node and drag a Send Email step into the empty placeholder below the Start step.
- With the Send Email step selected, expand the Configuration Panel.
- With the Send Email tab active, keep the default To value, Originator.
- For the Subject line, enter
Training Registration
and for the message Body, enter
You have been registered for training by:
Here are the registration details:
Trainee Name:
Trainee Manager:
- Expand the Context Browser.
- Click the Workflow tab near the lower right corner of your browser window. Expand the Originator node. Drag the Display Name variable into the message body and append it to the end of the first line.
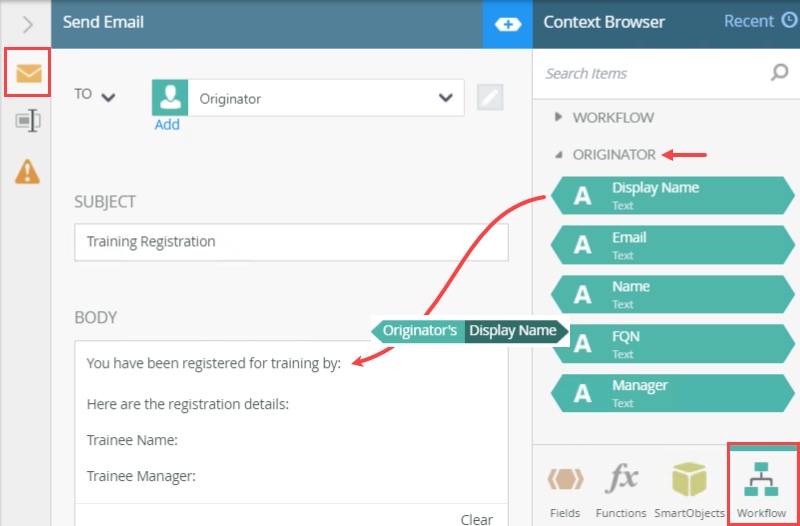
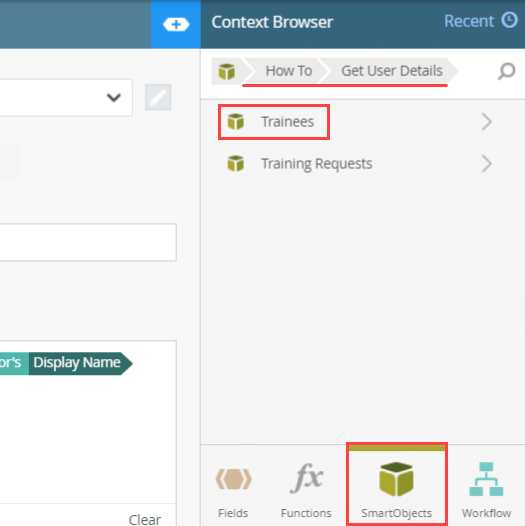
- Click the SmartObjects tab. Navigate to the Trainees SmartObject. (Your screen may not match the image below exactly depending on your categories and naming conventions.)
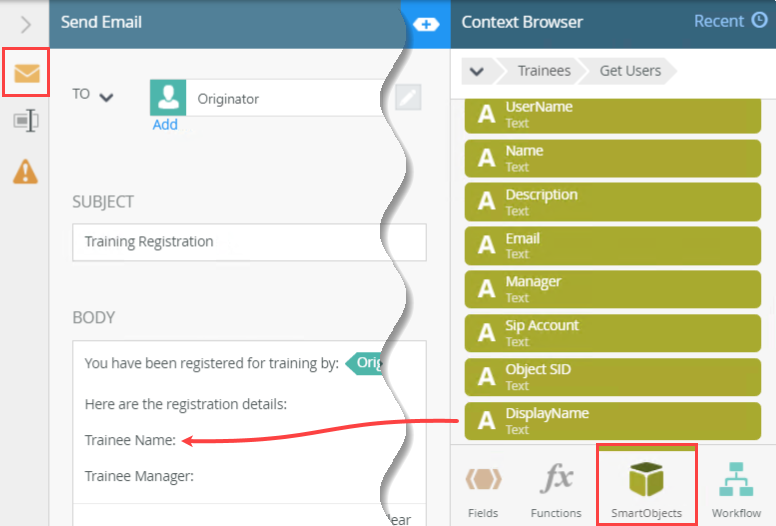
- Expand the Trainees SmartObject. Expand the Get Users method. Drag the DisplayName property into the message body and append it to the end of the Trainee Name line.
- As soon as you drop the property, the SmartField editor opens. You want to return the SmartObject record for the current workflow instance. K2 uses references to keep track of the current workflow instance and its properties and values. Change the filter parameter from FQN to Email. Click the Fields tab. Expand the Training Requests references. Drag the Trainee Name reference into the right filter parameter. (Remember the Trainee Name control is the picker control where the Email is the value.) Finally, enter
K2
as the Label Name value so K2 knows which security provider to filter. Click the exit icon to close the SmartField editor.To summarize this step, you are referencing the Trainees SmartObject > Display Name in your message body. To return the correct display name, you filter the SmartObject records using the email from the current record. The email value comes from the picker control (named Trainee Name).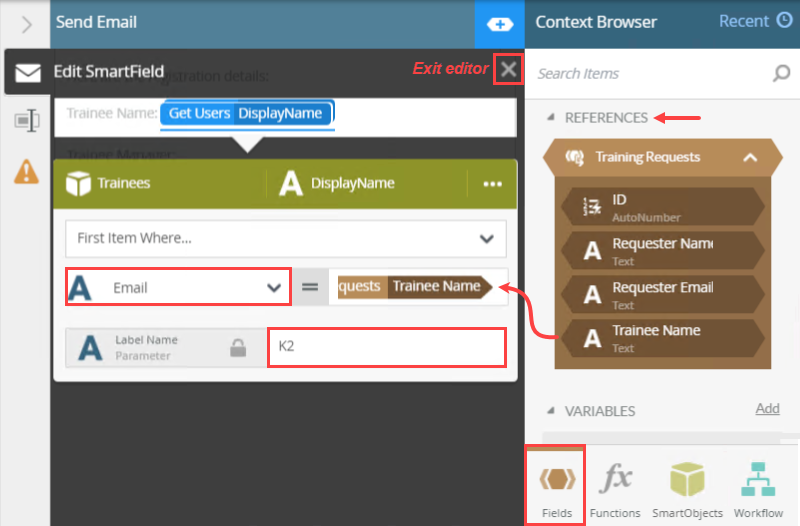
- Repeat the step above for the Trainee Manager. Drag the Trainees SmartObject > Manager property into the message body. When the SmartField editor opens, change the FQN (left) parameter to Email. Drag the Fields > References > Trainee Name reference into the right parameter. Enter
K2
for the Label Name. Exit the editor. Collapse the Configuration Panel. - Deploy the workflow (File > Deploy). When you see the success dialog, close the workflow designer. Deploying the workflow publishes it to the K2 server and makes it available for use.

Next, you add variables from the Context Browser to create dynamic content. At runtime, K2 replaces variables with live data, allowing you to personalize your message.
- Expand the Toolbox > Basic node and drag a Send Email step into the empty placeholder below the Start step.
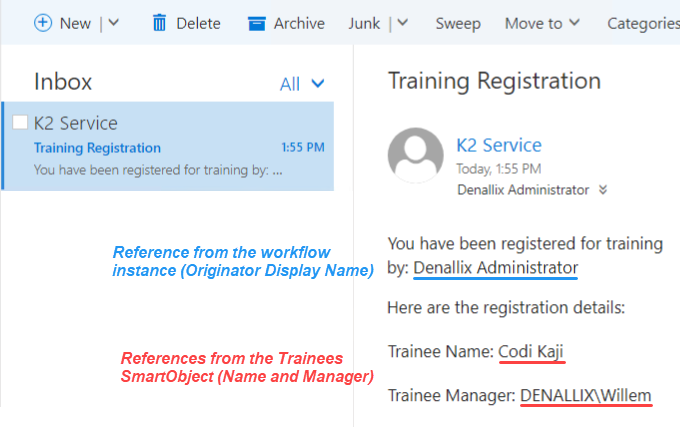
- Test the URM SmartObject integration. Run the Training Requests form. Use the picker control to select a trainee. Create the record. Open your email client and confirm you see the confirmation email with the runtime values in the message body.
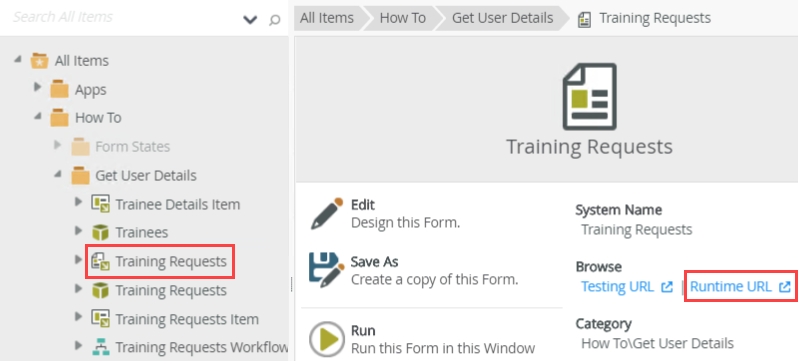
- Select the Training Requests form and click the Runtime URL in the central pane.
- Use the Trainee Name picker control to select a trainee. Click Create. The screen may flash briefly, but you won't have any other indication the form submitted because you have not added any rule actions that provide feedback after the form submits. In the real world, you might show a message or clear the fields, or even close the form window.

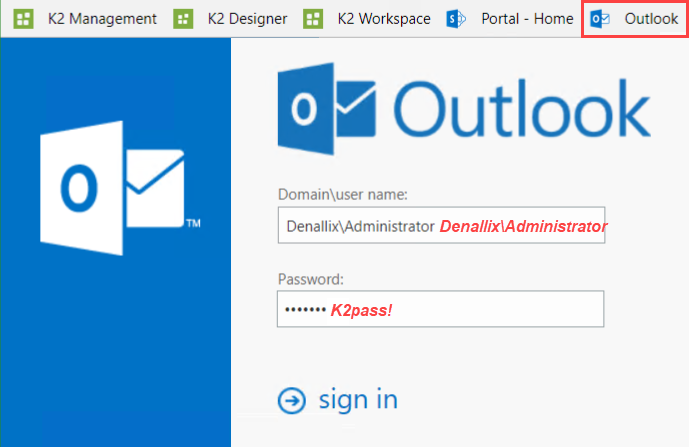
- Open your email client. If you are working on a K2-provided VM, use the Outlook/OWA link in the Favorites bar to open Outlook.
- Open the Training Registration email. You should see the values from both the workflow instance references and Trainees SmartObject in the message body.
- Select the Training Requests form and click the Runtime URL in the central pane.
Review
In this example, you created an advanced SmartObject based on the URM Service (User Role Manager) SmartObject > Get Users method. You linked the SmartObject with a picker control in a view, which allows you to search all security providers registered with K2 for user details. You also leveraged the System Values section of the Context Browser to retrieve details about the current user filling in the form. You retrieved user data in a workflow by calling the Get Users method in a Send Email step, as well as using values from the Context Browser for the workflow originator.