How To: Using Form States
This article illustrates how to use form states. States allow you to use the same form for different workflow tasks. One form can have many states. Each state has its own set of rules that you can edit depending on the scope of the task. In this demonstration, you create a workflow with two tasks. You customize the state's rules for each task so that the form behaves differently based on the task scope and recipient. For more information on states, see Form States.
Three state configurations of the same form

When to Use Form States
Use states when you want to use the same form for different tasks in a workflow. States are part of a form's rule configuration and allow you to customize the rules based on a workflow task. Each task has a state associated with it. You can use the same state for multiple tasks or you can create a new state for each task. For example, you have a state for the originator's task when they first submit the form. You might hide controls or views the originator does not need to see, such as controls or views that only the approving manager uses. Likewise, you might hide controls the approving manager does not need to see, such as create or delete buttons. You can use the same form for tasks in a single workflow and even across multiple workflows.
Scenario
You work in IT and have automated several of your organization's business processes. Most processes contain a workflow that includes one or more approval tasks. Each process has one form which you customize based on the workflow task at hand. Using states, you can add and edit rules based on each workflow task.
Steps
In this demonstration, you create a SmartBox SmartObject along with a view and form. You create a workflow containing two task steps. You create a new state for each task. After deploying the workflow, you edit the form and customize the state rules for each workflow task.
Setup Steps
The following steps set up the scenario from start to finish. If you want to skip the setup steps and view the topic step, go to Edit Form Rules.
- In K2 Designer, create a SmartBox SmartObject called State Sample with the following properties: Name (Text), Department (Text), First Task (Text), and Second Task (Text). (Optional) Create categories first to keep your work organized.
- Launch K2 Designer.If you do not know how to access K2 Designer, see Accessing K2 Sites.
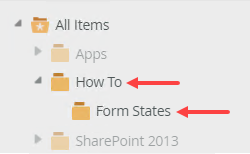
- Begin by creating categories to keep your work organized. Right-click All Items and select New Category. Use the image below as a sample for creating categories for this demonstration.
- Next, create the SmartObject. Right-click the Form States category and select New SmartObject. Name the SmartObject
State Sample
and confirm the SmartBox option. Click Create.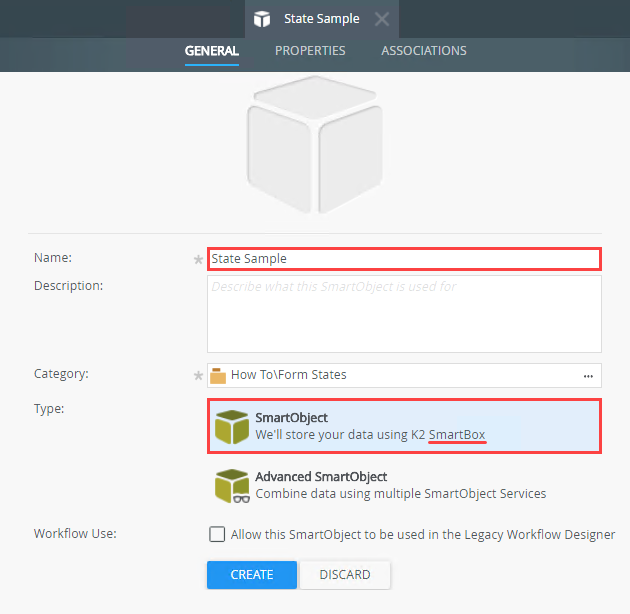
- Add the following properties:
Name (Text)
Department (Text)
First Task (Text)
Second Task (Text)
and click Finish to save and exit the SmartObject.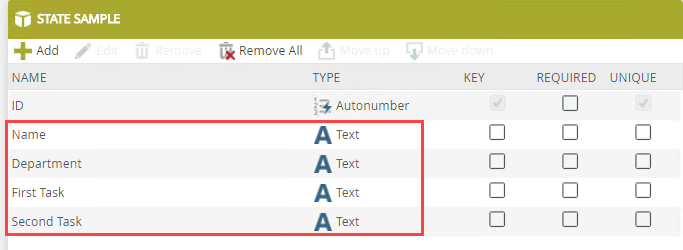
- Launch K2 Designer.
-
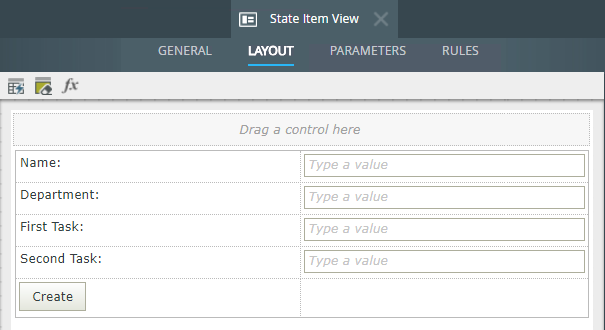
Design an Item View from the State Sample SmartObject called State Item View. Add all the properties except ID. Add the Create standard button.
- Right-click the State Sample SmartObject and select Design View.
- Name the view
State Item View
and confirm the type is Item View. Click Create.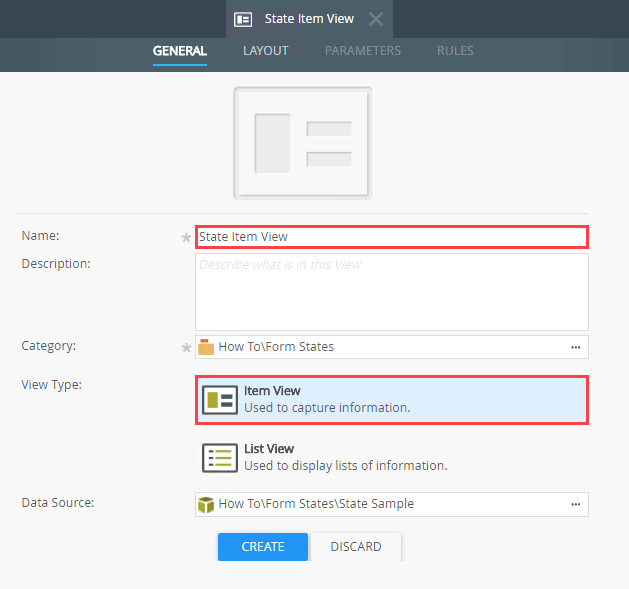
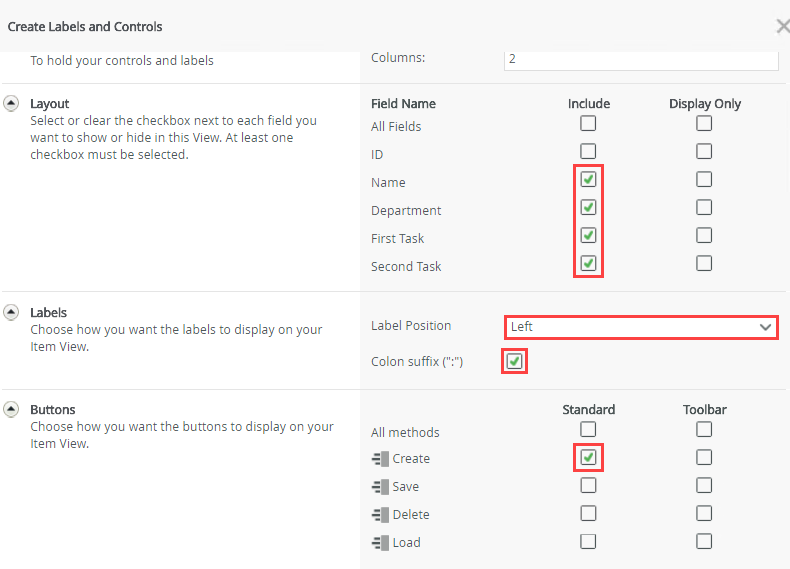
- Click Create Labels and Controls.
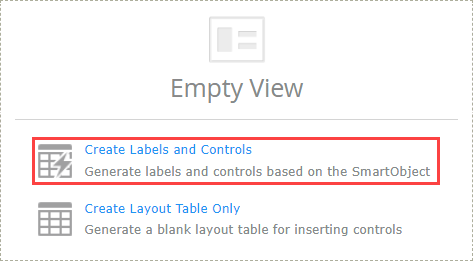
- Include all the fields except ID. Change the label position to left and enable the colon suffix. Add the Create standard button. Click OK.
- Your view should look like the image below. Click Finish to save and exit.
-
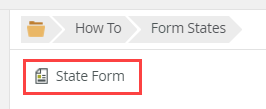
Design a form from the item view called State Form.
- Next, you design a form from the item view. Right -click the State Item View and select Design Form.Views are not accessible on their own. You must contain them within a form. Forms are the public facing interface that you open with a browser. You can use a view in more than one form and one form can contain more than one view.
- Name the form
State Form
and click Create.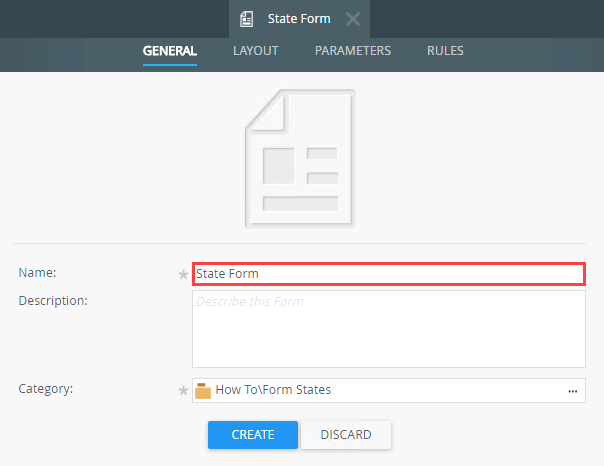
- There are no other edits to the form at this time, so click Finish to save and exit. You return to the form after building the workflow to customize each state's rules.
- Next, you design a form from the item view. Right -click the State Item View and select Design Form.
-
Add a workflow called State Workflow. Configure the Start step so that it uses the State Form and Create button to start the workflow. Change the default state name to Originator Submit State.
- Right-click the Form States category and select New Workflow.
- Name the workflow
State Workflow
and click Create.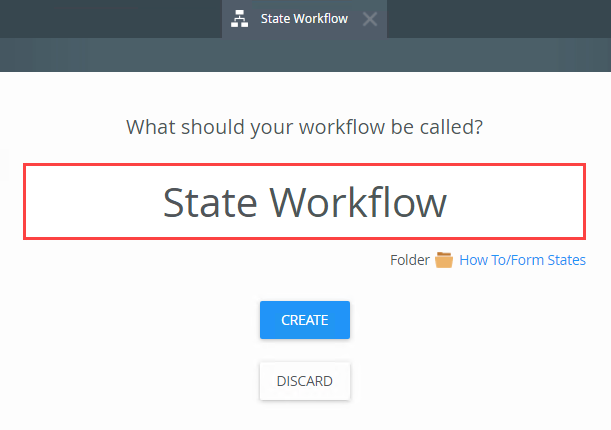
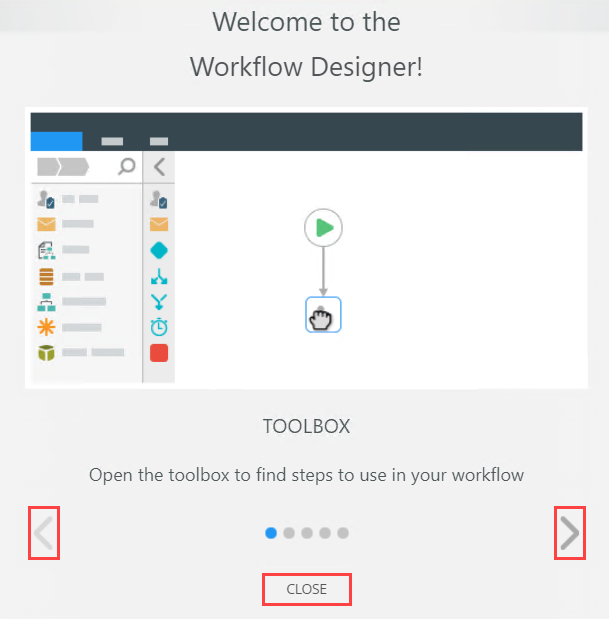
You see a Welcome screen with an interactive panel. You can click the right and left arrows to learn more about the workflow designer. Click Close to proceed to the design canvas.
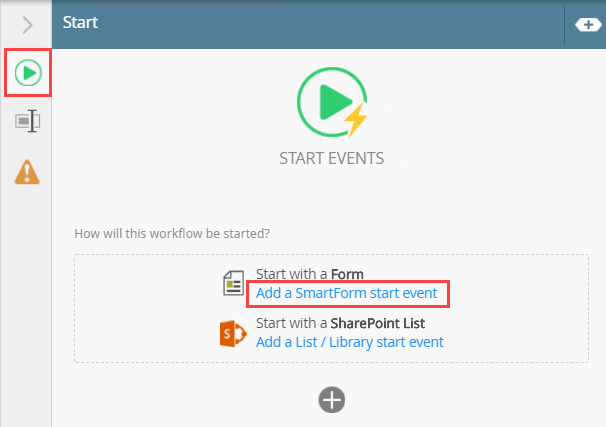
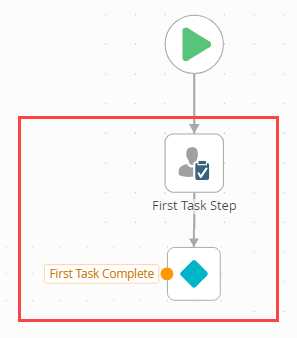
- You begin the workflow by configuring the Start step. Select the Start step and expand the Configuration Panel. (When selected, steps have a blue border.)The Configuration Panel allows you to configure and customize the steps you add to your workflow.
- Click Add a SmartForm start event.
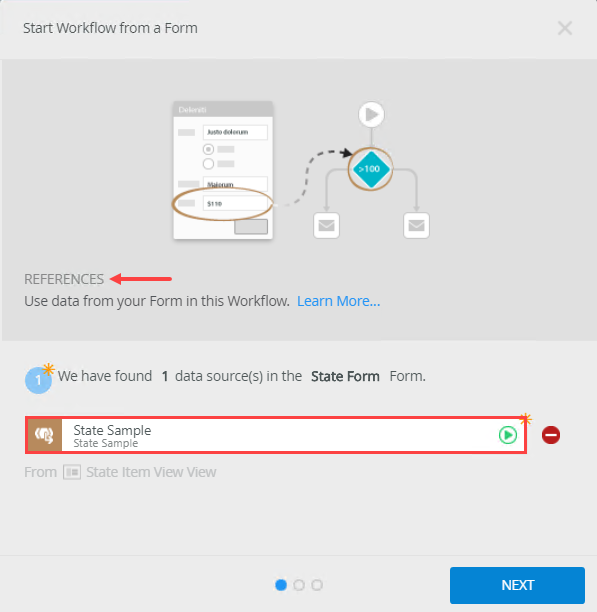
- Navigate to and select State Form. In the image below, the path is: How To > Form States > State Form. Your path may be different depending on your categories and naming convention. Click OK.
- On the References screen, notice K2 discovered the State Sample SmartObject. K2 creates a reference to this data source that allows you to use its properties and methods throughout the workflow. There are no changes to this screen, so click Next.
- On the Start Rule screen, select Help me configure it. This option steps you through each setting so you can customize your start settings. Click Next.

- You are now on the Form State screen. The first state represents the form's behavior for the originator, or person who submits the form in the first place. Notice that K2 automatically creates a new state and names it based on the workflow (State Workflow). You will change this name so that it is more descriptive. Replace State Workflow with
Originator Submit State
and click Next.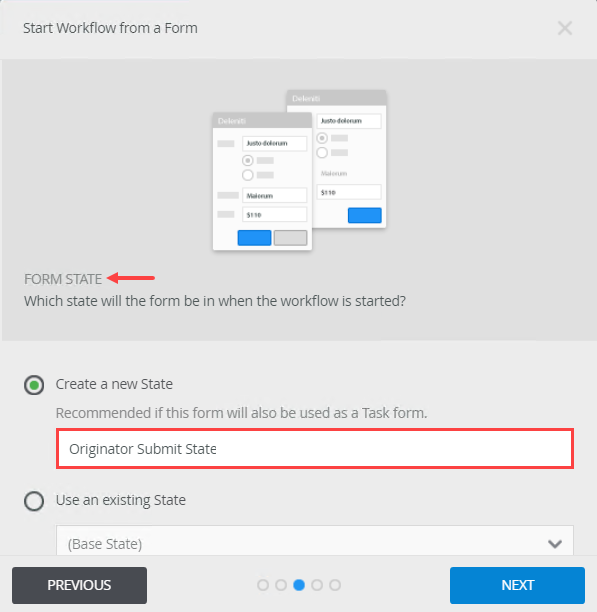
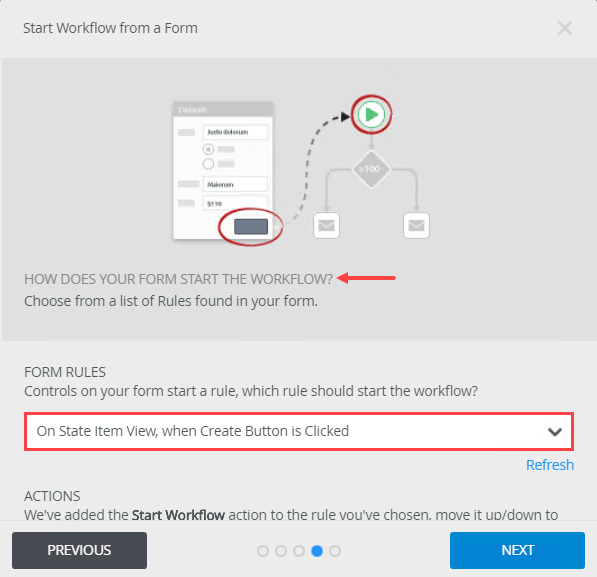
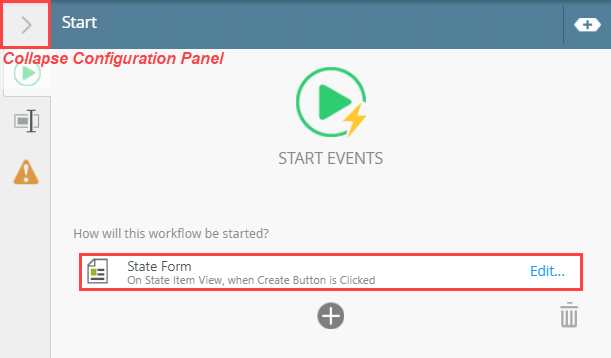
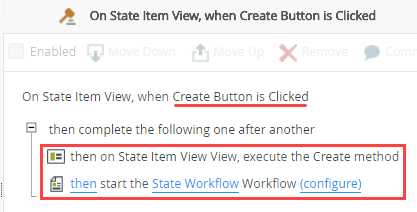
- On the How Does Your Form Start the Workflow screen, the default rule is On State Item View, when Create Button is Clicked. Since the Create Button is the only button, K2 assumes this is the control you want to use to start the workflow. Click Next to continue.
- On the summary screen, review the changes K2 makes to the State Form rules. Click Save and Finish. When you see the success check, click OK.
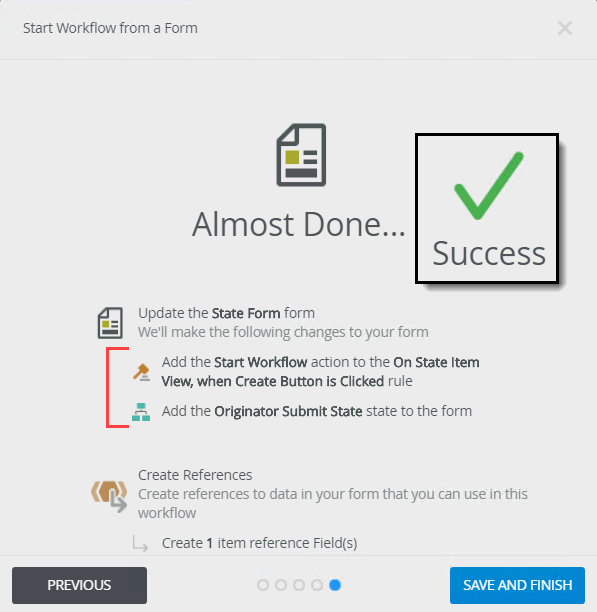
- Notice now that the start screen reflects the correct form and event that starts the workflow. Collapse the Configuration Panel by clicking the slider.
The Start Workflow from a Form wizard launches.
- Add a Task step followed by a Decision step. Use the table below as a guide for configuring the task step properties.
Add another Task step followed by a Decision step. Connect the task step to the First Task Complete outcome line. Use the table below as a guide for configuring the second task step properties.Tab/
PropertyValue Notes Task/
InstructionsSelect First Task Complete and click Submit.
Enter instructions for the task recipient. Form/
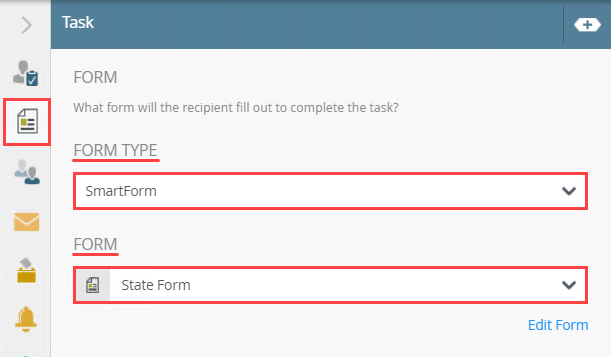
Form TypeSmartForm Form/
FormState Form Navigate to and select State Form. Open Task on a Form (wizard) References No change Open Task Help me configure it Workflow View Create a new State First Task Step State Open Task Rule No change After Submit Action No change Summary Save and Finish Task/
ActionsFirst Task Complete
You need one action for testing. In the real world, you might have several actions such as Approved, Denied, and Rework. Recipients/
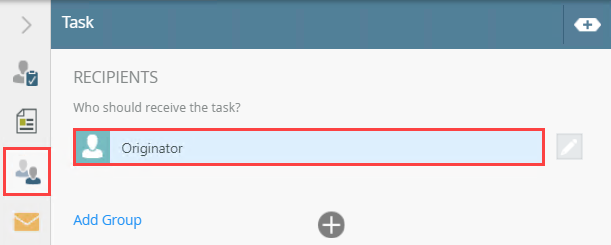
RecipientsOriginator You assign the task to yourself for testing. Properties/
NameFirst Task Step This is the name of the step you see on the design canvas and in reports. Tab
PropertyValue Notes Task/
InstructionsSelect Second Task Complete and click Submit.
Enter instructions for the task recipient. Form/
Form TypeSmartForm Form/
FormState Form Navigate to and select State Form. Open Task on a Form (wizard) References No change Open Task Help me configure it Workflow View Create a new State Second Task Step State Open Task Rule No change After Submit Action No change Summary Save and Finish Task/
ActionsSecond Task Complete
You need one action for testing. In the real world, you might have several actions such as Approved, Denied, and Rework. Recipients/
RecipientsOriginator You assign the task to yourself for testing. Properties/
NameSecond Task Step This is the name of the step you see on the design canvas and in reports. - From the Toolbox > Basic node, drag a Task step into the empty placeholder below the Start step.

- With the Task step highlighted, expand the Configuration Panel.When adding a step to the workflow design canvas, you may see a red warning badge. This badge simply indicates the step has required configurations. When you expand the Configuration Panel, the required configuration is also flagged. (Note that the steps below may be different from your screen.)
- Confirm the Task tab is active. For the Instructions, enter
Select First Task Complete and click Submit.
For the Actions, click the Add(+) icon. Enter
First Task Complete.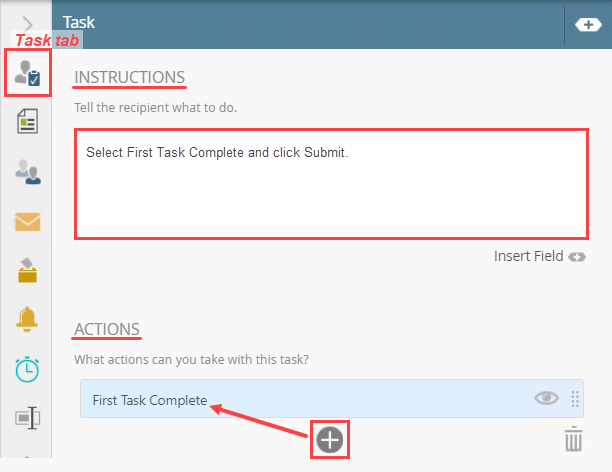
- Select the Form tab. Under the Form Type heading, select SmartForm. Under the Form heading, select State Form. (If State Form is not displayed, click Browse to navigate to the form.)
- On the References screen there are no changes, so click Next.
- On the Open Task screen, select Help me configure it and click Next.
- You are on the Workflow View screen. Here, you can keep or change the state associated with this task. Keep the setting to create a new state, but change the name to
First Task Step State
and click Next.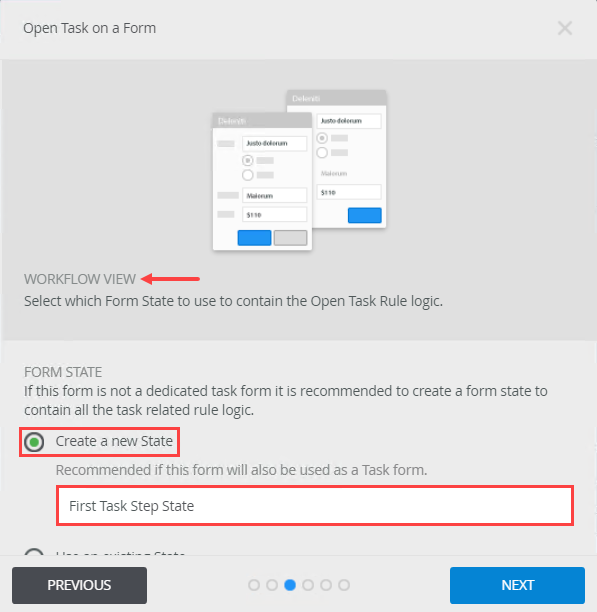
- There are no changes to the Open Task Rule Action screen, so click Next.
- There are no changes to the After Submit Action screen, so click Next.
- On the summary screen, review the changes K2 makes to the form rules and click Save and Finish. When you see the success check, click OK.
- Select the Recipients tab. Keep the default value, Originator. This makes testing easier if the person submitting the form (you!) also takes action on the tasks.
- Select the Properties tab. Change the name of the step to
First Task Step
and collapse the Configuration Panel.
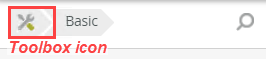
- From the Toolbox > Logic node, drag a Decision step below First Task Step. Connect the two steps.To return to the Toolbox main menu, click the Toolbox icon in the breadcrumb bar.
 To connect two steps, hover over the border of the first step until you see a handle. Drag the handle into the second step. Click on the design canvas to set the line.
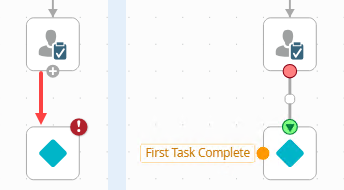
- From the Toolbox > Basic node, drag a second Task step onto the design canvas and align it with the First Task Complete outcome line. Connect the line to the step.

- Select the Task step and expand the Configuration Panel. Use the table below as a guide for configuring the second task step.
Tab
PropertyValue Notes Task/
InstructionsSelect Second Task Complete and click Submit.
Enter instructions for the task recipient. Form/
Form TypeSmartForm Form/
FormState Form Navigate to and select State Form. Open Task on a Form (wizard) References No change Open Task Help me configure it Workflow View Create a new State Second Task Step State Open Task Rule No change After Submit Action No change Summary Save and Finish Task/
ActionsSecond Task Complete
You need one action for testing. In the real world, you might have several actions such as Approved, Denied, and Rework. Recipients/
RecipientsOriginator You assign the task to yourself for testing. Properties/
NameSecond Task Step This is the name of the step you see on the design canvas and in reports. - Add a Decision step and connect it to the Second Task Step.
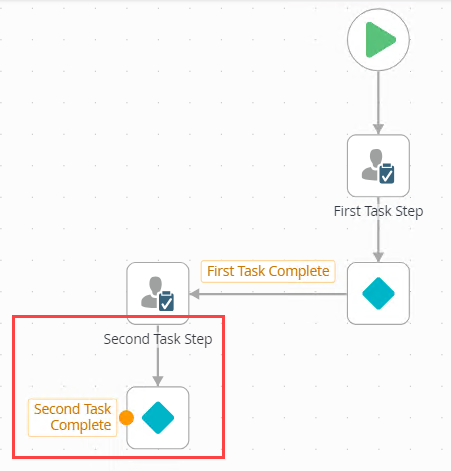
- From the Toolbox > Basic node, drag a Placeholder step onto the canvas and align it with the Decision step. Connect the Second Task Complete outcome line to the new step.
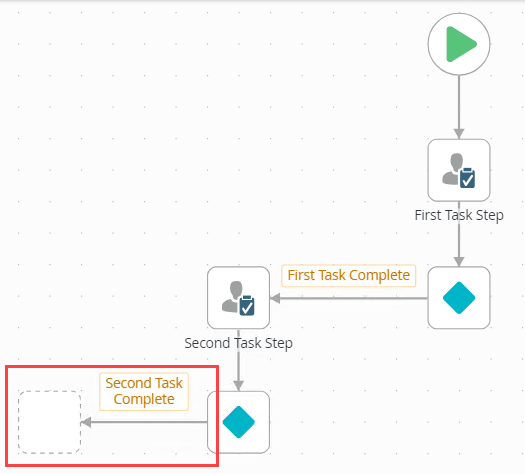
The Open Task on a Form wizard launches.
For testing, you open the form for the first and second tasks and review the form content. You don't need the workflow to proceed any further for this demonstration. However, you cannot deploy the workflow if there is an orphaned outcome line. As a workaround, you connect the outcome line to a placeholder step that allows you to deploy the workflow for testing.
- From the Toolbox > Basic node, drag a Task step into the empty placeholder below the Start step.
- Deploy the workflow. Close the workflow designer and return to K2 Designer.
- Click File > Deploy. Deploying a workflow publishes it to the K2 server and makes it available for use. If you change anything in the workflow, you must deploy it again so that the server has the latest version. When you see the success dialog, click File > Close to return to K2 Designer.
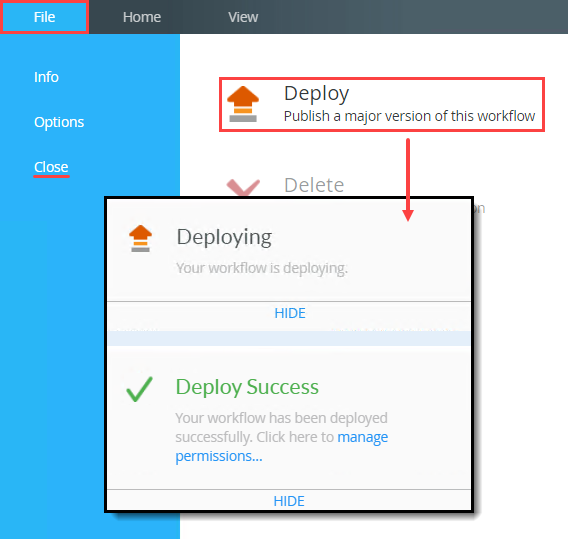
- Click File > Deploy. Deploying a workflow publishes it to the K2 server and makes it available for use. If you change anything in the workflow, you must deploy it again so that the server has the latest version. When you see the success dialog, click File > Close to return to K2 Designer.
Edit Form Rules
In the next step, you edit the form and customize the rules for each task state by hiding or showing controls.
- Edit the State Form.
Edit the form initializing rules for the First Task Step State and Second Task Step State. Use the table below as a guide for hiding or showing controls.
State Rule Edit First Task Step State Form Initializing 1. Hide the Second Task label and text box.
2. Hide the Create button.Second Task Step State Form Initializing 1. Hide the First Task label and text box.
2. Hide the Create button.- Right-click the State Form and select Edit.
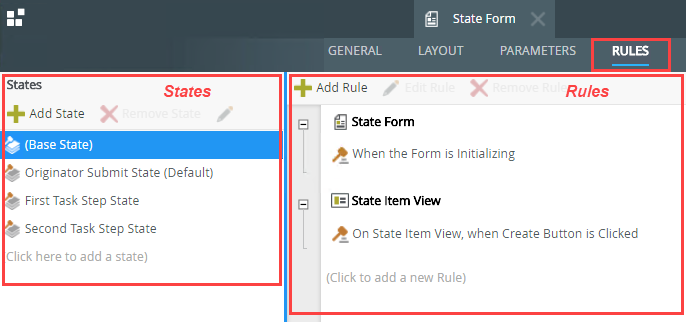
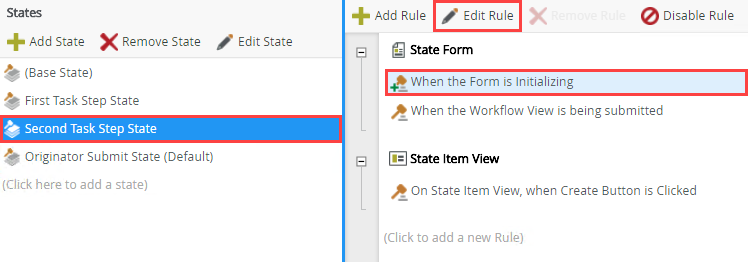
- Click the Rules tab. The states created in the workflow appear on the left side of your screen. Click through the states and notice how each one has its own set of rules displayed on the right side of your screen. (The Base State acts as a starting point for rules. Any rule you edit in the base state filters down throughout the other states.)
- Select the Originator Submit State, On State Item View, when Create Button is Clicked rule. Click Edit Rule.Rules consist of events, conditions, and actions. A valid rule contains at least one action.
- Events define when the rule should run, such as when a button is clicked, or when the form loads. (Events are optional, you can define "event-less" rules that you can call from other rules.)
- Conditions define whether the rule should run. If the criteria are true, continue the rule, and if the criteria are not met, stop the rule. For example, a condition might evaluate a form to confirm that required fields have content. (Conditions are optional - not all rules will require conditions.)
- Actions define what the rule should do. For example, show a message, start a workflow, or enable a form field. Rules can contain multiple actions that are run in sequence or in parallel.

- You see the event and actions for this rule (it does not have any conditions). The event (Create Button is Clicked) has two actions: create the record in the SmartObject and start the workflow. Click Cancel and Yes to exit the rule designer.
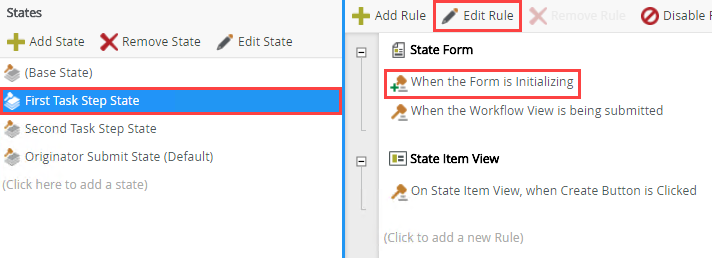
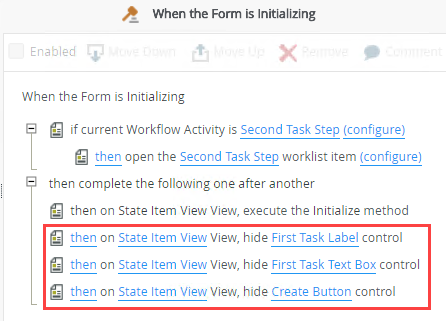
- Select the First Task Step State and the When the Form is Initializing rule. This state controls the form's behavior for the first task recipient. You will hide the second task label and text box controls, along with the create button. Click Edit Rule.
- You already have an event (When the form is Initializing) so next you add the action that hides the second task label. With the Actions tab selected, enter the keyword
hide
in the search text box. Click Hide a View control to add it to the rule definition pane.You can scroll through events, conditions, and actions or you can use the search text box to enter keywords. As you type, K2 resolves the keyword and returns your search results.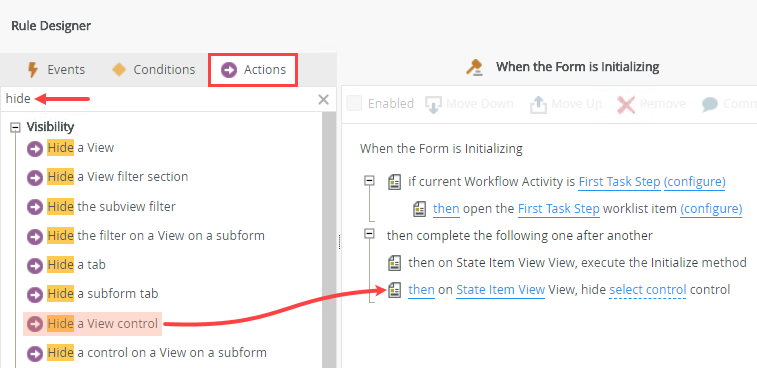
- Click the select control link and select Second Task Label.
- Repeat the steps above and add another instance of the Hide a View control action to the rule definition pane. This time, select the Second Task Text Box control.
- Now you hide the create button since the task recipient does not need to add new records. Once again, click the Hide a View control action to add it to the rule definition pane. Select the Create Button control. Click OK to save the rule definition.
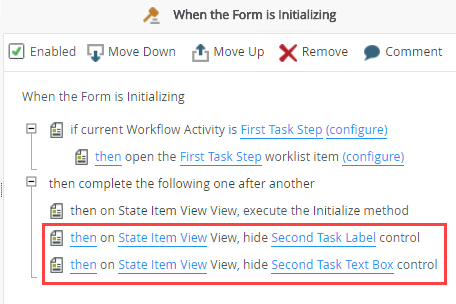
- Edit the Second Task Step State, When the Form is Initializing rule.
- With the Actions tab active, search for
hide
then click Hide a View control three times to add three instances of the action to the rule definition pane.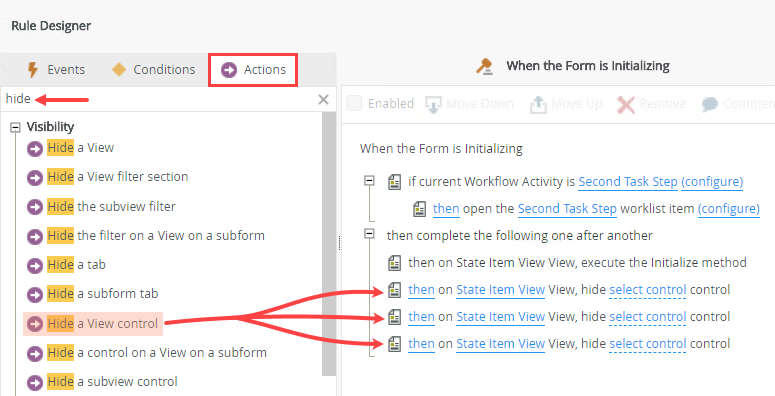
- Edit each action so that the following controls are hidden: First Task Label, First Task Text Box, and Create Button. Click OK to save the rule definition.
- Click Finish to save and exit the form.
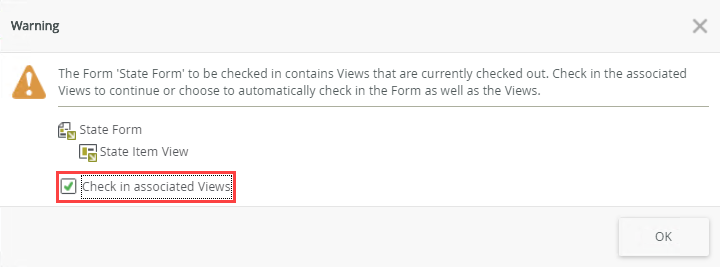
- Right-click the State Form and select Check In. When you see the warning pop-up, select the option to check in associated views. Click OK.
The Originator Submit State is the form's behavior and configuration for the person who submits the form in the first place. This is the state that has a rule action that starts the workflow.
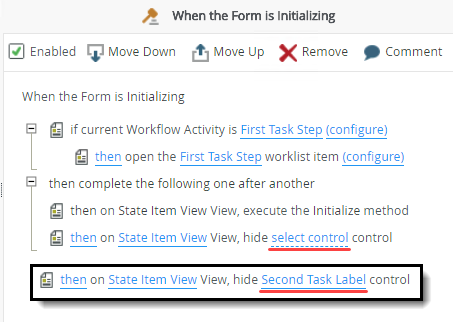
Your form initializing rule should look like the image below.
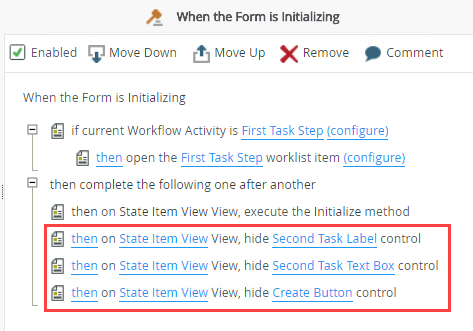
Next, you edit the Second Task Step State form initializing rule. You mirror the form initializing rule from the First Task Step State, only this time you hide the first task label and text box controls along with the create button.
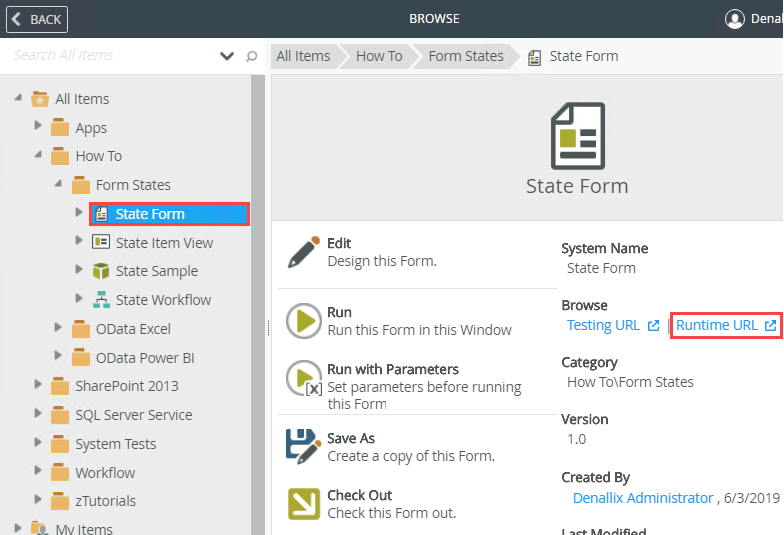
- Launch the State Form using the Runtime URL. After submitting the form, launch K2 Workspace (Desktop) and review how the form changes based on the task (first or second).
- To test your rule edits, begin by submitting the form. Select the State Form and click the Runtime URL link in the central pane.The Runtime URL is used to launch the form in a web browser. Use this URL as the public link to this form. For example, use this link in emails or web pages to provide access to other users.
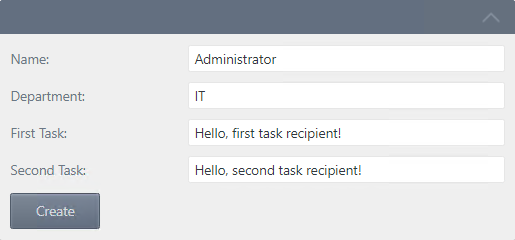
- Complete the form fields and click Create. Remember, when you click the create button, K2 adds the content to the State Sample SmartObject and starts the workflow. (After you click the create button, you will not have any other indication the form submitted. In the real world, you might clear the form fields upon submit or display a message confirming the action.) Close the browser window.
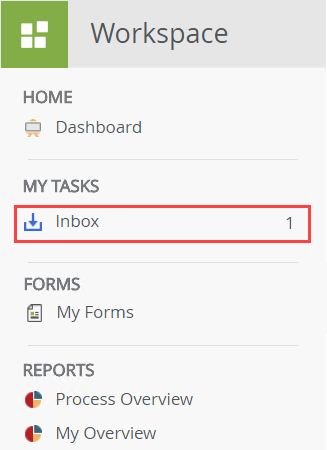
- Launch K2 Workspace (Desktop).If you do not know how to access K2 Workspace (Desktop), see Accessing K2 Sites.
- Click the Inbox to view the tasks assigned to you.
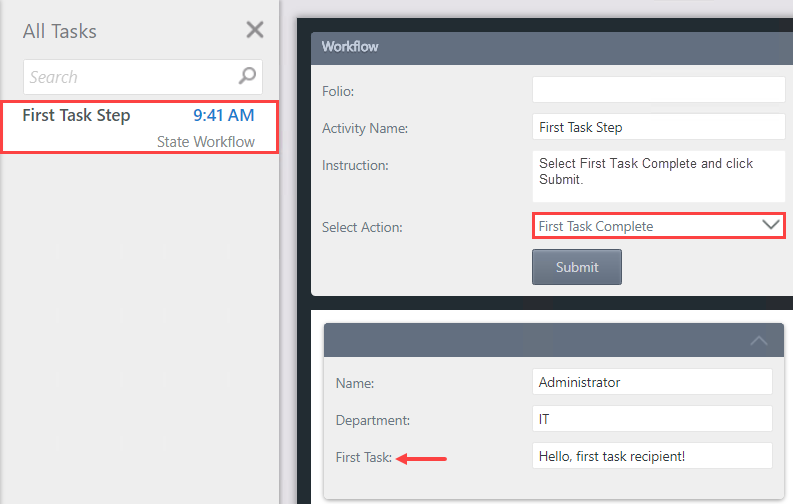
- Click the task notification for the First Task Step. The State Form opens on the right side of your screen. First, notice there are now two views: Workflow and the State Item View you created earlier. K2 adds the Workflow view automatically and this view displays the instructions, actions, and submit button. Review the fields on the State Item View. Notice the second task label and text box, along with the create button are hidden. Select First Task Complete from the Select Action drop-down list and click Submit. Click OK when you see the confirmation message.
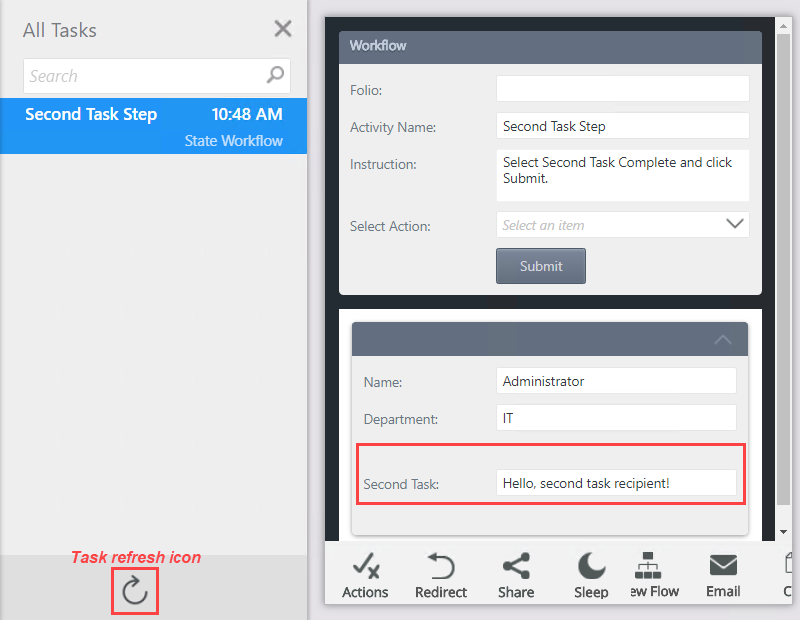
- Click the Refresh icon to update the task list. The Second Task Step notification appears. Click this notification and review the form fields. Notice the first task label and text box, along with the create button controls, are hidden. You do not need to action this task.
- To test your rule edits, begin by submitting the form. Select the State Form and click the Runtime URL link in the central pane.
Review
In this demonstration, you worked with states. A state represents the configuration and behavior of a form for a specific use. States are often associated with workflow tasks and a single form can have many states. Rather than creating multiple forms, you can use one form with different states, then apply rules to control form behavior for each of the states.