How To: Filter and Update List Items
In the following scenario, you use the Create Reference, Loop, Decision, Update List Item steps in
Filtering and Updating List Items
Scenario
In this scenario, you filter a list of company events according to the event date they occur and update the event status for each company event. The SharePoint list is used to store data about events, including the event name, event date and event status. The workflow uses the list to create a list item reference, filter the ID of each event using the list item reference, and updates the event status field based on the date of the event compared with today's date.
Steps
Follow the steps below to filter and update list items in SharePoint.
Setup Steps
The following steps set up the scenario from start to finish. If you want to skip the setup steps and view the topic step, go to Create the Company Events Workflow step.
-
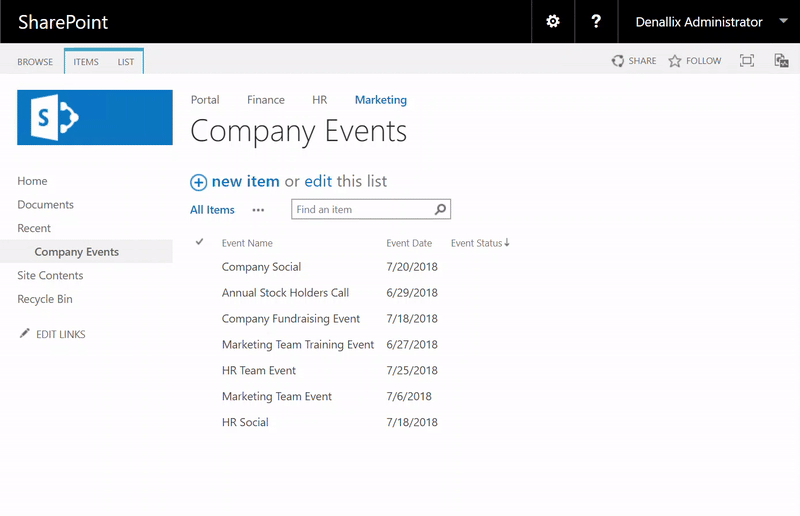
Create a SharePoint list
- Create a custom SharePoint list called Company Events.
- Add the following columns to the Company Events list:
Column Name Type Description Event Name Single line of text Name of the event. Event Date Date and Time The date the event takes place. Event Status Single line of text The status of the event. - Add items to the Company Events list.
-
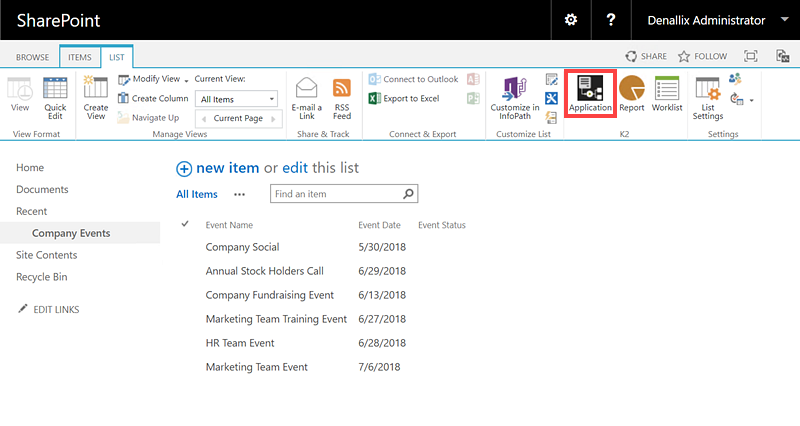
Create new application for the Company Events list
- On the Company Events list click Application.
- Click Create New Application.
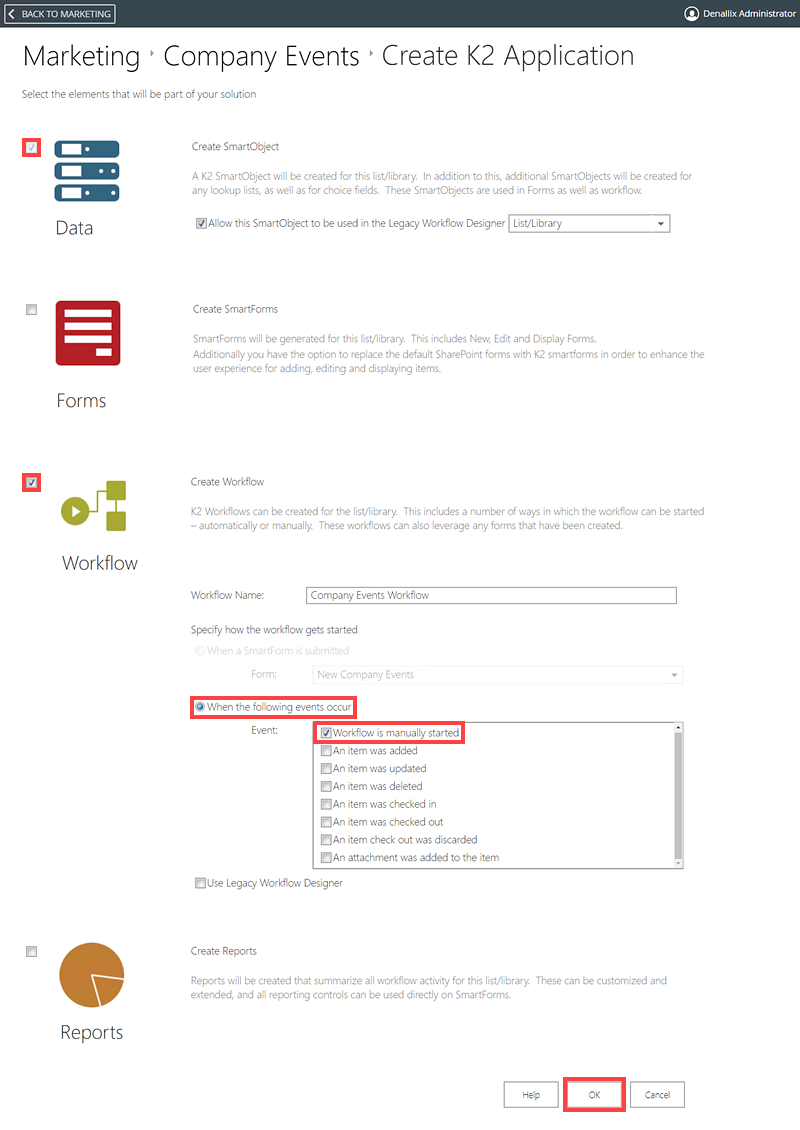
- On the [Site Collection Name] > Company Events > Create K2 Application page, make sure the Data and Workflow options are selected. On the Workflow section, select the When the following events occur option and select the Workflow is manually started option. Click OK. This creates a SmartObject and workflow for the Company Events list.
- When the application is created the workflow canvas opens.
- On the Company Events list click Application.
Create the Company Events Workflow
Use the following steps to create the Company Events workflow.
-
View the Start step for the workflow
On the Start step you can see the item references created when the workflow was generated. These are used in a later step.
- Select Start step and click Edit.
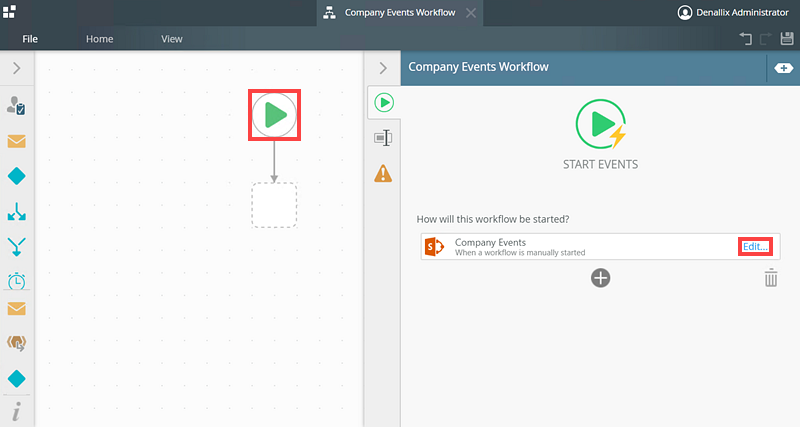
- Notice on the Start Workflow form a List /Library page, two references already exist for the Company Events workflow. Click the 2 References already exist option.
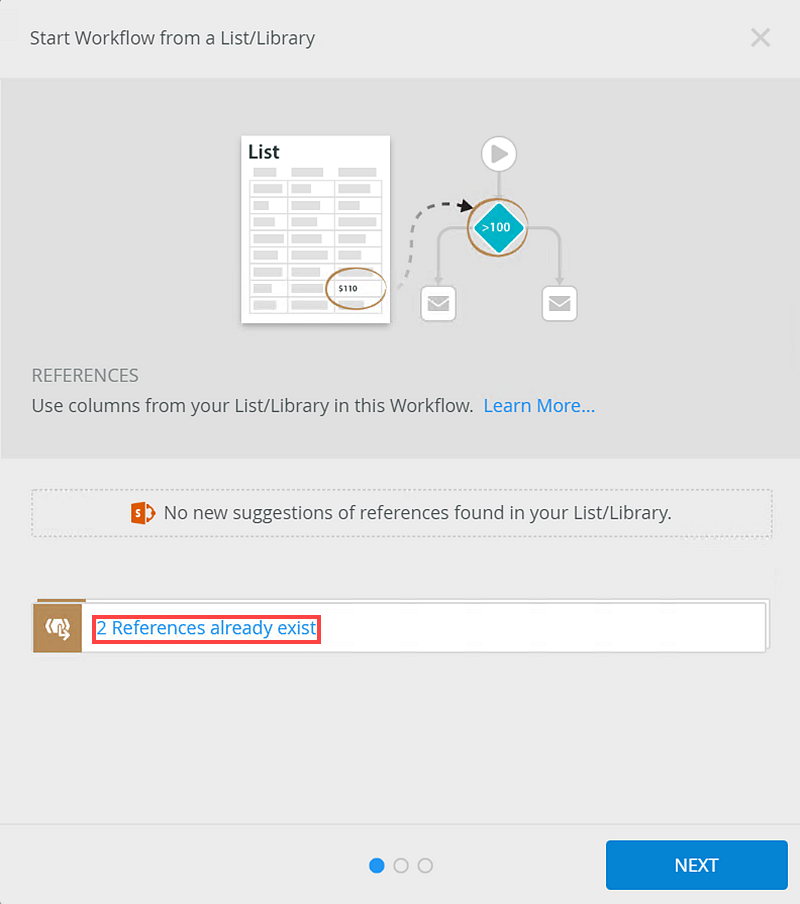
You use the Company Events SmartObject in the next step, which contains a Create Reference step, to create another reference which includes the list method of the Company Events SmartObject. You are doing this is because the Company Events reference created in the Start step does not include a list method. You use this new reference to loop through list items on the Company Events list by using the ID and List method of the Company Events SmartObject. Close the Start Workflow from a List/Library page as no configuration is required.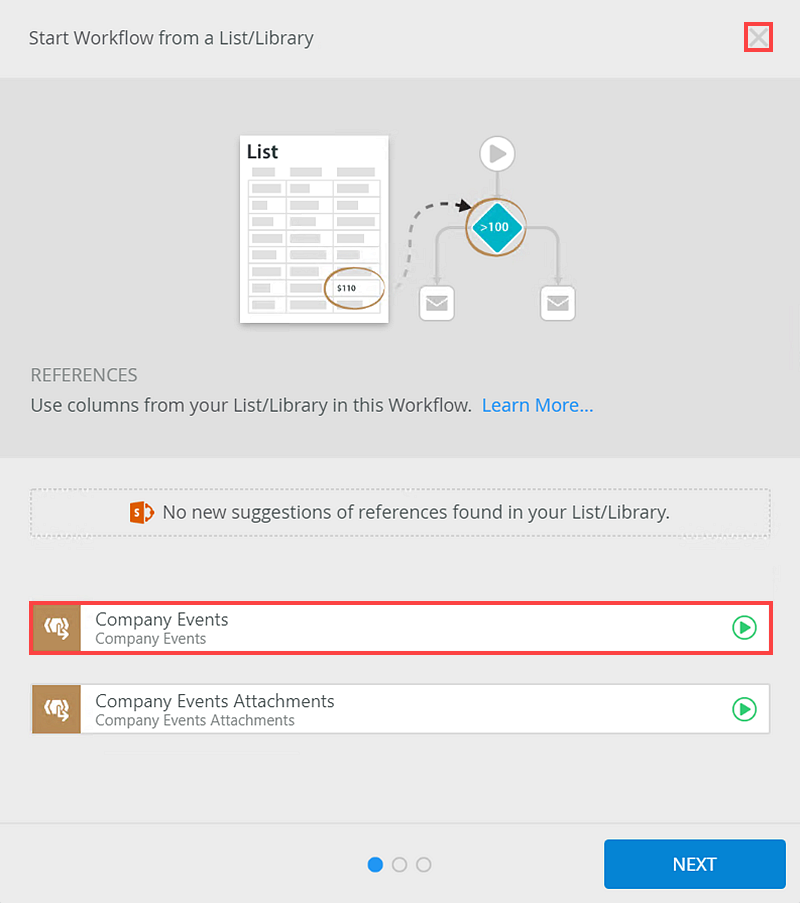
- Select Start step and click Edit.
-
Add and Configure the Create Reference step on the Workflow
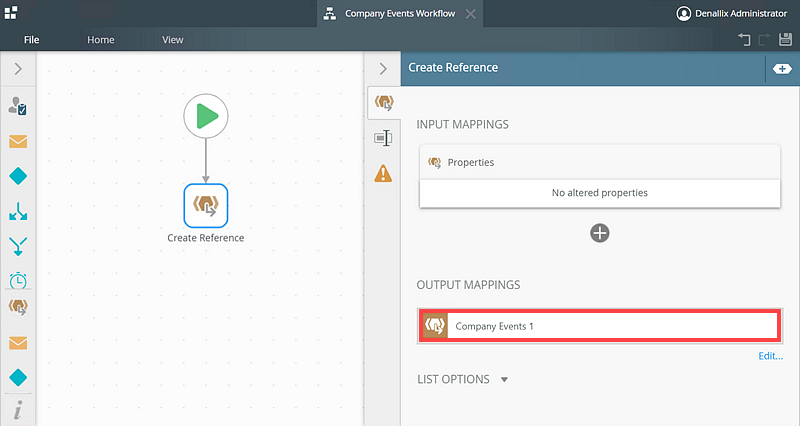
In this step you configure a Create Reference step and create a new reference called Company Events 1. This new reference uses the Company Events SmartObject, its List Method and the ID as the identifier, to be used in a Loop step later on. This later step executes the list method and loops through the list items of the Company Events list using the ID of each list item.
- Drag a Create Reference step on to the canvas. The Create Reference step is found in the Basic section of the toolbox.
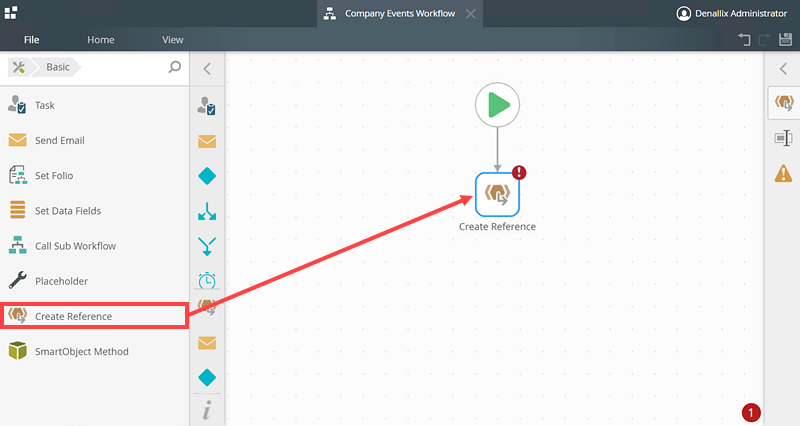
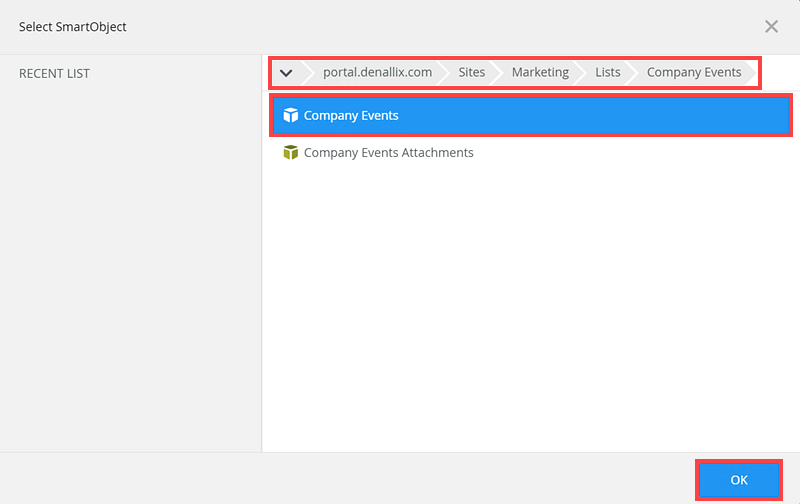
- Expand the Create Reference step. On the SmartObject option, select Browse.
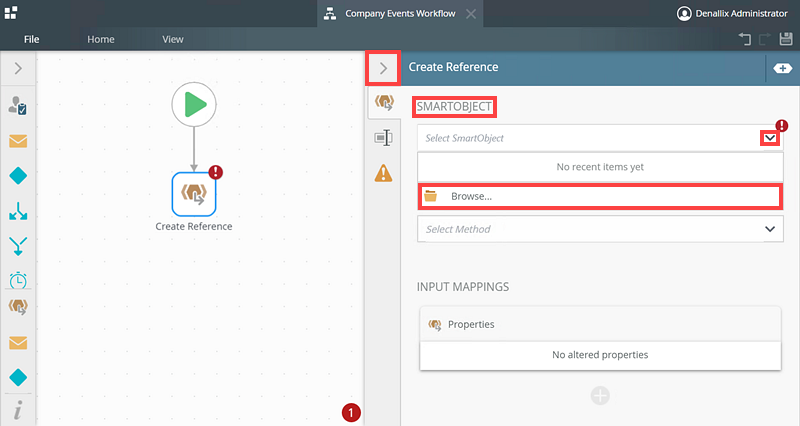
- On the Select SmartObject page, navigate to the list where the Company Events SmartObject resides. Select the Company Events SmartObject and click OK.
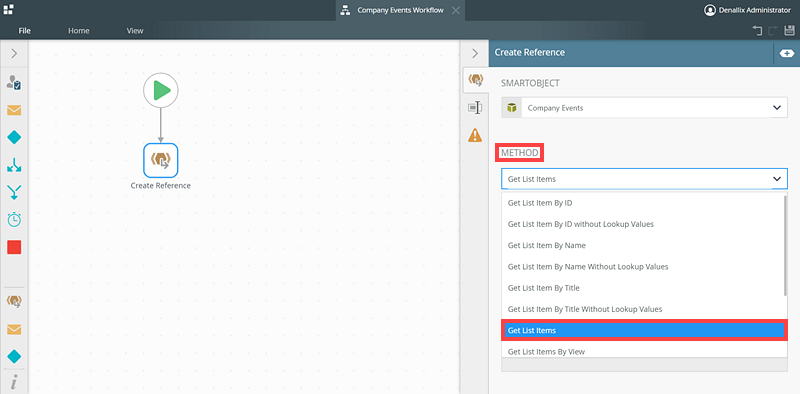
- On the Method option, select the Get List Items method.
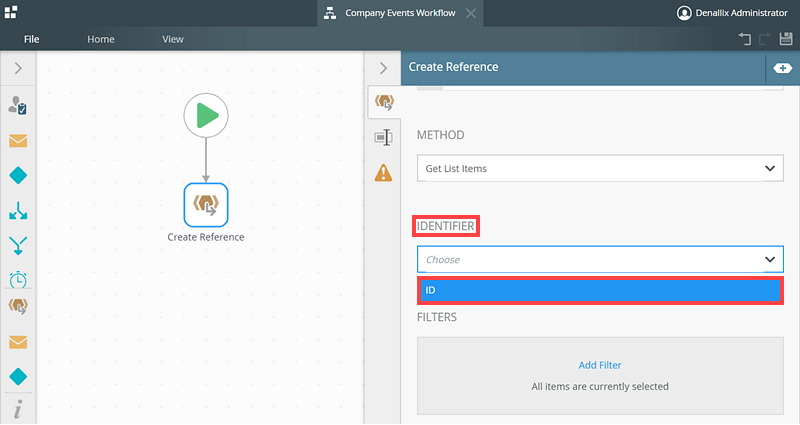
- On the Identifier option, select the ID option.
- Click Create on the Output Mappings section.
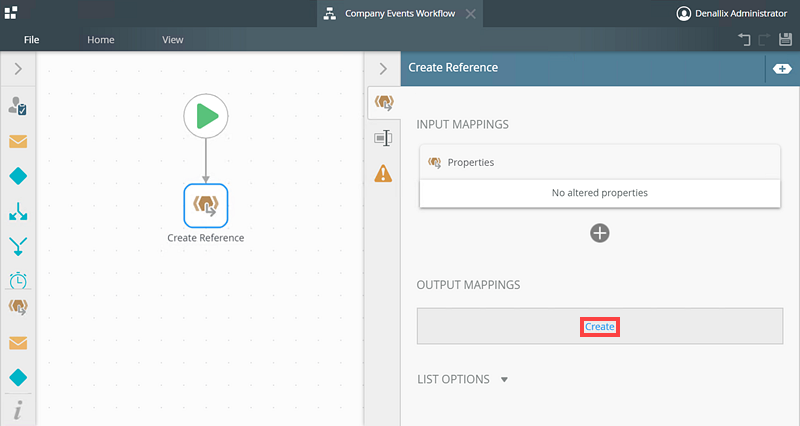
- This creates the Company Events 1 Item Reference, which you use the next step.
- Drag a Create Reference step on to the canvas. The Create Reference step is found in the Basic section of the toolbox.
-
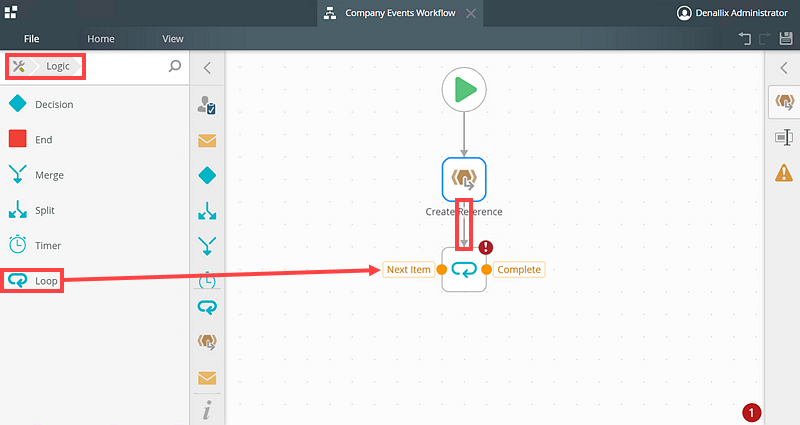
Add and Configure the Loop Step
In this step you add and configure a Loop step which uses the Company Events 1 Item Reference to loop through the Company Events list items by ID. The Loop step determines the status of each list item in the Company Events list, which are Upcoming, Completed, or In Progress.
- Drag the Loop step on to the canvas and connect it to the Create Reference step. The Loop step can be found in the Logic section of the Toolbox.
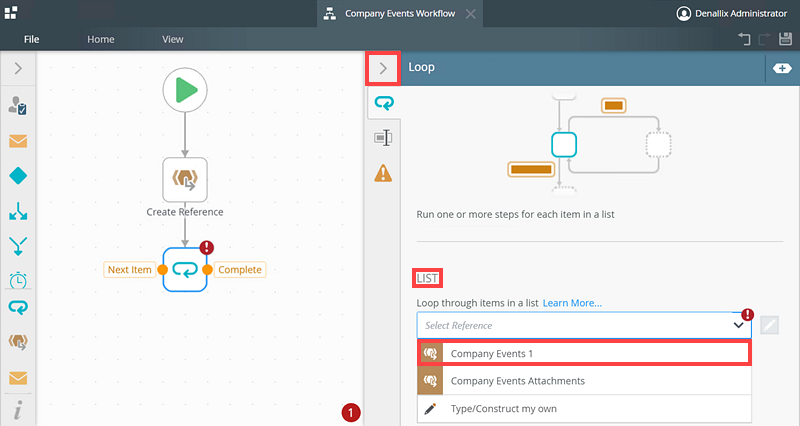
- Expand the Loop step and select the Company Events 1 item reference on the List option.
- Expand the Options section and notice the List Item section is populated with a new reference called Company Events 1 Item. The Company Events 1 Item item reference is a reference to the current item in the Company Events list.
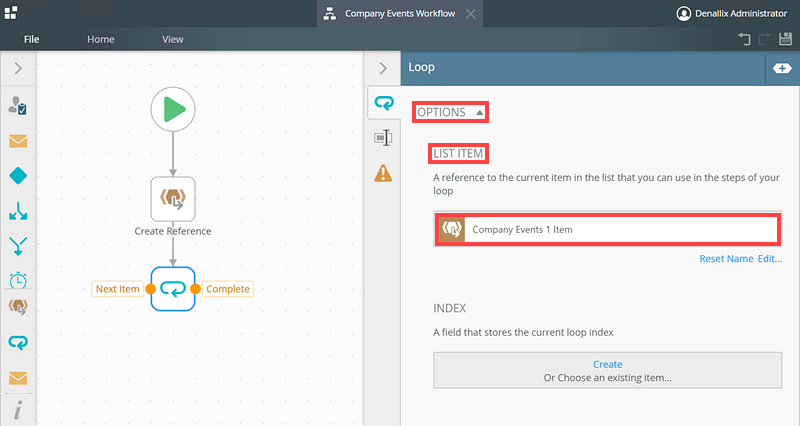
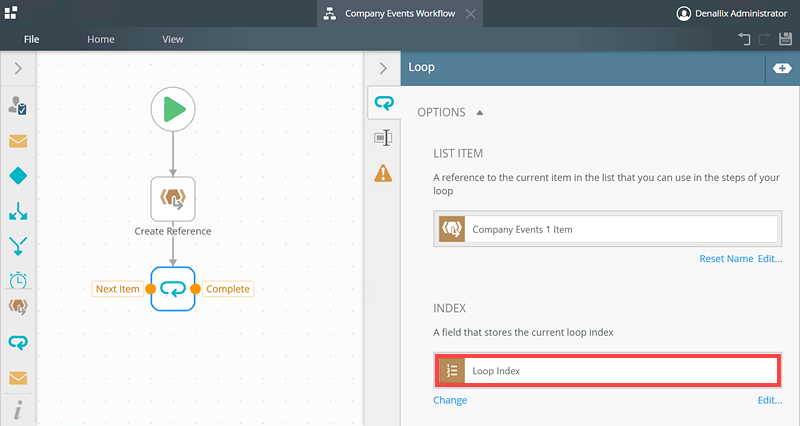
- On the Index section click Create. This creates a Loop Index for the Loop step.
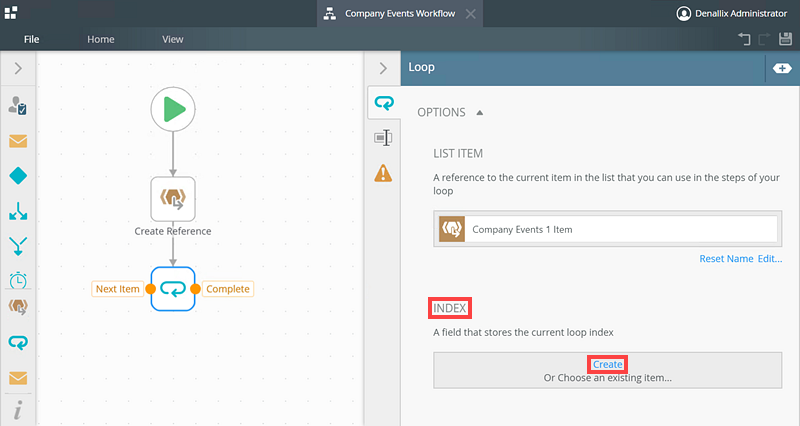
- The Loop Index in the Loop step is used to iterate through all items in the Company Events list.
- In the next step, you add and configure a Decision step on the workflow. In the Decision step you add and configure decisions to determine the correct Status based on the date value in the Date column of each list item in the Company Events list.
- Drag the Loop step on to the canvas and connect it to the Create Reference step. The Loop step can be found in the Logic section of the Toolbox.
-
Add and Configure the Decision Step
In this step you add and configure a Decision step. This step determines the Status of the event.
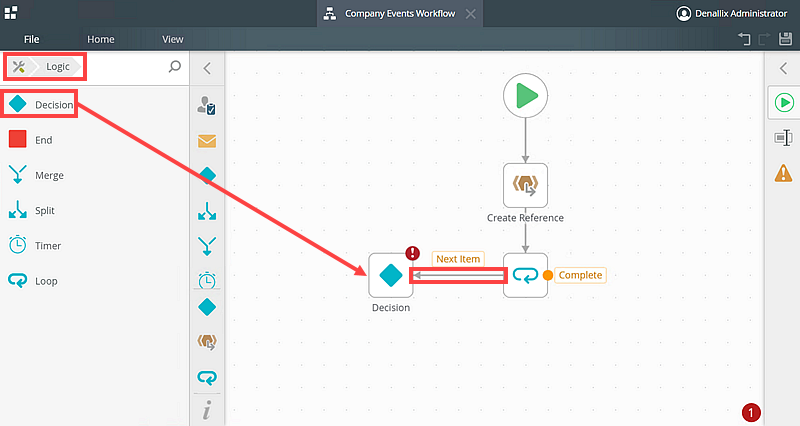
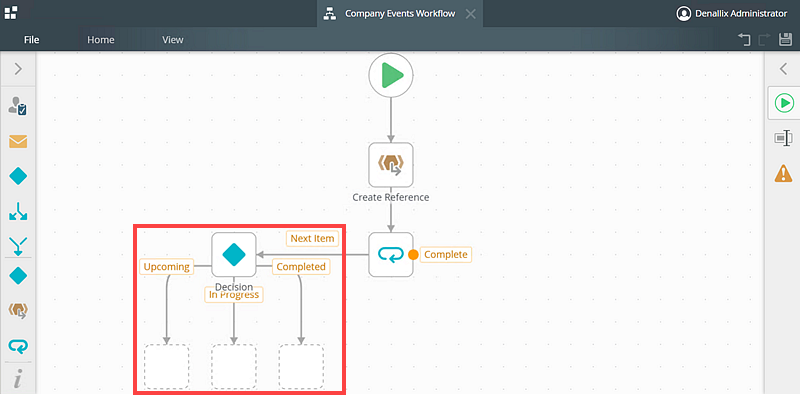
- Drag a Decision step on to the canvas and connect it to the Next Item path of the Loop step. Find the Decision step in the Logic section of the Toolbox.
- Expand the Decision step and click Add Decision on the Decisions section.
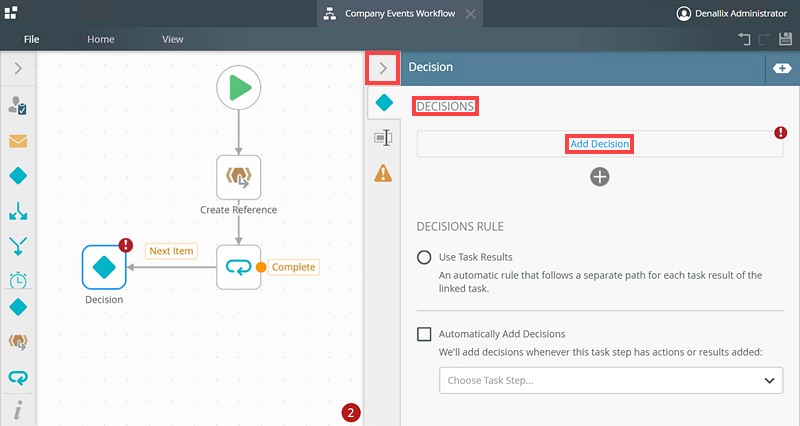
- Add three decisions called Upcoming, Completed, and In Progress.
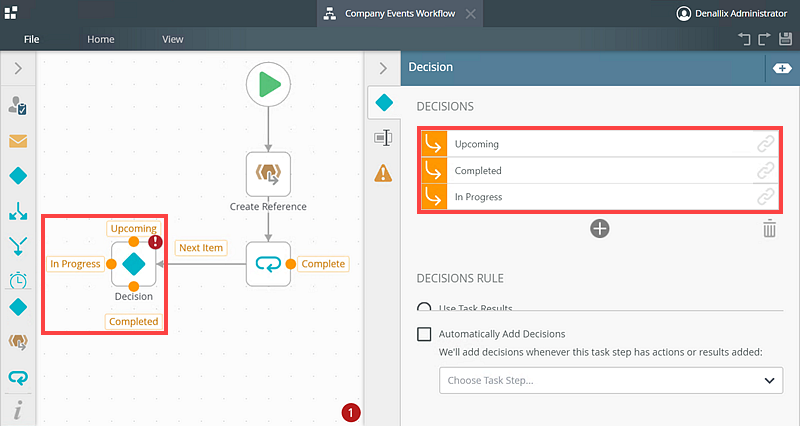
- The Upcoming decision is used when the date of the event is greater than the current date.
- The Completed decision is used when the date of the event is less than the current date.
- The In Progress decision is used when the date of the event is the same as the current date.
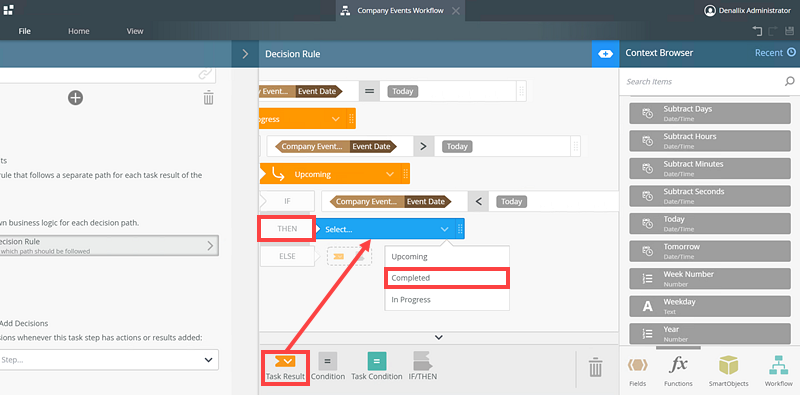
- On the Decisions Rule section, select the Custom Rule option and click Edit Decision Rule.
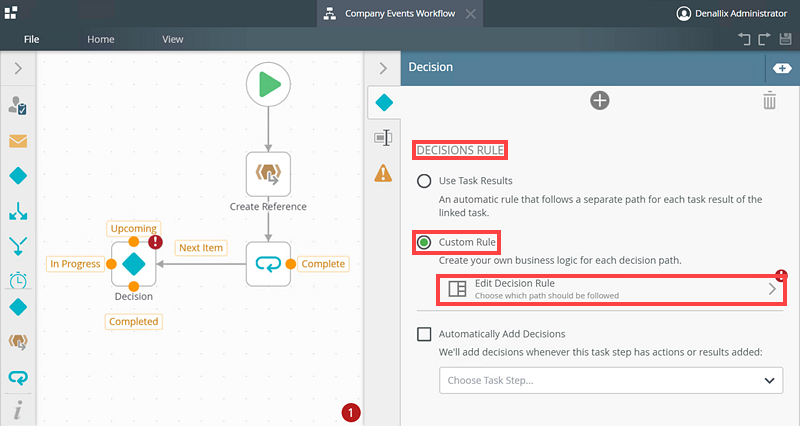
- Here you are configuring the decision rules for Upcoming, Completed and In Progress decisions you created earlier. On the Decision Rule page, drag the Condition option on the IF section.
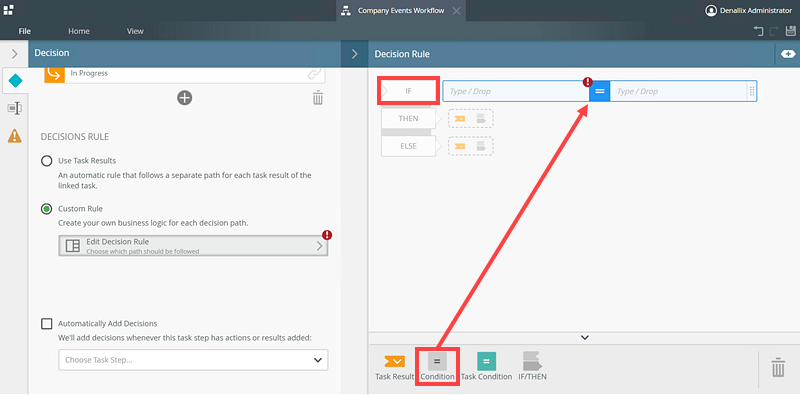
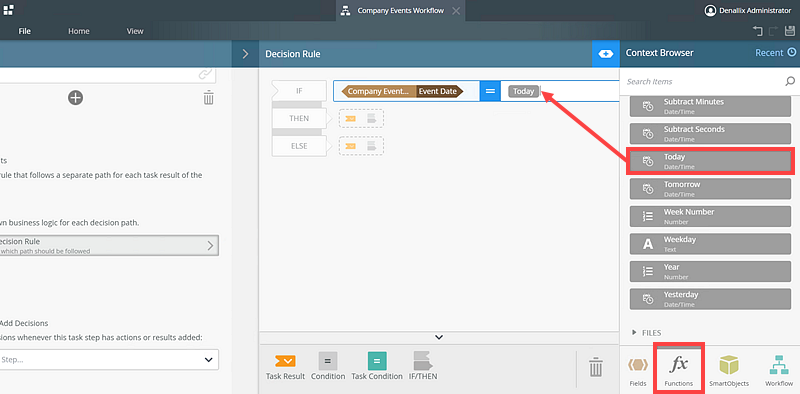
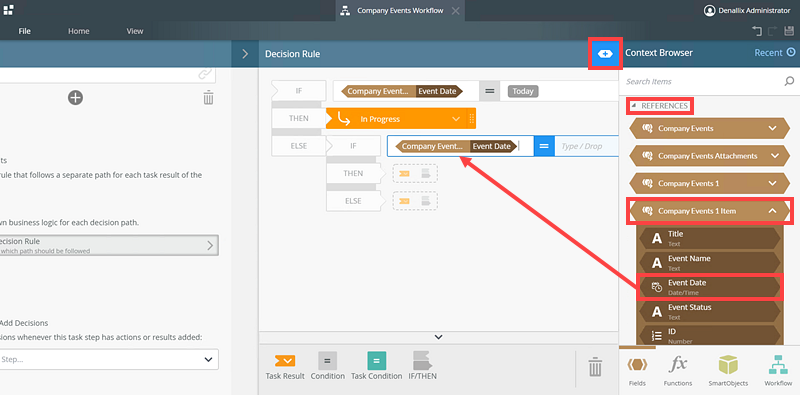
- Open the Context Browser. Expand the Company Events 1 Item reference from the References section and drag Event Date into the Condition in the IF section.
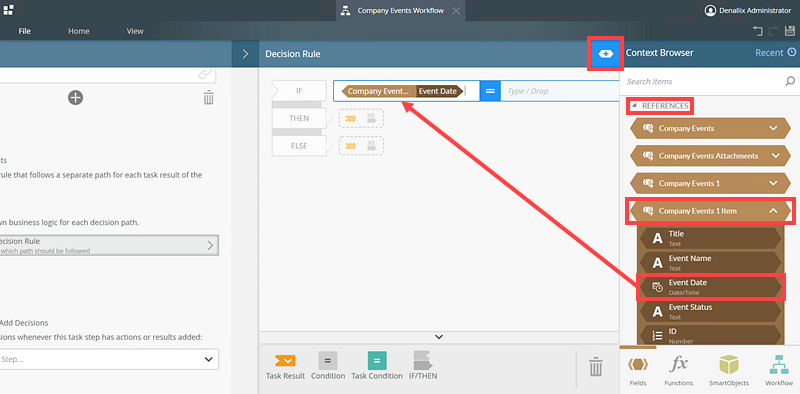
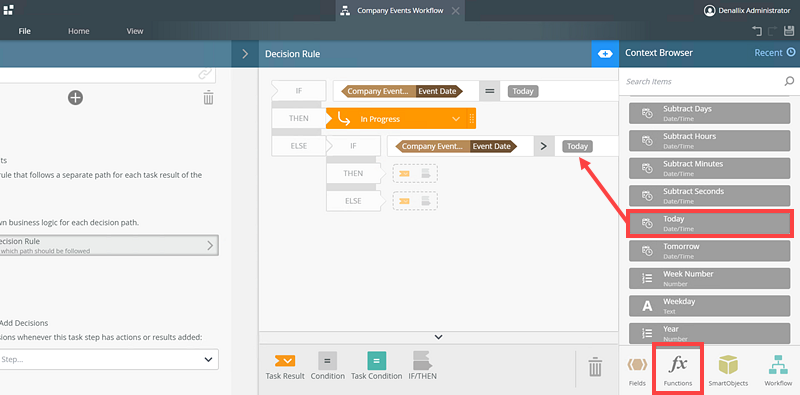
- Select the Functions option, expand the Date and Time section, and drag the Today function into Condition in the IF section.
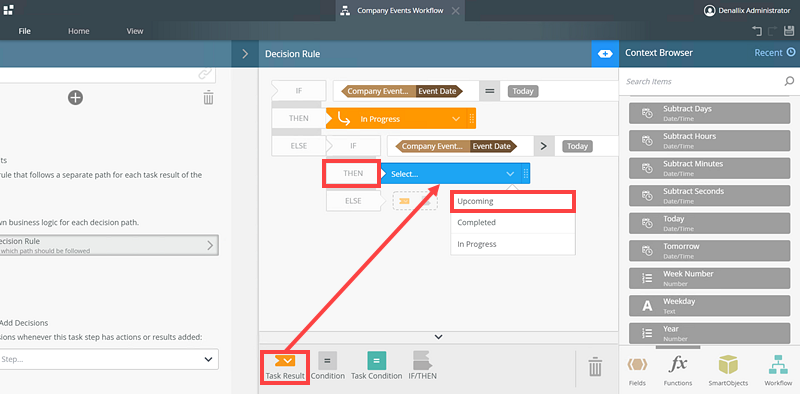
- Drag a Task Result into the Then section and select the In Progress decision.
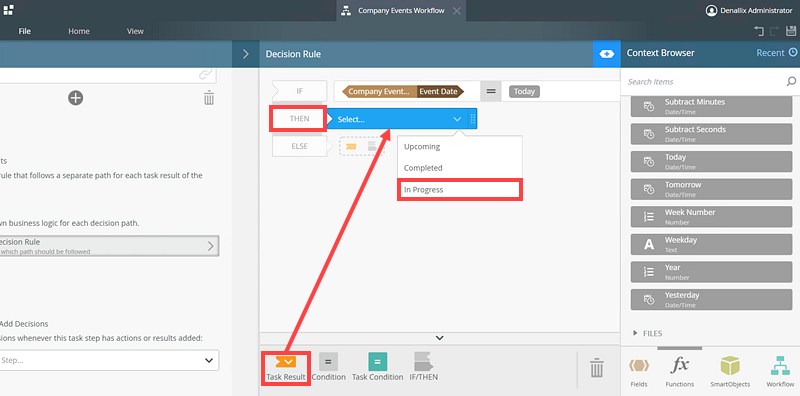
- You have configured the decision rule for the In Progress decision so that when the loop is running, if there is a list item with a Date that is equal to today’s date, the In Progress decision path is taken.
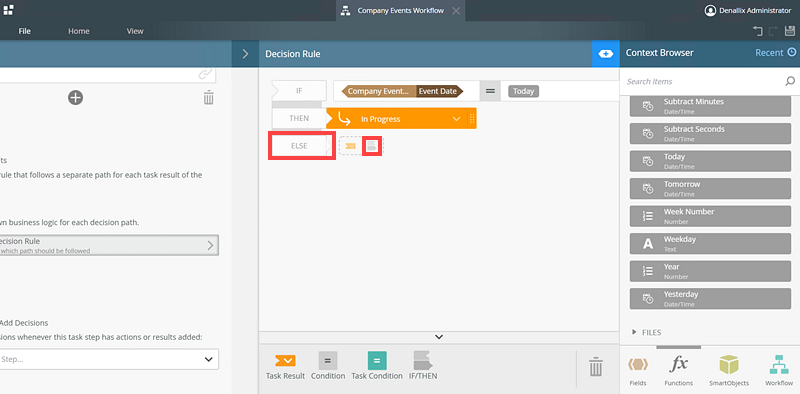
- Configure the decision rule for Upcoming decision.
On the ELSE section, click the IF/THEN option.
- Drag a Condition into the second IF section.
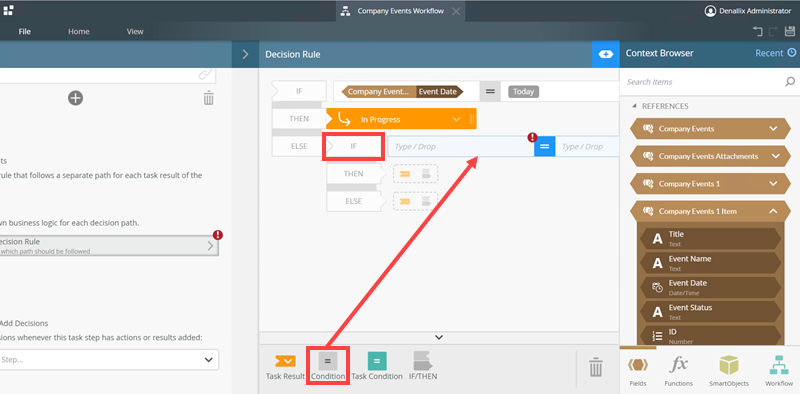
- Open the Context Browser. Expand the Company Events 1 Item reference from the References section and drag Event Date into the Condition in the second IF section.
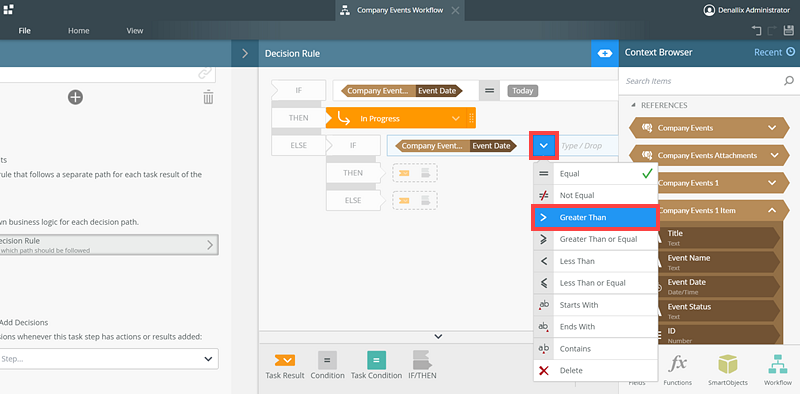
- Change the = operator to the > Greater Than operator.
- Select the Functions option, expand the Date and Time section, and drag the Today function in to Condition in the IF section.
- Drag a Task Result into the Then section and select the Upcoming decision.
- You have configured the decision rule for the Upcoming decision so that when the loop is running if there is a list item with a Date that is greater than today’s date, the Upcoming decision path is taken.
- Configure the decision rule for Completed decision.
On the ELSE section, click the IF/THEN option.
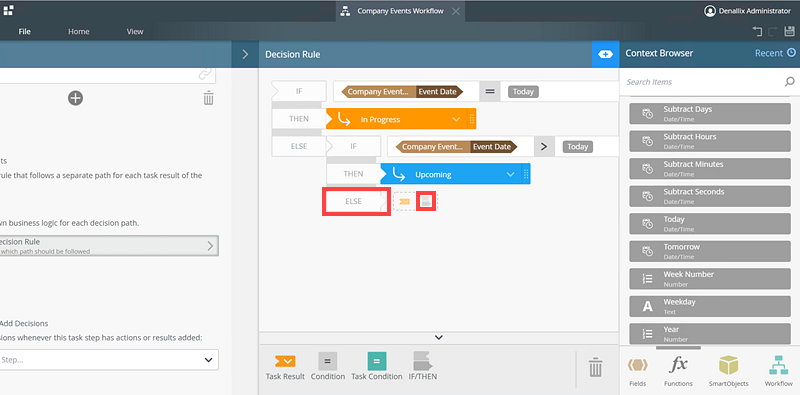
- Drag a Condition into the third IF section.
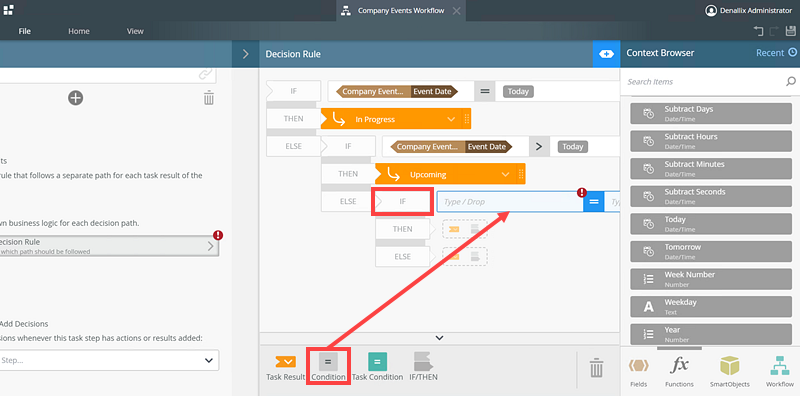
- Open the Context Browser. Expand the Company Events 1 Item reference from the References section and drag the Event Date into the Condition in the third IF section.

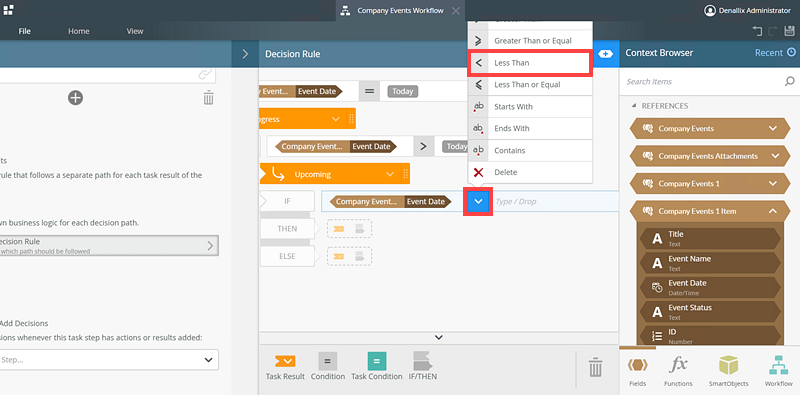
- Change the = operator to the < Less Than operator.
- Select the Functions option, expand the Date and Time section, and drag the Today function in to Condition in the IF section.
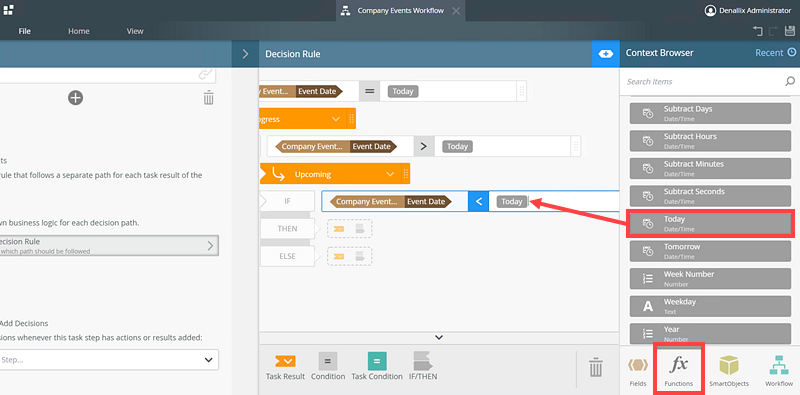
- Drag a Task Result in to the Then section and select the Completed decision.
- You have configured all the decision rules for the three decisions In Progress, Upcoming, and Completed. In the next step, you configure each decision path with an Update List Item step. This step updates the Event Status column in the Company Events list depending on which decision path taken in the Decision step.
- Drag a Decision step on to the canvas and connect it to the Next Item path of the Loop step. Find the Decision step in the Logic section of the Toolbox.
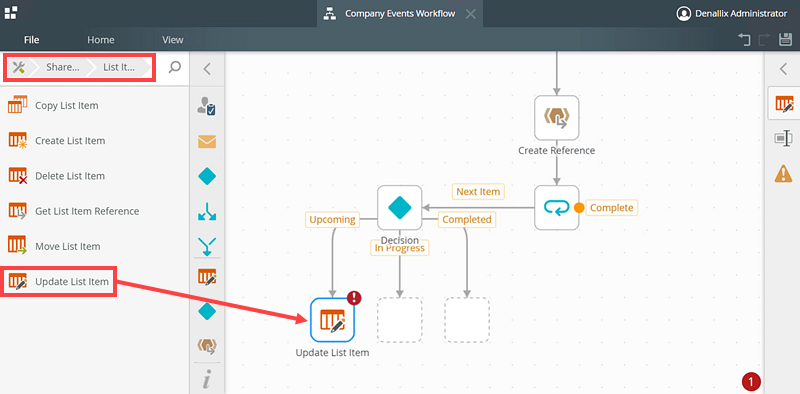
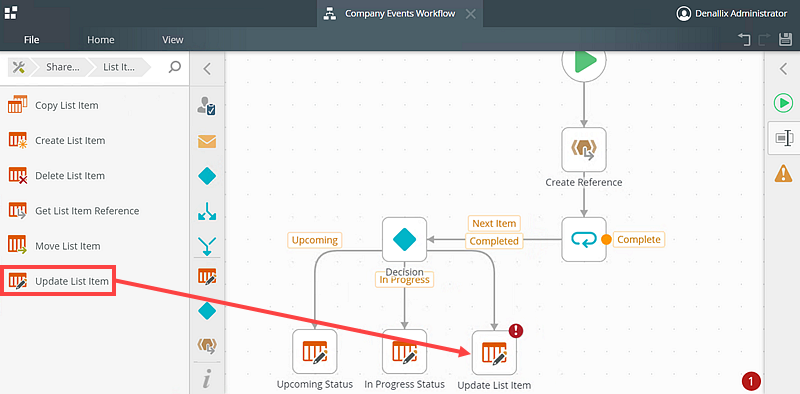
- Add and Configure the Update List Item Steps
In this step you add and configure Update List Item steps to the three configured decision paths. These steps update the Event Status column based on which decision path taken in the Decision step, setting the stats as Upcoming, In Progress or Completed and according to the Date value in the Event Date column.
- Rearrange the Decision Paths as shown below.
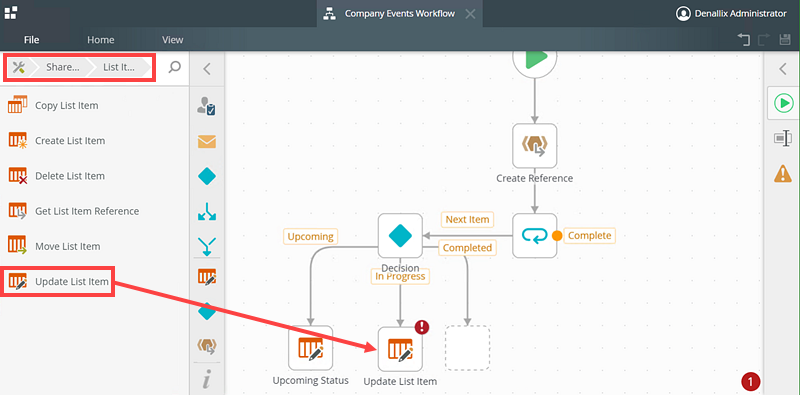
- Drag an Update List Item step in to the Upcoming path. Find the Update List Item step in the SharePoint > List Items section of the Toolbox.
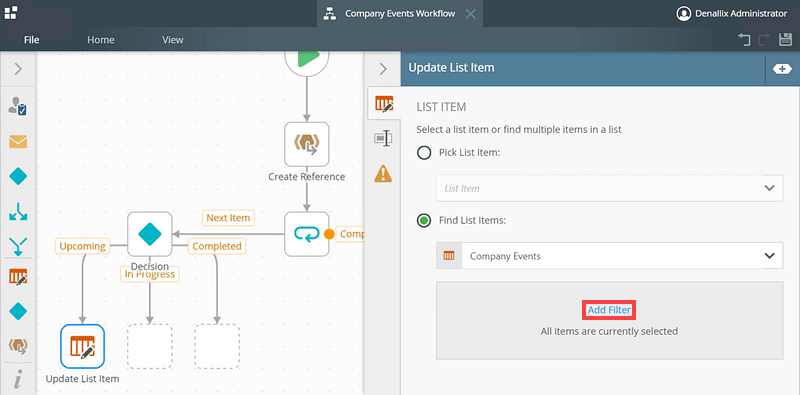
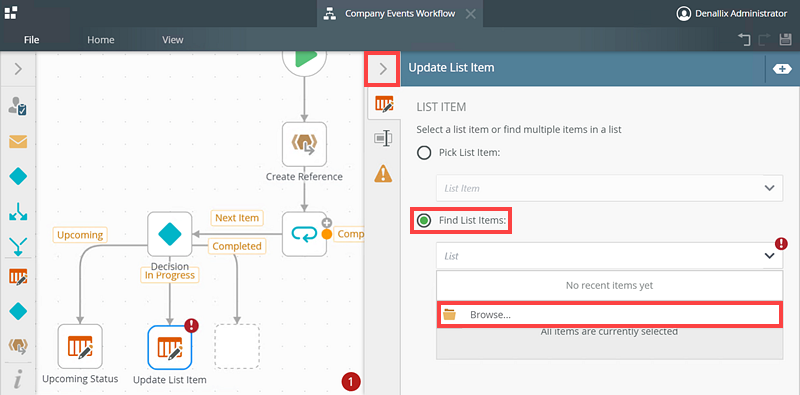
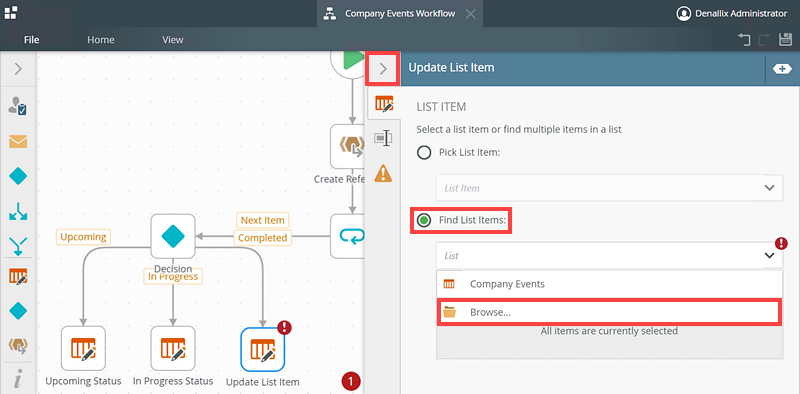
- Expand the Update List Item page and select the Find List Items option. Click Browse.
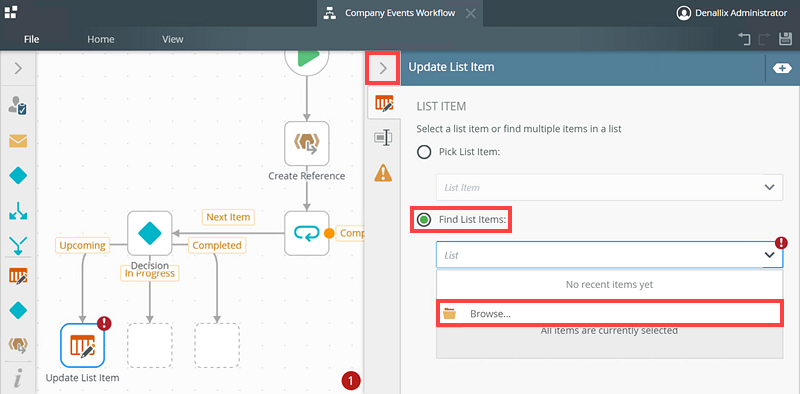
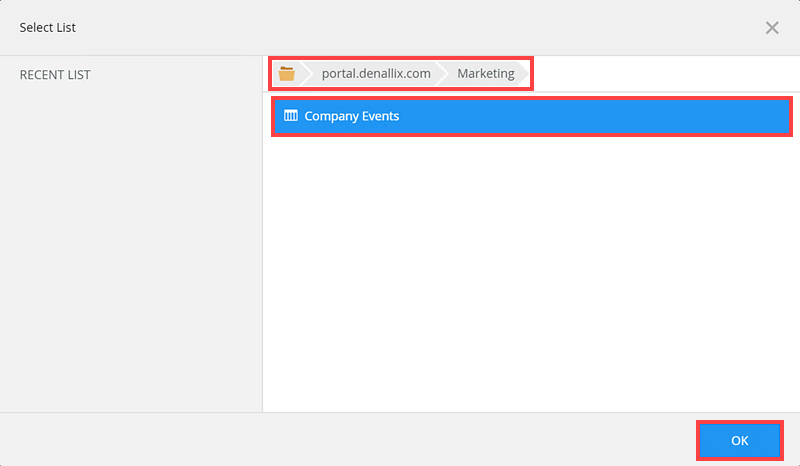
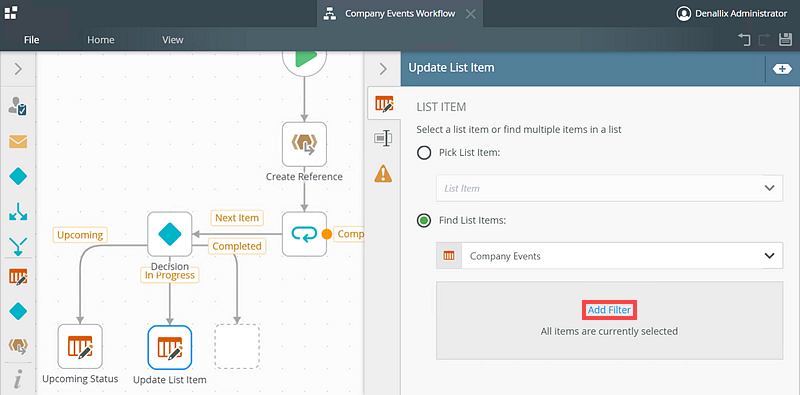
- On the Select List page, browse to the SharePoint site and select Company Events. Click OK.
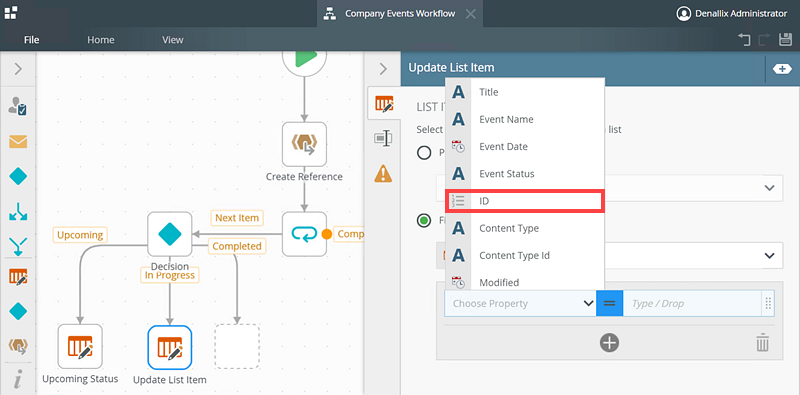
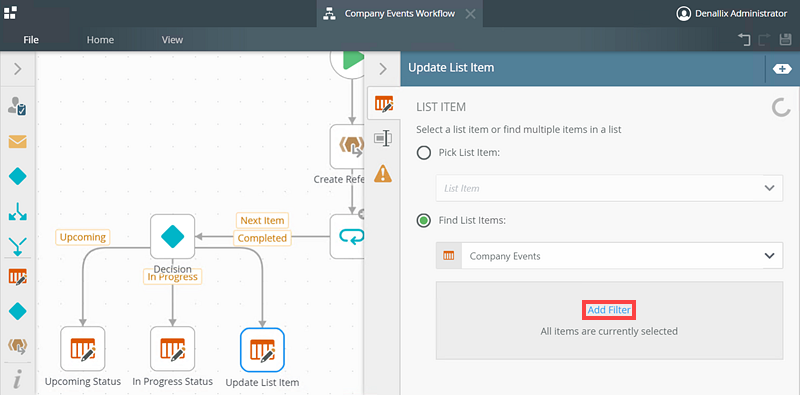
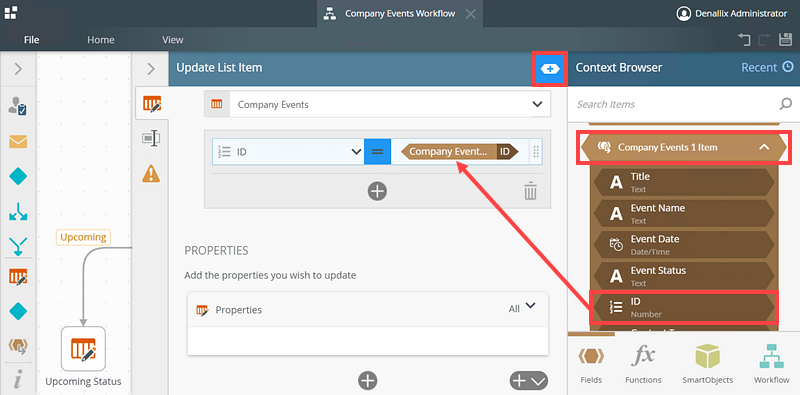
- Add a filter to tell the Update List Item step which fields to filter in the Company Events list. This filters the list method to the current list item by using its ID. Click Add Filter.
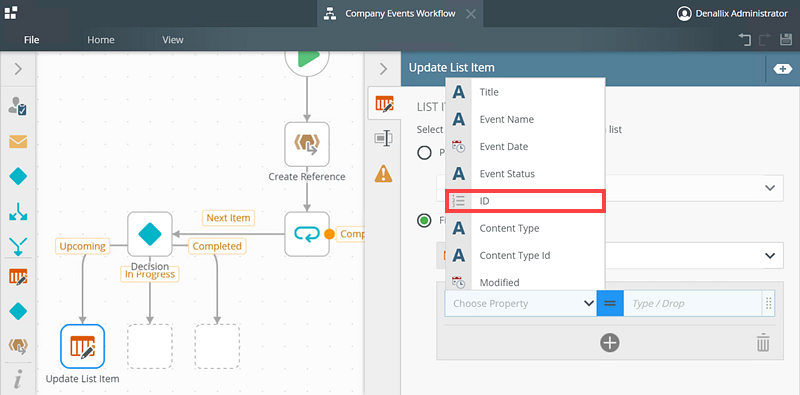
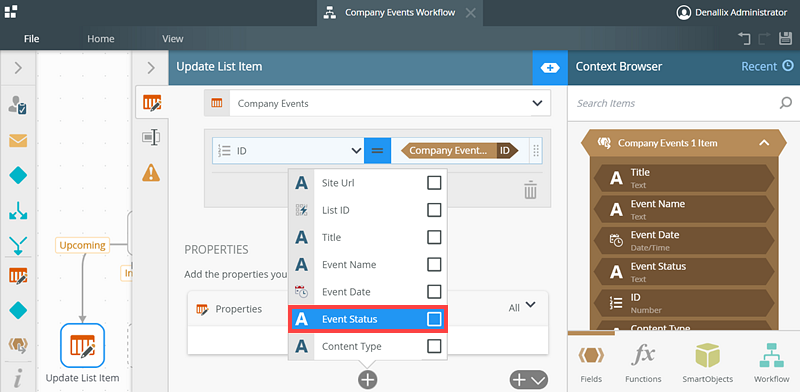
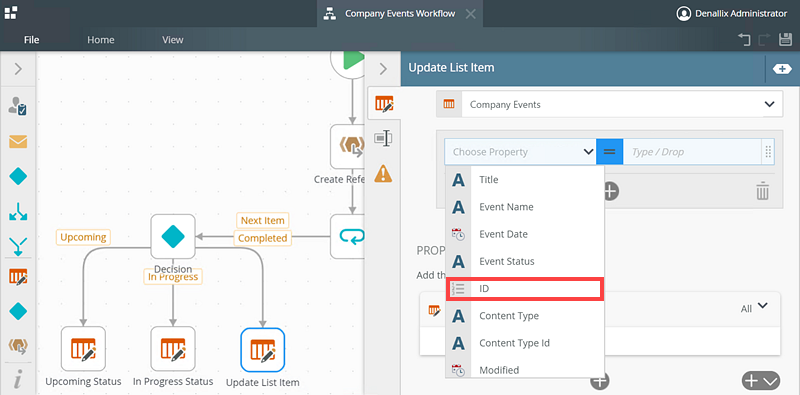
- Select the ID in the Choose Property section.
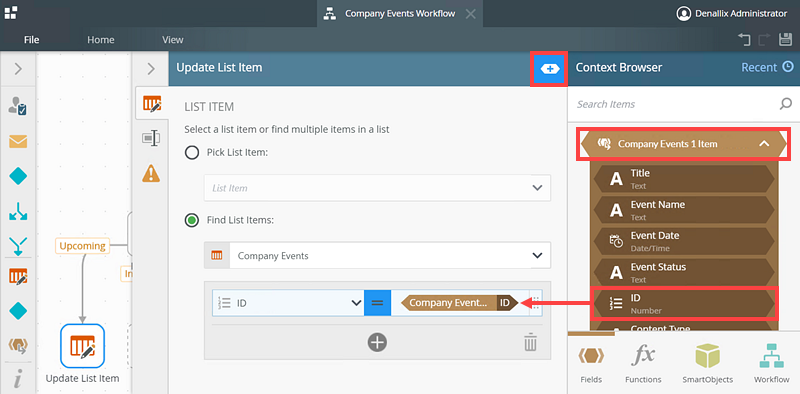
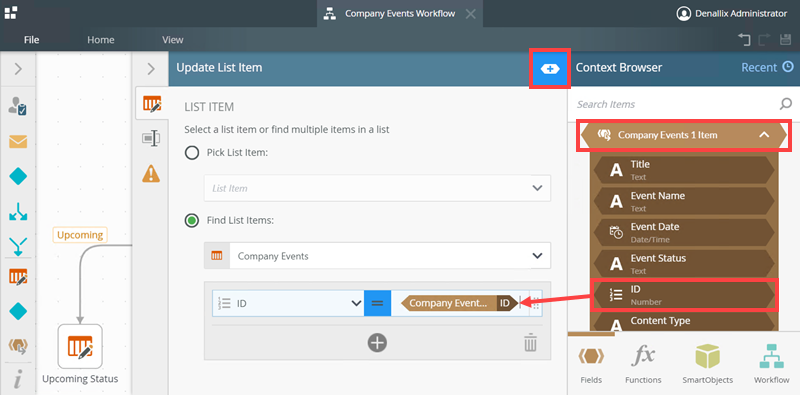
- Open the Context Browser. Expand the Company Events 1 Item reference from the References section and drag the ID over as shown here.
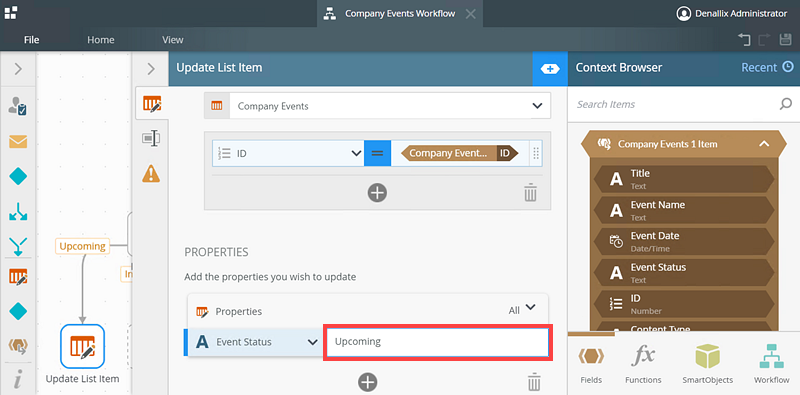
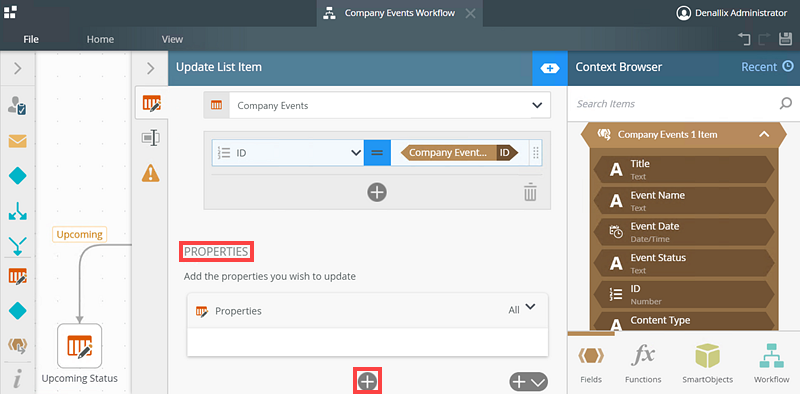
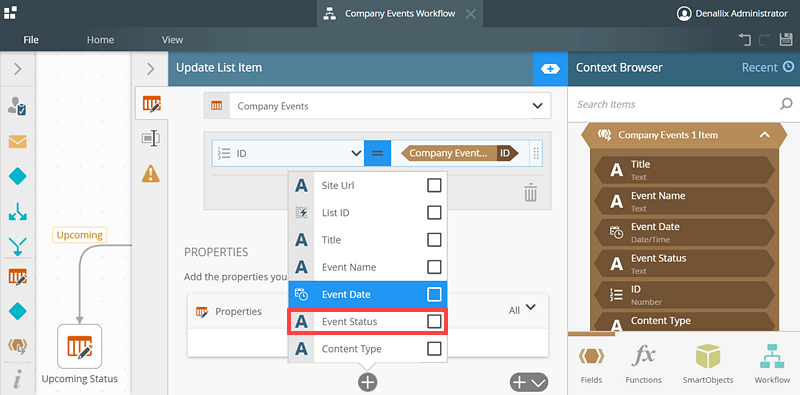
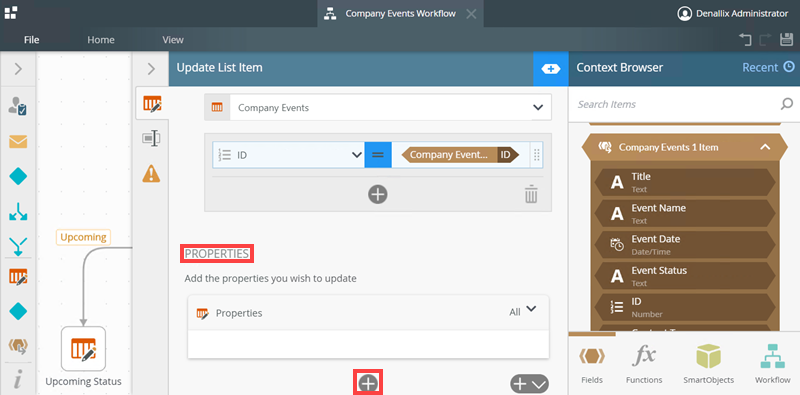
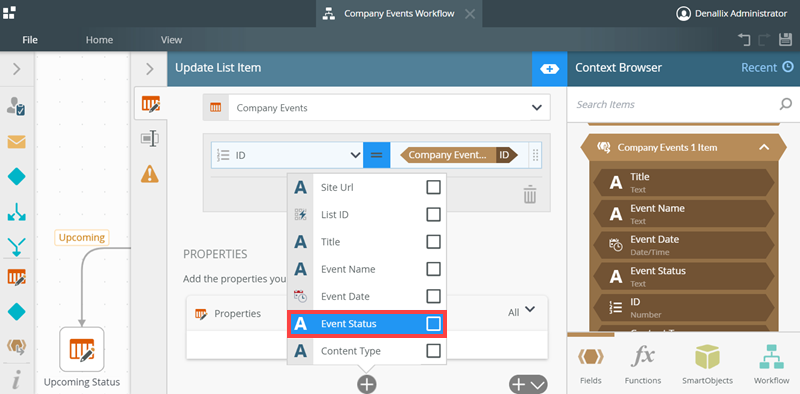
- On the Properties section, click Add. Here you tell the Update List Item to update the Event Status property in the Company Events list with the Upcoming value.

- Select the Event Status property.
- Type Upcoming in the Type / Drop field.
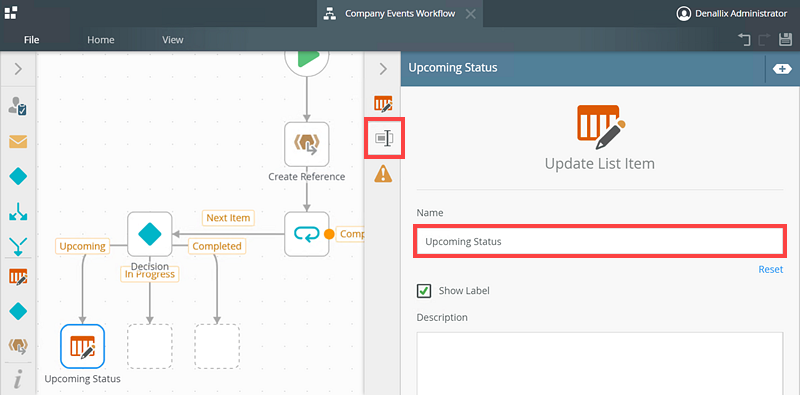
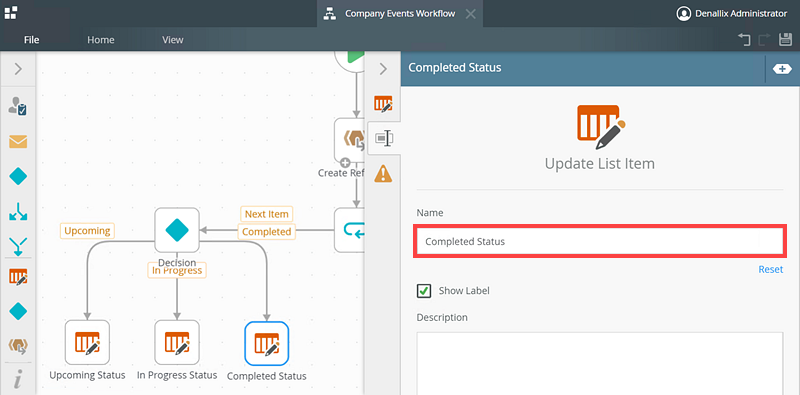
- Click on the Properties tab of the Update List Item step and rename the step to Upcoming Status.
You have completed the Update List Item step for the Upcoming decision path. Next, you repeat the steps above to add and configure a Update List Item step for the In Progress decision path.
- Drag an Update List Item step in to the In Progress path.
- Expand the Update List Item page and select the Find List Items option. Click Browse.
- On the Select List page, browse to the SharePoint site where your list resides and select Company Events. Click OK.
- Add a filter to tell the Update List Item step which fields to filter in the Company Events list. Click Add Filter.
- Select the ID in the Choose Property section.
- Open the Context Browser. Expand the Company Events 1 Item reference from the References section and drag the ID over as shown here.
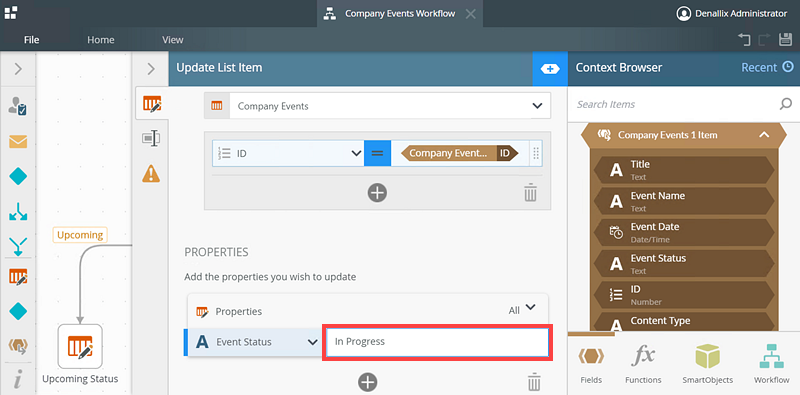
- On the Properties section, click Add. Here you tell the Update List Item to update the Event Status property in the Company Events list with the In Progress value.
- Select the Event Status property.
- Type In Progress in the Type / Drop field.
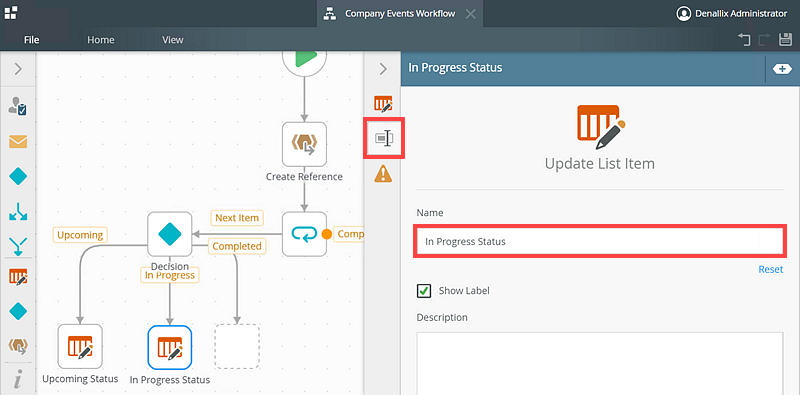
- Click on the Properties tab of the Update List Item step and rename the step to In Progress Status.
You have completed the Update List Item step for the In Progress decision path. Next, you repeat the steps above to add and configure a Update List Item step for the Completed decision path.
- Drag an Update List Item step in to the Completed path.
- Expand the Update List Item page and select the Find List Items option. Click Browse.
- On the Select List page, browse to the SharePoint site Company Events. Click OK.
- Add a filter to tell the Update List Item step which fields to filter in the Company Events list. Click Add Filter.
- Select the ID in the Choose Property section.
- Expand the Context Browser. Expand the Company Events 1 Item reference from the References section and drag the ID over as shown here.
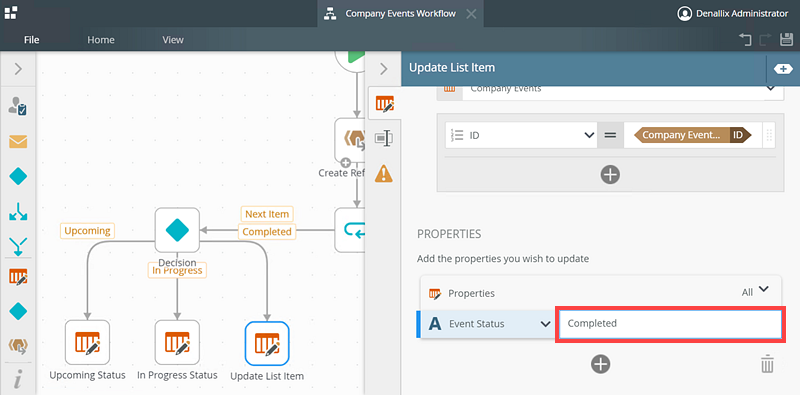
- On the Properties section, click Add. Here you tell the Update List Item to update the Event Status property in the Company Events list with the Completed value.
- Select the Event Status property.
- Type Completed in the Type / Drop field.
- Click on the Properties tab of the Update List Item step and rename the step to Completed Status.
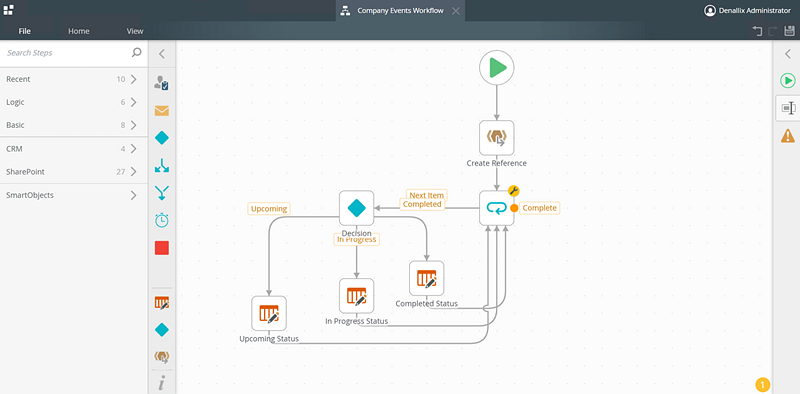
You have configured all the Update List Item steps for the Upcoming, In Progress and Completed decision paths. Next you finish the workflow by connecting all the decisions paths to the Loop step and add an End step to the Completed path of the Loop step.
- Rearrange the Decision Paths as shown below.
-
Finish the Workflow
In this step you finish the workflow by connecting all the decisions paths to the Loop step and add an End step to the Completed path of the Loop step. This completes the loop and, once the loop is done, the workflow is stopped by the End step.
- Connect the Upcoming Status, In Progress Status and Completed Status steps to the Loop step.
- Add an End step to the Complete path of the Loop step. Find the End step in the Logic section of the Toolbox.
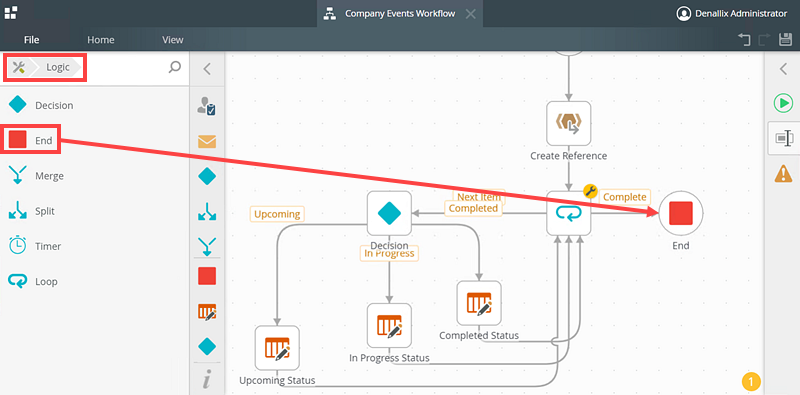
- Save and Deploy the Company Events workflow.
- Connect the Upcoming Status, In Progress Status and Completed Status steps to the Loop step.
-
Test the Scenario
- Open the K2 Management site and go to Workflow Server > Workflows > [Workflow Category Name] > [Workflow Name] and start a new instance of the workflow.
- Go to the SharePoint site where your list resides and notice the list has been updated. In this example, the Event Status field has been updated in the Company Events list.
Review
In the following scenario, you used the Create Reference, Loop, Decision, Update List Item steps in