How To: Expire Parallel Tasks Based on a Condition
In this article, you learn how to expire parallel paths based on a condition. Conditions can be time-based, such as an expiration date, a user action of some kind, or some other business logic. The condition occurs in either path, resulting in both paths expiring and the workflow moving to a new step.
For users familiar with K2, this demonstration provides the same outcome as the 'Go To' escalation activity found in earlier versions of the K2 platform.
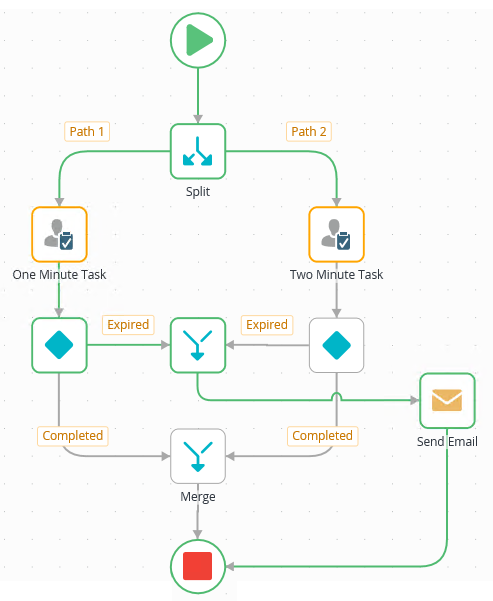
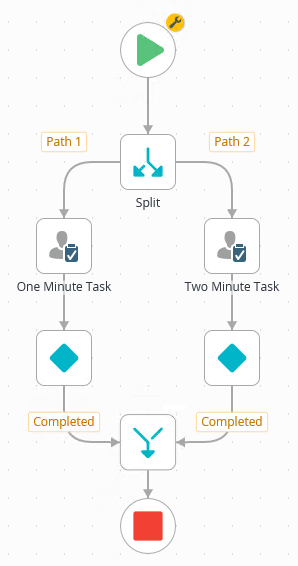
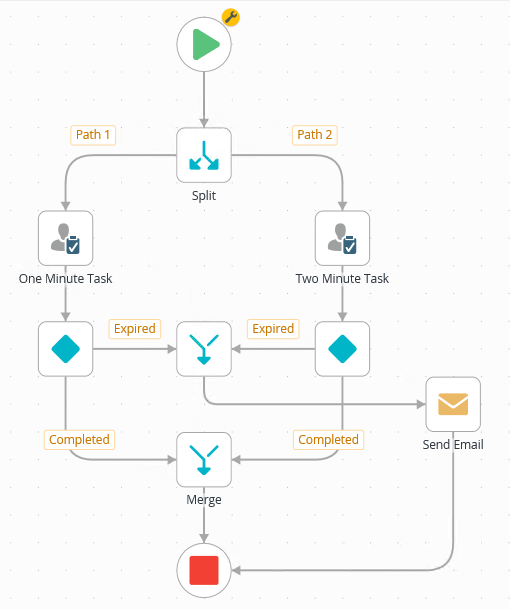
A workflow featuring parallel paths that expire based on a condition
Scenario
You work in IT and have provided employees with a form they can submit for support requests. When they submit the form, a workflow starts and creates a task for each member of the IT support group. In this way, the first available staff member responds to the request. Your staff has a set period of time to respond. If nobody picks up the task, the workflow expires all tasks and follows a different path for escalated requests.
Steps
This demonstration consists of a single workflow with parallel paths. You build a basic workflow and watch it in real-time using the View Flow report. Then you update the workflow, adding conditions to each path and a new outcome for the workflow to follow if there is at least one unmet condition. Once again, you observe the workflow in real-time to understand how the conditions affect the workflow outcome.
Setup Steps
The following steps set up the scenario from start to finish. If you want to skip the setup steps and view the topic step, go to Add Conditions that Expire Tasks Based on a Time Frame.
- From K2 Designer, create a new workflow called Expire Parallel Paths.
- Launch K2 Designer.If you do not know how to access K2 Designer, see Accessing K2 Sites.
- Create categories to store your work (optional). Create a new workflow called
Expire Parallel Paths.
- Close the interactive Welcome pane.
- Launch K2 Designer.
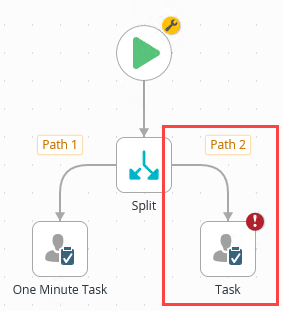
- Add a Split step, then a Task step to each path. Rename the steps One Minute Task and Two Minute Task respectively. Assign the tasks to yourself (Originator), so you can action them later. For both task steps, add one Action, Completed. Add a Decision step to each task. Merge the two paths when both tasks are complete. Add an End step and deploy the workflow.
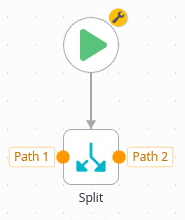
- From the Toolbox > Logic node, drag a Split step into the empty placeholder. The split step allows the workflow to run two or more paths simultaneously.
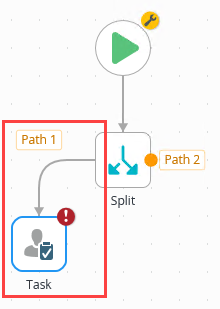
- From the Toolbox > Basic node, add a Task step and connect it to the Path 1 line.
- Select the Task step, and expand the Configuration Panel. Add one Action called
Completed.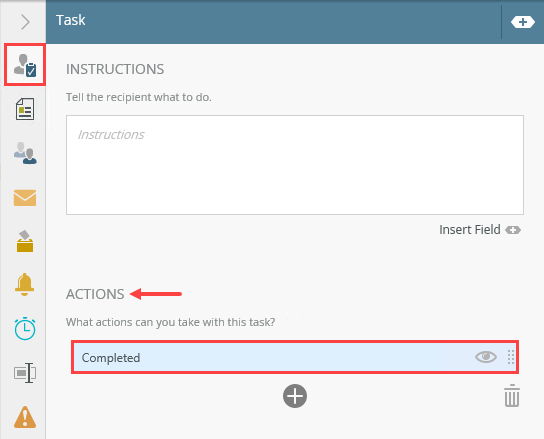
- Click the Properties tab. Rename the step
One Minute Task
then collapse the Configuration Panel.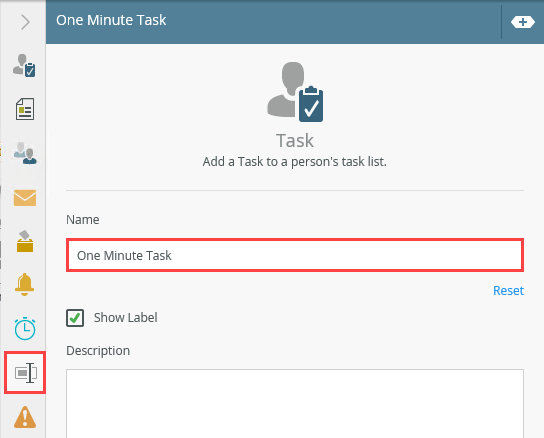
- Add a Task step and connect it to the Path 2 line.
- Select the Task step, and expand the Configuration Panel. Add one Action called
Completed. - Click the Properties tab. Rename the step
Two Minute Task
then collapse the Configuration Panel. - From the Toolbox > Logic node, add a Decision step below the One Minute Task step. Connect the steps. Repeat this for the Two Minute Task side.

- From the Toolbox > Logic node, add a Merge step below the Decision steps. Connect both Completed outcomes to the merge step.

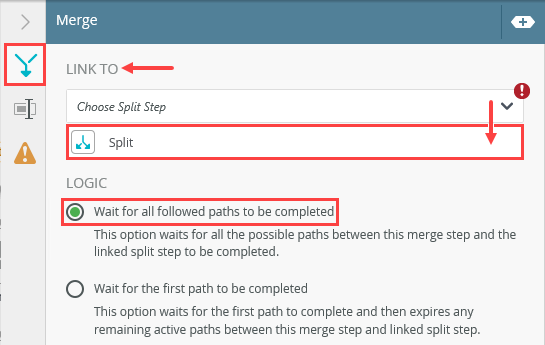
- Select the Merge step and expand the Configuration Panel. Under the Link To heading, click the down arrow and select Split. Some workflows may have more than one split step. K2 needs to know which split step you are completing. (For workflows with more than one split step, you should rename the steps for clarity.) Under the Logic heading, keep the default Wait for all followed paths to be completed. This logic tells K2 to wait until the recipients action both tasks before continuing. Collapse the Configuration Panel.
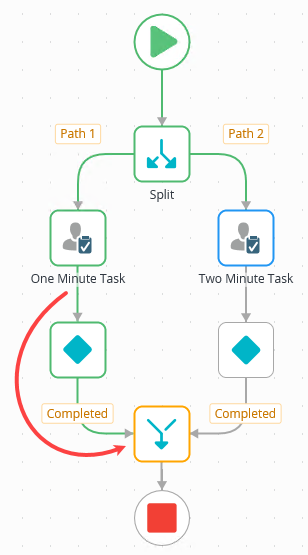
- From the Toolbox > Logic node, add an End step below the merge step. Connect the two steps. Collapse the Toolbox. Your workflow should look like the image below.
- Deploy the workflow. Click File > Deploy. When you see the deploy success confirmation, click the Hide link to close the dialog. Click the Home tab to return to the design canvas.
You do not need a form for this task and you can use the default recipient (Originator).
You do not need a form for this task and you can use the default recipient (Originator).
Next, you deploy the workflow. This step is optional. In Step 3, you start an instance of the workflow then view the behavior using the View Flow report. If you prefer, you can jump to Step 4 and configure the deadline conditions for the task steps, then test using the report.
- From the Toolbox > Logic node, drag a Split step into the empty placeholder. The split step allows the workflow to run two or more paths simultaneously.
- From the K2 Management site, start an instance of the Expire Parallel Paths workflow. Open the View Flow report for the instance. Notice the workflow followed both paths from the split and are now waiting for user action on the task steps. Open K2 Workspace (Desktop). Action one of the tasks. Watch the View Flow report update and notice the workflow is waiting for the second task step. Action the second task and confirm the View Flow report updates with the paths merged and the workflow completes.
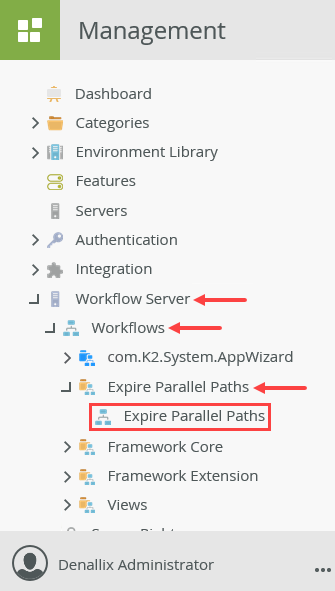
- Open the K2 Management site in a new browser tab.
- Expand the Workflow Server > Workflows > Expire Parallel Paths nodes and select your workflow.
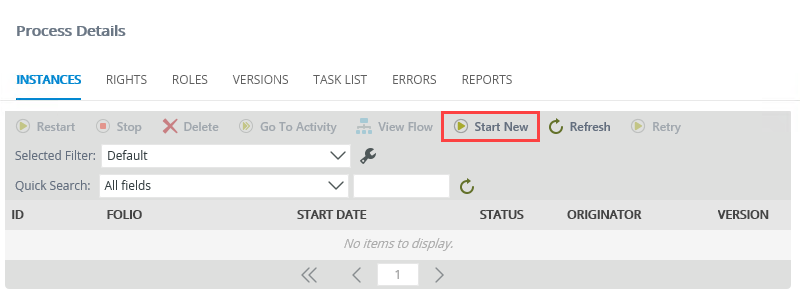
- Click the Start New button in the central pane.
- Change the Folio to use a Text value, then enter
Test Workflow
and click the Start button (near the lower right of your screen). Click OK for the confirmation dialog.
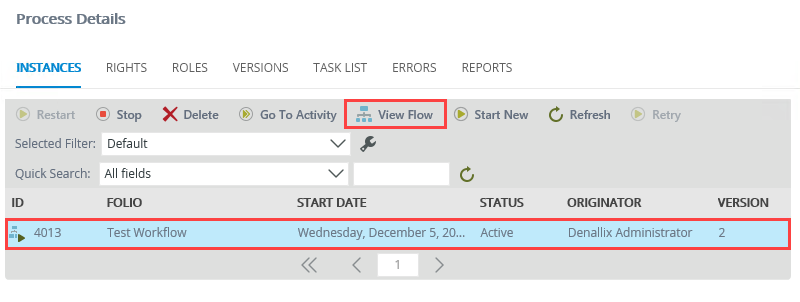
- In the central pane, select the Test Workflow instance, and click the View Flow button.
- In a new browser tab, open K2 Workspace (Desktop). (Do not close the View Flow report.) Open the Inbox. Notice there are two task notification emails: One Minute Task and Two Minute Task. Click the One Minute Task email to open the form in the central pane. Select Completed for the Action and click Submit. Click OK for the confirmation dialog.
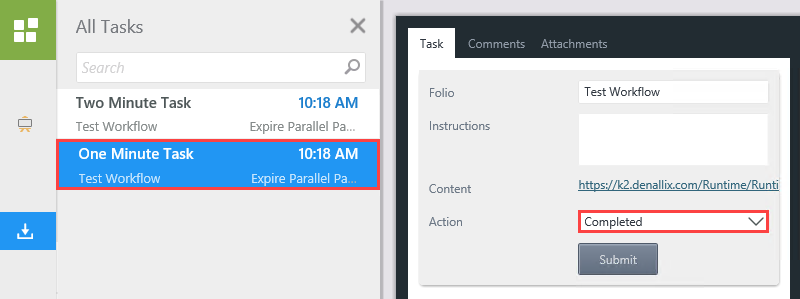
- Return to the View Flow report. Wait a minute for the report to update. Path 1 progresses to the Merge step. The orange color on the merge step indicates the workflow is waiting on a condition. In this case, the condition is met when both tasks are complete.
- Return to K2 Workspace (Desktop). Submit the second action for the Two Minute Task (Completed).
- Return to the View Flow report. Now that the merge condition is met, the workflow completes. Close the View Flow report in your browser.
Next, open the View Flow report and observe the behavior of the workflow as it progresses.
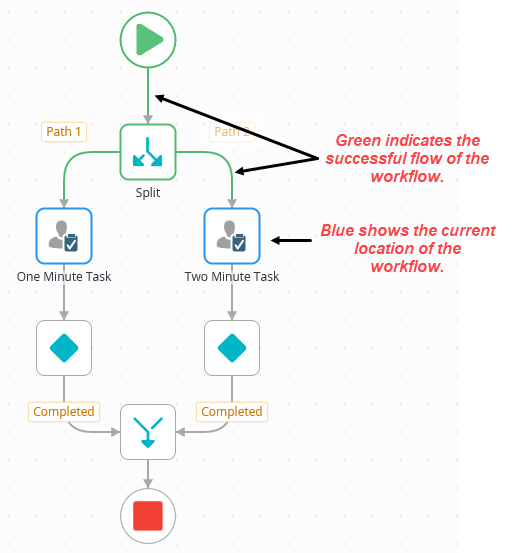
The report opens in a new browser tab. If you are not familiar with this report, it displays your workflow using colors to indicate successful (green), paused (blue), and failed (red) workflow progress in almost real-time. Notice the workflow split into two paths and is paused at each task step (where it waits for the recipient to take action).
Add Conditions that Expire Tasks Based on a Time Frame
In the following steps, you add a time-based condition to both tasks. You add a new task result (outcome) the workflow follows in the event the time elements are not met. In this case, the tasks expire and the workflow flows along a different path than the original steps.
- Add conditions to each path (Path 1 and Path 2) using the table below as a guide. Deploy the workflow when you have completed the settings.
Edit the One Minute Task step and add a deadline that expires the task after one minute. Tab > Heading Setting Notes Deadline > Deadline After Time: 1 minute You want to expire the task after one minute if the recipient has not responded. Deadline > Task Result Rule Behavior Create a new task result. Keep the default name, Expired The task result is the path the workflow follows if the task expires. Edit the connected Decision step. Decision > Decision Add a new decision called Expired You are creating a new outcome line from the Decision step. Decision > Decisions Link the new decision to the Expired task rule.
You are binding the new outcome to the expired task result. Edit the Two Minute Task and add a deadline that expires the task after two minutes. Tab > Heading Setting Notes Deadline > Deadline After Time: 2 minutes You want to expire the task after two minutes if the recipient has not responded. Deadline > Task Result Rule Behavior Create a new task result. Keep the default name, Expired The task result is the path the workflow follows if the task expires. Edit the connected Decision step Decision > Decision Add a new decision called Expired You are creating a new outcome line from the Decision step. Decision > Decisions Link the new decision to the Expired task rule.
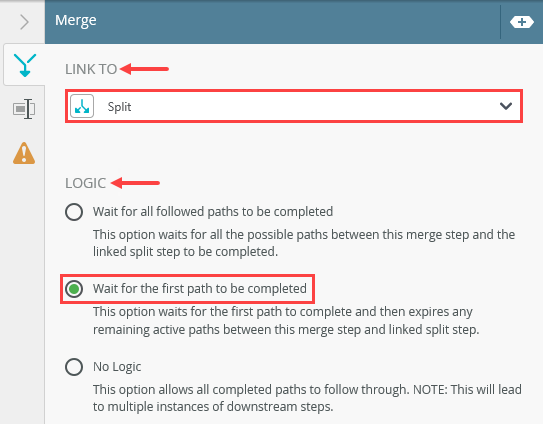
You are binding the new outcome to the expired task result. Add a Merge step and connect the two Expired outcomes. Tab > Heading Setting Notes Merge > Link To Split Bind the merge step to the split step. In some workflows, you may have more than one split step to select from. In this case, there is only one. Merge > Logic Select Wait for the first path to be completed.
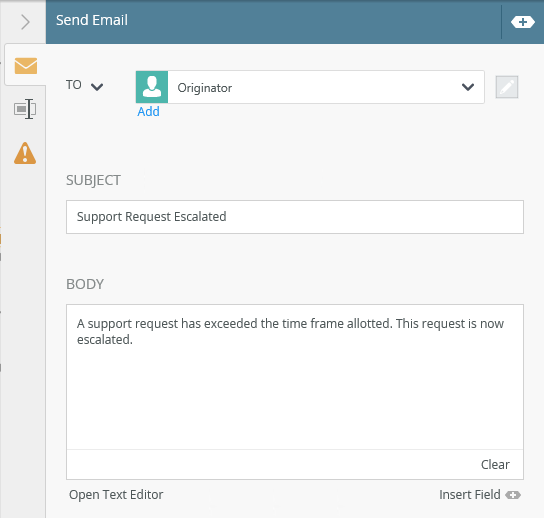
You want to expire the remaining tasks so the workflow can move to the escalated path. Add a Send Email step and connect it to the new merge step and the existing end step. Send Email > To Keep the default value, Originator Send Email > Subject and Body Enter your own content. This step does not come into play during testing. - Return to the workflow design canvas. Edit the One Minute Task step. Click the Deadline tab. Under the Deadline heading, change the task expire option to After Time. Enter
1
into the Minutes text box. Under the Task Result Rule Behavior heading, click Create to add a new outcome option. Keep the default value, Expired. The workflow follows the expired path if the time frame is not met. Collapse the Configuration Panel.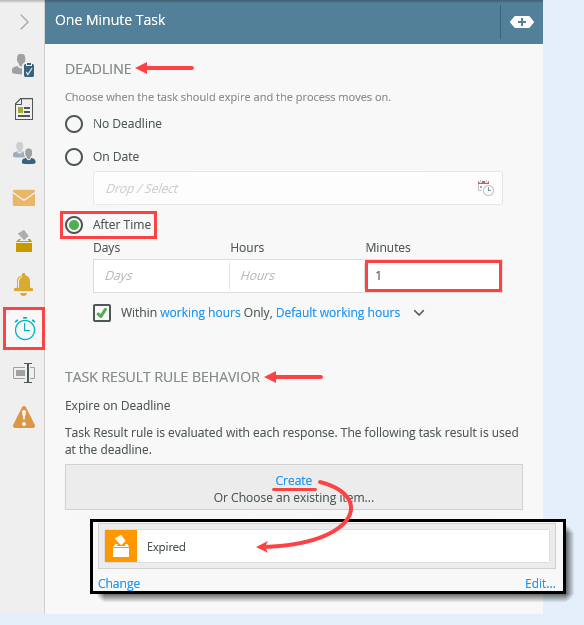
- Edit the Decision step under the One Minute Task step. Under the Decisions heading, click the Add(+) icon. Enter
Expired
for the new result value. You are adding a second outcome line to the Decision step. This outcome leads to a different workflow path if the task expires. In the scenario, the new path represents escalated support requests.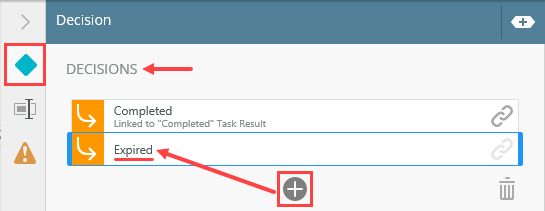
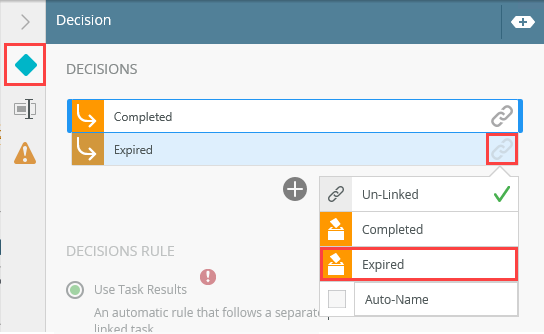
- Now, you must link the new decision to the Expired result added in the Task step so that K2 knows to follow this outcome if the task expires. (You are binding the outcome line to the task result.) Click the link icon for the Expired outcome. Select Expired from the list of available decisions. Collapse the Configuration Panel.
- Edit the Two Minute Task. Click the Deadline tab. Change the Deadline option to After Time, then enter
2
in the Minutes text box. Create a new task result, keeping the default value, Expired. Collapse the Configuration Panel.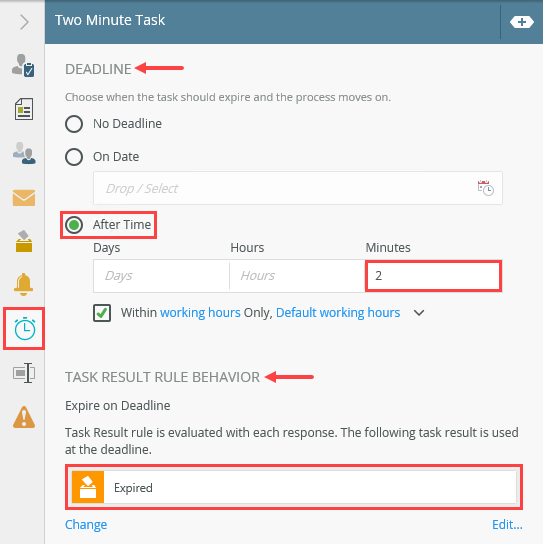
- Edit the Decision step under the Two Minute Task step. Add a new decision named
Expired
then link it to the Expired task result. Collapse the Configuration Panel.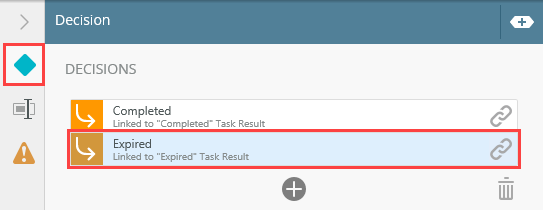
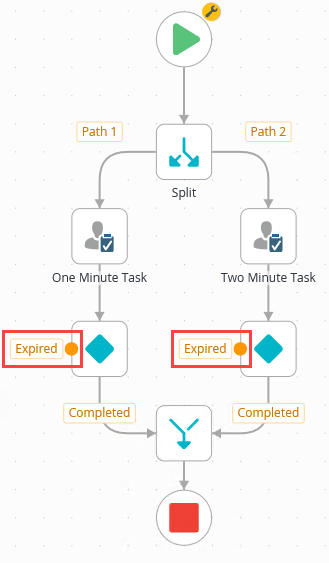
- From the Toolbox > Logic node, add a Merge step onto the canvas, between the two Decision steps. Connect the expired outcomes to the new merge step.
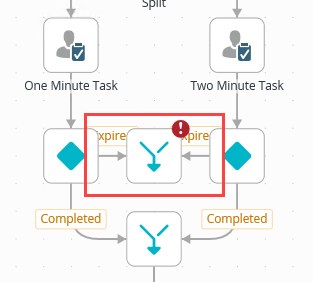
- Select the Merge step, then expand the Configuration Panel. Under the Link To heading, select Split step. Under the Logic heading, change the option to Wait for the first path to be completed. Once the first task expires due to the time frame condition, K2 expires all remaining tasks and the workflow follows the steps for the expired condition. Collapse the Configuration Panel.
- From the Toolbox > Basic node, add a Send Email step to the canvas and connect it to the new merge step.
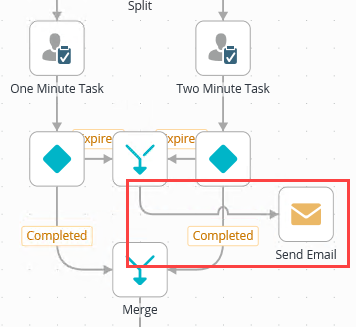
- Select the Send Email step and expand the Configuration Panel. Keep the default To value, Originator. Enter any content you like for the subject line and body. This step is just to show you how the workflow behaves following a conditional expiration. Collapse the Configuration Panel.
- Connect the Send Email step to the End step. Your workflow should look similar to the image below.
- Deploy the workflow. (File > Deploy)
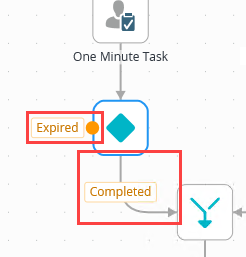
Notice now, the Decision step has two outcomes: Completed and Expired.
Now you have two task steps each with two possible outcomes: Completed or Expired. The workflow follows the expired outcomes if there is no action taken within the times allotted (one and two minutes). Next, you configure the steps for the expired outcomes.
You want the expired steps to follow a different path than the original workflow. In the scenario, the new steps represent the path that escalated support requests follow. First, you merge the two expired paths back into one.
- Return to the workflow design canvas. Edit the One Minute Task step. Click the Deadline tab. Under the Deadline heading, change the task expire option to After Time. Enter
- Return to the K2 Management Site. Start a new instance of the Expire Parallel Paths workflow. Open the View Flow report for the instance. After one minute, the Path 1 task expires. The merge step logic expires the remaining task and the workflow moves through the Send Email event and completes.
- From the K2 Management site, expand the Workflow Server > Workflows node. Select the Expire Parallel Paths workflow.
- In the central pane, click Start New.
- Change the Folio to use a Text value, then enter
Test Expiring Paths
and click the Start button (near the lower right of your screen). Click OK for the confirmation dialog.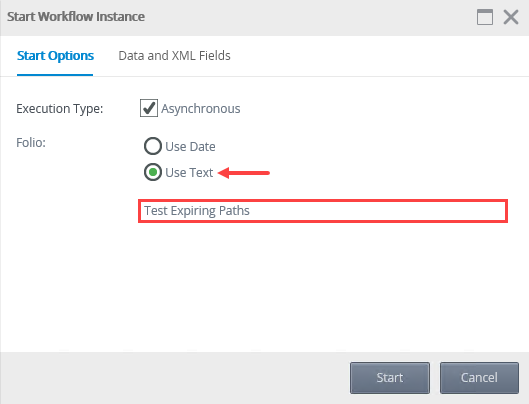
- In the central pane, select the Test Expiring Paths instance, and click the View Flow button.
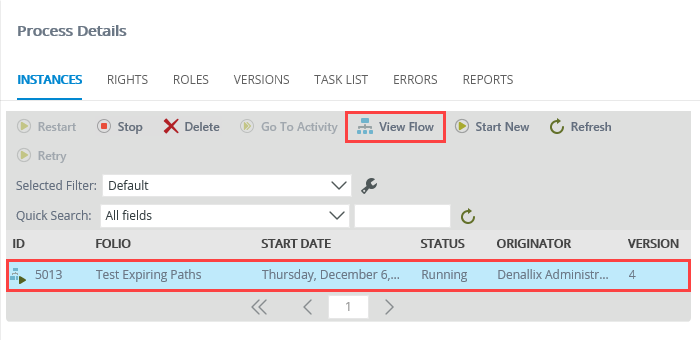
Next, open the View Flow report and observe the behavior of the workflow as it progresses.
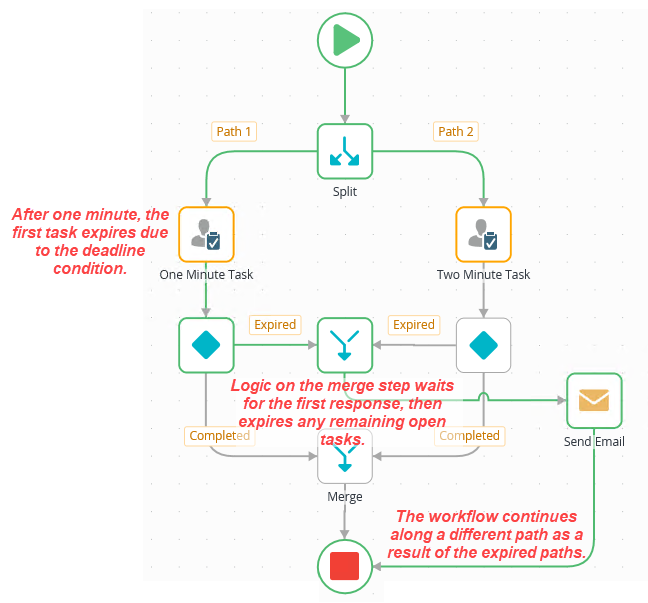
After one minute, the first task (One Minute Task) expires. The workflow for Path 1 continues to the merge step. The merge has logic that expires the other remaining task (Two Minute Task), then moves the workflow to the next step (Send Email). Finally the workflow completes. The new path the workflow follows as a result of expired parallel paths is your escalated path, which may simply be an email as shown here, a series of additional steps, or a Call Sub Workflow step.
- From the K2 Management site, expand the Workflow Server > Workflows node. Select the Expire Parallel Paths workflow.
Review
The goal of any business process automation is efficiency through increased customer service and decreased processing time. Using parallel paths in workflows where tasks run simultaneously is one method for decreasing processing time. However, in some cases, when your workflow depends on timely responses, it may be necessary to build in a contingency plan. This demonstration provides one method for adding conditions to expire unopened, available tasks to keep the process moving.