How to: clean your K2 environment by deleting application artifacts
This how-to demonstrates how you can clean your K2 environment by deleting application artifacts such as views, forms, SmartObjects, workflows, and services instances that, when combined, form K2 applications. Removing unnecessary artifacts keeps your environment clean, and is especially useful in shared or development environments. When deleting an application, you must follow a set order, as described in the detailed steps below.
Essentially, the sequence for deleting application artifacts is:
- Workflow instances
- Deployed workflow definitions
- Workflow design files
- Forms
- Views
- SmartObjects
- Category system folders
- Service Instances
- Roles
Depending on the type of application, you may need to delete additional artifacts or access the application artifacts in different ways. This topic is divided into the following types of application - use the appropriate steps depending on the type of application you want to delete:
Deleting artifacts of K2 applications
This section describes how to delete artifacts of a K2 application. Typically, this is the kidn of application you would create with the K2 Designer tool, and might include workflows, SmartObjects, forms and views.
Use the K2 Management site to delete deployed workflows
Begin by deleting workflow instances and deployed versions of your application's workflows from the K2 server. Use this first step as an opportunity to see what workflow instances might be active for the application you want to delete; depending on your requirements, it is possible that you may need to wait for active workflow instances to complete before you can delete the application.
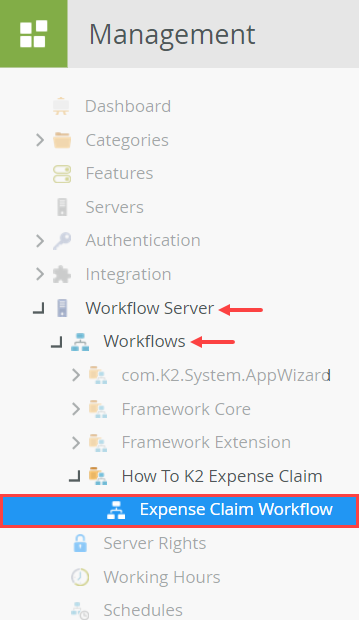
- Launch the K2 Management site. Navigate to and select your application's workflow in the Workflow Server > Workflows node.
- Launch the K2 Management site. Expand the Workflow Server > Workflows node. Locate and select your workflow. (You may need to expand additional categories, depending on the category structure for your application.)
- Launch the K2 Management site. Expand the Workflow Server > Workflows node. Locate and select your workflow. (You may need to expand additional categories, depending on the category structure for your application.)
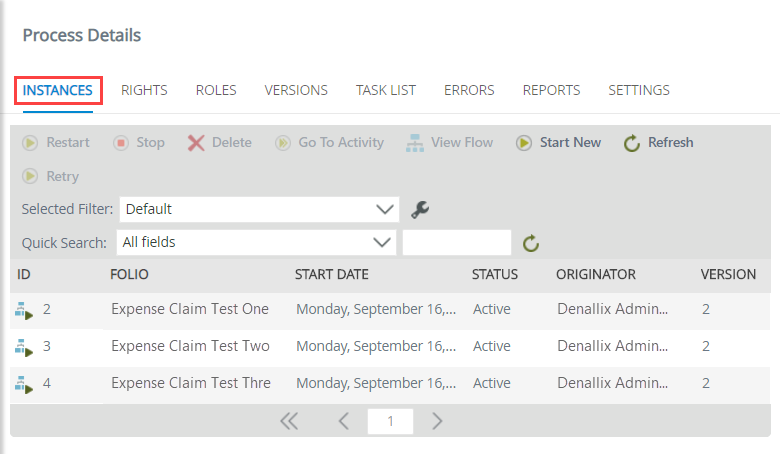
- Delete all workflow instances associated with your application's workflow. You are deleting workflow instances that are active, running, stopped, or in error. You can also choose to remove reporting data as well. With your workflow selected in the Workflows category, click the Instances tab in the central pane.
- To access a list of all workflow instances for your application's workflow, select your workflow in the Workflows category (in the left column) and click the Instances tab in the central pane. You see a list of all workflow instances including instances that are active, running, stopped, or in error.
- To access a list of all workflow instances for your application's workflow, select your workflow in the Workflows category (in the left column) and click the Instances tab in the central pane. You see a list of all workflow instances including instances that are active, running, stopped, or in error.
- Select a workflow instance and click Delete. You see a pop-up where you have the option to delete reporting logs. Check the Delete Reporting Data (Logs) box to delete all reporting and audit data generated for the workflow instance. Click Delete. Repeat this step and delete all workflow instances from the list.
- On the Process Details screen, select a workflow instance and click Delete. When you see the Delete Process Instance confirmation, check the box to Delete Reporting Data (Logs). Click Delete to complete the action.

- Using the steps above, delete any remaining workflow instances until the list is empty.
- On the Process Details screen, select a workflow instance and click Delete. When you see the Delete Process Instance confirmation, check the box to Delete Reporting Data (Logs). Click Delete to complete the action.
- Delete all versions of the workflow. You may see more than one version, and you have the option to delete all versions or specific versions. In this case, delete all versions along with the historical data and workflow reporting SmartObjects. Click the Versions tab to access a list of your workflow's deployed versions. Select a version and click Delete. To delete all versions at once, select Delete all versions and check the boxes to delete historical (log) data and workflow reporting SmartObjects.

- Still in the Workflow Server > Workflows category, select your workflow if it is not already. In the central pane, click the Versions tab. In the image below, there is only one version of the Expense Claim Workflow. You may have several versions, depending on how many times you deployed the workflow. Notice the columns for Active, Running, Stopped, and Error instances. You should see zeros here, since you deleted all workflow instances in the prior step. Select a version and click Delete.
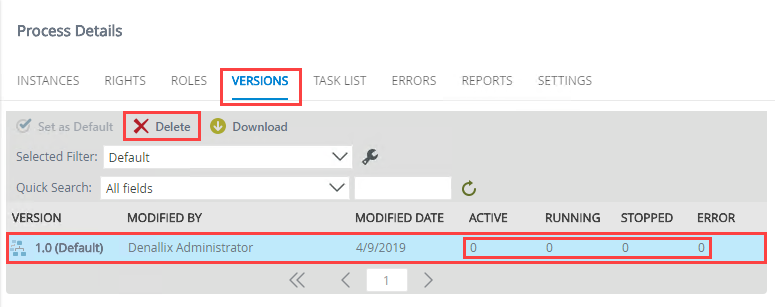
- On the Delete Workflow screen, select Delete all versions and check the option to delete all historical data and workflow reporting SmartObjects. Click OK.
- Still in the Workflow Server > Workflows category, select your workflow if it is not already. In the central pane, click the Versions tab. In the image below, there is only one version of the Expense Claim Workflow. You may have several versions, depending on how many times you deployed the workflow. Notice the columns for Active, Running, Stopped, and Error instances. You should see zeros here, since you deleted all workflow instances in the prior step. Select a version and click Delete.
Use K2 Designer to delete other artifacts including views, forms, and SmartObjects
The next step is to remove views, forms, SmartObjects, workflow design files, and categories. You perform this action in K2 Designer.
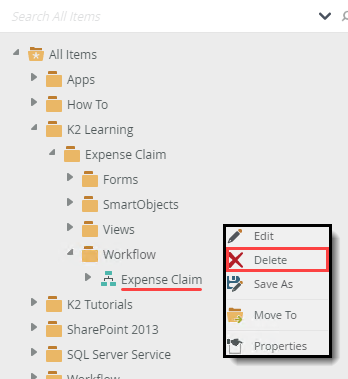
- Open K2 Designer. Delete your workflow design file. (In the previous step, you removed workflows published to the K2 server. In this step, you are removing the "design" copy of your workflow.)When you right-click the workflow design file, you should see a Delete option. If you do not see a Delete menu option, it may be because the workflow was deployed to the environment with the Package & Deployment tool. If needed, you can select the option to Edit the workflow and save the workflow. You should then see the Delete menu option.
- From K2 Designer, navigate to your application's categories. Right-click your workflow and select Delete. Click Yes for the confirmation.
 If you do not see a Delete option, it may be because the workflow was deployed to the environment with the Package & Deployment tool. If needed, you can select the option to Edit the workflow and save the workflow. You should then see the Delete menu option.
- From K2 Designer, navigate to your application's categories. Right-click your workflow and select Delete. Click Yes for the confirmation.
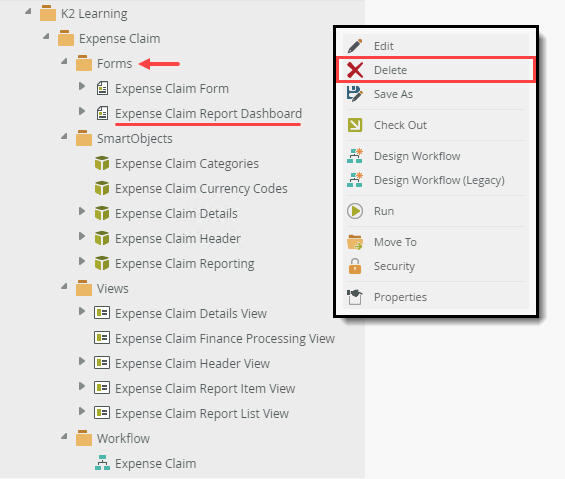
- Delete your application's forms. You must delete forms first, followed by the views used by those forms.
- Right-click each form in your application and select Delete. Click Yes for the confirmation. You must delete forms before you can delete views. If you see a message about associated workflows, you can ignore it and continue, because you already deleted the workflows for the application in previous steps.
- Right-click each form in your application and select Delete. Click Yes for the confirmation. You must delete forms before you can delete views. If you see a message about associated workflows, you can ignore it and continue, because you already deleted the workflows for the application in previous steps.
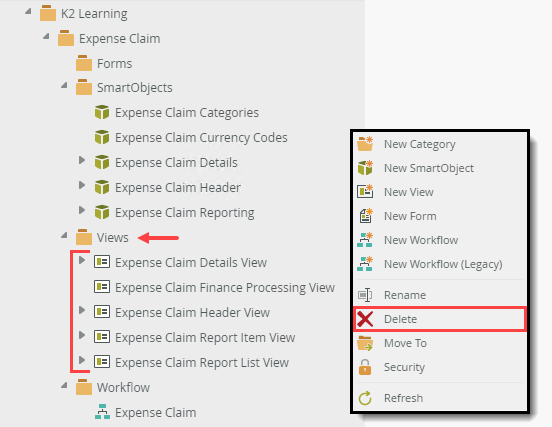
- Delete your application's views.
- Right-click each view in your application and select Delete. Click Yes for each confirmation.
- Right-click each view in your application and select Delete. Click Yes for each confirmation.
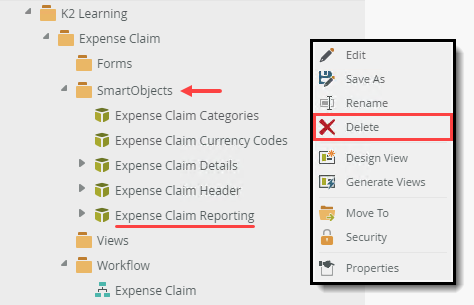
- Delete your application's SmartObjects. You must follow the order below because of associations between SmartObjects.
- SmartObjects not associated with other SmartObjects (such as an independent SmartObject used for reporting)
- SmartObjects that provide supporting services, such as calculations or control values
- SmartObjects that store child records
- SmartObjects that store primary, or parent records
- Navigate to your SmartObjects. Delete independent SmartObjects first (or SmartObjects that do not have an association with other SmartObjects). In the image below, the Expense Claim Reporting SmartObject does not have any associations with the other SmartObjects, so it's deleted first. Right-click the SmartObject and select Delete. Click Yes for the confirmation.
- Delete any SmartObjects that provide control values (such as drop-down lists) or perform functions (such as calculations).
- Delete any child SmartObjects. These are data sources used to store child records that are linked to parent records.
- Delete the primary, or parent SmartObject.
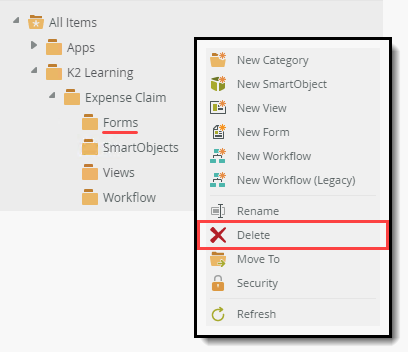
- Delete your categories beginning with any subcategories (if you have them).
- Delete your application’s categories. You must delete subcategories first, followed by the main category.
- Delete your application’s categories. You must delete subcategories first, followed by the main category.
Use the K2 Management site to delete service instances and roles
Next, you return to the K2 Management site and delete any service instances and roles you created for the application.
- From the K2 Management site, delete any service instances created for the application. You find service instances in the Integration > Service Instances node.
- In the K2 Management site, expand the Integration node and click Service Instances. In the central pane, select your service instance and click Delete. Click OK for the confirmation. Repeat this for any remaining service instances you created for the application.

- In the K2 Management site, expand the Integration node and click Service Instances. In the central pane, select your service instance and click Delete. Click OK for the confirmation. Repeat this for any remaining service instances you created for the application.
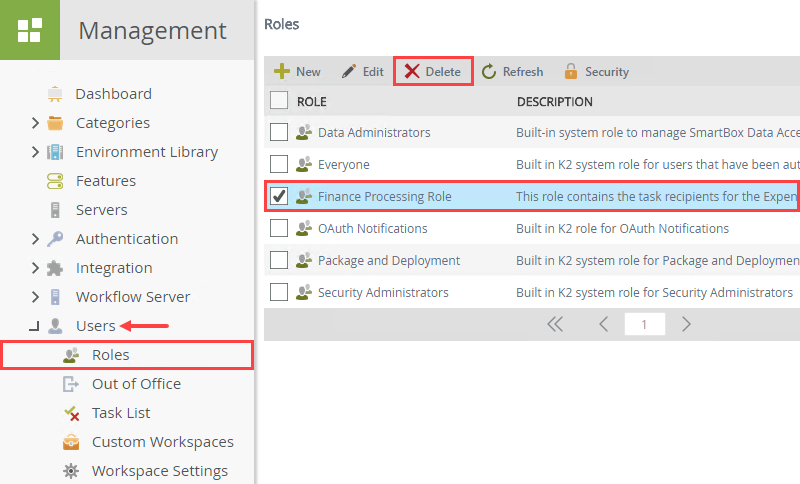
- Delete any roles you created for the application. You find roles in the Users > Roles node.
- Expand the Users node. Select Roles. In the central pane, select any roles you created for the application and click Delete. Click OK for the confirmation.
At this point, you have deleted all artifacts for your K2 application. Performing this maintenance helps keep your K2 environment neat and tidy, especially in shared environments.
- Expand the Users node. Select Roles. In the central pane, select any roles you created for the application and click Delete. Click OK for the confirmation.
Deleting artifacts of K2 for SharePoint applications
This section describes how to delete artifacts from a K2 for SharePoint application such as views, forms, workflows, and SmartObjects. For information on deleting the K2 for SharePoint app from your environment, see Removing K2 artifacts and integration from SharePoint.
Use the K2 Application elements page toolbar to delete views, forms, SmartObjects, and workflows
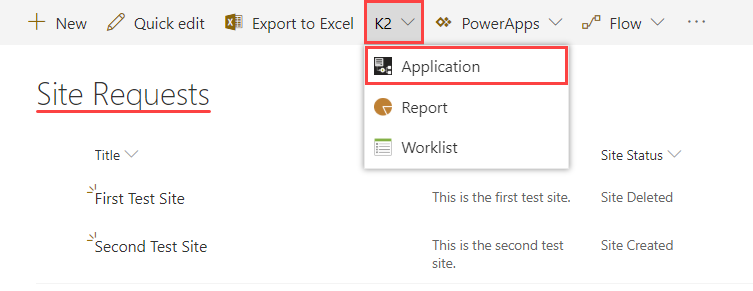
- Navigate to the K2 Application elements page using the K2 > Application menu option from your list or library landing page.
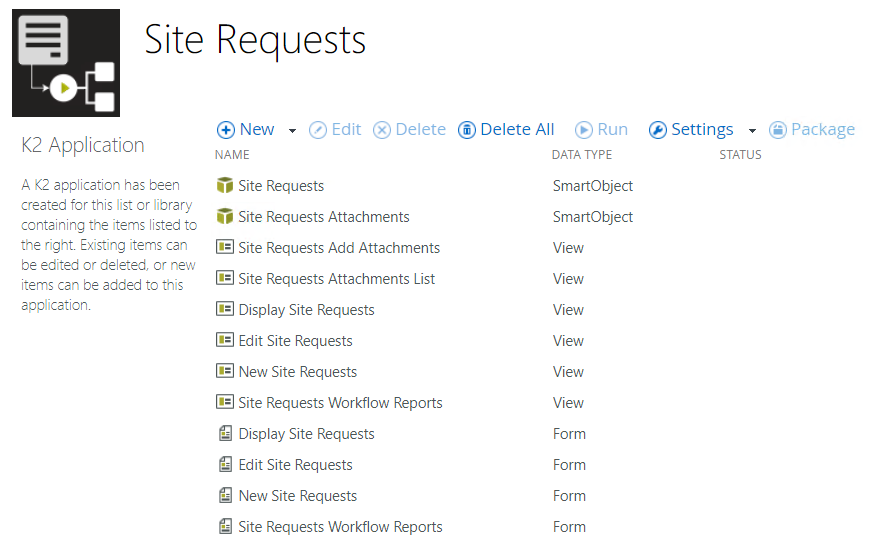
- You delete K2 for SharePoint application artifacts (such as views, forms, SmartObjects, and workflows) from the K2 Application elements page. From your SharePoint list or library landing page, click Application in the K2 menu to open the application page.
- You delete K2 for SharePoint application artifacts (such as views, forms, SmartObjects, and workflows) from the K2 Application elements page. From your SharePoint list or library landing page, click Application in the K2 menu to open the application page.
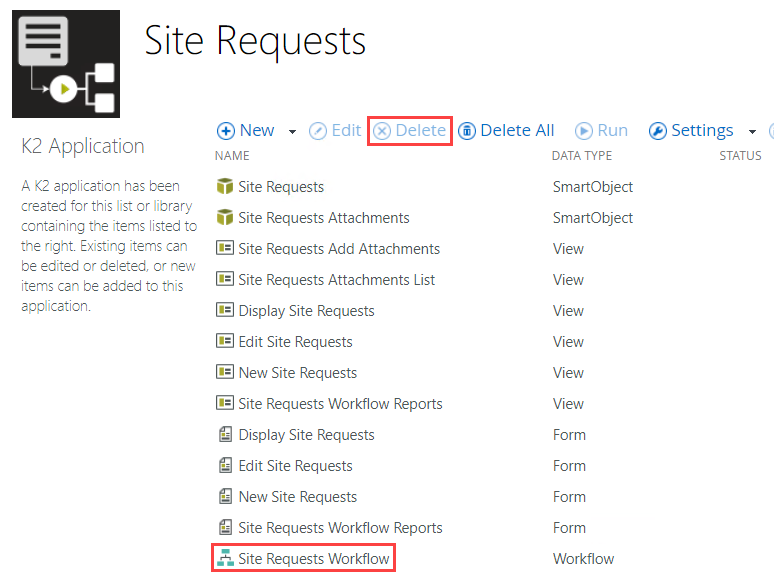
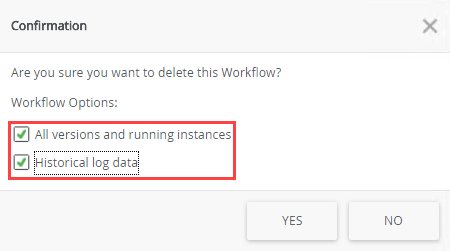
- From the K2 Application elements page, select your application's workflow and click Delete. You see a message that gives you the options to delete all versions and historical log data. Check both of these options and click Yes.
- The K2 Application elements page contains a list of all the artifacts for your application. To clean your environment, begin by deleting the workflow. Select your application's workflow and click Delete.
- You see a confirmation message asking if you want to delete all versions and running instances, as well as historical log data. Check the box for each option and click Yes.
It may take a few minutes for K2 to process the command. First, K2 deletes any active workflow instances, then it deletes all versions of the workflow. Typically, there is a new version each time you deploy the workflow, so you may have several versions to delete, depending on how many times you deployed the workflow.
- The K2 Application elements page contains a list of all the artifacts for your application. To clean your environment, begin by deleting the workflow. Select your application's workflow and click Delete.
- Delete the application forms.
- Next, you delete all the forms. You must delete forms before views. Select a form and click Delete. Click Yes for the confirmation. Repeat this step and delete the remaining forms.

- Next, you delete all the forms. You must delete forms before views. Select a form and click Delete. Click Yes for the confirmation. Repeat this step and delete the remaining forms.
- Delete the application views.
- Next, delete the views. Select a view and click Delete. Click Yes for the confirmation. Repeat this step and delete the remaining views.
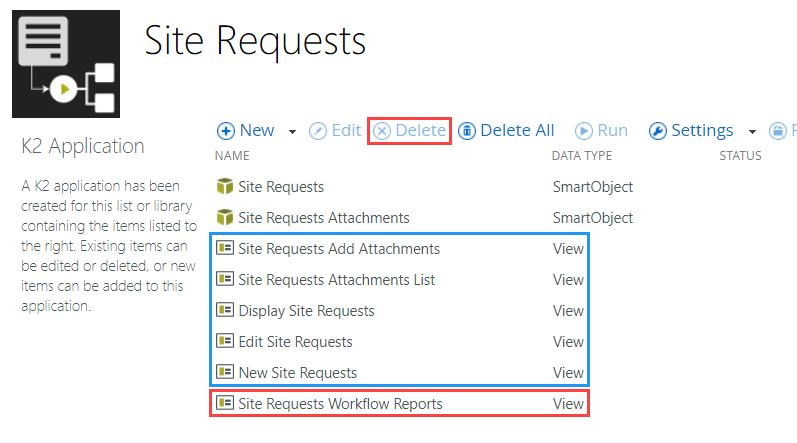
- Next, delete the views. Select a view and click Delete. Click Yes for the confirmation. Repeat this step and delete the remaining views.
- Delete the application SmartObjects. You cannot delete SmartObjects individually from the K2 Application elements page due to underlying associations between SmartObjects. Use the Delete All button to remove the remaining data sources. This option removes associations and then removes the SmartObjects.
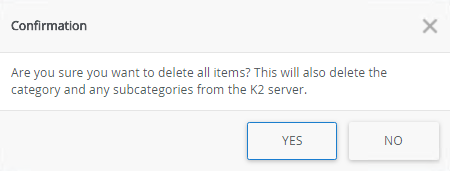
- In the steps above, you deleted artifacts individually. To complete the process, you need to delete the application's SmartObjects. You cannot delete SmartObjects individually from the application elements page due to underlying associations between SmartObjects. Click Delete All.You might have noticed the Attachments SmartObject (and views you just deleted). These artifacts are specific to SharePoint applications. K2 adds them for you (when you generate artifacts from a list or library) so that you can add and store attachments from your workflow forms.You may be wondering if you can click the Delete All button in the first place. You can! The purpose of this how-to is to show you how to remove artifacts individually and the order to use. However, you can use the Delete All button up front if you want to save time. Be aware however, that you are deleting all artifacts including views, forms, SmartObjects, workflows, and categories and you cannot easily retrieve or restore them.

- You see a confirmation message that tells you all items are removed, including categories. Click Yes.
- In the steps above, you deleted artifacts individually. To complete the process, you need to delete the application's SmartObjects. You cannot delete SmartObjects individually from the application elements page due to underlying associations between SmartObjects. Click Delete All.
Use SharePoint tools to delete the SharePoint list and subsite.
You've deleted the K2 artifacts for the application (views, forms, SmartObjects, workflow). For a complete scrub of the application, delete the SharePoint list or library and finally, your subsite (if you created one).
- Delete the SharePoint list or library and subsite (if you created one).
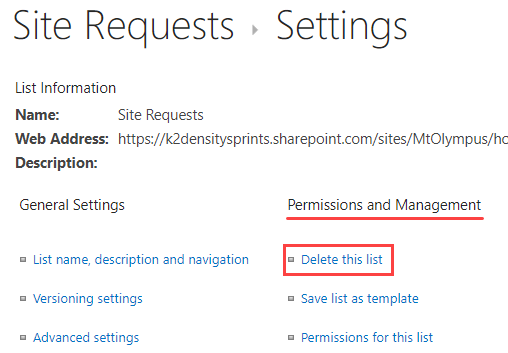
- Navigate to the list or library's Settings page.
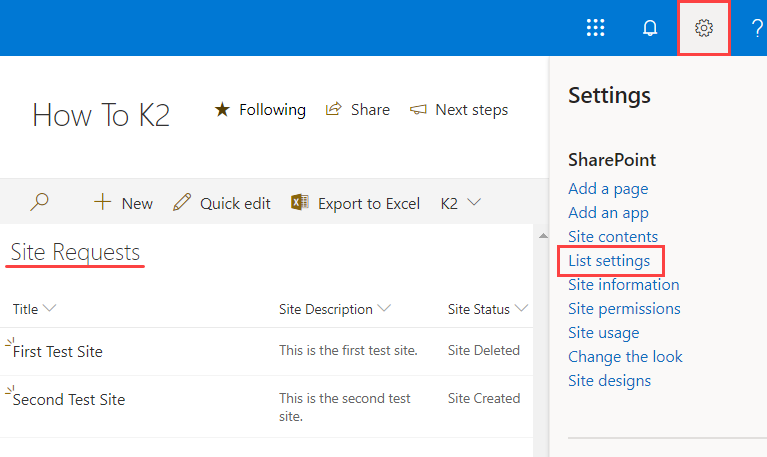
- Under Permissions and Management, click Delete this list (or document library) and click OK for the confirmation.
- Delete the subsite (if you created one). Contact your SharePoint administrator for instructions on deleting sites in your environment, if necessary.
At this point, you have deleted all artifacts for your K2 for SharePoint application. Performing this maintenance helps keep your K2 environment clean, especially in shared or development environments.
- Navigate to the list or library's Settings page.