List Views
Use a List view to create a view that displays lists of information (multiple records) such as shown here:
You have two options when the view is empty: You can Create Labels and Controls based on the SmartObject you selected on the General tab, or generate a blank layout table for inserting controls. If you want to get back to an empty view, click the Clear canvas button in the toolbar.
Selecting the first option, Create Labels and Controls, allows you to specify the details for creating the layout and other options including making the list view editable. Clicking OK automatically generates the view. 
| Feature | Description | How to use it |
|---|---|---|
| Layout | Specify the SmartObject fields that you want to show on your view. | Select the fields you want to show on your view |
| Edit Options | Enable list editing: Creates a view that allows you to directly edit information in the list.
|
Select Enable list editing if you want to create an Editable List view, then specify the details for editing |
| Additional | Optionally allows you to manually refresh the list. | Select the option if you want to include a refresh button |
You can now start customizing your view using controls, fields, methods, rules, List view settings and column settings. 
Click Create Layout Table Only to design the view by dragging fields, methods and controls onto the canvas. You can also drag fields and controls (available in the Toolbox) directly onto the canvas when creating a new view. It is not necessary to first configure the layout.
See the Get to Know the Canvas topic to familiarize yourself with the Layout and how to use the components on the canvas.
See the List View Settings topic for more options when you style, sort, and filter your List view.
See the Column Settings topic for information on how to configure the Column, Header, and Body sections of a List view.
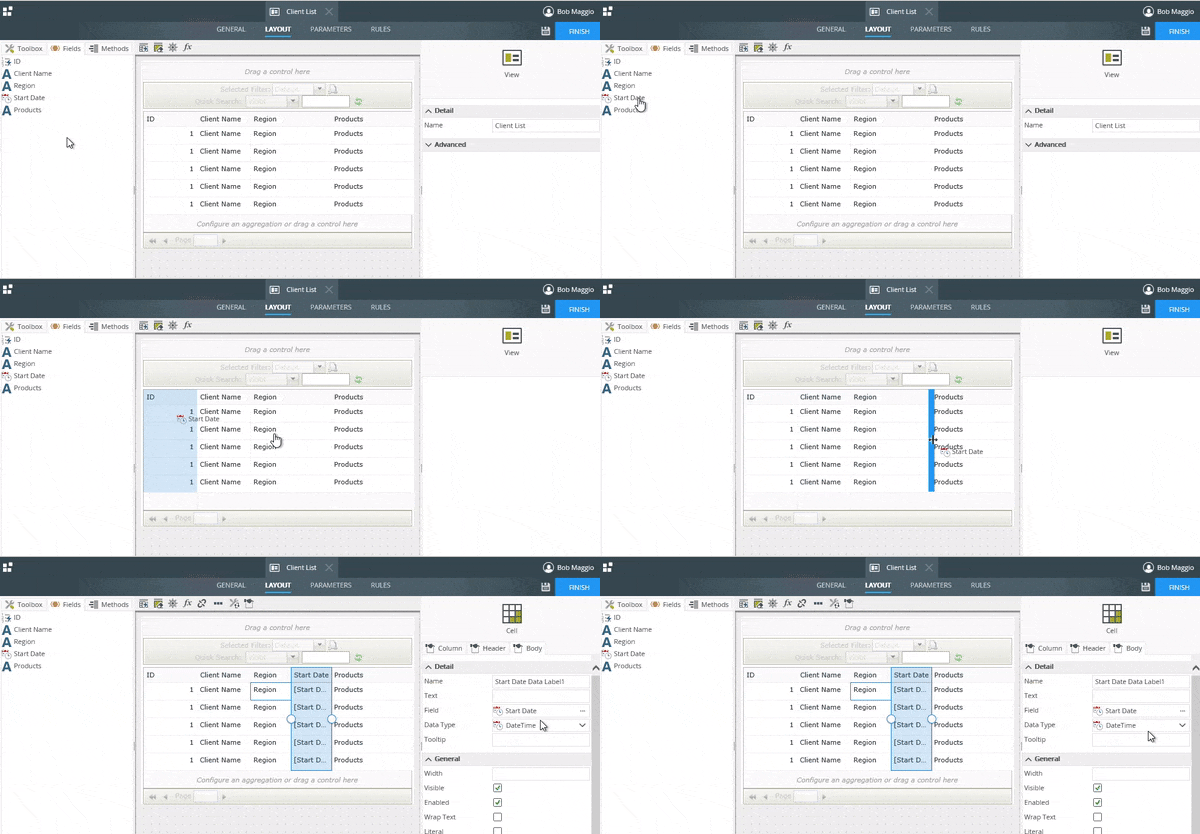
You can add additional columns to a view by dragging fields or controls onto the canvas. When you drag the field or control, wait for the drop zone to display, and then drop the field or
control where you need it. Note that the column is configured according to the type of field or control. See the example below on how to add an additional column.

Controls behavior is based on where you use them and the type of view you're designing. See the topic Binding Controls for information on how to bind and unbind a SmartObject field to a control. Bound and unbound controls are treated in the following way:
- Bound controls are allowed in the body section and return values as text and other data such as files, images, and hyperlinks. The primary controls that you use in the body section are Data Label and List Display, and you can use the latter to display associated data.
- Unbound controls, primarily the Data Label, are only allowed on the display template (body), which you can use to display a default value.
You can use the following keyboard shortcuts on a List view
- To copy and paste, click on a record to select it and press CTRL+C to copy. Switch to the application where you want to paste your data and press CTRL+V.
- To select multiple records, press and hold CTRL while selecting additional records which can be non-contiguous.
- To select a set of contiguous records, press and hold SHIFT, and then use one of the following methods to expand the selection:
- use the arrow keys on your keyboard
- use your mouse
- click on the last record of the sequence
- You can paste tab-separated selected rows in a plain text editor or other software not supporting rich text. For rich text clients like Outlook, Excel, and Word, records are pasted in a HTML table or similar. Excel inserts the pasted rows into a spreadsheet and Outlook pastes an unformatted HTML table for you to style.