Sync Service
The Sync Service synchronizes identities between the identity schema in the K2 database and the Identity Provider (AD or AAD, for example). Use the service's SmartObjects as shown in this article to perform an initial sync and set up recurring syncs, and to see the sync run history.
Prerequisites
Use the new Sync Service by running a separate installer against your K2 Five 5.2, after which the new Sync Service will be enabled. See the Identity Synchronization and Caching KB article for more information including how to download the installer.
Working with SmartObjects
You must perform the following steps to configure the Sync Service:
- Get details for the identity providers (IdPs) in your environment
- Run the initial sync with your IdP and configure scheduled syncs
- Confirm the status of the initial sync and scheduled syncs
Find the Sync Service SmartObjects in the System category.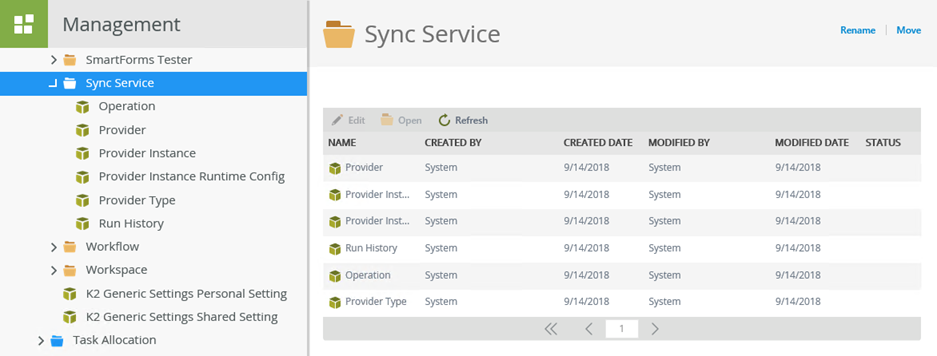
Configuring the Sync Service
To start a manual sync or configure scheduled syncs, you need the provider details:
- Provider Name: this matches the security label configured in your K2 environment. The K2 Five 5.2 installation creates identity sync providers for each K2 security label in the environment. Common ones are K2, K2SQL, and SP.
- Provider Instance Name: this is the name of the provider instance, which for Active Directory (the K2 label) is the domain name of your system.
For example, if a sync provider instance is created for an Active Directory sync on a standalone Denallix server, the Provider Name is K2 and the Provider Instance Name is Denallix (the domain name).
- To get a list of Provider Instance Names, execute the List Provider Instances method of the Provider Instances SmartObject.
- To get a list of Provider Names, execute the List Providers method of the Provider SmartObject.
Use the methods of the Provider Sync Service SmartObject to list existing providers and to see associated information.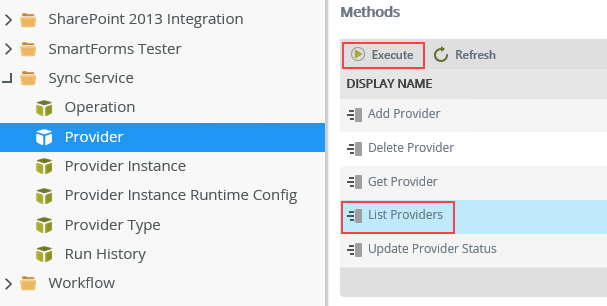
List Providers:
- Execute the List Providers method to provider names and other info.
The results page. 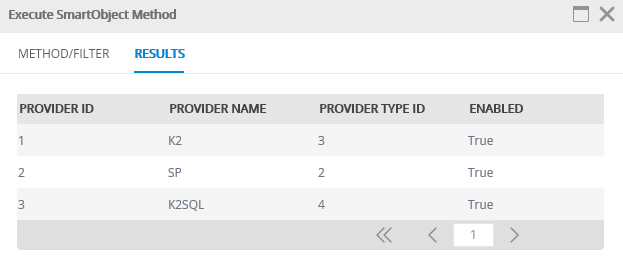
Note that the Provider ID in the results for the List Providers method is shown in the results of the List Provider Instances method as shown below.
Use the methods of the Provider Instances Sync Service SmartObject to list existing Provider Instances and see associated information on them.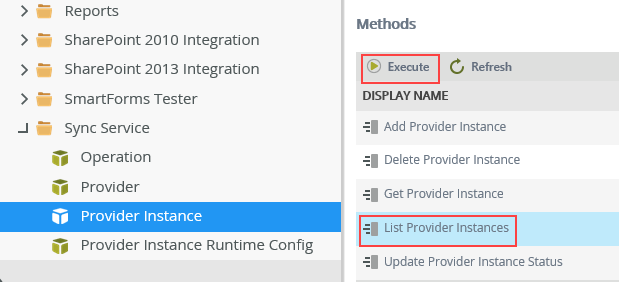
List Provider Instances:
- Execute the List Provider Instances method to see provider instance names and other information.

Use the methods of the Operation SmartObject to start a sync or configure a sync schedule.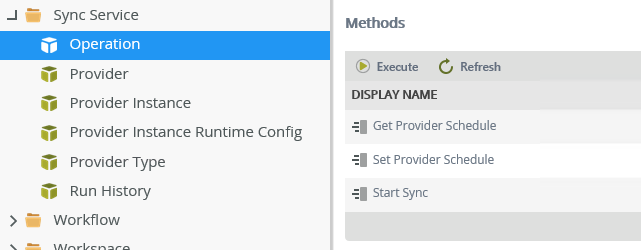
Manually start a sync:
- Execute the Start Sync method.
- Enter the Provider Name (required) as text, for example, K2 for AD.
- Enter the Provider Instance Name (optional) as text, for example, your AD domain name Denallix.
- Click Execute to start the sync, and Done on the results screen.
Set Provider Sync:
- Execute the Set Provider Sync method
- Enter the Provider Name (required) as text, for example, K2 for AD.
- Enter the Provider Instance Name (optional) as text, for example, your AD domain name Denallix.
- Enter the Schedule time in the format DD:HH:MM:SS, for example, 00:08:00:00 (sync occurs every eight hours)
Get Provider Sync:
- Execute the Get Provider Sync method.
- Enter the Provider Name (required) as text, for example, K2 for AD.
- Enter the Provider Instance Name (optional) as text, for example, your AD domain name Denallix.
- The Results screen shows you the sync schedule for the provider you chose.
Use the methods of the Run History Sync Service SmartObject to see run histories by either date range or status.
Get Run History Entries By Date Range
- Execute the Get Run History Entries By Date Range method.
- Enter the Provider Name (required) as text, for example, K2 for AD.
- Enter the Provider Instance Name (optional) as text, for example, your AD domain name Denallix.
- Enter the Sync Start date/time in the format MM/DD/YYYY HH:MM, for example, 09/13/2018 10:00AM
- Enter the Sync End date/time in the format MM/DD/YYYY HH:MM, for example, 09/14/2018 09:59AM
Executing the SmartObject results in a list of previous sync runs in your specified date range as shown in this image: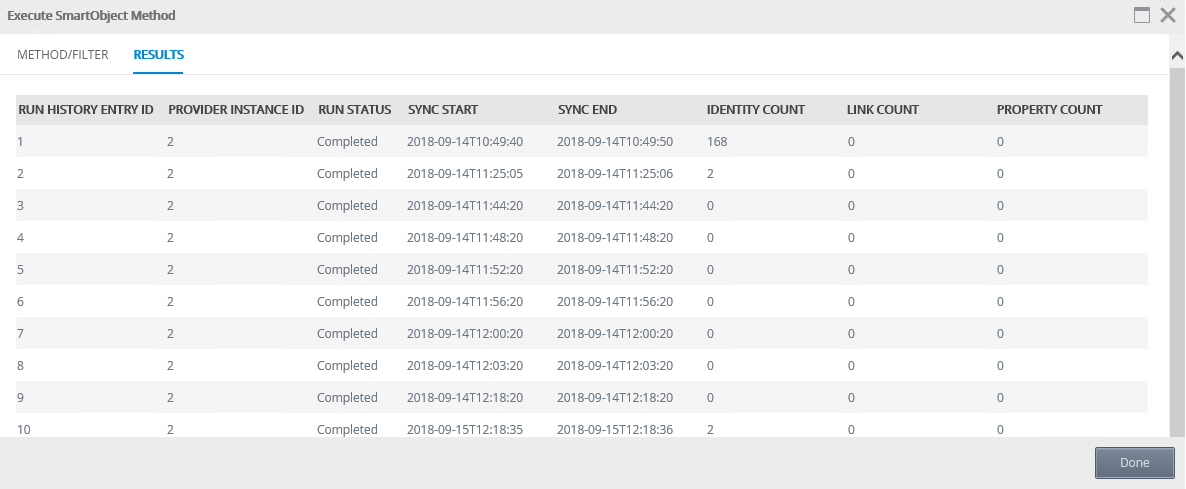
The first row shows the full sync of 168 identities in the IdP, while subsequent syncs only sync changes, two of which occurred on the tenth run.
Notes on Results Column Names
| Identity Count | An identity is a user or group. The identity count is the number of users and groups included in this sync instance. |
| Link Count | Links are relationships between identities. Group membership is considered a link as well as manager-direct report relationships. This count represents the number of group membership and manager-direct report relationships which are included in this sync instance. This number provides some insight into the complexity of your environment. |
| Property Count | The number of user and group properties changes (for example, a change in user or group name) included in this sync run. |
Get Run History Entries By Status
- Execute the Get Run History Entries By Status method.
- Enter the Provider Name (required) as text, for example, K2 for AD.
- Enter the Provider Instance Name (optional) in text, for example your AD domain name.
- Enter a Run Status: Active, Completed, or Failed. There is a known issue where Active returns an error, use Synchronizing to overcome this.
Considerations
- Hybrid SharePoint environments cannot use the sync service. If you use SharePoint in a hybrid environment, in other words using both SharePoint online and on-premises, the sync service only syncs the most recently registered SharePoint. So, if you first registered SharePoint on-premises and then later registered SharePoint Online, only SharePoint Online will be synced.
- When the Sync Service is enabled, automatic syncing is enabled for SharePoint groups. Clicking the Sync Groups link on the K2 for SharePoint app settings page shows you the following:

- When syncing with ADFS, only the first 1000 records (identities or groups) are returned by default. To sync all the ADFS identities, change your configuration as described in the KB002721.
- Groups in AAD with the same name are cached as a combined single group in K2. See the KB003504 article for more information.
Re-execute a Full Sync
If you want to run a full sync instead of a differential sync at some point after the initial sync, you first need to clear the SyncState and LastSyncDateOffset column values stored in the Provider Instance table in the K2 database. Follow these steps:
- Find the instance ID by running this query:
SELECT * FROM [SyncEngine].[ProviderInstance]This image is an example of what is returned. Your environment might be different.

- Use this query to clear the values for the SyncState and LastSyncDateOffset columns for whichever Provider Instance ID you choose:
UPDATE [SyncEngine].[ProviderInstance] SET [SyncState] = NULL, [LastSyncDateOffset] = NULL WHERE ID = [Provider Instance]Replace [Provider Instance] with the ID for the Provider Instance on which you want to run the full sync. For example, ID 2 from the image. Remember that the ProviderID value corresponds to the ID value in the [SyncEngine].[Provider] table.
- Run a sync for the provider and does a full sync. The full sync generates new values for the SyncState and LastSyncDateOffset columns and from this point forward differential syncs are run.