12. Set the Folio Value
In this step you will edit the Leave Request Form and set the folio value. You will set the folio by editing a rule on the Leave Request Workflow (Default) state. Remember that states represent the configuration and behavior of a form at a given point in the workflow. The Leave Request Workflow (Default) state is the form configuration for the workflow originator, or the person requesting leave.
A common use for the folio is to distinguish one workflow instance from another. The folio is often a unique value, but it does not have to be unique, nor is it required. The folio can use properties from the Context Browser as its value, or it can be set by hand, and it can be changed over the course of a workflow if you want to.
-
First, you will edit a rule associated with Leave Request Workflow (Default) state. You will use a variable from the Context Browser for the Folio value. At runtime, K2 replaces this variable with live content. Edit the ...when Create Button is Clicked rule for the Leave Request Workflow (Default) state. This rule is found on the Leave Request Form. If you are still in the K2 Management site, switch to the K2 Designer browser tab to continue. Once in the designer tab, you are still in the K2 Workflow Designer, where you deployed the workflow. To return to the SmartForms designer, click File > Close. You should now see the categories.
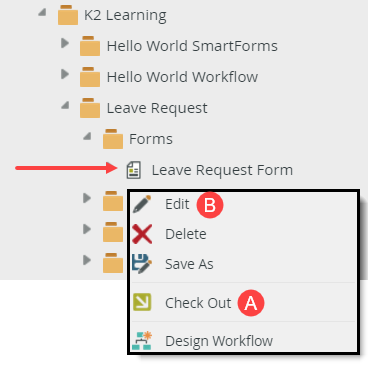
- Before you can edit a view or form, you must check them out. This "locks" the view or form in your name and ensures that your changes are not overwritten by another user. From the K2 Designer explorer, right-click and check out the Leave Request Form. Right-click and Edit the form. If the form is already checked out, just right-click and Edit the form.In some versions of K2, deploying the workflow checks in associated views and forms. In other versions, the views and forms remained checked out from when you created them. If your form is already checked out, right-click and Edit the form.

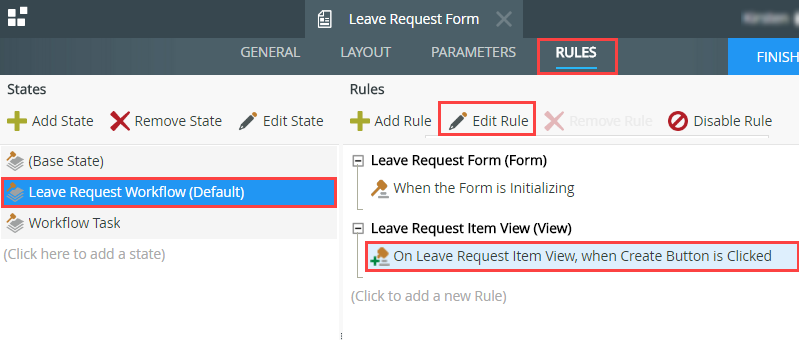
- Once the K2 Designer opens, switch to the rules screen. Click the RULES button.Rules consist of events, conditions and actions. A valid rule contains at least one action.
- Events define when the rule should run, such as when a button is clicked, or when the form loads. (Events are optional, you can define "event-less" rules that you can call from other rules.)
- Conditions define whether the rule should run. If the criteria are true, continue the rule, and if the criteria are not met, stop the rule. For example, a condition might evaluate a form to confirm that required fields have content. (Conditions are optional - not all rules will require conditions.)
- Actions define what the rule should do. For example, show a message, start a workflow, or enable a form field. Rules can contain multiple actions that are run in sequence or in parallel.

- Next, you will edit the rule that fires when you click the Create button. You want to edit an action in the rule to map a variable from the Context Browser to the Folio. Click to highlight the Leave Request Workflow (Default) state, then edit the ...when Create Button is Clicked rule. (Remember, the Leave Request Workflow (Default) state is the form behavior that the requester sees when they want to submit a new leave request).

- Before you can edit a view or form, you must check them out. This "locks" the view or form in your name and ensures that your changes are not overwritten by another user. From the K2 Designer explorer, right-click and check out the Leave Request Form. Right-click and Edit the form. If the form is already checked out, just right-click and Edit the form.
-
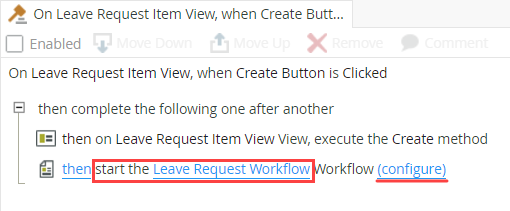
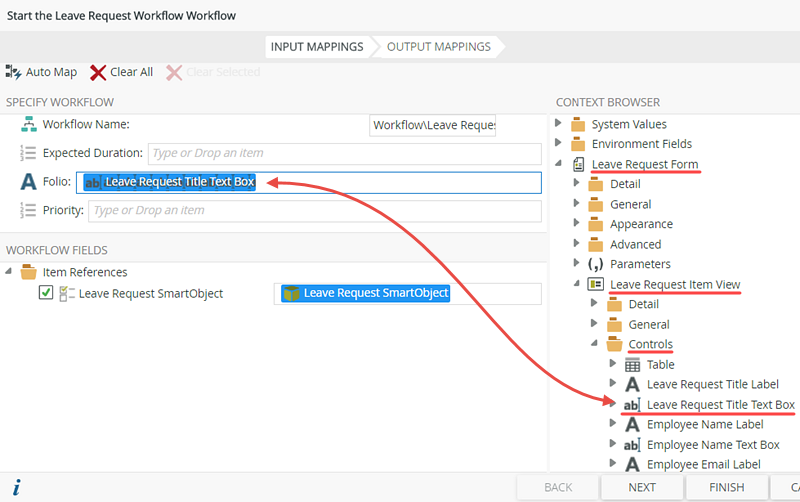
Locate the action that starts the workflow, then edit it by clicking the (configure) link. Map the Context Browser > Leave Request Item View > Controls > Title Text Box control to the Folio.
- Next, you will edit the action that starts the workflow. When the workflow starts, you want K2 to take the value from the Leave Request Title Text Box (on the form) and make it the Folio value. On the rule definition pane, locate the action then start the Leave Request Workflow Workflow. To edit this action, click the (configure) link.

- Expand the Context Browser > Leave Request Form > Leave Request Item View > Controls nodes. Drag the Leave Request Title Text Box into the Folio field. Once again, when the workflow starts, K2 will take the value from the Title Text Box and assign it as the Folio value. Click FINISH, then click OK to close the Rule Designer. Keep the form open.

- Next, you will edit the action that starts the workflow. When the workflow starts, you want K2 to take the value from the Leave Request Title Text Box (on the form) and make it the Folio value. On the rule definition pane, locate the action then start the Leave Request Workflow Workflow. To edit this action, click the (configure) link.
Review
In this step, you set the folio value. While not required, the folio is a common way to distinguish instances of the same workflow. In the next step, you will configure a rule so that the form opens with the current user's name and email pre-populated. This rule will also populate the user's previous leave requests at the bottom of the form.