Manually Configure K2 for Azure Active Directory (AAD)
K2 integrates with Microsoft Azure Active Directory (AAD) which allows AAD users to log in to K2 web sites and allows you to assign AAD users workflow tasks and get user details using the AAD SmartObjects.
For more information about AAD integration see Azure Active Directory in the K2 User Guide.
This article shows you how to manually setup AAD as an authentication option for K2. For information on inbound OAuth, see the KB article Configure AAD and K2 Services for Inbound OAuth.
- If you have integrated K2 with SharePoint using the K2 for SharePoint app, in particular with a SharePoint Online tenancy or one that uses Azure Active Directory, you DO NOT need to do the configuration described here as it is done automatically during app installation and registration. This topic is specifically for environments that do not need SharePoint integration but need to integrate with AAD.
- Make sure you use the K2 administration account when doing this configuration and that you perform these steps on the K2 server.
Prerequisites
You need the following items in your environment to configure K2 for AAD:
- SSL-enabled K2 sites
- An Azure Active Directory subscription
High Level Configuration Steps
If you're familiar with configuring claims integration these high-level steps summarize the steps you need to follow. For a detailed guide, see the Detailed Steps section below.
General Configuration
- SSL-enable the web site that hosts the K2 virtual directories.
- Create an App in AAD for your K2 site
and gather information for configuring K2.
- Export the K2 OAuth High Trust certificate of your K2 server and upload it to the app in your AAD tenant.
- Register an OAuth resource in K2 for AAD.
- Add the AAD Security Label.
- Optionally configure the AAD Service Instance and generate SmartObjects.
- Configure Claims.
- Test your AAD login.
During the configuration you need the following information from your AAD app and subscription. Write these values down as you go.
| Item | Example Values | Your Values |
|---|---|---|
| Application ID / Client ID | 304e7ece-9380-43ac-a35c-a4645d5bba5e | |
| Key / Client Secret | sO7Uu2gC84Gdx/Vb7jcaGqek7KrPAfGfcsjlMS5m6AE= | |
| Tenant ID / Directory ID | 0bb385a0-6343-4ba1-8aa3-a4371a9c458c | |
| Federation Metadata Document URL | https://login.microsoftonline.com/0bb385a0-6343-4ba1-8aa3-a4371a9c458c/federationmetadata/2007-06/federationmetadata.xml | |
| OAuth 2.0 Token Endpoint | https://login.microsoftonline.com/0bb385a0-6343-4ba1-8aa3-a4371a9c458c/oauth2/token | |
| OAuth 2.0 Authorization Endpoint | https://login.microsoftonline.com/0bb385a0-6343-4ba1-8aa3-a4371a9c458c/oauth2/authorize | |
| Certificate Thumbprint | 1528a6b4d1f2w680b4b095c69afdadf9cd65c7837 | |
| Identity Claim Type | http://schemas.xmlsoap.org/ws/2005/05/identity/claims/name | |
| Identity Provider Claim Type | http://schemas.microsoft.com/identity/claims/tenantid/ | |
| Login URL | https://login.microsoftonline.com/0bb385a0-6343-4ba1-8aa3-a4371a9c458c/wsfed | |
| Issuer | Azure Active Directory |
Detailed Steps
All communication between K2 and AAD must be encrypted which is why you need to SSL-enable your K2 virtual directory. If your environment is already SSL-enabled, you can skip this step.
- Open Internet Information Services (IIS) Manager.
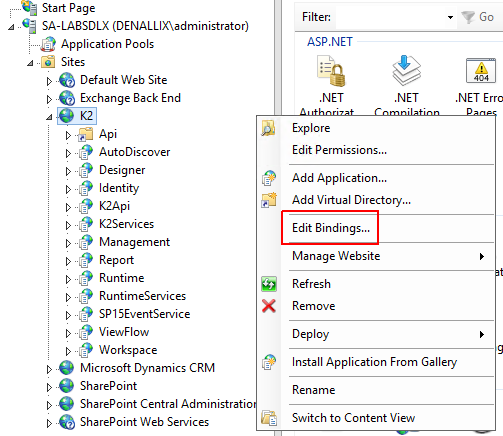
- Right click the K2 site and select Edit bindings.
- Click Add.
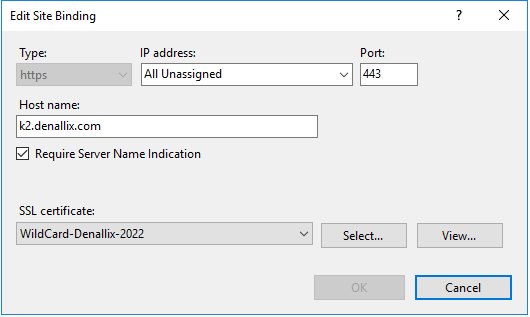
- Select https from the Type drop-down list and type a new number in the Port field (typically 443).
-
Select the certificate to use for your site. The WildCard-Denallix-2022 certificate, purchased from a Certificate Authority, is used in this example.Self-signed and Domain Certificates do not work in this scenario where you're connecting to the cloud. You must use a certificate that AAD can validate.
- Rerun the K2 Setup Manager using the Configure option to update the new HTTPS configuration in the K2 sites configuration. See Reconfigure Environment for how to do this.
You integrate with Azure Active Directory using an application. Use these steps to create the AAD app and gather information for configuring K2.
- Find and record your Tenant ID.
- Log in to https://portal.azure.com/ and navigate to your Active Directory Domain.
- Click Azure Active Directory.
- Click Properties and copy the Tenant ID for later use.
- Click the App registrations item on the blade and then click New registration.
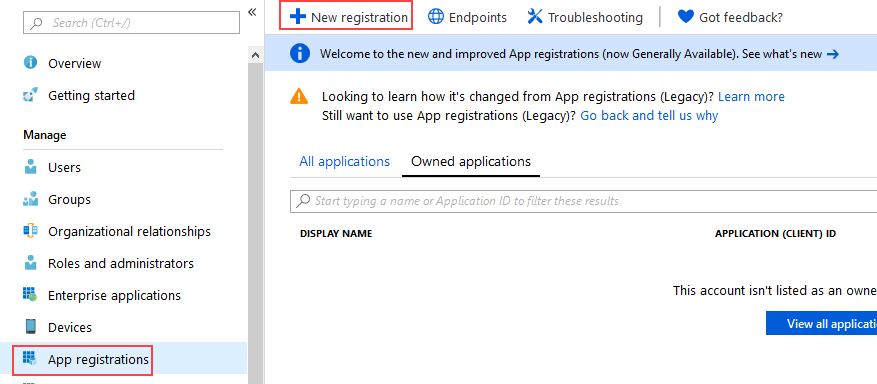
- The Register an application blade opens.
- Give your app a Name (this is the user-facing display name for this application).
- Select who can use this application or access this API in the Supported account types.
- Specify a Redirect URI for OAuth authorization. For example, https://k2.denallix.com/identity/token/oauth/2.
- Add your Identifier URIs by editing and running this script. Microsoft made a change in AAD that invalidates the manifest file if URIs contain trailing forward slashes, but K2 requires the trailing slash in identifier URIs. Edit and run the following PowerShell script that will add the trailing slashes. Remember to edit the Azure app name value to match the name of the app you created in Azure, and change the sample IdentifierURIs values to your K2 environment’s values. When you run the script and get prompted for credentials, be sure to log in as an Azure Tenant Admin.Copy
Edit and run the following script that will add the trailing slashes
# Start of script
$AzureAppName = ""; # App Display Name in https://portal.azure.com
Function Connect-Azure
{
$AzureAD = Get-Module AzureAD;
If(!$AzureAD)
{
Install-Module AzureAD -SkipPublisherCheck -Force -Confirm:$false -WarningAction SilentlyContinue;
Import-Module AzureAD -WarningAction SilentlyContinue;
}
Connect-AzureAD;
}
Function Configure-App
{
$AzureApp = Get-AzureADApplication -Filter "DisplayName eq '$($AzureAppName)'";
If($AzureApp)
{
Set-AzureADApplication -ObjectId $AzureApp.ObjectId `
-IdentifierUris "https://k2.denallix.com/Designer/", "https://k2.denallix.com/Runtime/";
}
}
Connect-Azure;
Configure-App;
#End of Script - Add your additional Redirect URIs to match the Identifier URIs you added by using the script above. The list of Reply URLs should look similar to the following image but with your K2 details.Redirect URIs are the URIs that Azure accepts as destinations when returning authentication responses (tokens) after successfully authenticating users. Redirect URIs are also known as Reply URLs.
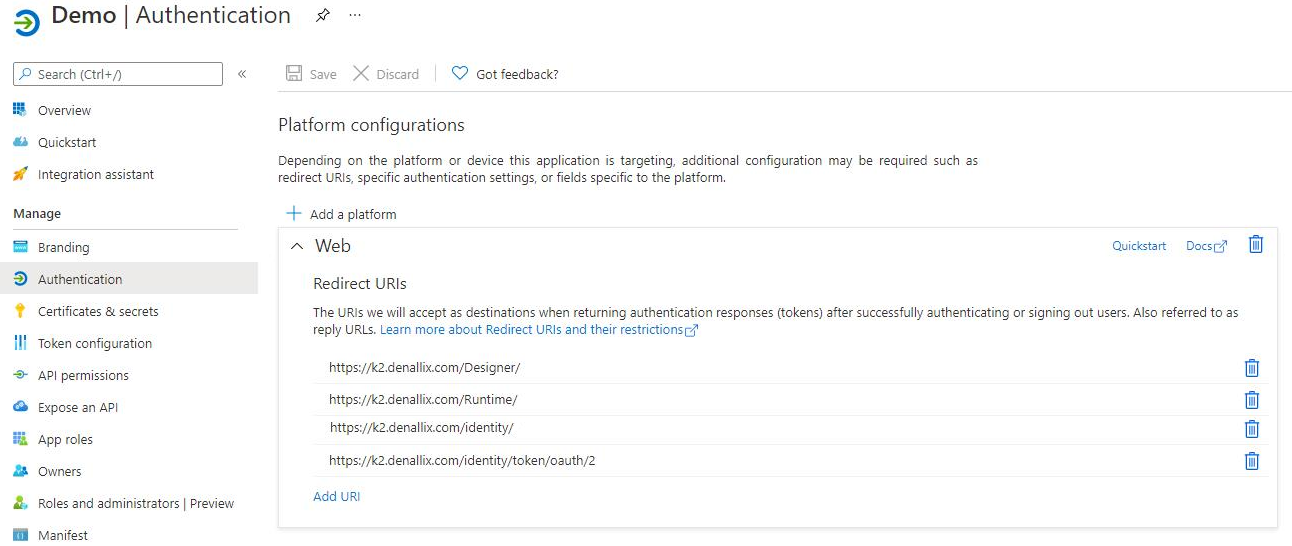
- Your app is now in the list of apps when you select App registrations. Select your new app to continue.
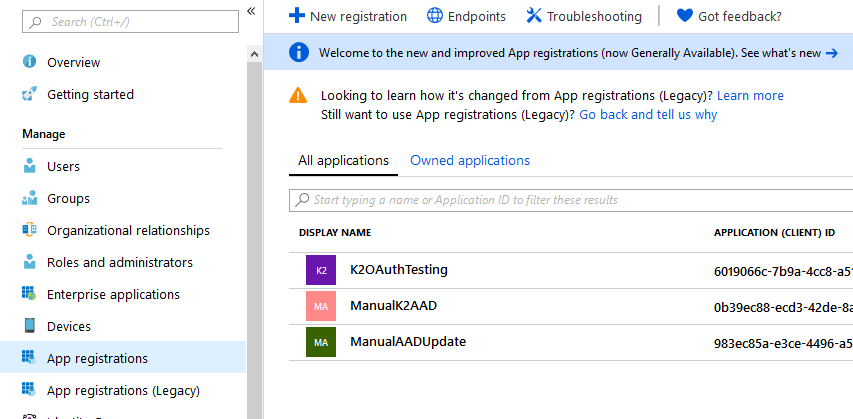
Copy the Application (client) ID of your new app for later use. - Export the K2 OAuth High Trust certificate from the Personal branch of your K2 server and upload it to your AAD tenant. Also copy the certificate thumbprint for later use.
- Open the Manage Computer Certificates MMC on your K2 server and export the K2 OAuth High Trust certificate found in the Personal > Certificates branch. Do this by right-clicking the certificate and selecting All Tasks > Export.

- Use the default options:
- No, do not export the private key
- DER encoded binary X.509 (.CER) - Browse to a folder to save the key and type a file name, for example K2 OAuth High Trust.cer.

Click Next to continue. - Check your setting in the last page then click Finish to export the certificate.
- In Azure Portal, click Certificates & secrets under the Manage menu for your app.
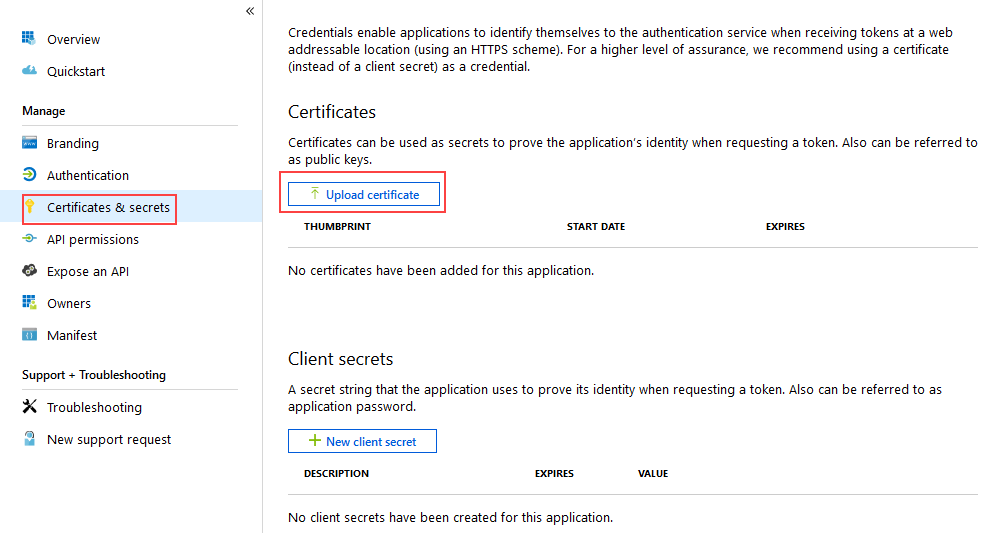
- Click Upload certificate and select the certificate you exported, then click Add.
The Certificates section is updated with your key. - Copy the Thumbprint as you will need it in later steps.

- Open the Manage Computer Certificates MMC on your K2 server and export the K2 OAuth High Trust certificate found in the Personal > Certificates branch. Do this by right-clicking the certificate and selecting All Tasks > Export.
- Find and copy your Client Secret for later steps.
- In your AAD tenant, click Certificates & secrets under the Manage menu for your app. Then click New client secret under the Client secrets section.
- Type a Description for the key and select an expiry time. Click Add to generate a Key Value.
The Key Value is your Client Secret -- copy it for later steps.
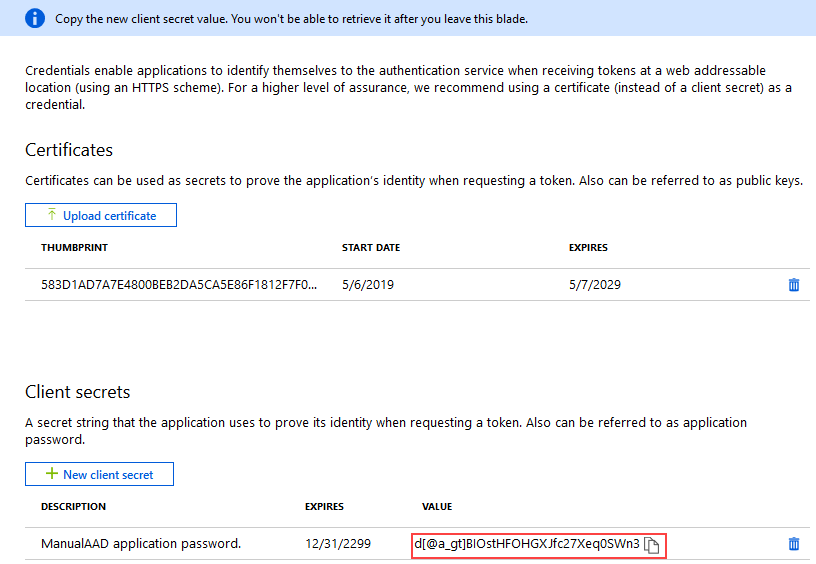 You cannot retrieve this value once you leave the blade so make sure you copy and store it now.
 - Set permissions for the app using the following steps:
- In your AAD tenant, click API permissions under the Manage menu for your app then click Add a permission.
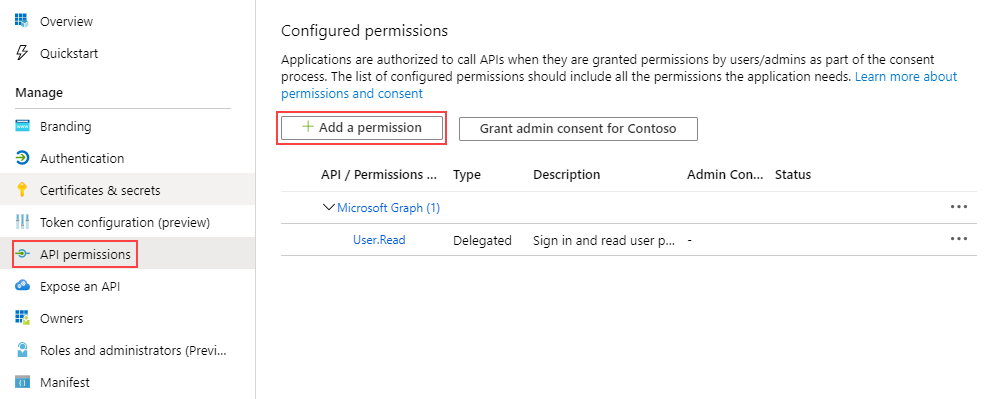
- Click Microsoft APIs and then select Microsoft Graph.
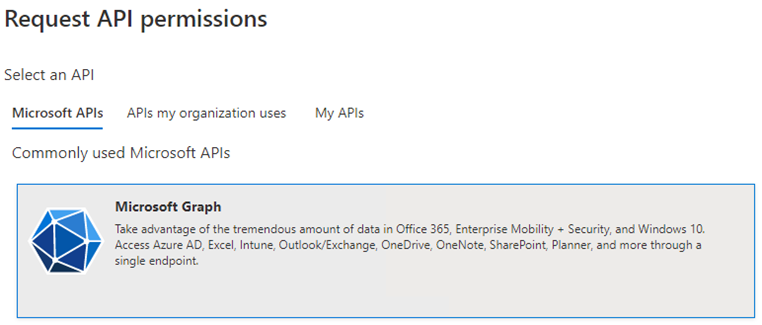
Add the following permissions in the Application Permissions and the Delegated Permissions sections:Permission name Type Description Admin consent required Directory.Read.All Application Read directory data Yes Directory.Read.All Delegated Read directory data Yes User.Read Delegated Sign in and read user profile No - Grant admin consent on behalf of all users in the directory by clicking Grant admin consent for <directory name> and then Yes on the query.

You see admin consent is granted for the new permissions.
- In your AAD tenant, click API permissions under the Manage menu for your app then click Add a permission.
- In your AAD tenant, click Overview for your app and then click Endpoints.

Copy and save the URLs for later use. You need the following items:- Federation metadata document URL
- OAuth 2.0 token endpoint (v1) URL
- OAuth 2.0 authorization endpoint (v1) URL
- WS-Federation sign-on endpoint
This ends your AAD app configuration. You should have the following items for configuring K2:
- Application ID / Client ID. You can get it from the Overview blade. Used as all values of client_id OAuth resource property in K2.
- Client secret. Used in all values of client_secret OAuth resource property in K2.
- Federation metadata document URL. Copy it from Overview > Endpoints page.
- OAuth 2.0 authorization endpoint (v1). Copy it from Overview> Endpoints page. Used when adding a New OAuth Resource in K2.
- OAuth 2.0 token endpoint (v1) URL. Copy it from Overview> Endpoints page. Used when adding New OAuth Resource in K2.
- Directory ID / Tenant ID. GUID part which can be found in above-mentioned endpoint URLs, or on the Overview blade. Used as token value of entity_id OAuth resource property in K2.
- Thumbprint. Copied from the uploaded certificate on the Certificates & secrets blade.
After you've configured an app in AAD, set up an OAuth resource in K2 to request authorization tokens from AAD. Remember that your Tenant ID is the GUID portion of your copied URLs.
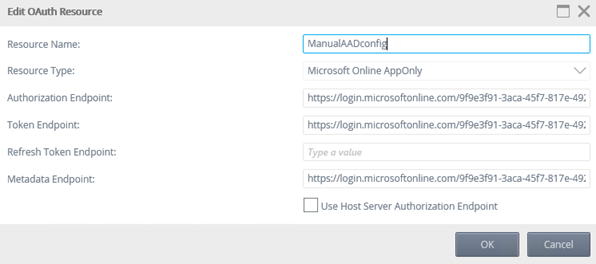
- Open the K2 Management site and on the dashboard click the View OAuth Settings link, or expand the Authentication > OAuth > Resources nodes, and then do the following:
- Under Resources click New.
- Enter a Resource Name.
- Select Microsoft Online AppOnly for the Resource Type.
- Enter the Authorization Endpoint, without the query string parameters, from the AAD App you created in Step 2 (Example: https://login.microsoftonline.com/{YourTenantID}/oauth2/authorize).
- Enter the Token Endpoint, without the query string parameters, from the AAD App you created in Step 2 (Example: https://login.microsoftonline.com/{YourTenantID}/oauth2/token).
- Enter the Federation Metadata Document endpoint you copied in Step 2 (Example: https://login.microsoftonline.com/{YourTenantID}/federationmetadata/2007-06/federationmetadata.xml)
- Leave the Refresh Token Endpoint blank.
- Leave the Use Host Server Authorization Endpoint check box unchecked and click OK.
- Select the resource from the Resources list and you'll see the Resource Parameters section update. Follow these steps using the Resource Parameters section:
- Select client_id from the Resource Parameters list and click Edit. Enter the Application ID from the AAD app you created in Step 2 for the Authorization Value, the Token Value and the Refresh Value and click OK.
- Select redirect_uri from the Resource Parameters list and click Edit. Enter https://{YourK2Server}/identity/token/oauth/2 for the Authorization Value and the Token Value and click OK (replace {YourK2Server} with the server name or host header value to your K2 site).
- Select api_version from the Resource Parameters list and click Edit. Enter 1.0 for the Authorization Value, the Token Value and the Refresh Value and click OK.
- Select scope from the Resource Parameters list and click Edit. Enter reader for the Authorization Value and click OK.
- Select response_type from the Resource Parameters list and click Edit. Enter code for the Authorization Value and click OK.
- Select resource from the Resource Parameters list and click Edit. Enter https://graph.microsoft.com for the Authorization Value, the Token Value and the Refresh Value and click OK.
- Select client_secret from the Resource Parameters list and click Edit. Enter the Client Secret from the AAD app you created in Step 2 for the Authorization Value, the Token Value and the Refresh Value and click OK.
- Select entity_id from the Resource Parameters list and click Edit. Enter your Tenant ID (the GUID in your endpoints) in the Token Value and click OK.

K2 provides a security provider for AAD. Execute the script below to configure a label for the security provider that uses the OAuth resource you created.
- Open SQL Manager and connect to the SQL server of the K2 database.
- Execute the following script against your K2 database after updating it for your environment.Executing this script overwrites the existing AAD label. Do not run this script if you're upgrading your K2 server. For more information about upgrading, see KB002999 Manually Configure K2 for AAD using Microsoft AppOnly.
Add the AAD Security Label in K2
DECLARE @SecurityLabelName NVARCHAR(20) = 'AAD';
DECLARE @SecurityLabelID UNIQUEIDENTIFIER = NEWID();
DECLARE @Client_ID NVARCHAR(100) = '57928c92-7074-45f8-b89e-fe2556ac187f';
-- K2 for AAD Login Azure Application ID
DECLARE @DefaultLabel BIT = 0;
DECLARE @ResourceName NVARCHAR(100) = '{K2 Resource Name}';
-- This is the name of your newly created Azure Resource
DECLARE @OAuthResourceID NVARCHAR(100) = (
SELECT
[ResourceID]
FROM
[Authorization].[OAuthResource]
WHERE
[ResourceType] = 'Microsoft Online AppOnly'
AND [Name] = @ResourceName
);
DECLARE @AuthInit XML = '<AuthInit>
<OAuthResourceID>' + @OAuthResourceID + '</OAuthResourceID>
<OAuthResourceAudience>https://api.k2.com</OAuthResourceAudience>
<ClientID>' + @Client_ID + '</ClientID>
</AuthInit>'
DECLARE @RoleInit XML = '<RoleInit>
<OAuthResourceID>' + @OAuthResourceID + '</OAuthResourceID>
<OAuthResourceAudience>https://graph.microsoft.com</OAuthResourceAudience>
</RoleInit>'
DECLARE @ProviderID UNIQUEIDENTIFIER = (
SELECT
[SecurityProviderID]
FROM
[HostServer].[SecurityProvider]
WHERE
[ProviderClassName] = 'SourceCode.Security.Providers.AzureActiveDirectory.SecurityProvider'
);
DELETE FROM
[SecurityLabels]
WHERE
[SecurityLabelName] = @SecurityLabelName;
INSERT INTO [SecurityLabels]
VALUES
(
@SecurityLabelID, @SecurityLabelName,
@ProviderID, @AuthInit, @ProviderID,
@RoleInit, @DefaultLabel
);- Restart the K2 service and perform an iisreset from the Windows command prompt.
- After executing the script, manually trigger admin consent for the K2 for AAD Login app by browsing to this link after replacing {YourTenantID} and following prompts on screen:CopyReplace {YourTenantID} then follow prompts to grant consent
https://login.microsoftonline.com/{YourTenantID}/oauth2/authorize?client_id=57928c92-7074-45f8-b89e-fe2556ac187f&response_type=code&redirect_uri=https://help.nintex.com/en-US/HELP_DOC/AADpages/AADSuccess.html&resource=https://api.k2.com&prompt=admin_consent
Creating the Service Instance is an optional step that you need to take if you are planning on using the Azure Active Directory wizards in a workflow to manage AAD properties. Additionally, your custom app's delegated permissions must include Read and write directory data, see the permissions section in this topic for more information.
For more information see the Service Instance topic in the K2 Five User Guide.
- Open the K2 Management site and select the Integration node.
- Select Service Instances and click Add.
- In the Display Name box, enter Azure Active Directory.
- Enter a description such as Manual Azure Active Directory configuration (optional).
- In the Service Type menu select Azure Active Directory.
- In the Authentication Mode menu select OAuth.
- In the OAuth Resource Name menu select Azure Active Directory (this is the resource you created earlier).
- In the OAuth Resource Audience box, enter https://graph.microsoft.com
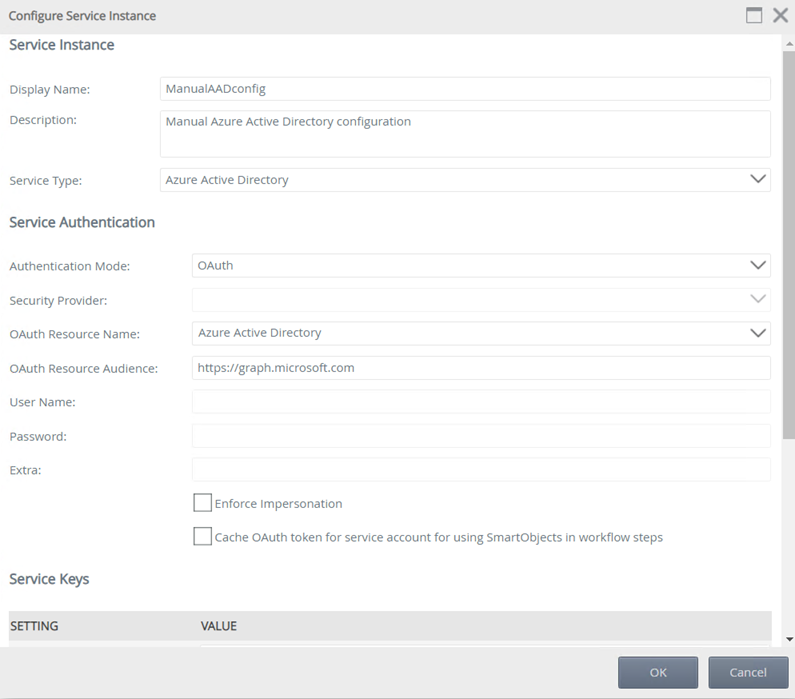
- Click OK. If you get an OAuth error, click OK to be redirected to an AAD login page. If you get no error, skip ahead to step 12.

- Sign in as your tenant admin. The Read Directory Data delegated permission requires this permission level. To execute a SmartObject to write data, you must have granted the app Read and Write Directory Data delegated permission. If you did not do this, go back and do it now before proceeding.

- You should now get the authorization successful message.

- Navigate back to your service instance configuration and click OK to create the instance.
- Click OK again and note your new service instance in the list.
- Select it and click Generate SmartObjects.

- Check Select All and then click OK to generate SmartObjects.
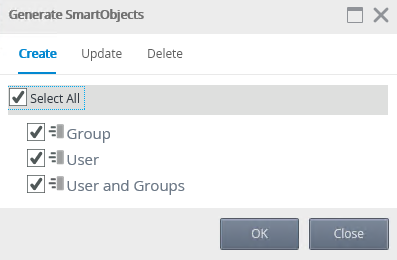
- Once the SmartObjects are generated, click the Integration node on the left and search for Azure in the SmartObjects pane on the right. Select the User SmartObject and click Execute.

- The final step is to populate your K2 identity table with AAD identities. Select the Get List method on the Execute SmartObject Method window and click Execute.
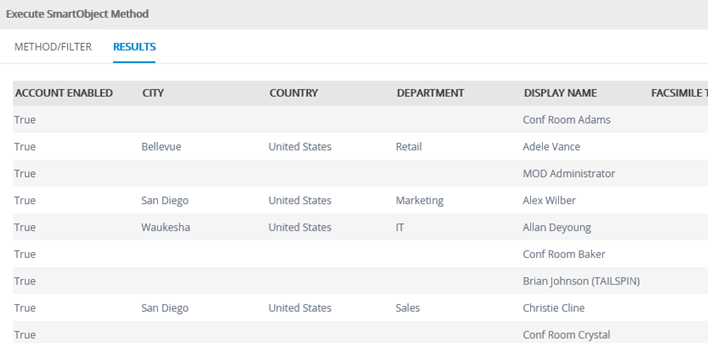
Follow these steps to configure AAD claims in K2.
- Add a new Issuer
- Add the Issuer Claim
- Map the realm you want to associate with the AAD claims
- New Issuer.
You need a Claim Issuer in K2 to map the Security Token Service (STS) signing certificate with the security tokens.- Open K2 Management and expand the Authentication > Claims > Issuers node.
- Click New.
- Enter a Name and Description for the AAD Issuer.
- Enter the Token Issuer Endpoint for AAD in the Issuer text box. (Example: https://sts.windows.net/{YourTenantID}/). Make sure to add a trailing slash in the Issuer URL.
- Enter the Login URL for AAD in the URI text box. This is the WS-Federation Sign-On Endpoint from Step 2 (Example: https://login.microsoftonline.com/{YourTenantID}/wsfed).
- Enter the thumbprint of the K2 OAuth High Trust token-signing certificate for AAD that you obtained in Step 2 above.
- Check the Use for Login check box and click OK to add the AAD issuer.
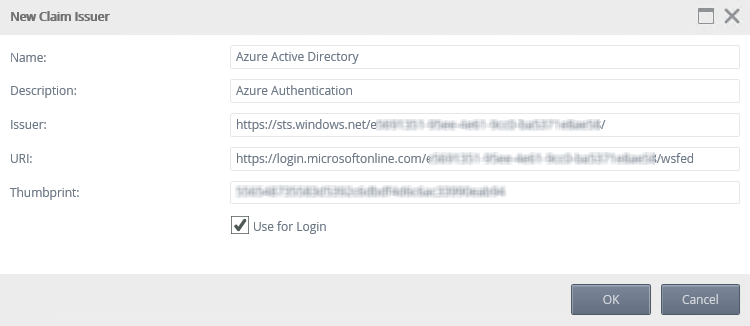
- Add the Issuer Claim (Claims mappings).
Claims mappings are used to identify the incoming claims and map them to the appropriate K2 security label. See the K2 Five User Guide for general information about claim mapping- Open the K2 Management Site and expand Authentication > Claims > Claims.
- Click New on the Security Label view.
- Select the security provider you configured in Step 6 from the Security Label drop down.
- Select the issuer you configured earlier from the Issuer drop down.
- Check the Claim Type info box.
- Leave the Name Identity Issuer text box empty.
- Enter the User Token Identifier as: i:0#.f|membership. This is the identifier that SharePoint uses to identify users.
- Enter the Group Token Identifier as: c:0-.f|rolemanager. This is the identifier that SharePoint uses to identify groups.
- For the Identity Provider > Original Issuer text box enter the Original Issuer value for AAD (Example: https://sts.windows.net/{YourTenantID}/).
- For the Identity Provider > Claim Type text box enter http://schemas.microsoft.com/identity/claims/tenantid.
- For the Identity Provider > Claim Value text box enter your Tenant ID for AAD
- For the Identity > Original Issuer text box enter the Original Issuer value for AAD (Example: https://sts.windows.net/{YourTenantID}/).
- For the Identity > Claim Type text box enter the Claim Type value for AAD (Example: http://schemas.xmlsoap.org/ws/2005/05/identity/claims/name).
- Leave the Identity > Claim Value text box empty as this claim is different for each user that logs in.
- Click OK to add the mapping.
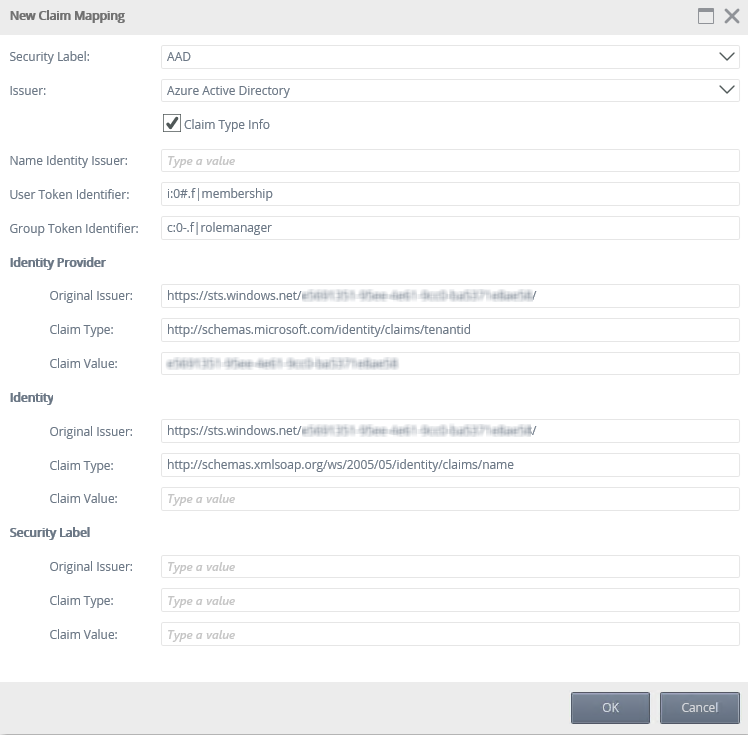
For more information about the encoding for the user and group identifiers see https://social.technet.microsoft.com/wiki/contents/articles/13921.sharepoint-20102013-claims-encoding.aspx - Map the Realm you want to associate with the authentication.
The realm is the unique value that associates the K2 site with the claims authentication options. Audience URIs are the actual URLs that you use to access the K2 site. You can specify extra Audience URIs for a single Realm. For example, if you use https://k2.denallix.com/Runtime and http://dlx:82/Runtime to access the same underlying site, you need both URLs registered as Audience URIs.Realms must exactly match your identifier URIs (Reply URLs) that you added to the Azure app's manifest.
Link each realm to your AAD issuer by following these steps:- Open the K2 Management Site and expand Authentication > Claims > Realms.
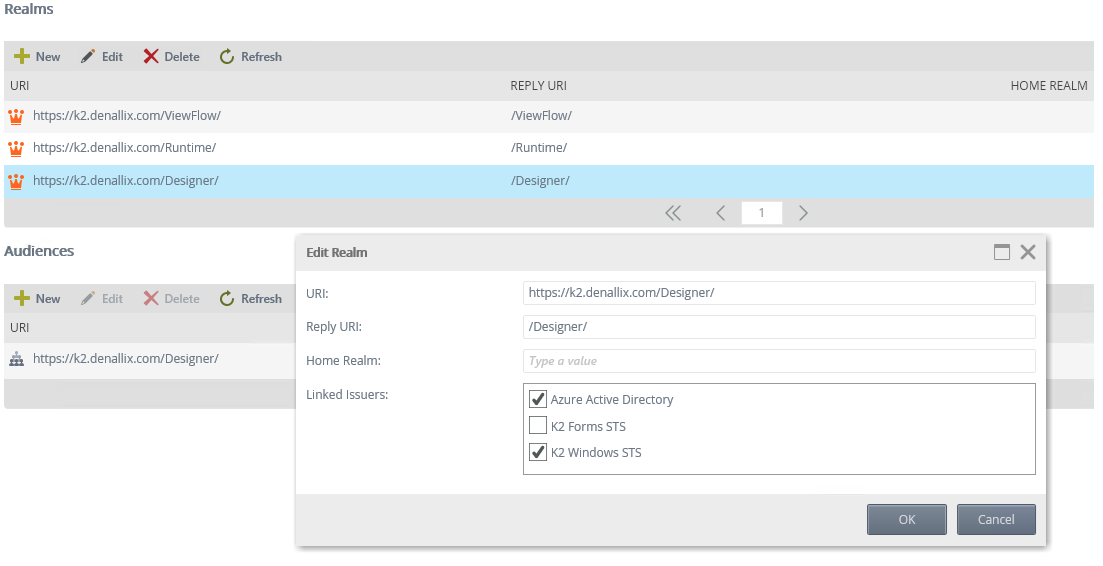
- The list of Realms should be preconfigured with your Runtime, Designer, and View Flow realms and Audience URIs. For each realm for which you need to enable AAD authentication, follow these steps:
- Select the Realm and click Edit.
- In the Edit Realm dialog use the checkboxes to select the issuers for the realm.
- Click OK.
If AAD is the only Linked Issuer configured for your Realm in the previous step, you should be redirected to the Azure Active Directory log in page. If there is more than one Linked Issuer configured you will see a page with a drop down that lets you select the Linked Issuer that you want to use. Authentication that you have previously been using to access your sites are likely cached by your browser. If this is the case, clear your browser cache.
Do the following to test:
- Clear your browser cache
- Close your browser
- Reopen your browser and navigate to your K2 Designer site, for example, https://k2.denallix.com/Designer
- You should see the following:
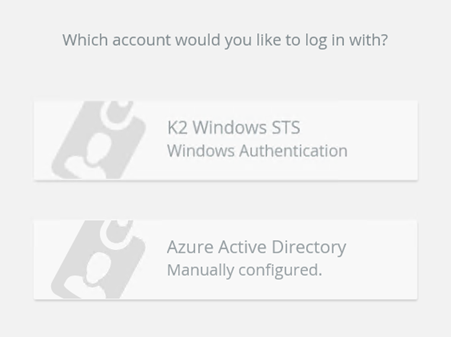
- Select the Azure Security Label you created in Step 5 from the drop down
- The Microsoft Sign in page opens. Log in with an Azure identity other than your tenant administrator (for testing purposes)

- Verify your login
