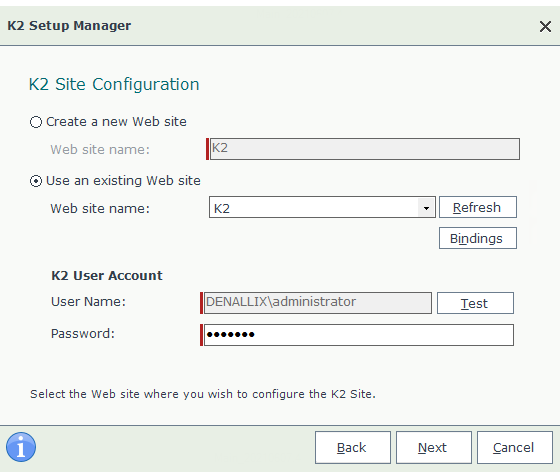
K2 Site Configuration
You can do the following on the K2 Site Configuration page:
- Create the K2 Site.
- Select an existing site if one exists.
- Select a binding if multiple IIS bindings are used.
If you create a new site with the installer, a K2 Self Signed Certificate will be automatically generated and used. If you choose an existing site, that site must already have a certificate and must be a secure site (HTTPS). HTTPS is required to ensure communication between a user's browser and the K2 site is secure, for more info see K2 relies on HTTPS to secure communication between browsers and the server.
On a simple full installation (single server) the Setup Manager uses the K2 User Account seen in the image below for the Application Pool, the K2 Service Account and the K2 Administrator account.
When doing a custom installation, you will see a slightly different screen where you can enter three different accounts (App Pool, Service, and Admin).
When generating the XML file for an unattended install, you will see the create a new website and use an existing website section.
| Feature | Description |
|---|---|
|
Create a New Web Site |
If you want to create a new site, type the name in the Web Site Name field, and K2 will create it automatically. |
|
Use an Existing Web Site Name |
The name of the site created under IIS. Use the Bindings button to select which binding to use. Note: You can create the site without closing the K2 Setup Manager. Click Refresh to reload the list of available web site options. |
|
Test the User Account credentials |
To test the username / password combination, click the Test button. |
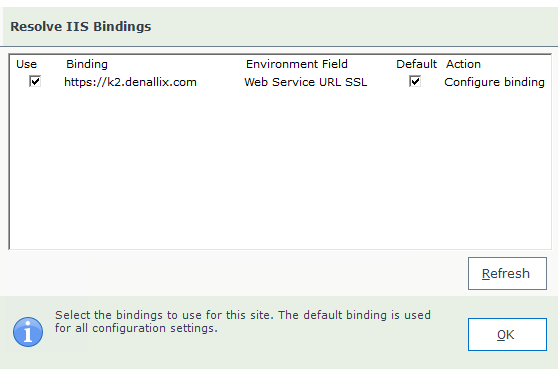
The Setup Manager takes care of bindings configuration in the background, the bindings page is not shown unless you click the Bindings button. The Setup Manager hides the bindings page except under the following conditions:
- The Setup Manager shows the bindings page if you have a binding on your website set up in IIS with a wildcard certificate and with no host name entry.
In this case the bindings page will show a binding in this format:
https://[MachineName].[domain].com:443
You're free to use this if you do not want to set up a Host Header. If you want to use a Host Header, see the following points:- If you select this binding and are using IIS 7.5 (legacy), you will need to resolve the binding by following the steps shown in this article:
http://www.sslshopper.com/article-ssl-host-headers-in-iis-7.html - If you are using IIS 8, simply edit the binging in IIS and enter a host header.
- If you select this binding and are using IIS 7.5 (legacy), you will need to resolve the binding by following the steps shown in this article:
- The Setup Manager shows the Resolve STS Issuers page if, during an Upgrade or Reconfigure, the selected bindings don't match the STS Issuers in the database. See the Resolve Security Token Service Issuers topic for more information.
- K2 sites configured as HTTP will display as disabled and will not be used as HTTPS is required.
K2 uses SSL (HTTPS) when configuring K2 sites (Viewflow, K2 Designer, and SmartForms Runtime sites). If you don't use SSL you run the risk of unencrypted site traffic being intercepted.
If you configure all K2 sites to use SSL (HTTPS), K2 recommends setting cookies as secure. Using secure cookies prevents sending authentication and other cookies over unencrypted HTTP connections. Enabling secure cookies applies to the following cookies set by K2 sites:
- .K2Auth
- FedAuth
- XSRFCookie
- AspxAutoDetectCookieSupport
Possible errors in mixed-protocol environments
In environments that use both SSL and non-SSL bindings, cookies may be incorrectly set to secure.
For example, suppose that the Designer site is set to HTTP, but the Runtime site is set to HTTPS. Now suppose that you open the runtime site (configured for HTTPS) first and then open the Designer site (configured for HTTP), and you get redirected to the login page. If you are using Windows STS you see a blank page that is stuck in a loop trying to authenticate you. If you are using Forms STS, you are redirected to the login page where you can enter credentials, but you are returned to this page even if you submit valid credentials
If you do encounter these issues you must disable secure cookies.
Enable or disable secure cookies
To enable or disable secure cookies, you must change the web.config file in the sections mentioned below, for each K2 site listed below:
- Viewflow: [K2 installation folder]\WebServices\Viewflow\
- K2 Designer: [K2 installation folder]\K2 SmartForms Designer\
- SmartForms Runtime site: [K2 installation folder]\K2 SmartForms Runtime\
Set the requireSSL value to true to enable secure cookies, or set the requireSSL value to false to disable secure cookies:
<system.identityModel.services>
<federationConfiguration>
<cookieHandler requireSsl="true" path="/" />
<authentication mode="Forms">
<forms defaultUrl="Default.aspx" loginUrl="_trust/Login.aspx" requireSSL="true" enableCrossAppRedirects="true" cookieless="AutoDetect" timeout="9000" />
Add or edit the following setting under the <system.web> element:
<system.web>
<httpCookies requireSSL="true"/>Save the web.config file, clear your browser cache and open the site again. Cookie security should be set according to the configuration you used.
Strict-Transport-Security (HSTS)
K2 recommends enabling HSTS if your K2 sites and web endpoints make use of SSL (HTTPS). In short, enabling HSTS tells the client browser to force the use of HTTPS for the domain.
See the HTTP Strict Transport Security Cheat Sheet for information on HSTS.
If HSTS is enabled by mistake and you run into issues due to a mixed protocol configuration, you can disable it by completely removing the following entry under the ViewFlow, K2 Designer, and SmartForms Runtime web.config files:
<system.webServer>
<httpProtocol>
<customHeaders>
<add name="Strict-Transport-Security" value="max-age=5184000;" />
What to do on this page
Enter the load balanced URL here if installing the K2 Site over a load balanced environment. Also, if choosing HTTPS for the web site, you need to have already set up the binding and certificate.
To configure the K2 Site:
Option 1- Create a new web site:
- Enter the name for the New web site or keep the default name, K2.
- Click Next to proceed.
- The Setup Manager will create the new web site.
Option 2 - Use an existing Web site:
- Select the web site to use from the Web Site drop down menu.
- Click Next to proceed.