Uploading files to a SmartObject File property
This example demonstrates how to upload a file when using a SmartObject File property to store the file. IN this exampl,e we assume you have a SmartObject called "Attachments", which has the following properties: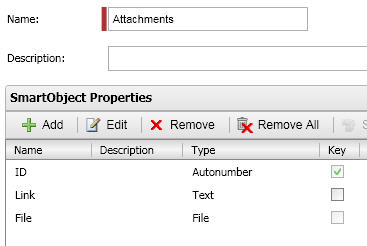
Using the SmartObject Client API to upload a file
For this code sample, references to the SourceCode.HostClientAPI and the SourceCode.SmartObjects.Client assemblies are required.
Copy
Using the SmartObject Client API to upload a file
//TODO: use the SCConnectionStringBuilder class to create a connection string to K2
string _connectionstring = "[K2environmentConnectionString]";
// open a K2 Server connection
SourceCode.SmartObjects.Client.SmartObjectClientServer serverName = new SmartObjectClientServer();
serverName.CreateConnection();
serverName.Connection.Open(_connectionstring.ToString());
try {
// get an object representing the "Attachments" SmartObject definition and one for the "File" property
SmartObject smartObject = serverName.GetSmartObject("Attachments");
SmartFileProperty smartFile = (SmartFileProperty) smartObject.Properties["File"];
// specify which SmartObject method will be called.
smartObject.MethodToExecute = "Create";
//TODO: read in the file you want to add.
//in this example we're loading a file called SampleDocument.txt from the file system
string _fileName = "SampleDocument.txt";
string fullPath = string.Format(@"C:\Temp\{0}", _fileName);
//Check if the file exists at the location.
byte[] _fileContent = null;
if (File.Exists(fullPath)) {
//read file contents into a Byte Array
_fileContent = File.ReadAllBytes(fullPath);
//if you were using a ASP Web Page with a file upload control called FileUpload1, you can load the file as follows:
//int fileLength = (int)FileUpload1.FileContent.Length;
//_fileContent = new byte[fileLength];
//FileUpload1.FileContent.Read(_fileContent, 0, fileLength);
}
//convert the file to base64 before uploading, and set the SmartFile properties
smartFile.Content = System.Convert.ToBase64String(_fileContent, 0, _fileContent.Length, Base64FormattingOptions.None);
smartFile.FileName = _fileName;
// set other SmartObject properties as needed
smartObject.Properties["Link"].Value = _fileName;
// execute the SmartObject method
serverName.ExecuteScalar(smartObject);
} catch {
// do something with the exception
} finally {
// close the connection
serverName.Connection.Close();
}
Using the SmartObject ADO.NET provider to upload a file
Another method of accomplishing the same functionality is to use the .NET Framework ADO.NET Data Provider for K2 SmartObjects.
For this code sample, a reference to the SourceCode.Data.SmartObjectsClient is required.
Copy
Using the SmartObject ADO.NET provider to upload a file
//set the connection object properties
SOConnection connection = new SOConnection("localhost", 5555);
//create the ADO.NET command
SOCommand smoCommand = new SOCommand();
smoCommand.Connection = connection;
smoCommand.CommandType = System.Data.CommandType.StoredProcedure;
//set the SmartObject name and the method to be called
smoCommand.CommandText = "Attachments.Create";
//TODO: set properties for the file you want to add.
//in this example we're loading a file called SampleDocument.txt from the file system
string _fileName = "SampleDocument.txt";
string fullPath = string.Format(@"C:\Temp\{0}", _fileName);
//Check if the file exists at the location.
if (File.Exists(fullPath)) {
//add the file content using the path to the file (no need to stream the file first)
smoCommand.Parameters.AddWithValue("File", fullPath);
//if you were using a ASP Web Page with a file upload control called FileUpload1, you can load the file as follows:
//smoCommand.Parameters.AddWithValue("File", FileUpload1.PostedFile);
//set other SmartObject properties as needed
smoCommand.Parameters.AddWithValue("Link", _fileName);
//execute the query
smoCommand.ExecuteScalar();
}