How to: Create embedded signatures with DocuSign
This topic shows you how to create an end-to-end solution with DocuSign to automate the signing of a document. It includes how to embed the DocuSign signing experience within a SmartForm which means that you don't need to open DocuSign separately to sign documents.
The solution used in this example shows you how to configure forms and a workflow to submit a contract of employment to Human Resources and then send it to the new employee and their manager to sign. The new employee signs by clicking on a DocuSign link in an email sent by the workflow, and the manager signs the document by opening a workflow task from Workspace (Desktop and Mobile).
The DocuSign service type allows the product to integrate with DocuSign. For more information on how to enable this integration see DocuSign Feature Activation.
This example assumes that you are familiar with DocuSign.
Runtime example of embedded DocuSign signing in Workspace (Desktop)

Scenario
As part of an employee onboarding process, your company sends a contract of employment for electronic signing. After the contract is approved by HR, the document is sent to the newly hired employee and the employee's manager. Both parties need to sign the contract to complete the process.
To start, you submit a form containing the new employee details (Name, Email, Start Date, Department) and the contract of employment. This is sent to a person in Human Resources for approval. After successful approval, DocuSign sends the document to the employee's private email address. The employee is not part of the company domain so he signs the document by clicking on a link in the email from DocuSign.
Once signed by the new employee, the document is ready for the manager's signature. The manager receives a task containing the contract and uses Workspace (Desktop and Mobile) to view it. The manager signs the document directly from within Workspace (Desktop and Mobile) and there is no need to click an external DocuSign link. This is known as an embedded signing experience.
Steps
In this scenario, you begin by creating a SmartObject, generating views and forms.
Next you create a workflow that contains Task, Set Folio, Decision, Timer, and DocuSign steps. You use the Create Envelope, Add Document, Add Recipient, Create Tab in Document and Send Envelope steps to configure the DocuSign signing process. For the embedded signing process, you configure a task step to use a specific form so the recipient can sign from within Workspace (Desktop and Mobile).
Finally, you deploy the workflow and test the solution.
Setup Steps
The following steps set up the scenario from start to finish. If you want to skip the setup steps and view the topic step, go to Create and Configure the DocuSign Embedded Form.
- Create a SmartObject called New Employee.
- From the Designer, create the New Employee SmartObject as shown below.

If you are not familiar with creating a SmartBox SmartObject, see How To: Create A SmartBox SmartObject.
- From the Designer, create the New Employee SmartObject as shown below.
- Generate a List view for the New Employee SmartObject.
- From the Designer, right-click the New Employee SmartObject and select Generate Views
 .
. - On the Generate Options page, make sure that the item list view is generated in the correct category. In this example, they are generated in the Views category. Check the Item List check box and then click OK.

- The generated list view show in the Views category.

If you are not familiar with creating views, see How To: Create an Item View and a List View.
- From the Designer, right-click the New Employee SmartObject and select Generate Views
- Create a new view called DocuSign Data Label and use the DocuSign View SmartObject as the data source. You also add two data label controls to the view.
- From the Designer, right-click the Views category and select New View.

- In the Name field type DocuSign Data Label as the name for this view. Click the Data Source ellipsis button to specify a data source for this view.

- On the Select a SmartObject page browse to the DocuSign category and select the View SmartObject. Click OK.

- Click Create.

- On the Layout tab select Create Layout Table Only.

- On the Create Layout Table page, select 2 Columns, 1 Row and click OK.

- From the Toolbox drag a Data Label control onto the canvas into each one of the columns.

- Select Data Label. In the Details section on the Properties tab, change the Name and Text fields to EnvelopeID. In the General section, uncheck the Visible check box.

- Select Data Label1. In the Details section on the Properties tab, change the Name and Text fields to RecipientID. In the General section, uncheck the Visible check box.

- Click Finish to save to the view.
- From the Designer, right-click the Views category and select New View.
- Use the New Employee Item view to generate the New Employee form.
- From the Designer, locate and right click the New Employee Item view. From the menu select Generate Forms.

- On the Generate Forms page, make sure the form is created in the correct category. In this example, it's created in the Forms category. Change the form name to New Employee. Click OK.

- From the Designer, locate and right click the New Employee form and select Edit.

- On the Layout tab, change the New Employee Item view title to New Employee Details.

- From the Properties tab, change the form's Legacy Theme to Lithium. The property is available in the Advanced section. Click Finish.
- From the Designer, locate and right click the New Employee Item view. From the menu select Generate Forms.
- Create and configure the Redirect Form that redirects to a message. This form shows after the manager signs the contract (the embedded signing experience). The Runtime URL of this form is used when you configure the embedded signing rule in point k of Step 6.
- From the Designer, locate and right click the Forms category. From the menu select New Form.

- In the Name field type Redirect for the name. Click Create.

- From the Toolbox, drag a Text Area control onto the canvas.

- In the Details section on the Properties tab, type a Thank you for signing message into the Text field.

- Click Finish. Right-click the Redirect form's Runtime URL link to copy it. You'll use this in Step 6: Step Create and Configure the DocuSign Embedded Form.

- Here is an example of the Runtime URL of the Redirect form.

- From the Designer, locate and right click the Forms category. From the menu select New Form.
Create and configure the DocuSign Embedded Form
In this step, you create a form called DocuSign Embedded. The manager uses this form to sign the contract and you add the following items to the form:
- a content control
- a data label called DocuSignURL
- the DocuSign Data Label view
- add the DocuSign EnvID and DocuSign RecID parameters
- and rules
You add the data label and the view to the form to make sure the correct DocuSign information is sent from the workflow to the form. This allows the DocuSign signing experience to happen inside the form. You also need the EnvelopeID and RecipientID to return a DocuSign URL. The view is linked to the DocuSign View SmartObject which stores the EnvelopeID and RecipientID. You use the DocuSign URL to display the embedded signature in the content control.
You add parameters to the view to enable communication between the form, view and the DocuSign variables you create later in the workflow.
You add rules for the correct URL to show in the content control. These rules get the Envelope ID and Recipient ID from the workflow variables using form parameters. This means the Envelope ID and Recipient ID from the workflow are passed to the form's DocuSign EnvID and DocuSign RecID parameters. You then use these parameters in rules to create the DocuSign URL displayed in the content control.
-
Create and configure the DocuSign Embedded form
- From the Designer, locate and right click the Forms category. From the menu select New Form.

- In the Name field, type DocuSign Embedded for the name. Click Create.

- From the Toolbox, drag a Content control onto the canvas.

- Drag a Data Label control onto the canvas below the Content control. In the Details section on the Properties tab, change the Name and Text fields to DocuSignURL. This data label contains the DocuSign URL which enables the manager to sign the contract in the form.

- In the General section, uncheck the Visible check box for the DocuSignURL data label.

- From the Views tab, drag the DocuSign Data Label view onto the canvas underneath the DocuSignURL data label. In the General section, uncheck the Visible check box for the view.

- Select the Parameters tab and click Add Parameter. Add two parameters called DocuSign EnvID and DocuSign RecID as shown below.

- Select the Rules tab, select the When the Form is Initializing rule and then click Edit Rule.

- On then on DocuSign Data Label View, execute the Initialize method, click the Initialize link and change it to Get Recipient Url.

- Click the configure link. On the On DocuSign Data Label View, Execute the Get Recipient Url Method page, select Input Mappings. Expand the Parameters node in the Context Browser. Click and drag the DocuSign EnvID parameter into the Envelope ID field. Click and drag the DocuSign RecID parameter into the Recipient ID field.

- Locate the Runtime URL for the Redirect form you created in Step 5. Paste the URL into the Return Url field. Click Next.

- For the Output Mappings, click and drag the Url return property from the Context Browser into the DocuSignURL field. This is the URL that shows in the content control and enables the embedded DocuSign experience. Click Finish.

- Select the Actions tab. In the search field type transfer, locate the Data Transfer section, and select Transfer Data.

- Click the configure link. On the Transfer Data page, expand the View node in the Context Browser. Click and drag the Url property into the Url field. This transfers the data from the DocuSign View SmartObject to the form. Click OK.

- Select the Actions tab. In the search field type control, locate the Control Interaction section, and select Set a Form control's properties. This rule ensures that the DocuSign View SmartObject Url shows in the content control.

- Click the set control link and select Content.

- Click the configure link. On the Set the Properties Of Content Control page, expand the View node in the Context Browser. Click and drag the Url property into the URL field. Click OK.

- Your rule should look like the following example. Click OK.

- Click Finish to complete the form configuration.
- From the Designer, locate and right click the Forms category. From the menu select New Form.
- Create a workflow called Employee Contracts. The workflow starts by submitting the New Employee form. A task is created for the person in the Human Resources department. The person approves the task which starts the DocuSign signing process. The contract is sent first to the new employee for signature and then to the manager for final signature. The employee's signing experience happens externally (DocuSign link via an email). The manager's signing experience happens in a user task form. The workflow completes once both people sign the contract.
- From the Designer, locate and right click the Contracts category. From the menu select New Workflow.

- Name this workflow Employee Contracts and click Create.

- Select the Start step and click the toggle to expand the Configuration Panel. You can also double click the step to expand the panel. Select the Start with a Form option.

- Browse and select the New Employee form. Click OK.

- The Start Workflow from a Form page shows. Click Next.

- In the Start Rule section, select the Do it for me! option and click Next.

- The Almost Done page shows. This page contains all changes to the form. Click Save and Finish.

- On the Success page click OK.

- The start rule is configured.

- Click the toggle to expand the Context Browser. From the Variables section, click the Add link.

- Use information from the table below to create seven variables:
Variable Name Description Type DocID Stores the unique Document ID. Text EnvID Stores the Envelope ID. Text EmloyeeRecID Stores the employee's Recipient ID. Text ManagerRecID Stores the manager's Recipient ID. Text Status Stores the status of the workflow. Example: In Progress. Text EmployeeTabID Stores the employee's Tab ID. Text ManagerTabID Stores the manager's Tab ID. Text - The variables show as follows:

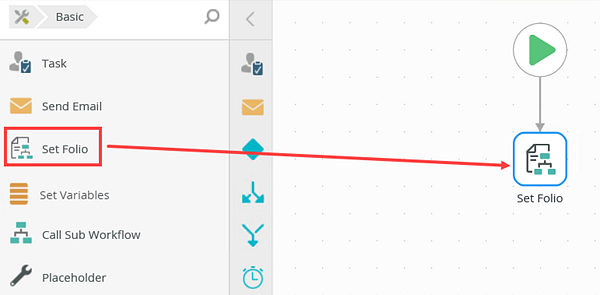
- From the Toolbox, click the Basic category and drag the Set Folio step onto the canvas.
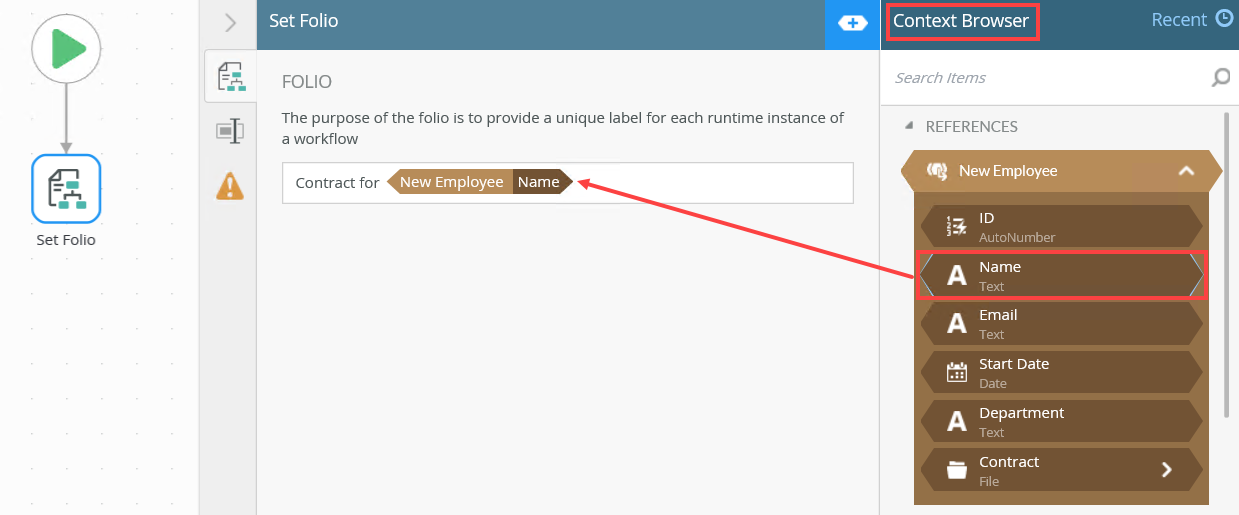
- Select the Set Folio Detail tab. In the Folio field, type Contract for and then drag the Name property from the New Employee reference into the field. This adds the employee name to the workflow folio. You can find the reference in the Context Browser, References section and then expand the New Employee reference.
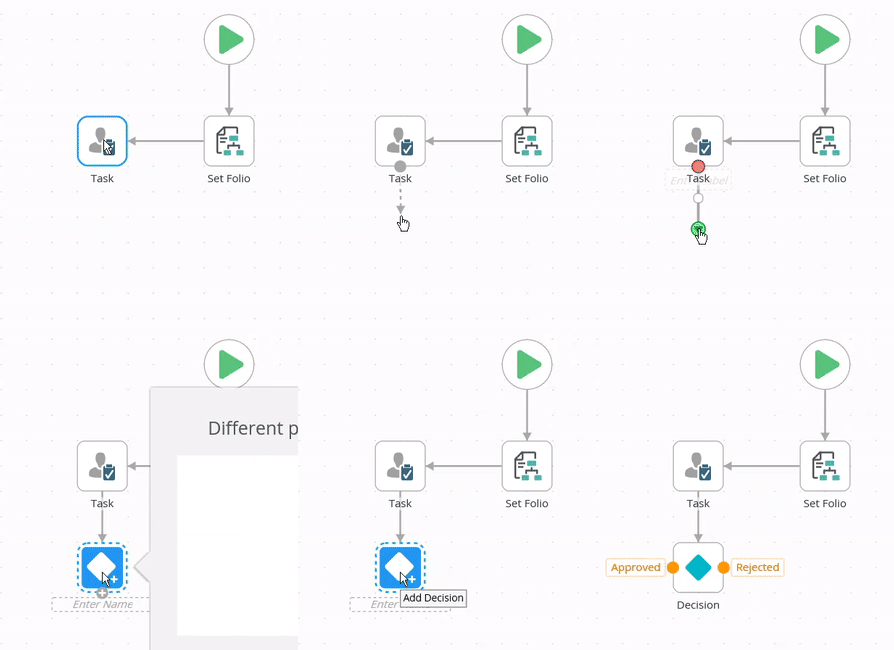
- From the Toolbox, click the Basic category and drag the Task step onto the canvas. Connect the step to the Set Folio step. Select the Task tab and create two task actions (Approve and Reject).

- Select the Forms tab. From the Form Type drop down menu select Basic Task Form.

- Select the Recipients tab. Browse and select the person from HR as the recipient for this task.

- Drag a line from the Task step to add the Decision step.
- Drag a line from the Reject action port to create a Placeholder step.
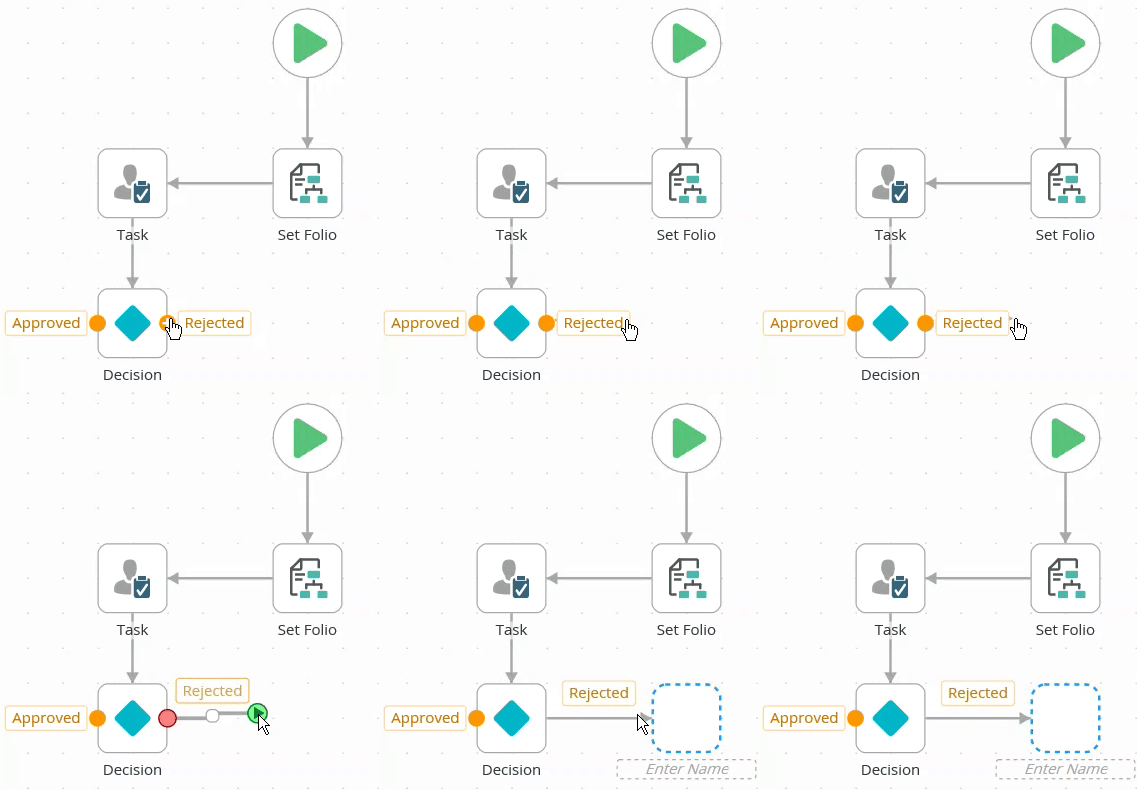
- Drag a Send Email step onto the Placeholder step and configure the email as shown below.

- Select the Task step and change the name to HR Approval.

- From the Designer, locate and right click the Contracts category. From the menu select New Workflow.
- Add and configure the Create Envelope step that starts the DocuSign automation.
- From the Toolbox click the DocuSign category, the Envelope category, and then drag the Create Envelope step onto the canvas. Connect the step to the Approved task action.

- Select the step and expand the Configuration Panel. You can also double click the step to expand the panel. Select the Create Envelope tab to configure the DocuSign service instance, envelope type, envelope and the return property mappings. From the DocuSign Service menu, select the service instance. In this example, select the Standard Envelope.

- Configure the Notification. In the Subject field, type Signature required. In the Body field, type the message as shown below and then drag the corresponding property from the New Employee reference into the notification. This adds the employee name, start date and department to the notification. You can find the reference in the Context Browser, References section. Expand the New Employee reference to see the fields of the reference.

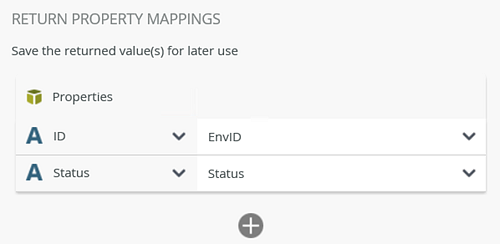
For more information about References, see References. - Configure the Return Property Mappings. Click the add button and add the ID and Status properties and map them to EnvID and Status.
- From the Toolbox click the DocuSign category, the Envelope category, and then drag the Create Envelope step onto the canvas. Connect the step to the Approved task action.
- Add and configure the Add Document step.
- From the Toolbox, click the DocuSign category, the Document category, and then drag the Add Document step onto the canvas. Connect the step to the Create Envelope step.
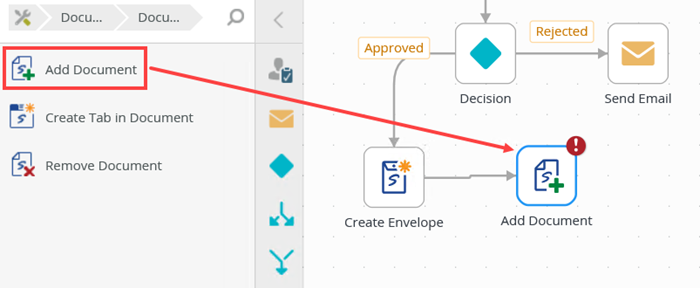
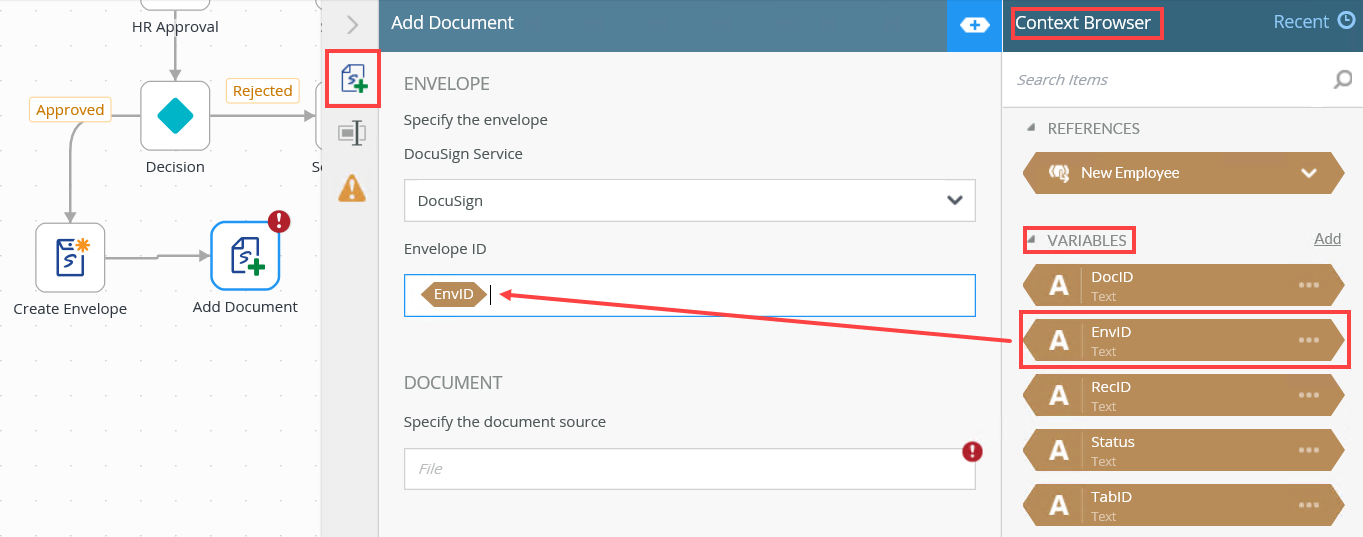
- Select the step and expand the Configuration Panel. You can also double click the step to expand the panel. Select the Add Document tab to configure the DocuSign service instance, envelope ID, document, document ID and the return property mappings. From the Variables section, drag the EnvID property into the Envelope ID field.
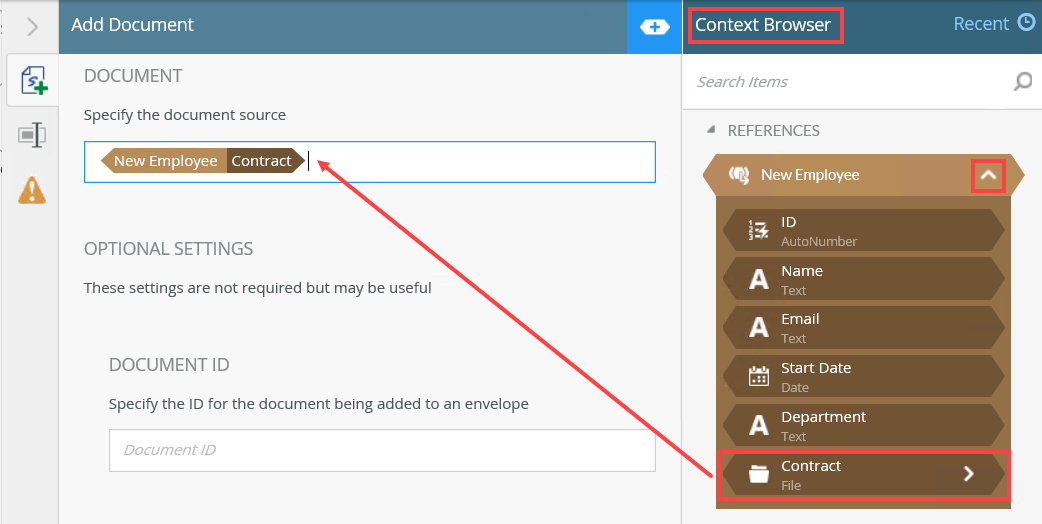
- Configure the Document section. From the New Employee reference, drag the Contract file property into the Document field.
- Configure the Document ID. From the New Employee reference, drag the ID property into the Document IDfield.

- Configure the Return Property Mappings. Click the add (plus) button and add the Status property and map it to Status.

- From the Toolbox, click the DocuSign category, the Document category, and then drag the Add Document step onto the canvas. Connect the step to the Create Envelope step.
- Add and configure the Add Recipient step and add the recipient to the envelope.
- From the Toolbox, click the DocuSign category, the Recipient category and then drag the Add Recipient step onto the canvas. Connect the step to the Add Document step.

- Select the step and expand the Configuration Panel. You can also double click the step to expand the panel. Select the Add Recipient tab to configure the DocuSign service instance, envelope ID, envelope type, recipient options and the return property mappings. From the Variables section, drag the EnvID property into the Envelope ID field.

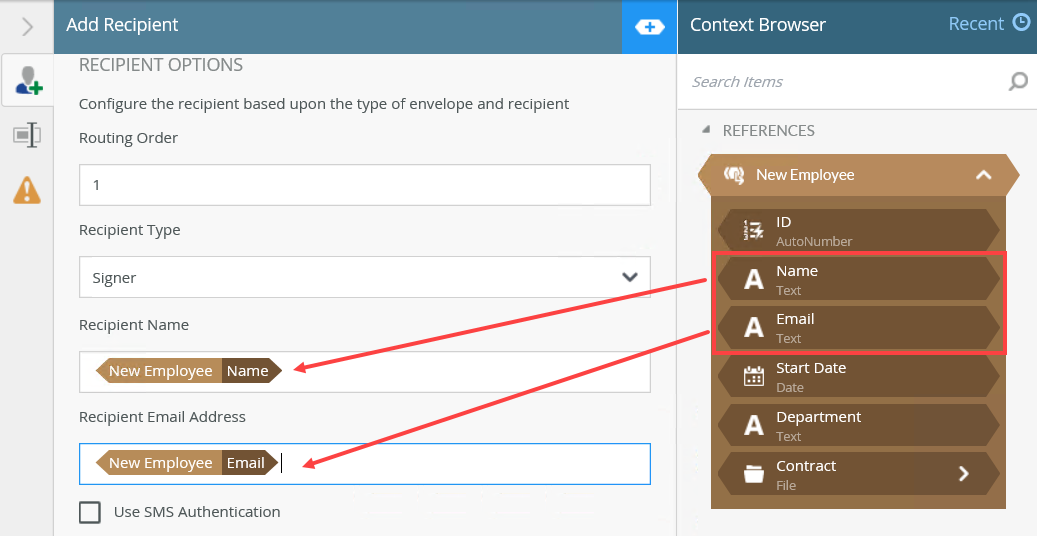
- Configure the Recipient Option section. In the Routing Order field type 1. From the Recipient Type menu select the Signer option. From the New Employee reference, drag the Name property into the Recipient Name field and the Email property into the Recipient Email Address field.
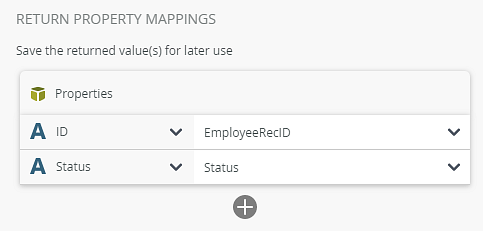
- Configure the Return Property Mappings. Click the add (plus) button and add the ID and Status properties and map them to EmployeeRecID and Status.
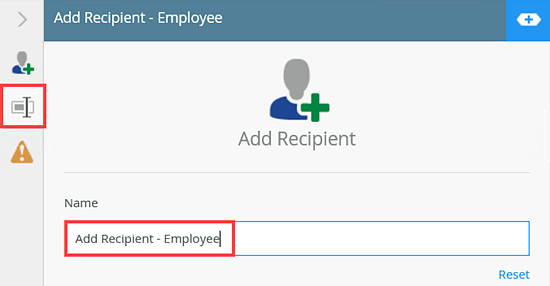
- Select the Properties tab and change the step name to Add Recipient - Employee.
- From the Toolbox, click the DocuSign category, the Recipient category and then drag the Add Recipient step onto the canvas. Connect the step to the Add Document step.
- Add and configure the Create Tab in Document step to specify the spot where the employee signs the document.
- From the Toolbox, click the DocuSign category, the Document category and then drag the Create Tab in Document step onto the canvas. Connect the step to the Add Recipient - Employee step.

- Select the step and expand the Configuration Panel. You can also double click the step to expand the panel. Select the Create Tab tab to configure the DocuSign service instance, envelope ID, recipient ID, tab details, tab positioning and the return property mappings. From the Variables section, drag the EnvID property into the Envelope ID field.

- Configure the Recipient section. From the Variables section, drag the EmployeeRecID property into the Recipient ID field.

- Configure the Document section. From the New Employee reference, drag the ID property into the Document ID field.

- Configure the Tab Details section. In the Label field, type Sign Here and select the Sign Here option from the Type menu.

- Configure the Tab Positioning section. In the Anchor String field type Signature. The purpose of this field is to specify where the DocuSign tab is added to the document. In this example, the tab is added close to the Employee Signature text in the contract.


- Configure the Return Property Mappings. Click the add (plus) button and add the ID property and map it to EmployeeTabID.

- Select the Properties tab and change the step name to Create Tab - Employee.

- From the Toolbox, click the DocuSign category, the Document category and then drag the Create Tab in Document step onto the canvas. Connect the step to the Add Recipient - Employee step.
- Add another recipient to the envelope using the Add Recipient step. In this scenario, the second recipient is the manager who must sign the contract.
- From the Toolbox, click the DocuSign category, the Recipient category and then drag the Add Recipient step onto the canvas. Connect the step to the Create Tab - Employee step.

- Select the step and expand the Configuration Panel. You can also double click the step to expand the panel. Select the Add Recipient tab to configure the DocuSign service instance, envelope ID, envelope type, recipient options and the return property mappings. From the Variables section, drag the EnvID property into the Envelope ID field.

- Configure the Recipient Option section. In the Routing Order field type 2. From the Recipient Type menu select the Signer option. Type the recipient name and email address in the Recipient Name and Recipient Email Address fields. In this example we use Bob and bob@denallix.com.

- Configure the Option Settings. Click the add (plus) button and add the Client User ID property. Type K2 into the field. You do this to make sure that this part of the DocuSign signing process is handled by Nintex K2. No email is sent to the manager as they sign using a task.

- Configure the Return Property Mappings. Click the add (plus) button and add the ID and Status properties and map them to ManagerRecID and Status.

- Select the Properties tab and change the step name to Add Recipient - Manager.

- From the Toolbox, click the DocuSign category, the Recipient category and then drag the Add Recipient step onto the canvas. Connect the step to the Create Tab - Employee step.
- Add and configure the Create Tab in Document step to specify the spot where the manager signs the document.
- From the Toolbox, click the DocuSign category, the Document category and then drag the Create Tab in Document step onto the canvas. Connect the step to the Add Recipient - Manager step.

- Select the step and expand the Configuration Panel. You can also double click the step to expand the panel. Select the Create Tab tab to configure the DocuSign service instance, envelope ID, recipient ID, tab details, tab positioning and the return property mappings. From the Variables section, drag the EnvID property into the Envelope ID field and drag the ManagerRecID property into the Recipient ID field.

- Configure the Document section. From the New Employee reference, drag the ID property into the Document ID field.

- Configure the Tab Details section. In the Label field, type Sign Here and select the Sign Here option from the Type menu.

- Configure the Tab Positioning section. In the Anchor String field type Signature. The purpose of this field is to specify where the DocuSign tab is added to the document. In this example, the tab is added close to the Manager Signature text in the contract.


- Configure the Return Property Mappings. Click the add (plus) button and add the ID property and map it to ManagerTabID.

- Select the Properties tab and change the step name to Create Tab - Manager.

- From the Toolbox, click the DocuSign category, the Document category and then drag the Create Tab in Document step onto the canvas. Connect the step to the Add Recipient - Manager step.
- Add and configure the Send Envelope step to send the item to both the employee and manager for signatures.
- From the Toolbox, click the DocuSign category, the Envelope category and then drag the Send Envelope step onto the canvas. Connect the step to the Create Tab - Manager step.

- Select the step and expand the Configuration Panel. You can also double click the step to expand the panel. Select the Send Envelope tab to configure the DocuSign service instance, envelope ID, recipient ID, tab details, tab positioning and the return property mappings. From the Variables section, drag the EnvID property into the Envelope ID field. Configure the Return Property Mappings. Click the add button and add the Status property and map it to Status.

- From the Toolbox, click the DocuSign category, the Envelope category and then drag the Send Envelope step onto the canvas. Connect the step to the Create Tab - Manager step.
- Add a Decision and Timer steps to check if the employee signed the contract. The Timer step keeps checking if the employee signed the contract. When the employee signs the contract, the workflow moves on to get the manager’s signature.
- From the Toolbox, click the Logic category, and drag the Decision step onto the canvas. Connect the step to the Send Envelope step.

- Select the step and expand the Configuration Panel. You can also double click the step to expand the panel. In the Decisions section, click Add to add the Employee Signed and Employee NOT Signed decisions.

- Click Edit Decision Rule to configure the Decision Rule. This rule chooses which path to follow when the employee signs the contract or not.

- To see if the employee signed the contract or not, use the Status property from the DocuSign Recipient SmartObject. From the Context Browser, click the SmartObjects tab and browse to DocuSign > DocuSign > Recipient > List and drag the Status property into the IF field of the rule.

- In the SmartField composer, configure the SmartField and drag the EmployeeRecID property into the Status field and the EnvID property into the Envelope ID field. Click X to close the SmartField composer.

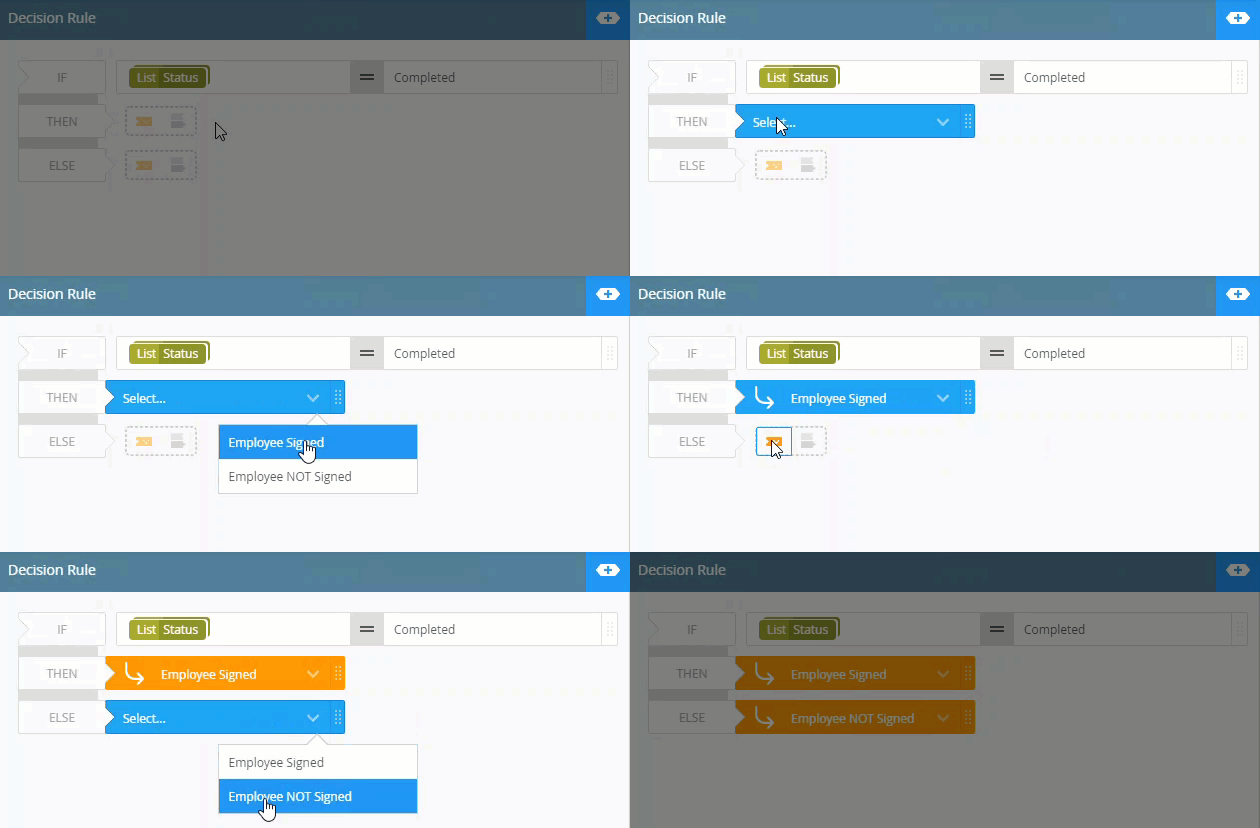
- Type Complete as the IF outcome. For the THEN path, select Employee Signed from the menu and Employee NOT Signed as the ELSE path.
From the Toolbox, click the Logic category, and drag the Timer step onto the canvas. Connect the step to the Employee NOT Signed path.

- Select the step and expand the Configuration Panel. You can also double click the step to expand the panel. In the Period of Time section, type 15 in the Minutes field.

- Connect the Timer step back to the Decision step. This creates a loop that keeps checking every 5 minutes if the employee signed the contract. see DocuSign API rate limits for more information.
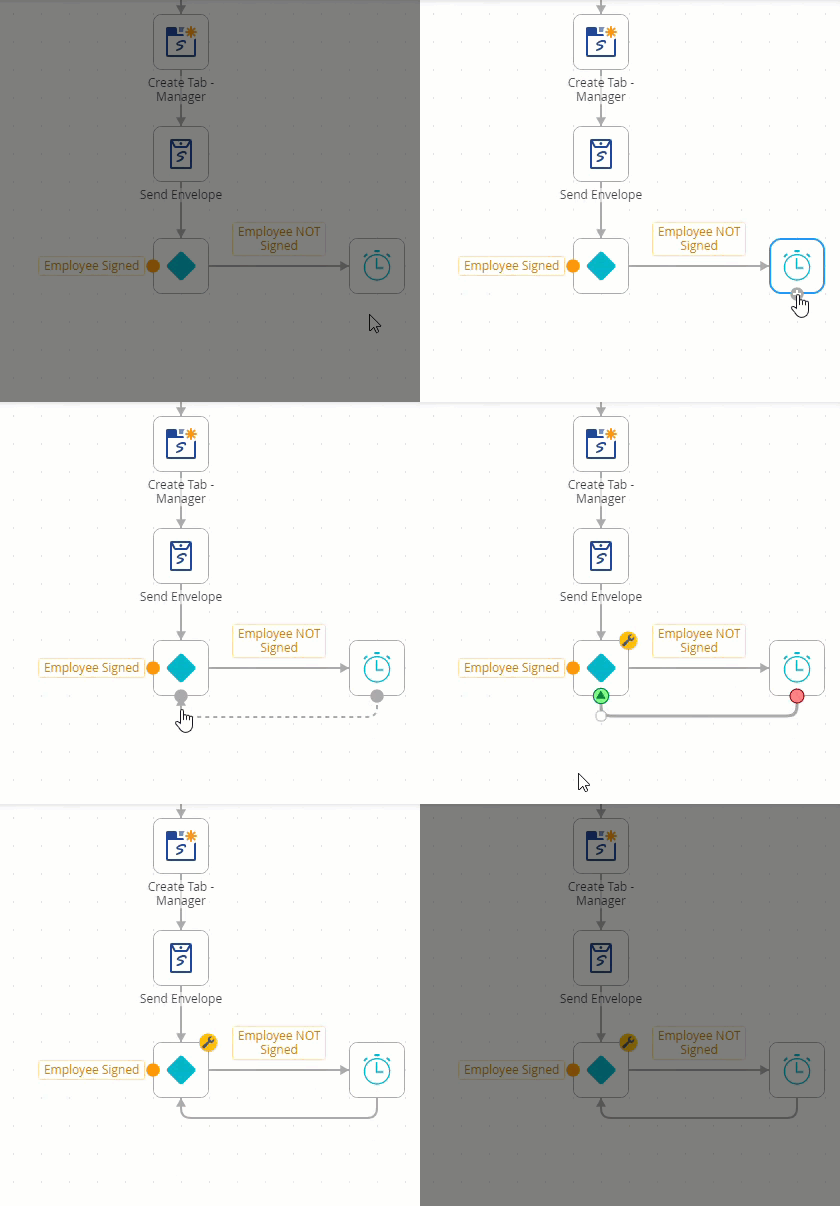
- From the Toolbox, click the Logic category, and drag the Decision step onto the canvas. Connect the step to the Send Envelope step.
- Add a Set Folio step to populate the task step that is part of the embedded signing.
- From the Toolbox, click the Basic category and drag the Set Folio step onto the canvas. Connect the step to the Employee Signed path.

- Select the Set Folio Detail tab. In the Folio field, type Complete contract signing for and then drag the Name property from the New Employee reference into the field. This adds the employee name to the workflow folio. You can find the reference in the Context Browser, References section and then expand the New Employee reference.

- From the Toolbox, click the Basic category and drag the Set Folio step onto the canvas. Connect the step to the Employee Signed path.
- Configure a Task step to use a specific form so the recipient can sign from within Workspace (Desktop and Mobile).
- From the Toolbox, click the Basic category and drag the Task step onto the canvas. Select the Task tab and create two task actions (Approve and Reject).
Connect the step to the Set Folio step.

- Select the Properties tab and change the step name to Embedded Sign Task.

- Select the Forms tab. From the Form Type drop down menu select the SmartForm option. Select the Browse option from the Form drop down menu. Browse to and select the DocuSign Embedded form.


- The Open Task on a Form page shows. Deselect the option to create the View references. Click Next.

- In the Open Task section, select the Help me configure it option and click Next.

- From the Workflow View section, select the Use an existing State option and select (Base State). Click Next.

- No configuration is needed for Form Rules or Actions. Click Next.

- No configuration is needed for the After Submit Action. Click Next.

- The Almost Done page shows. This page contains all changes to the form. Click Save and Finish.

- On the Success page click OK.

- Notice the added DocuSign EnvID and DocuSign RecID parameters in the Parameters section. You added these parameters to the form in Step 6 of this topic. You use these parameters to pass information from the workflow to the form.

- Expand the Configuration Panel. From the Variables section, drag the EnvID variable into the DocuSign EnvID parameter and the ManagerRecID variable into the DocuSign RecID parameter.

- Select the Recipients tab. Browse and select Bob Maggio as the recipient for this task.

- Drag a line from the Embedded Sign Task step to add the Decision step.
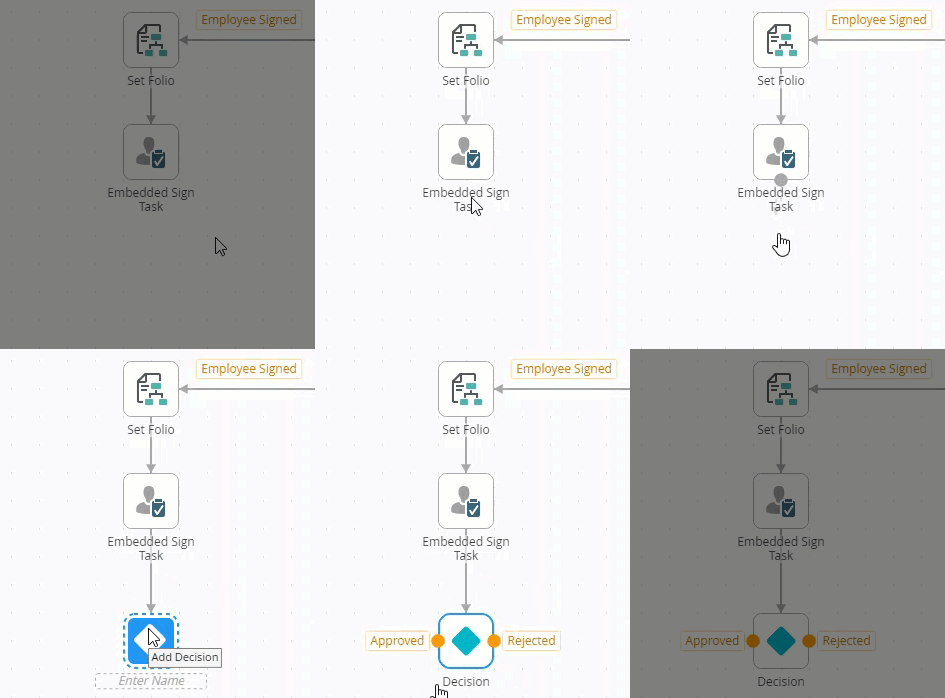
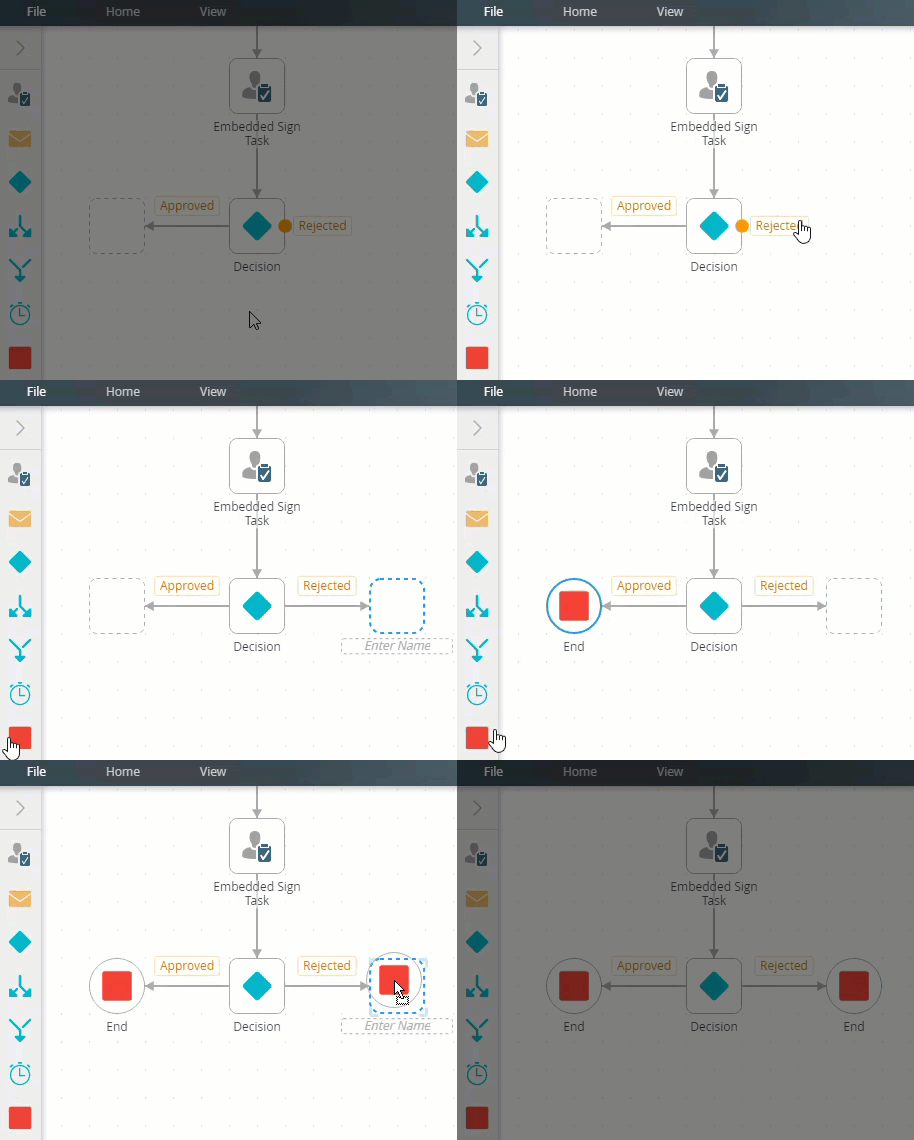
- Drag a line from the Approved and Rejected actions port to create a Placeholder step. Drag an End step into each of the placeholders.
- Your workflow is ready to be deployed. Click File and select Deploy.

For more information on the infinite loop, see Infinite Loop. - After successful deployment, click File and Close to close the workflow and exit the Workflow Designer.
- Check in all forms and views before testing the solution.
- From the Toolbox, click the Basic category and drag the Task step onto the canvas. Select the Task tab and create two task actions (Approve and Reject).
Connect the step to the Set Folio step.
- Test the solution by running the New Employee form, add the employee contract and submit the form. The person from HR approves it which starts the DocuSign process. The contract is sent to the new employee by email for them to sign. From there it is sent to the hiring manager (Bob) via a Workspace (Desktop and Mobile) Task. Bob completes the process by signing the contract on the task card and approves the task.
- From the the Designer, locate the New Employee form and click the Runtime URL link.

- Complete the form as shown below (using your own email address for the Email value and your own value for the Name). Click Save.
To download a sample of the employee contract, click here.

- Open Workspace (Desktop) and log in as the HR person. On the HR Approval task, select Approve and then click Submit.

- The DocuSign process starts. The employee receives an email from DocuSign. From the email click the Review Document link.

- The DocuSign page opens. Check I agree to use electronic records and signatures and click Continue. Sign the contract and click Finish.

- The contract now needs to be signed by the hiring manager Bob. Open Workspace (Desktop) and log in as Bob. Select the Embedded Sign Task assigned to Bob. The DocuSign experience shows in the task form. Click Continue.

- You can sign the contract from within the task without needing to open another browser window. Click Finish to sign the contract.

- The Redirect form shows. To complete the task, select Approve from the Select Action drop down menu and click Submit.

- From the the Designer, locate the New Employee form and click the Runtime URL link.
Review
You learned how to use DocuSign steps in a workflow to create an end-to-end solution with DocuSign functionality to automate the signing of a contract by two recipients. You also learned how to embed the signature process in Workspace (Desktop).
- If the DocuSign feature is not activated you will not see the DocuSign steps in the Workflow Designer. Check with your administrator to make sure the feature is activated and that you are running the correct version of the product.
- When setting up DocuSign you typically activate it using a developer account. If you or your company already have a DocuSign account, you may use that instead. Check with your DocuSign representative for more information on how to configure the DocuSign feature or see the DocuSign Feature Activation topic.
- Once you have created your workflow, you can deploy it to a production environment. For more information see the following Knowledge Base article for the deployment steps. KB001689 - How To: Deploy a DocuSign integrated workflow