3. Create the Contact Notes and Attachments SmartObject
In this step you will create the Contact Notes and Attachments SmartObject. This SmartObject stores the "details" content for a contact. Each contact may have several notes and attachments records associated with its header. Header and details records are bound together by a common property, which you will set in a later step.
-
Add the data source that stores the details records for the Contact Management application. Create a SmartBox SmartObject called Contact Notes and Attachments SmartObject. Add the properties shown in the table below.
Name Data Type ContactID Number Notes Memo Attachments File - In the Designer, create a new SmartBox SmartObject that stores the details records. Right-click the SmartObjects category and select New SmartObject.
- Name the SmartObject
Contact Notes and Attachments SmartObject
then select the SmartBox option. Click CREATE. - Click Add and add each of the following properties, then click OK:
Name Data Type ContactID Number Notes Memo Attachments File 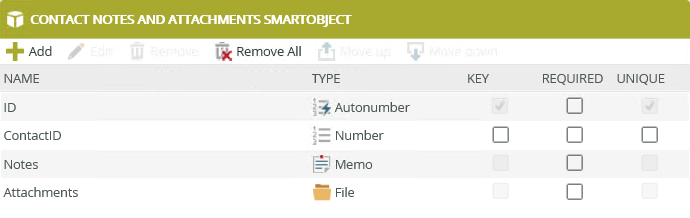
- Finish the SmartObject.
Review
In this step, you created the Contact Notes and Attachments (SmartBox) SmartObject. This data source stores the "details" content for each contact record. In the next step, you will create the Contact Item View, which is the header part of the contact form.