SmartObject OData API v4 endpoints
The SmartObject OData URL is the base for all your API endpoints. Find your base URL on the API configuration page described in the topic Configuring the SmartObject OData API.
SmartObjects are identified as EntitySets in the returned data when you hit the OData URL The EntitySet name is the system-name of the SmartObject.
You must know how the SmartObject you want to interact with is designed, what input and output properties are available, and whether their values are required. Only the property name and type is available when you retrieve a list of the entities with an endpoint.
When using the endpoint, you can specify methods which follow the standard HTTP verbs:
| Method Type | HTTP Verb |
| Create | POST |
| Update | PUT |
| Delete | DELETE |
| Read | GET |
| List | GET |
| Execute | POST |
This example uses a simple SmartObject and a Postman collection to illustrate basic use of the OData API v4. We recommend at least basic knowledge of Postman to work through this example.
The example in this topic uses a simple SmartObject called EmployeeSample with six properties and default methods. Use the Designer to create the following SmartObject, and execute the Create method to enter some data.
For information on creating SmartObjects, see the topic How To: Create A SmartBox SmartObject
| Property Name | Data Type |
|---|---|
| ID | Autonumber |
| FirstName | String |
| LastName | String |
| HireDate | DateTime |
| DepartmentCode | Number |
| Joblevel | String |
The default methods are:
- GetList
- Create
- Delete
- Save
- Load
To interact with your SmartObjects using the OData v4 endpoints, do the following:
Use the OData URL to return a list of entities (SmartObjects available to the OData API):
https://{{base_URL}}/

Adding $metadata to the URL returns formatted XML which is easier to read than the raw JSON. You can only use the $metadata parameter on the OData base URL, not on any other endpoint:
https://{{base_URL}}/$metadata

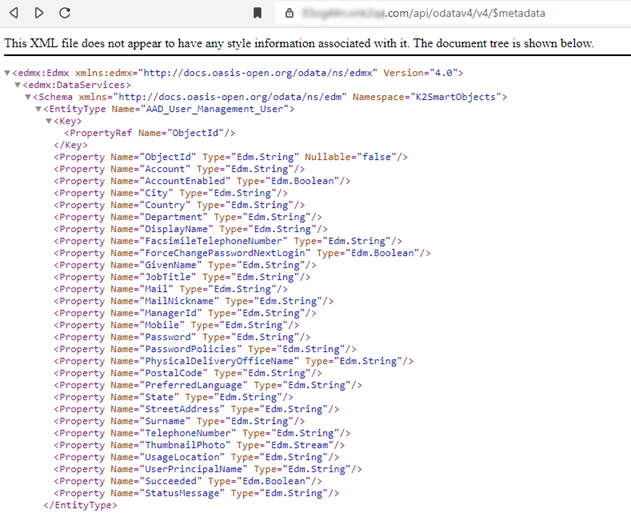
At the bottom of the returned XML is a tag section named <EntityContainer Name="ODataService">. This container lists all SmartObjects available to the OData API. The EntitySet Name values are the SmartObject system-names. These names correspond with the EntityType Name value for the containers shown in the image above. Each container also lists the SmartObject properties' name and type.

Adding the entity name to the URL returns the records in that SmartObject.
https://{{base_URL}}/EmployeeSamples

You would get the same data if you used the ?method=GetList query.
https://{{base_URL}}/EmployeeSamples?method=GetList
Your SmartObject may have a different name for the List method. The method in the example on this page is named GetList.
Return the list of SmartObject methods
To get a list of the SmartObject methods, use the /ml/methods/ endpoint and specify the name of the EntitySet:
https://{{base_URL}}/ml/methods/EmployeeSamples

Use the filter query string parameter
If you want to return only employee data for employees whose names start with the letter A, use this URL:
https://{{base_URL}}/EmployeeSamples?method=List&$filter=startswith(FirstName, 'A')

Now you have all the information about the SmartObject that you need to interact with it.
Use this example Postman collection to familiarize yourself with the SmartObject OData v4 API.
OData v4 Employee Sample.postman_collection.json
To use the collection:
- Expose your EmployeeSample SmartObject to your OData v4 API.
- Import the OData v4 Employee Sample.postman_collection.json collection into Postman.
- Edit the following environment variables in Postman for your environment:
{{base_URL}}
{{username}}
{{password}}
The SmartObject OData API v4 supports file and image SmartObject properties.
When you load/create an entity in OData you receive a response like the following:
Sample response
{
"ID": 1,
"FirstName": "Andre",
"LastName": "Pretorius",
"HireDate": "2020-10-14T00:00:00Z",
"DepartmentCode": 1,
"Joblevel": "Senior ",
"EmployeeImage@odata.mediaReadLink": "https://**********.com/api/odatav4/resources/EmployeeSample(1)/EmployeeImage",
"MyFile@odata.mediaReadLink": "https://**********.com/api/odatav4/resources/EmployeeSample(1)/MyFile"
}
Use the odata.mediaReadLink key's value (the URI) to view or download the file or image with the HTTP GET method. Also, use the same link to PUT a file or image when doing a Save or Update. The URI to use is like the Sample response shown above: "https://***********.com/api/odatav4/resources/EmployeeSample(1)/EmployeeImage". Yours will be different:
https://[Domain]/api/odatav4/resources/[entity name]([primary key value])/[property name]?method=Save
-
Entity name: the name of the entity you want to interact with.
-
Primary key value: the value of the primary key for the record in the SmartObject associated with the entity name. This is usually the ID field of the record.
-
Property name: the name of the property in the SmartObject's record you are interacting with.
Passing a file or image
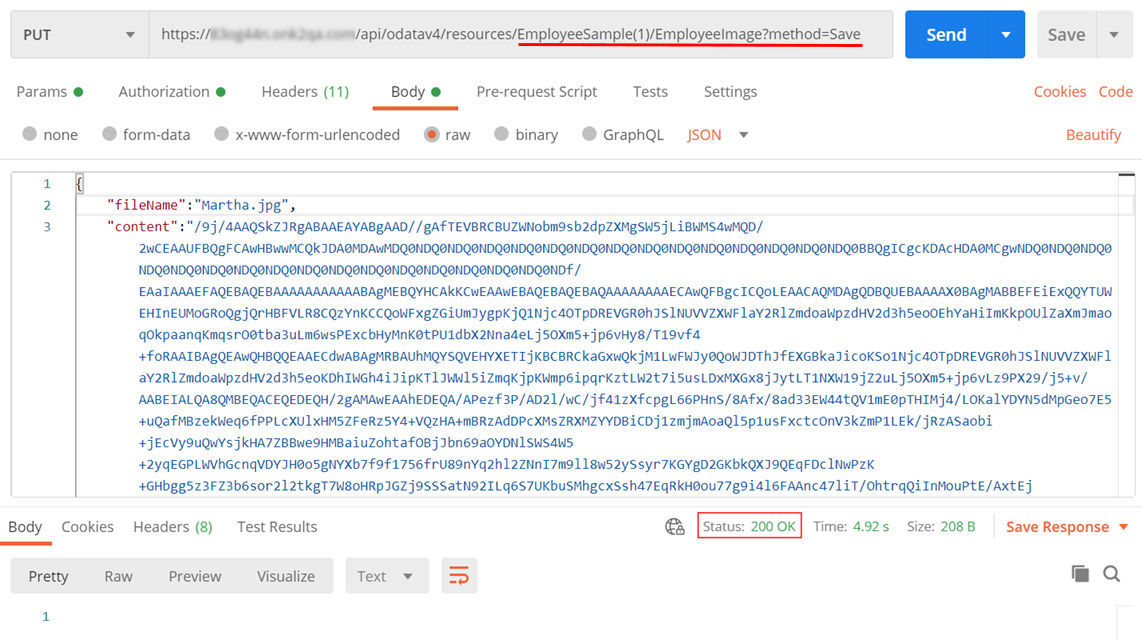
When you call the endpoint to create or update a file or image, use the Content-Type header of application/json and pass the following structure in the body of your request:
This image shows an example in Postman where a file named Martha.jpg is added to a record with the ID of 1, in a SmartObject called EmployeeSample, with a property called EmployeeImage. The Method used to add the image is Save. All images and files added to SmartObjects must be base 64-encoded and passed in the content key.

Considerations
-
Endpoints are case sensitive. For example, https://{{OData URL}}/<SmartObject system-name>?method=Create