How To: Use Task Reminders
You can combine Reminders in User Task steps to perform different actions, such as sending an email a certain number of times before redirecting the task to someone else to action. In this the following how to topic, you create a Claims application which contains a SmartObject, views, a form, and a workflow. In the workflow you configure a Task Email Reminder, Task Redirect, and a Deadline, so that the workflows will send two reminder emails, then redirect the task to another person, and finally expire the task if it is not completed within 30 minutes.
Using an Task Email Reminder, Task Redirect and Deadline to remind recipients to action a task, redirect a task to another recipient when a specified duration has expired
Scenario
Your company uses a Claims application to manage claim submissions. As part of your claim policy, a claim must be actioned within two minutes after submission. If no action was taken reminder emails are sent. After 10 minutes the claim should redirect to a different agent if no action was taken. After 30 minutes the submitted claim should expire. To make sure this happens, you need to configure the Email reminder, Redirect, and a Deadline on the Task step.
Steps
Begin by building a Claims Details SmartObject to store your claim details. Next, create an item view and a list view based on the SmartObject, and then a form based on the item view. Create a workflow called Claims and configure the task deadline, email and redirect reminders on the Task step. Finally, submit the form and test the solution.
Setup Steps
The following steps set up the scenario from start to finish. If you want to skip the setup steps and view the topic step, go to Configure the Reminder and Deadline sections.
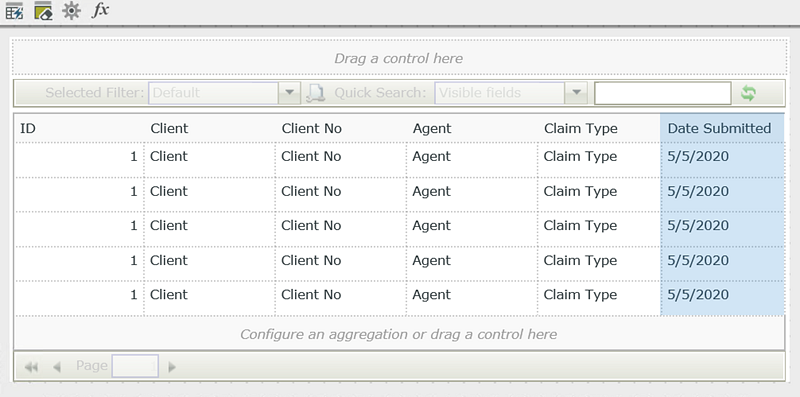
- From the Designer, create a SmartObject called Claims Details to store the submitted claim details. Use the table as a guide for adding properties.
- Create a new category folder called Claims.
- Create a SmartObject called Claims with the following properties:
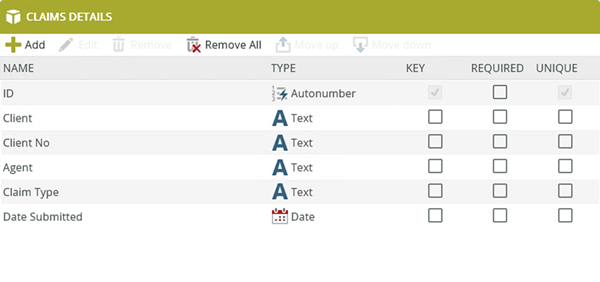
Property Type Key Required Unique ID Autonumber Yes No Yes Client Text No No No Client No Text No No No Agent Text No No No Claim Type Text No No No Date Submitted Date No No No For more information on creating a SmartObject, see How To: Create A SmartBox SmartObject.
-
In this step, use the Claims Details SmartObject to generate and item and a list view called Claims Details Item and Claims Details List
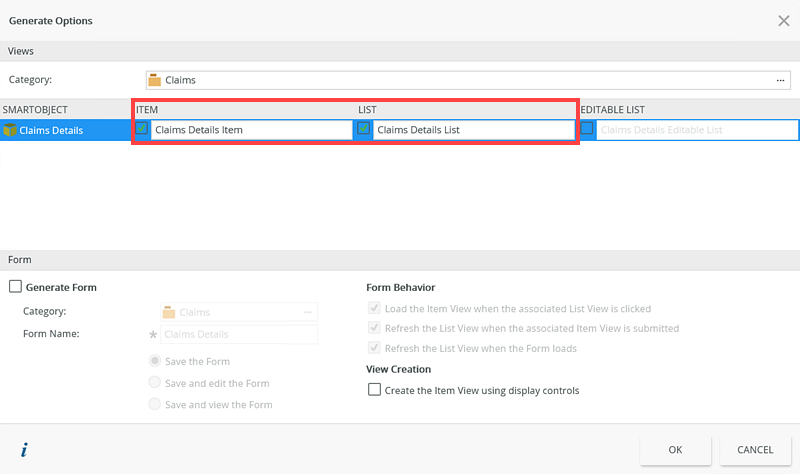
- Generate a Claims Details Item view and a Claims Details List view based on the Claims Details SmartObject.
For more information on creating views, see How To: Create an Item View and a List View.
- Generate a Claims Details Item view and a Claims Details List view based on the Claims Details SmartObject.
-
In this step, you generate the Claims Details Form from item view.
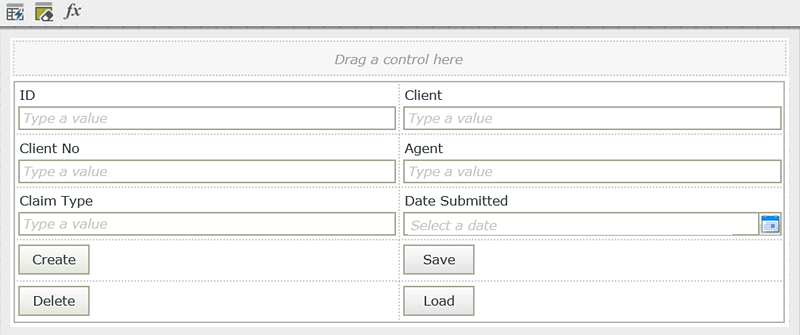
- Generate a form based on the Claims Details Item view.


For more information on creating forms, see How To: Create a Form.
- Generate a form based on the Claims Details Item view.
- In this step, you design a workflow and configure the Start step to start the workflow when you submit the Claims Details Form.
- Select the Claims Details Form from the category tree and click the Design Workflow option. Name the workflow Claims.
- Select the Start step and click Edit.

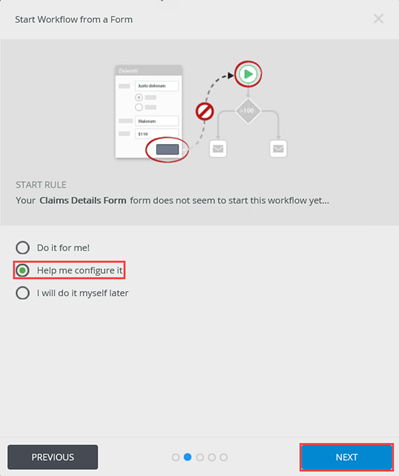
- Click Next on the Start Workflow from a Form page.
- Select the Help me configure it option and click Next.
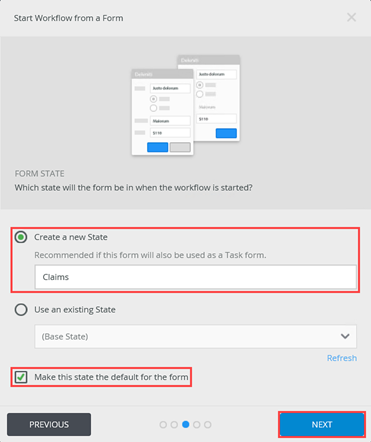
- Ensure you select the Create a new State and the Make this state the default for the form options and click Next.
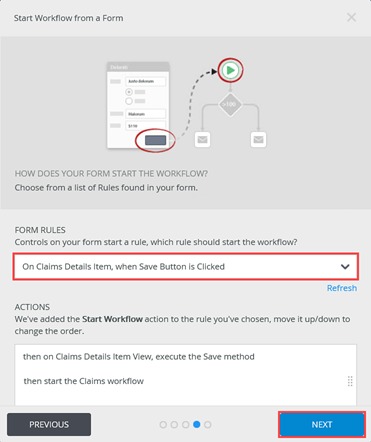
- Ensure you select the On Claims Details Item, when Save Button is Clicked option in the Form Rules section and click Next.
- Click Save and Finish.
-
In this step, you add and configure a Set Folio step. Use the references to populate the folio with the client name and number information.
- Select the Set Folio step from the Tool Box and add it to the canvas.
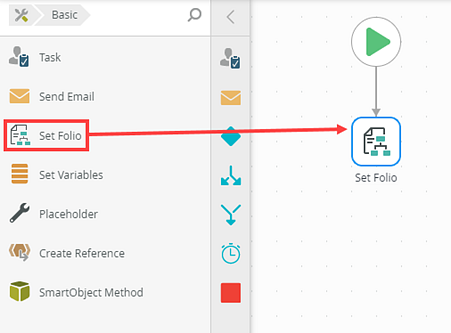
- Select the step, expand the Configuration Panel and the Context Browser. Expand the Claims Details reference in the References section and drag the Client No and Client references into the Folio.

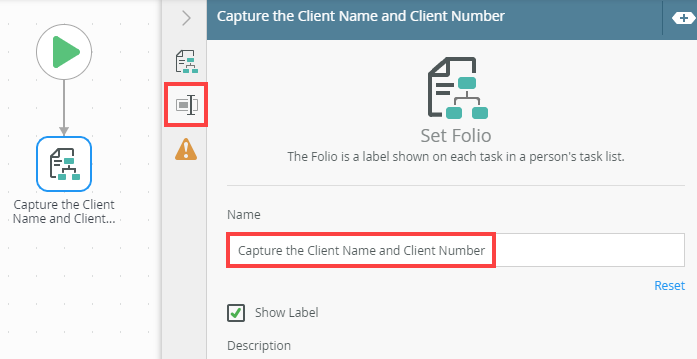
- Select the Properties tab and rename step name to Capture the Client Name and Client Number.
For more information, see Set Folio step.
- Select the Set Folio step from the Tool Box and add it to the canvas.
-
Add and configure the Task Step
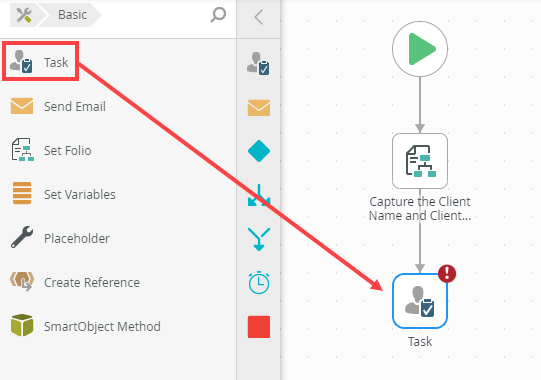
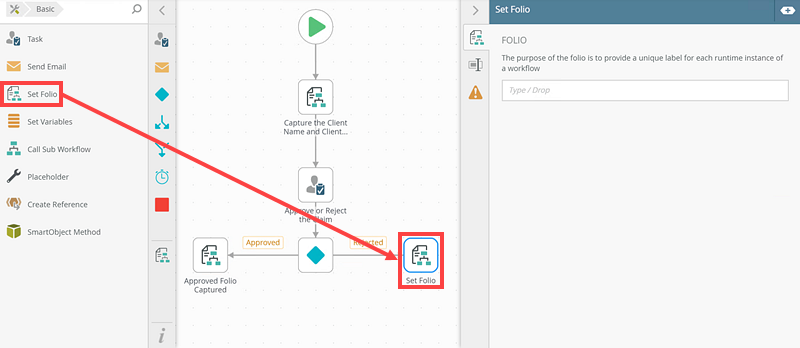
- Add the Task step from the Tool Box to the canvas and connect it to the Folio step.
- On the Task tab in the Instructions section, type the following recipient instruction Please review the claim and action it. In the Actions section, select both Approved and Reject as the task actions.
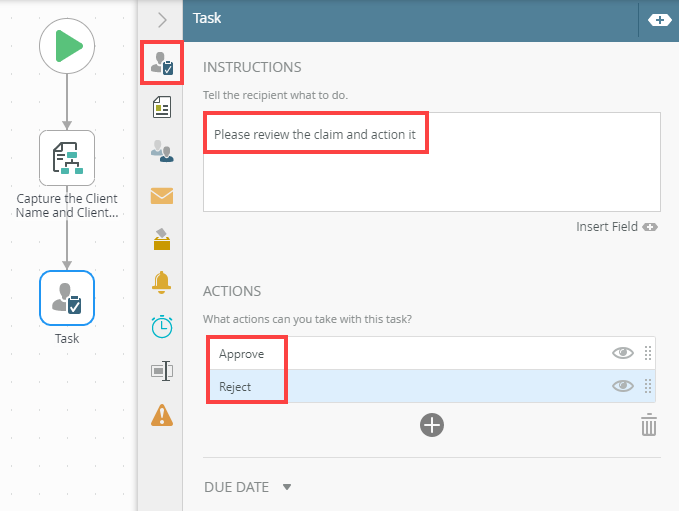
- On the Recipients tab select the user to receive the task. In this scenario, the task goes to Codi.

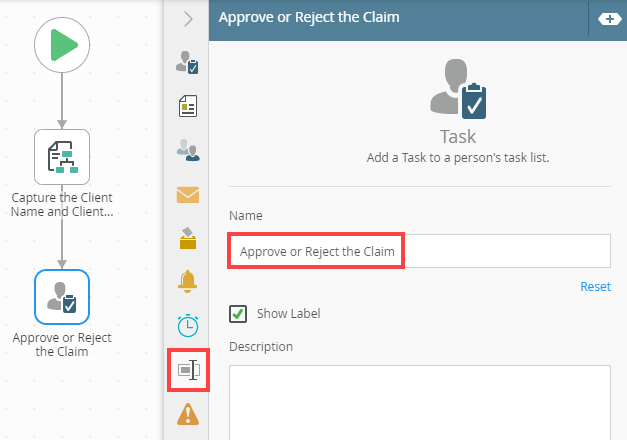
For more information, see Task step. - Select the Properties tab and rename step name to Approve or Reject the Claim.
- Add the Task step from the Tool Box to the canvas and connect it to the Folio step.
Configure the Reminder and Deadline sections
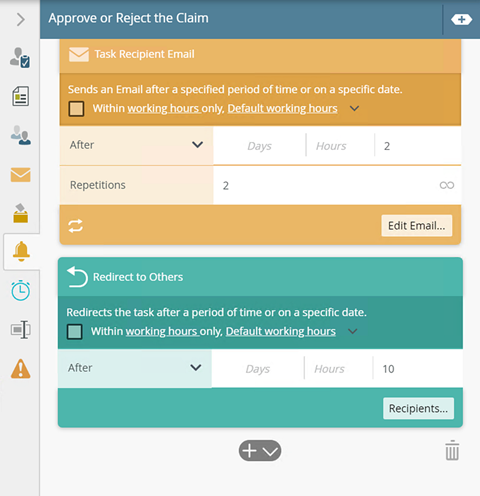
In this step, you add and configure the Email and Redirect reminders. You also configure a deadline to the step. In this scenario, the email reminder gets sent to Codi if no action was taken on the claim. The first email reminder is sent two minutes after claim submission and repeats twice. The claim redirects to a different recipient (Anthony) if no actions was taken within 10 minutes of claim submission. After 30 minutes, the submitted claim expires.
-
Configure the Reminder and Deadline sections
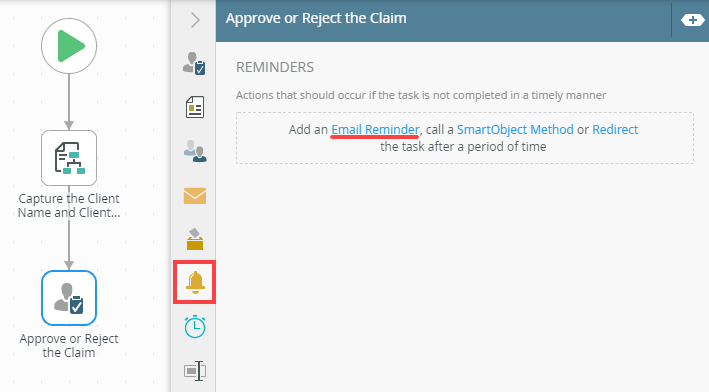
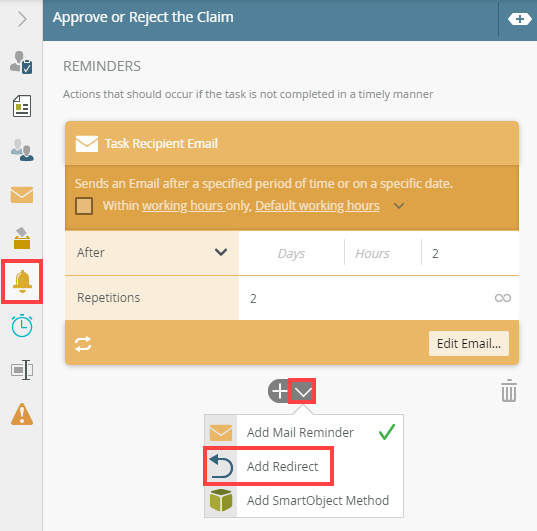
- On the Task step, select the Reminders tab and click Email Reminder.
- In the Reminders, section add the required time for the reminder. In this scenario, select the After option and type 2 in the minutes field. To make sure the email reminder repeats twice, type 2 in the Repetitions field. You might need to click the repeat icon (
 ) to show the Repetitions field. Click Edit Email to configure the recipient, email subject and body.
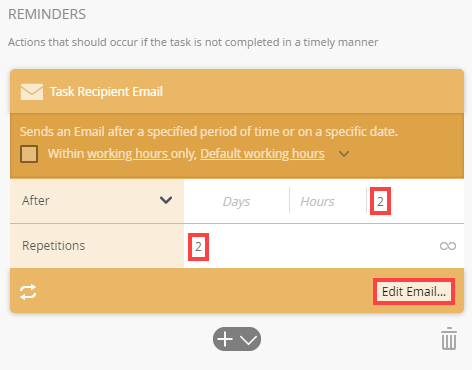
- On the Task Recipient Email panel, add the task recipient in the To field. In this scenario, select Codi and uncheck the Send email to workflow originator option.
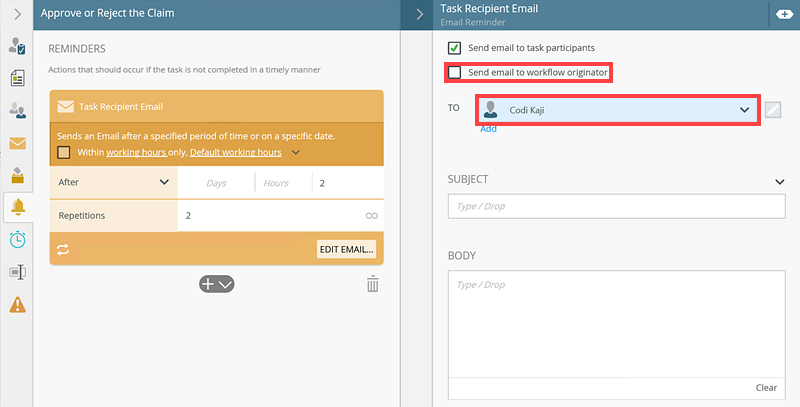
- Configure the Subject field to show the client and client number. Expand the Context Browser and drag the Client and Client No properties from the Claims Details references into the field.
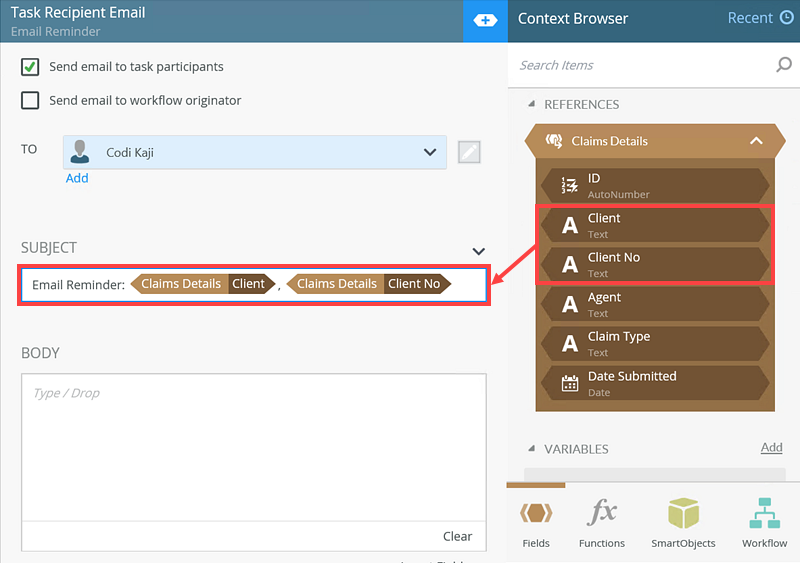
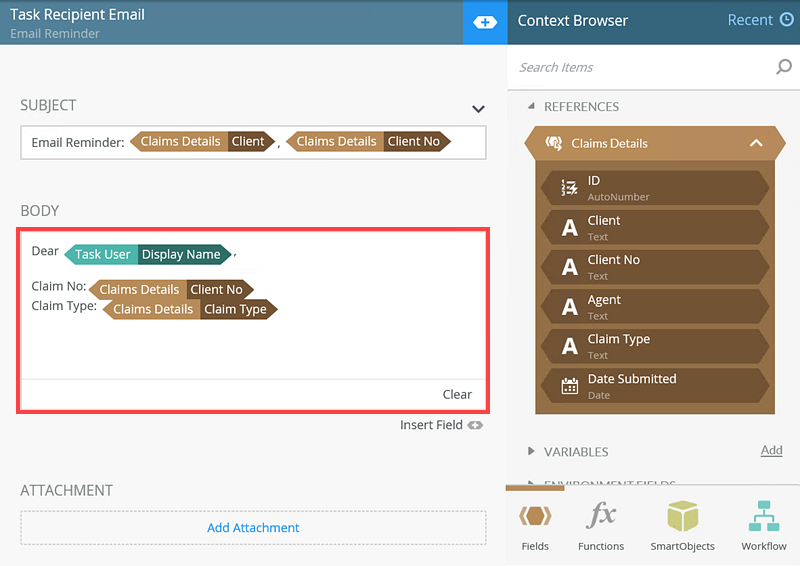
- Configure the email Body section as shown below:
For more information on the Email reminder, see Email reminder. - Next, you configure the redirect reminder. This reminder redirects the task to a different recipient if no action was taken. On the Reminders tab, click the down arrow and select Add Redirect from the menu.
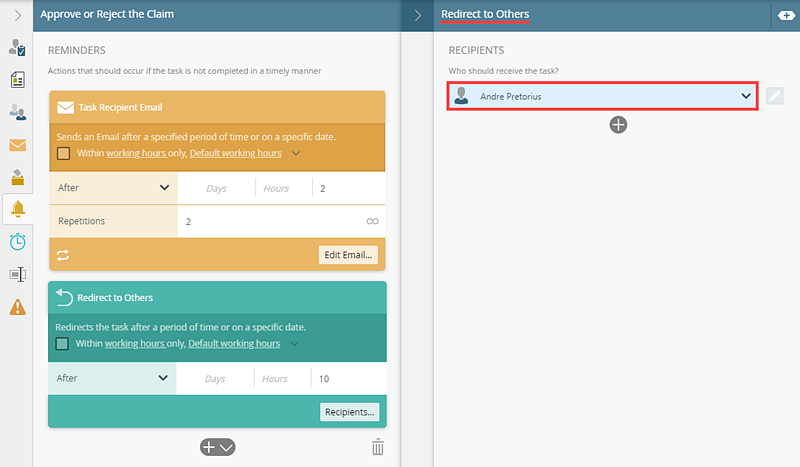
- On the Redirect to Others reminder, enter the time value when the task should redirect to a different recipient. In this scenario, after 10 minutes the task redirects to Anthony if no action was taken by Codi. Select the After option and type 10 in the minutes field. Click Recipients to configure the redirected recipient.

- On the Redirect to Others panel, add the recipient. In this scenario, select Anthony.

- To expire the task, you need to set a deadline. On the Deadline tab select the After Time option and type 30 in the minutes field. In this scenario, the task expires after 30 minutes if no action was taken by either Codi or Anthony.
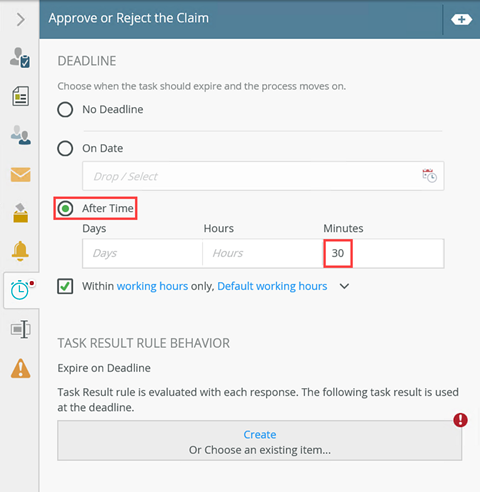
- Click Create in the Deadline Behavior section to create a task result when the task expires.
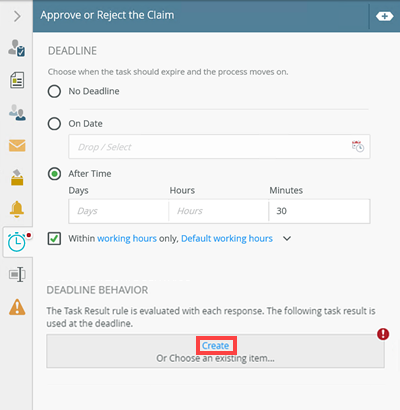

- In the Deadline Behavior section, click Change.

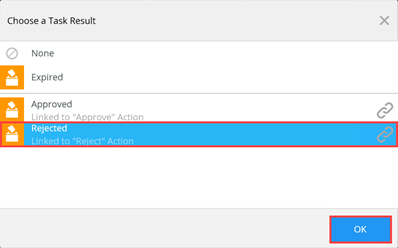
- On the Choose a Task Result screen, select the Rejected option. Click OK. When the claims task is not actioned by the original recipient or the redirected recipient, after thirty minutes the deadline executes and follows the Rejectedpath of the workflow, the folio updates with Expired, and the instance of the task ends.
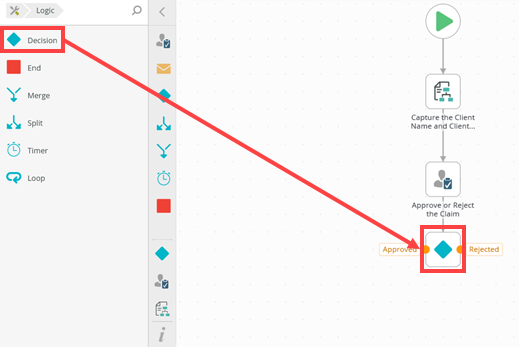
- From the Toolbox > Logic category, drag a Decision step onto canvas and connect it to the Approve or Reject the Claim task step. Notice that both task actions (Approved, Rejected) automatically show on the Decision step.
For more information on the Decision step, see Decision step.
When setting up an email reminder, it's important to include an interval time. Without an interval, you'll receive an endless stream of emails all at once. - On the Task step, select the Reminders tab and click Email Reminder.
- In this step, you add and configure a Set Folio step and connect it to the Approved action path.
- From the Toolbox > Basic category, drag a Set Folio step onto the canvas and connect it to the Approved action.

- Select the step, expand the Configuration Panel and the Context Browser. Expand the Claims Details reference in the References section and drag the Client and Claim Type references into the Folio as shown below.
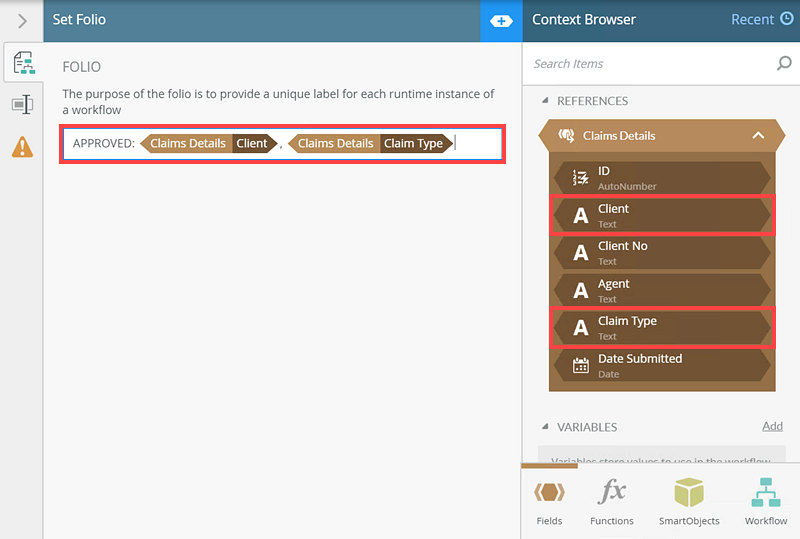
- Select the Properties tab and rename step name to Approved Folio Captured.

For more information on the Folio step see Set Folio step
- From the Toolbox > Basic category, drag a Set Folio step onto the canvas and connect it to the Approved action.
-
In this step, you add and configure a Set Folio step and connect it to the Reject action path.
- From the Toolbox > Basic category, drag a Set Folio step onto the canvas and connect it to the Rejected action.
- Select the step, expand the Configuration Panel and the Context Browser. Expand the Claims Details reference in the References section and drag the Client and Claim Type references into the Folio as shown below.
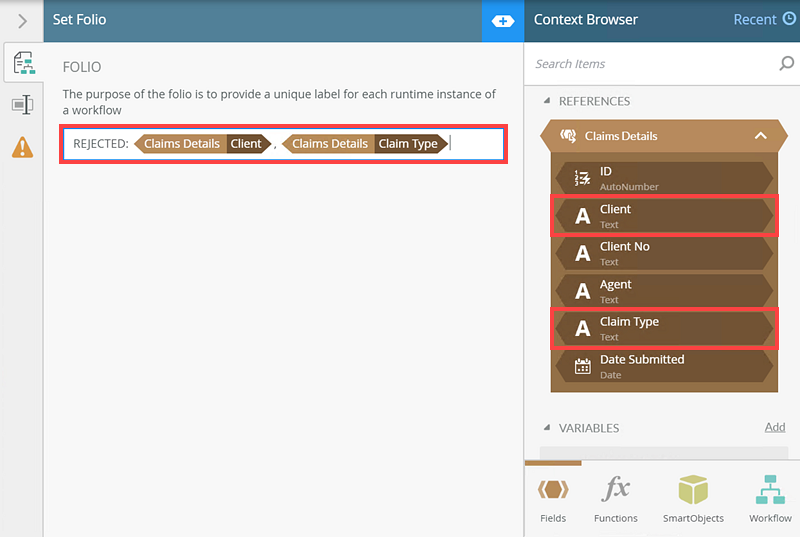
- Select the Properties tab and rename step name to Rejected Folio Captured.

For more information on the Folio step see Set Folio step
- From the Toolbox > Basic category, drag a Set Folio step onto the canvas and connect it to the Rejected action.
-
In this step, you add an End step and deploy the workflow.
- From the Toolbox > Logic category, drag an End step onto the canvas and connect the Approved and Rejected actions to the End step.

For more information on the End step, see End step. - Click File and click Deploy.
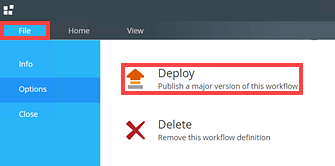
For more information on deploying a workflow, see Deploy a Workflow.
- From the Toolbox > Logic category, drag an End step onto the canvas and connect the Approved and Rejected actions to the End step.
- Test the solution. In this step, you run and complete the Claims Details Form form and submit a claim. The claim goes to Codi, the assigned agent. In this scenario, Codi takes no action to open or complete the claim. The claim then redirects to Anthony who also takes no action to open or complete the claim. The claim expires after 30 minutes. This shows the function of the Reminder and Deadline steps.
- Open the Claims Detail Form and enter values for the claim. Click Save.

- The table below show the process the workflow executes:
Action Time The following happens: Dennis Parker submit the Claims Details form 11:29 Workflow starts and New Task email sent to the task recipient (Codi)
After 2 minutes 11:31 Email reminder sent to Codi After 2 minutes (1st repeat) 11:33 Email reminder sent to Codi After 2 minutes (2nd repeat) 11:35 Email reminder sent to Codi After 10 minutes 11:39 Task redirected to and New Task email sent to Anthony
After 2 minutes 11:41 Email reminder sent to Anthony After 2 minutes (1st repeat) 11:43 Email reminder sent to Anthony After 2 minutes (2nd repeat) 11:45 Email reminder sent to Anthony After 30 minutes 11:59 Deadline reached and tasks expires
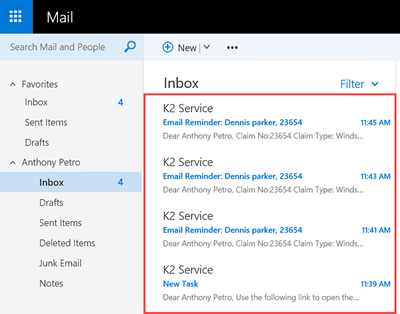
- The New Task email and reminders are sent to Codi every two minutes. You will notice below that Codi has received three Task Email Reminders. This is because the initial reminder is sent then the two repetitions configured earlier are sent every two minutes.

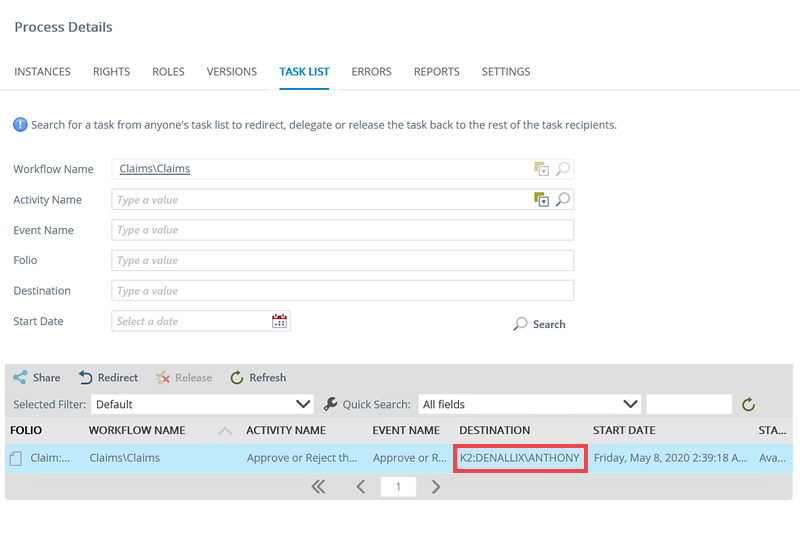
- After ten minutes, Codi takes no action to open or complete the claim. This means, the task redirects to Anthony. You will also notice below that Anthony has also received the New Task and three Task Email Reminders. This is because the initial reminder is sent, then the two repetitions configured earlier are sent every two minutes. When you view the Task List in Management, notice the task is sent to Anthony.
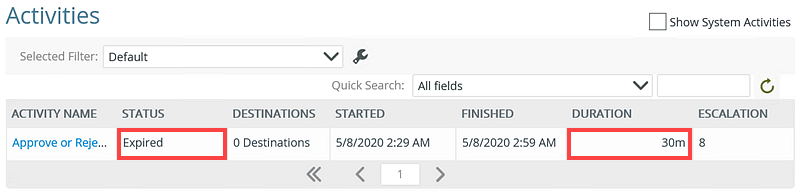
- After 30 minutes, no action taken by Anthony to open or complete the claim and the task expired. In Management > Workflow Server > Workflows > [workflow name] > Reports > Process Instance Detail > Activities notice the Expired status.
- Open the Claims Detail Form and enter values for the claim. Click Save.
Review
In this how to you created a workflow with multiple actions in the Task Reminders and Task Deadline configuration. If the task was not actioned after a specified duration, the task would be sent to another recipient for actioning. If the task was not actioned after thirty minutes by any of the recipients the task goes into the expired state.