Parent-Child Workflows in K2 Studio (Intermediate)
This tutorial provides the step-by-step instructions for configuring a parent-child workflow using K2 Studio. To successfully work through this tutorial, you should be familiar with K2 terminology and workflow concepts. The steps in this tutorial are intermediate level. If you feel you need more basic instruction, begin with the Parent-Child Workflows (Basic) tutorial to get started with basic parent-child concepts.
Why use Parent-Child Workflows?
Parent-Child Workflows are ideal in situations where you have multiple tasks that are not dependent on each other. For example, you might start child workflows if you have a process that requires action from multiple departments, yet those actions are independent of the other departments. Another example would be if your process contains a number of system events (such as updating lists) that are not dependent on other steps in the process. Child workflows can run at the same time, or one after another. The parent workflow must have some sort of closure however, from the child workflow so that it can continue and complete.
Workflow Design
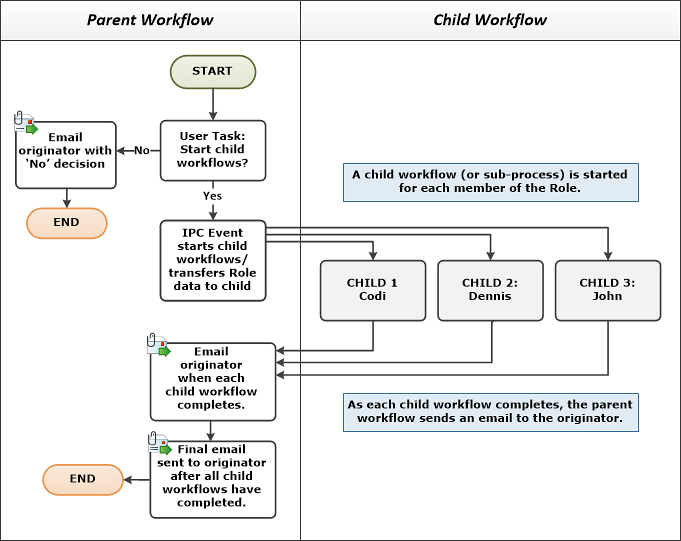
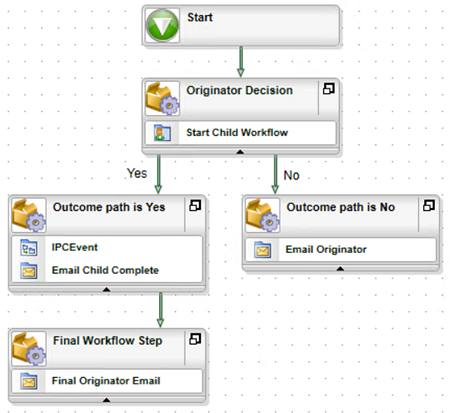
In our parent-child vignette, we will create a new project in K2 Studio, then add two process items (the Parent Workflow and the Child Workflow). The Parent Workflow will consist of a single user task, which will demonstrate how the child workflows either start or don't start depending on the user decision selected. If the user selects to kick off the Child Workflows, the Parent Workflow will move on to an IPC (Inter-process Communication) event where K2 will determine how many Child Workflows to start (individually) based upon the number of members in the Role that we will create. We will configure the Parent Workflow to pause as the Child Workflows run. As each Child Workflow completes, it will revert back to the Parent Workflow where an email confirmation will be sent to the originator letting them know that the individual Child Workflow has completed. The originator will receive an email confirmation for each of the Child Workflows as they are completed. When all of the Child Workflows have completed, a final email will be sent to the originator to complete the parent-child workflow process.
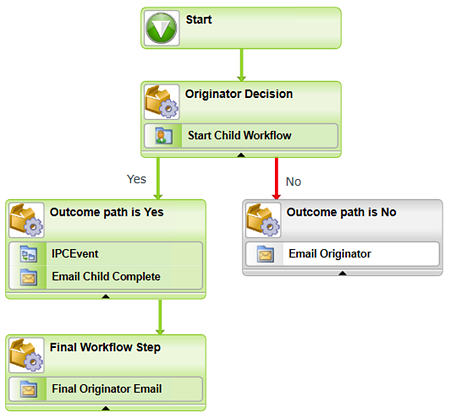
The diagram below illustrates our parent-child concept using a flowchart. Notice that there are two columns, one for the Parent Workflow steps and one for the Child Workflow steps. What's important to notice here is that an individual Child Workflow (or sub-process) is started for each member of the Role.
Mapping out your workflow steps using a flowchart or similar diagram can help you to clearly visualize the events and steps necessary to accomplish your parent-child workflow goal.
There are six steps for completing this vignette. In Step 1, we will create the shell for our project by adding a Role (user group) in K2 Workspace. In K2 Studio, we will create a project and add two process items (the Parent Workflow and the Child Workflow) to the project. In Step 2, we will add one user task and one system task to the Parent Workflow. In Step 3, we will configure the destination rules and add the IPC event to the Parent Workflow. (The IPC event is the wizard we use to configure the Parent Workflow communication with the Child Workflow.) In Step 4, we will add a user task to the Child Workflow and configure its destination rules. Steps 5 and 6 complete our vignette as we deploy and test our project.
Duration
This tutorial should take approximately 30-45 minutes to complete.
We begin with Step 1, creating the Role and the workflow shell.
We begin our tutorial by building the basic shell components necessary for the parent-child workflows. The first task at hand is to create a sample Role in K2 Workspace. A Role is simply a group of users that can be assigned tasks, or added as email recipients, etc. In our case, we will configure our Parent Workflow to start individual Child Workflows for each member of the Role.
After we have created our Role, we will create the project and two workflows (parent and child) in K2 Studio.
Step 1 Tasks
- Create a new Role in K2 Workspace and Name it
Parent Child Sample Role
then assign Codi, Dennis and John as Role Items. (If you are in your own environment, assign two or three users where you will have access to their Outlook and web browsers.) - Create a new Project in K2 Studio and Name it
Parent Child Project - Add a blank Process Item to the Project (for the Child Process) and Name it
Child Process - Add another blank Process Item to the Project (for the Parent Process) and Name it
Parent Process - Add a Data Field to the Parent Workflow and name it
Child Workflow Task Approver - Add a Data Field to the Child Workflow and name it
Role Members
- Launch K2 Workspace. (Start > All Programs > K2 blackpearl > K2 blackpearl Workspace)
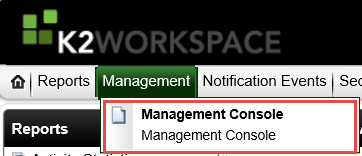
- On the K2 Workspace home page, open the Management Console.
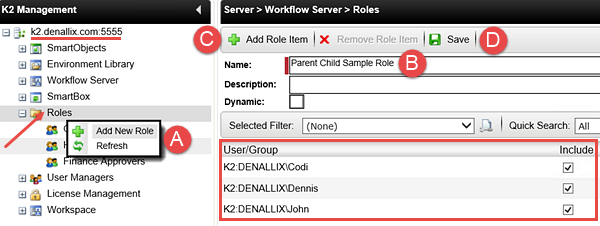
- Expand the K2 server node, then the Roles node. Right-click Roles and select Add New Role. (A below) Name the Role
Parent Child Sample Role (B below)
then click Add Role Item. (C below) Search for and add the following users:
Codi, Dennis, and John
keeping the default (Include) setting checked. Save the Role Items when you have finished adding the users. (D below) We now have our list of users that will become the destination users for each of the Child Workflows. - Launch K2 Studio. (Start > All Programs > K2 blackpearl > K2 Studio)
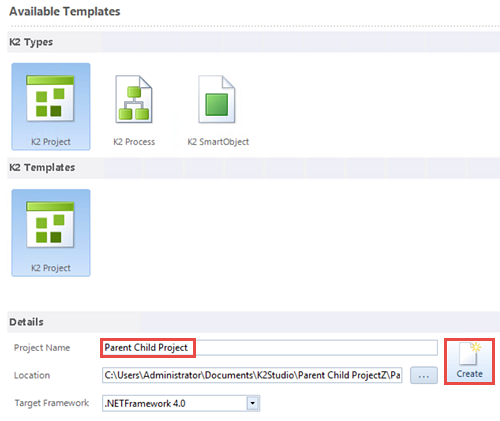
Create a new project (File > New) with the following settings:
K2 Types: K2 Project
K2 Templates: K2 Project
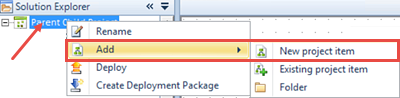
Project Name: Parent Child Project - Right-click the Parent Child Project title and select Add > New project item
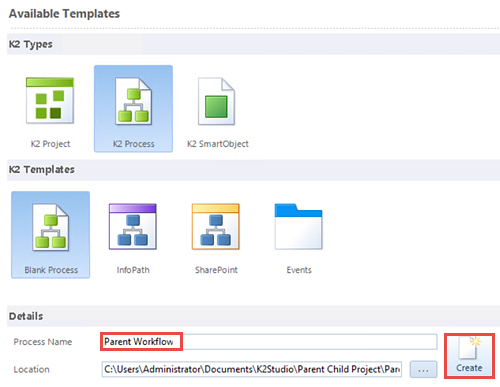
- Create a new process with the following settings:
K2 Types: K2 Process
K2 Templates: Blank Process
Process Name: Parent Workflow - Repeat the steps above and create a new project item for the
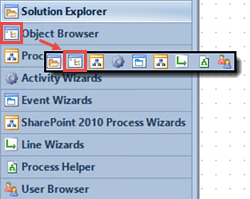
Child Workflow - Begin by double-clicking the Child Workflow title so that it is the 'live' workflow. Click the Object Explorer pane or icon.
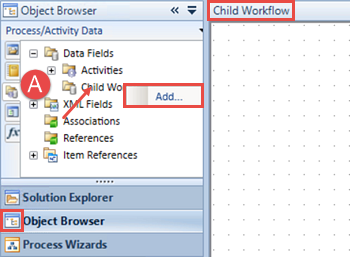
- In the Object Browser, first click the Process/Activity Data icon (A below), then expand the Data Fields node.
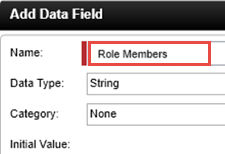
Right-click the Child Workflow title and select Add. - Name the data field
Role Members
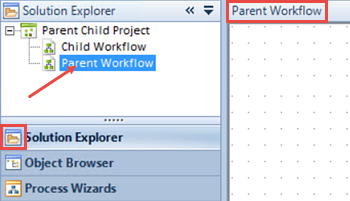
then click OK. (Keep all of the default settings in place.) - Switch back to the Solution Explorer and double-click the Parent Workflow to make it the 'live' workflow.
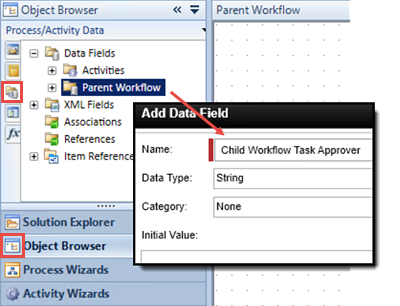
- Once again, switch back to the Object Browser. Select the Process/Activity Data icon, expand the Data Fields node, then right-click Parent Workflow and click Add. For the new data field Name, enter
Child Workflow Task Approver
then click OK. - Save your project. (File > Save)
In this step, we will create a sample Role, or group, that will contain a number of user names. If the option to start Child Workflows is selected in our Parent Workflow, K2 will create a separate Child Workflow for each user in this Role.
Now we will switch over to K2 Studio and build the parent and child workflow shells.
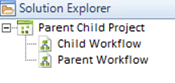
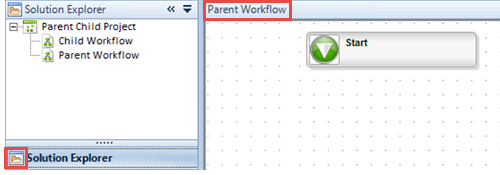
When the project is created, you will be directed to the Solution Explorer. We will now add a project item to the project, which will be the Parent Workflow.
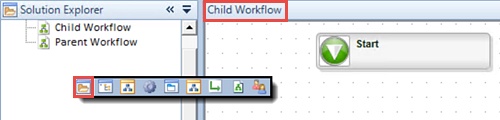
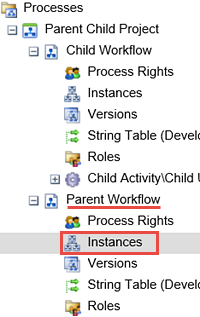
Your Solution Explorer should look like the image below.
Now we need to create two data fields, one for each workflow. The data fields pass data from one workflow to the other. In other words, we will pass the user names of our Parent Child Sample Role from the Parent Workflow to the Child Workflow via a data field. Then, we will pass the name of the user who actioned the user task in the Child Workflow back to the Parent Workflow so that we can use it in our confirmation email.
Notice that the Child Workflow is the live workflow, which is evidenced by the title bar. (See the image below.) So we will be adding the Child Workflow data field. We will use this data field to pass the destination users (members of the Parent Child Sample Role) from the Parent Workflow to the Child Workflow. The Child Workflow will then have a list of users and K2 will create a separate Child Workflow for each of the users.
Now we will add a data field to the Parent Workflow. This data field will 'receive' the name of the individual user that actioned the Child Workflow user task. We will use this value in the confirmation email that is sent back to the originator. In the real world, you may or may not use this step exactly, but the intent is to demonstrate one method of transferring content from a child workflow back to the parent workflow.
Step 1 Review
In this step we created the Parent Child Sample Role (or group) that contain the user names of the destination users we will assign our Child Workflows to. We then created a new Parent Child Project in K2 Studio with two project items, the Parent Workflow and the Child Workflow. To complete our basic shell, we added a data field to both the parent and the child workflows. The data fields will be used in later steps to transfer data from the Parent Workflow to the Child Workflow and vice versa.
In this step, we will begin configuring the events for the Parent Workflow. Our first event will be a user task that we will assign to the originator. There are two possible outcomes (Yes or No) that will determine whether or not to start the Child Workflows. If 'No' is selected, a confirmation email will be sent back to the originator and the Parent Workflow will be complete.
If 'Yes' is selected, then the workflow will proceed to an IPC event, which we will configure in Step 3.
Step 2 Tasks
- Add a Default Client Event to the Parent Workflow design canvas. Name it
Start Child Workflow
Configure the Event Notification to notify the participants, but do not select the option to customize the notification message.
Configure two Actions
Yes
No
making sure to generate the outcomes, then the outcome lines.
Add the Originator as the Destination User.
Change the Activity title to
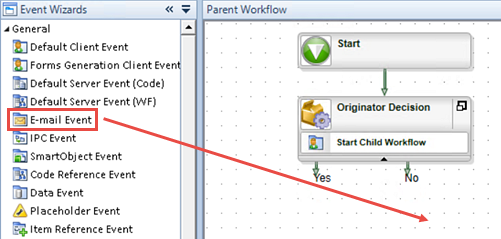
Originator Decision - Add an E-mail Event to the 'No' outcome line and Name it
Email Originator
then configure the recipient to be the Originator (only) and add any content you like for the Subject line and the Message Body.
Change the Activity title for the E-mail Event to
Outcome path is No
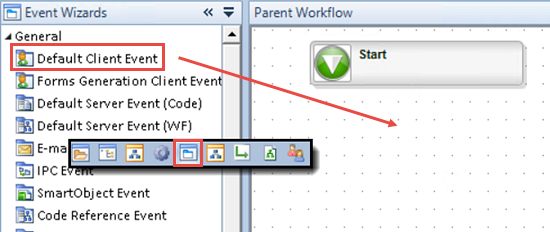
- Begin by confirming the Parent Workflow is the live workflow. (Look for the process title just above the design canvas.) If it is not, then navigate to the Solution Explorer and double-click the Parent Workflow.
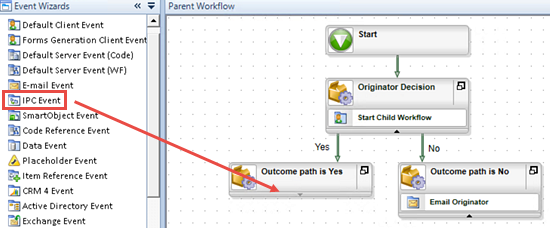
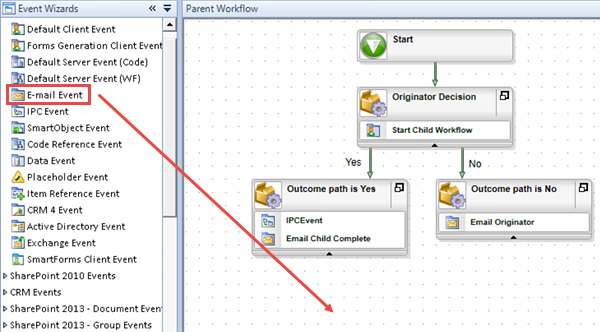
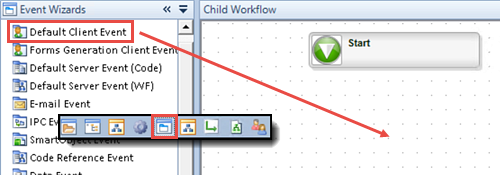
- Click on the Event Wizards pane or icon to expose the options. Expand the General category if it is not already, then drag a Default Client Event onto the design canvas.
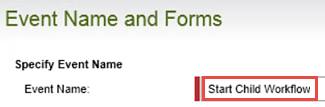
- The Default Client Event wizard opens. Click Next on the home screen. On the Event Name and Forms screen, Name the event
Start Child Workflow
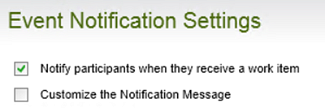
then click Next. (The other settings on this screen are fine as is.) - On the Event Notification Settings screen, CHECK the box to Notify participants when they receive a work item, then click Next. (We will not be customizing the email message for this step.)
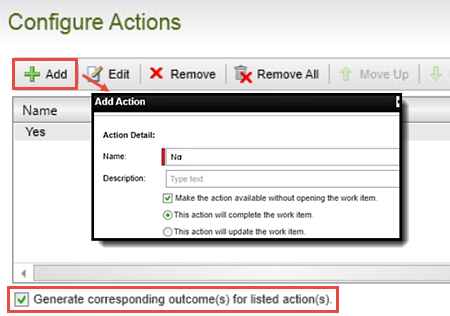
- On the Configure Actions screen, click Add. For the first action, enter
Yes
as the Action Name, then click OK. Add a second action and Name it
No
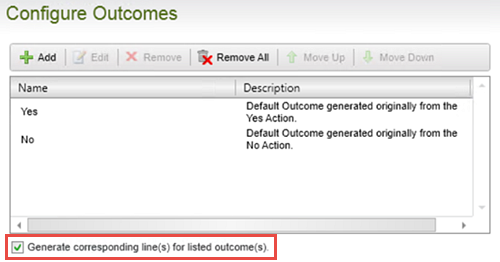
then click OK. Confirm that the option to Generate corresponding outcome(s)... is CHECKED. Click Next. - On the Configure Outcomes screen, you should see the Yes and No actions listed. Confirm the Generate corresponding line(s)... box is CHECKED, then click Next.
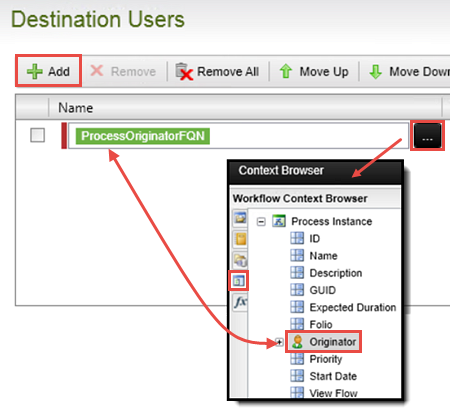
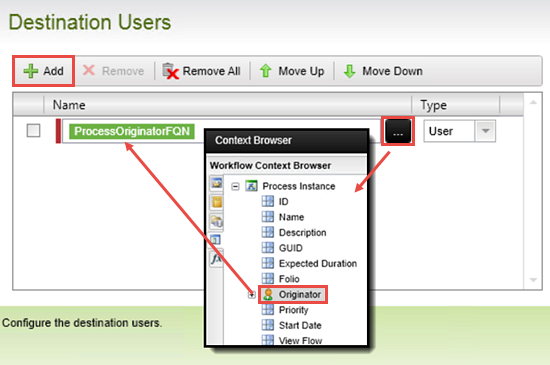
- On the Destination Users screen, click Add. Open the Context Browser, then the Workflow Context Browser and drag the Originator property into the Name field. Click Next, then Finish to complete this Client Event configuration.
- Double-click the DefaultActivity title and change it to
Originator Decision
then connect the Start box to the Originator Decision activity. (To connect the Start box to the activity, right-click within the Start box and hold+drag down into the activity.) - With the Event Wizards options still exposed, drag an E-mail Event onto the design canvas so that is aligns closely with the 'No' outcome.
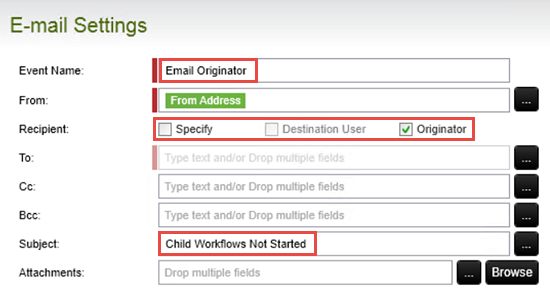
- The E-mail Event wizard opens. Click Next on the wizard home screen. Change the Event Name to
Email Originator
then for the Recipient, UNCHECK the 'Specify' option and CHECK the 'Originator' option. For the Subject line, enter
Child Workflows Not Started
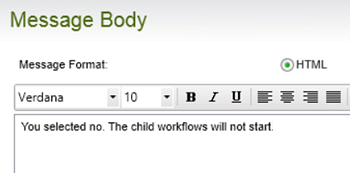
then click Next. - On the Message Body screen, enter any content you like to indicate the Child Workflows were not started. Click Next, then Finish to complete this wizard.
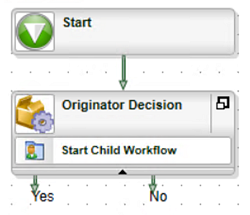
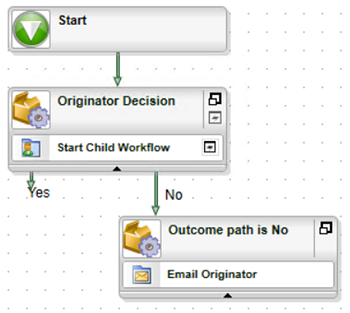
- Double-click the DefaultActivity title and change it to
Outcome path is No
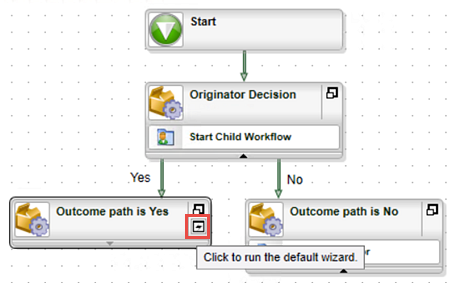
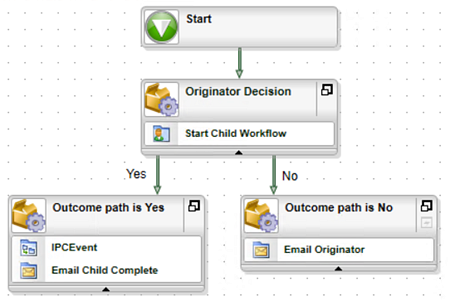
then connect the 'No' outcome line to the 'Outcome path is No' activity. At this point, your workflow should look like the image below.
First we will add the user task that will be assigned to the originator. The originator must decide whether or not to start the Child Workflows.
At this point, your screen should look like the image below.
Now we are going to add a simple email event to the 'No' outcome. After this email has been sent, the Parent Workflow will be complete without starting any Child Workflows.
Step 2 Review
In this step, we added a user task to the Parent Workflow with the originator as the destination user. We configured two possible outcomes for the user task and depending on which outcome is selected, the Child Workflows may or may not start. This completes the steps necessary for the 'No' outcome. In the next step, we will add the events for the 'Yes' outcome.
We are now ready to configure the outcome path for the 'Yes' decision. We begin by adding a DefaultActivity, then configuring the Destination Rules for the activity. We want a separate Child Workflow started for each member of the Parent Child Sample Role, so will need to tell K2 to retrieve the members in the Role and create a slot for each member. (This is a more advanced concept and we will expand on it further as we get to that step.)
After configuring the Destination Rules, we will add the IPC event that will interact with the Child Workflow. We will complete the activity by adding an E-mail Event that will send a confirmation to the originator each time a Child Workflow completes. Finally, we will add another E-mail Event that will send a final confirmation to the originator after all of the Child Workflows have completed.
Step 3 Tasks
- Add a Default Activity to the Parent Workflow design canvas so that it aligns under the 'Yes' outcome of the 'Originator Decision' activity. Change the Default Activity title to
Outcome path is Yes
then Run the default wizard. - From the General Properties home screen, open the Destination Users wizard. Switch the wizard so that it runs in the Advanced Mode.
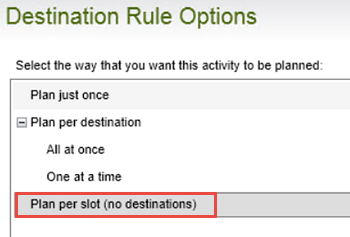
- Select the Plan per destination > Plan per slot (no destinations) option.
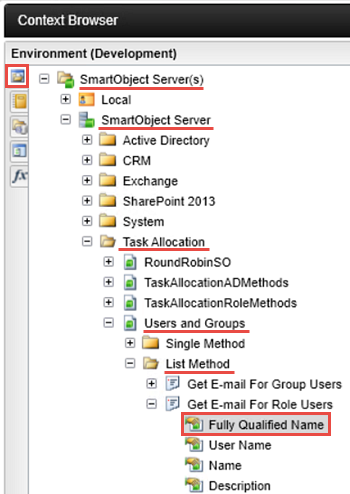
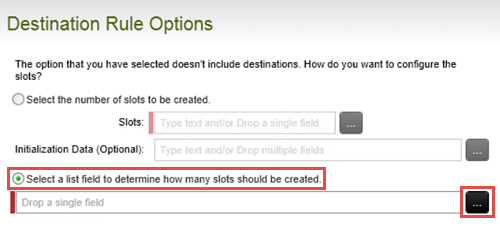
- Select the 'Select a list field to determine how many slots should be created' option, then navigate to and add the SmartObject Server(s) > SmartObject Server > Task Allocation > Users and Groups > List Method > Get E-mail For Role Users > Fully Qualified Name method for the list data.
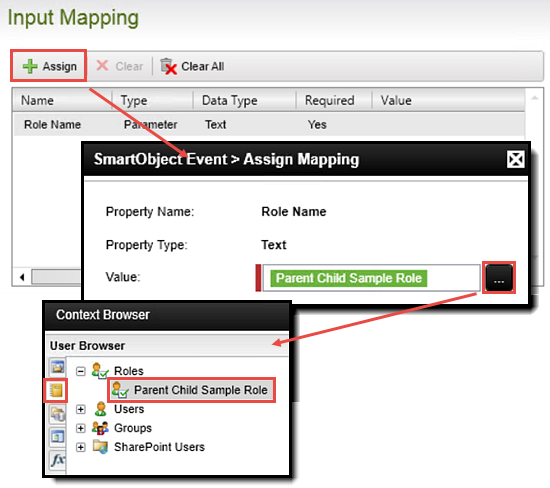
- For the Input Mapping, assign the Parent Child Sample Role to the Role Name.
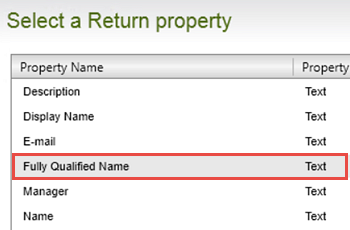
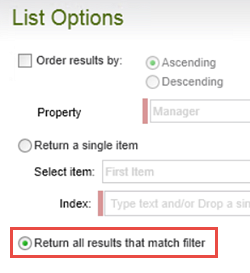
- For the Return property, confirm the Fully Qualified Name property is selected, then for the List Options, choose to return all results that match the filter.
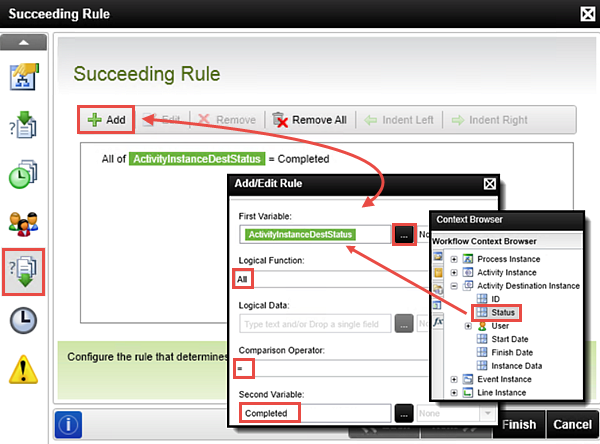
- Edit the Succeeding Rule. Add a new rule so that the Activity Destination Instance Status value is equal to
Completed
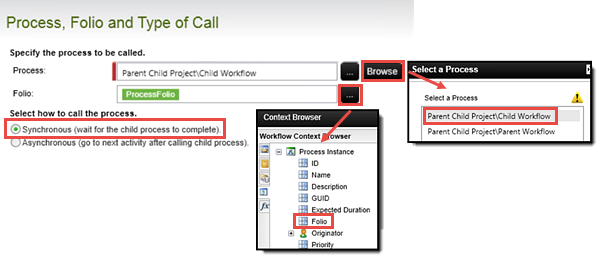
for All logical functions. - Add an IPC event to the newly created activity. For the Process, browse to and add the Child Workflow. Add the Process Folio as the Folio value and call the process using the Synchronous option.
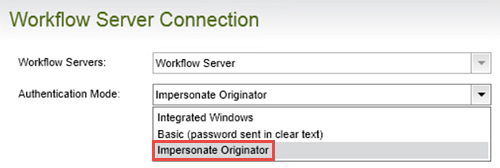
- Keep the default Workflow Servers setting, and change the Authentication Mode to Impersonate Originator.
- On the Process Send Field Mappings screen, map the Activity Destination Instance > Instance Data property to the Role Members data field.
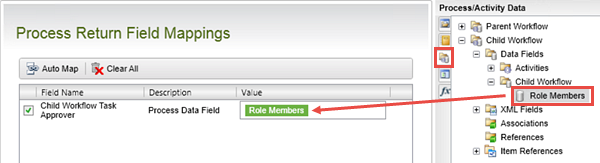
- On the Process Return Field Mappings screen, map the Child Workflow > Role Members data field to the Child Workflow Task Approver data field.
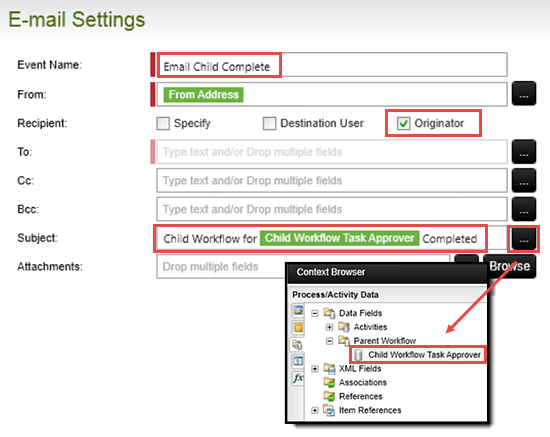
- Add an E-mail Event just under the IPC event and Name it
Email Child Complete
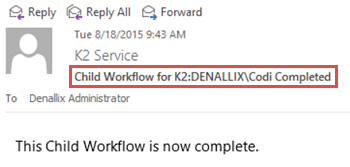
then configure the Recipient as the Originator and enter the following for the Subject line:
Child Workflow for [Child Workflow Task Approver] Completed
replacing the bracketed text with the (Parent Workflow) Child Workflow Task Approver data field.
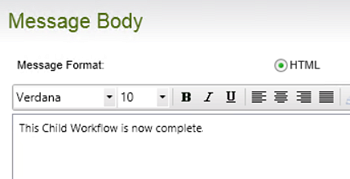
Enter any content you like for the Message Body to indicate this Child Workflow has completed. - Add a new E-mail Event to the design canvas (separate from the 'Outcome path is Yes' events. Name it
Final Originator Email
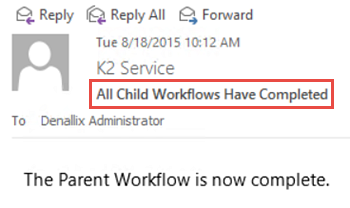
then configure the Recipient as the 'Originator' and enter the following for the Subject line:
All Child Workflows Have Completed
Enter any content you like for the Message Body.

- Still working in the Parent Workflow, click the Activity Wizards pane or icon.
- Drag the DefaultActivity wizard onto the design canvas so that it aligns with the 'Yes' outcome. Double-click the DefaultActivity title and change it to
Outcome path is Yes
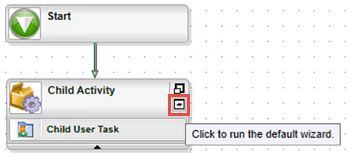
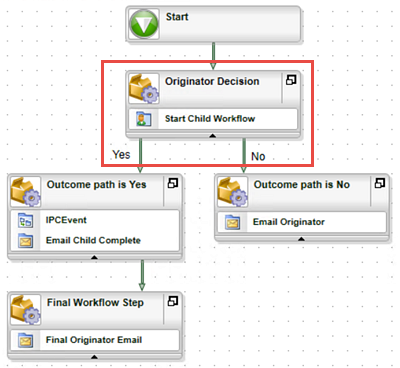
then connect the 'Yes' outcome line to the 'Outcome path is Yes' activity. - Click inside the new activity to expose the 'run default wizard' icon. Click the icon to open the default wizard for the activity. (See the image above for reference.)
- We are directed to the General Properties screen for this activity. We will be configuring the Destination Rules, so begin by clicking the Destination Users icon. To configure the destination rules for the IPC event, we need to run this wizard in Advanced Mode. To access the Advanced Mode wizard, click the Back button or click the first thumbprint shown at the bottom of the screen.
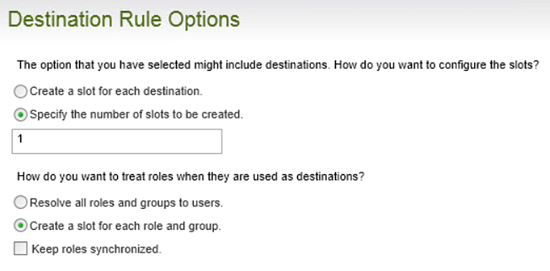
- CHECK the box to Run this wizard in Advanced Mode, then click Next.
- On the Destination Rule Options screen, select Plan per destination > Plan per slot (no destinations), then click Next.
- Select the option to Select a list field to determine how many shots should be created. Click the ellipses to open the Context Browser.
- Confirm that the Environment (Development) browser is open, then select the SmartObject Server(s) > SmartObject Server > Task Allocation > Users and Groups > List Method > Get E-mail For Role Users > Fully Qualified Name method. Use the image below for reference. (This is the SmartObject method that is used to retrieve the role items from the Parent Child Sample Role.)
- The Input Mapping screen opens. Click to highlight the Role Name, then click Assign. The Assign Mapping screen opens. Click the ellipses to open the Context Browser. Expand the User Browser > Roles node. Double-click the Parent Child Sample Role to add it to the Value field. Click OK to complete the mapping.
- Click Next, then Next. On the Select a Return property screen, click to highlight the Fully Qualified Name property, then click Next.
- On the List Options screen, select Return all results that match filter. Click Finish to complete the Destination Rules configuration. (Do not exit the activity (Outcome path is Yes) Properties just yet. We still need to set another configuration.)
- Click the Succeeding Rule icon to open its wizard. Add a new Rule. For the First Variable, open the Context Browser > Workflow Context Browser > Activity Destination Instance node and drag the Status property into the First Variable field.
- With the Event Wizards exposed, drag an IPC event into the 'Outcome path is Yes' activity.
- The IPC event wizard opens. Click Next on the home screen. On the Process, Folio and Type of Call screen, click Browse for the Process field, then select the Child Workflow. Click OK.
- On the Workflow Server Connection screen, keep the default Workflow Servers setting, then select Impersonate Originator for the Authentication Mode. Click Next.
- Integrated: Uses the K2 service account as the user attempting to start the IPC process.
- Basic: Uses the originator's credentials to start the IPC process. This option is only available if the IPC Process is located on the local K2 server.
- Impersonate: Uses the originator's credentials to start the IPC process.
- Expand the Context Browser, then the Workflow Context Browser. Expand the Activity Destination Instance node, then drag the Instance Data property into the Role Members Value field. Click Next when ready.
- Now, we are going to transfer data from the Child Workflow back to the Parent Workflow. On the Process Return Field Mappings screen, map the Role Members data field from the Child Workflow back to the Child Workflow Task Approver field. (Recall that the Child Workflow Task Approver data field is the data field we created in the Parent Workflow.)
- Add an E-Mail Event to just below the IPC event. The E-mail Event wizard opens. Click Next on the home screen. For the Event Name, enter
Email Child Complete
then change the Recipient from 'Specify' to 'Originator'. For the Subject line, enter
Child Workflow for [Child Workflow Task Approver Data Field] Completed
replacing the bracketed text with the Child Workflow Task Approver data field found in the Context Browser > Process/Activity Data node. - Enter any content you like for the Message Body, then click Next, then Finish.
- Drag another E-mail Event onto the design canvas below the 'Outcome path is Yes' activity.
- The E-mail Event wizard opens. Name the event
Final Originator Email
then change the Recipient from 'Specify' to 'Originator'. For the Subject line, enter
All Child Workflows Have Completed
then click Next. - Enter any text you like for the Message Body to indicate the Parent Workflow is now complete. Click Next, then Finish.
- Change the DefaultActivity title to
Final Workflow Step
then connect the 'Outcome path is Yes' activity to the 'Final Workflow Step' activity.


For more information on destination rules, see the whitepaper on K2 blackpearl Roles and Advanced Destination Rules.
In this next step, we will be configuring the Destination Rule to call the Parent Child Sample Role as the list data..
In this step, we are simply telling K2 to retrieve all of the role items it finds. We are not applying any filters or orders to our list data.
Now we need to configure the Succeeding Rule for the 'Outcome path is Yes' activity. This Rule will tell K2 to wait until all of the events within this activity are complete before moving on to the next activity.
To expand on this a little further, after we start the Parent Workflow, three Child Workflows will be started as part of the IPC event (one for each Role member). As each Role member completes their assigned user task (and thus their Child Workflow is complete), the next event in the 'Outcome path is Yes' activity will start, which is to send the originator an email saying that particular Child Workflow has completed. We are going to add a final email event later on that we want sent indicating all of the Child Workflows have completed. To prevent K2 from just jumping straight into this final email event, we need to put a 'hold' per se, on the 'Outcome path is Yes' activity so that it waits for all of the Child Workflows to complete before proceeding.
For the Logical Function, select All. For the Comparison Operator, select "=" (equals).
In the Second Variable field, enter
Completed
then click OK and Finish.
We are now ready to add and configure the IPC event. This is the event that interacts with the Child Workflow. The IPC event provides two-way communication between the Parent Workflow and the Child Workflow. This allows us to send the list data (from the Destination Rules) to the Child Workflow (Parent to Child) and in return, retrieve the user name of the Role member that actioned the Child Workflow user task (Child to Parent).
Open the Context Browser for the Folio, then the Workflow Context Browser, then double-click the Folio property to add it to the Folio field.
Confirm that Synchronous is selected for the Select how to call the process option. Click Next when ready.
The Synchronous option will essentially pause the parent workflow while each child workflow runs because the parent is expecting a response back from the child. (In this case, we want to retrieve the user name of the person who actioned the child workflow task.) Because each child workflow is independent from the other child workflows, the Parent Workflow will resume after each child workflow has completed. The Asynchronous option is basically 'fire and forget' where the parent workflow will continue along because it is not expecting a response back from the child workflows. In this case, the parent and child workflows run in parallel from the point where the child workflow was called.
For more information on Synchronous and Asynchronous configurations for IPC events, see the K2 Concepts - Synchronous and Asynchronous Events documentation.
Choosing the wrong Authentication Mode can cause errors later at runtime.
On the Process Send Field Mappings screen, notice the Role Members property. Recall in Step 1, this is the data field we added to the Child Workflow. This data field will become the transfer point for the Parent Workflow to send the Child Workflow the list data, or Role members.

Because we just mapped the Instance Data to the Role Members data field in the previous step, this data field now contains the user value for the Role member that is associated with the Child Workflow. Click Next, then Finish.
We have now completed our IPC event configuration. In the next few steps, we are going to add two email events, one to the 'Outcome path is Yes' activity and another one separate from the outcome activity. By putting an email event into the same activity as the IPC event, each time a Child Workflow completes, the IPC event will proceed to the next event, in this case sending a confirmation email that the Child Workflow has completed. The second email, contained in its own activity, will send an email after all of the Child Workflows have completed. This puts a nice, singular end to our parent-child workflow.
At runtime, this variable will be replaced with the name of the Role member who actioned the Child Workflow user task. Click Next when ready.
Your workflow should look like the image below.
Now we will complete the Parent Workflow by adding a final E-mail Event. This event will send a final confirmation email to the originator after all of the Child Workflows have completed.
Step 4 Review
In Step 4, we completed the Parent Workflow by configuring the Destination Rules for the 'Outcome path is Yes' activity, adding and configuring the IPC event and email, then wrapping up the process with a final email event. We learned how to change the Destination Rules wizard to the Advanced Mode, allowing us to call a SmartObject method to list the role items in our Role, then pass the number of items discovered to create the correct number of slots. We configured the IPC event to run synchronously, meaning the Parent Workflow will wait for the Child Workflow to complete before it resumes. We also configured the IPC event to pass data from the Parent Workflow to the Child Workflow (passing the Role member names) and then from the Child Workflow back to the Parent Workflow (the Role member who actioned the Child Workflow user task). Finally, we added an additional email event though not required, provides a clean end to our parent-child workflow.
The Child Workflow is very simple and consists of one user task with one action option. As each Child Workflow is started on behalf of each Role member, a user task will be assigned to that Role member. An important concept to grasp is that each Child Workflow is independent of the other Child Workflows. Each Child Workflow has its own unique relationship with the Parent. And in turn, the Parent Workflow has a unique relationship with each Child.
Step 4 Tasks
- In the Solution Explorer, make the Child Workflow the active workflow.
- Add a Default Client Event to the Child Workflow design canvas and Name it
Child User Task
then select the option to notify participants when they receive a work item. We will not be customizing the email notification for this step. - Add one Action and Name it
Child Workflow Task Complete
then confirm that an outcome will be generated for this action. We do NOT need a line generated, as this event will be the only event for the Child Workflow. - Add the Process Originator as the Destination User.
- Edit the Child Activity properties, Destination User rules so that the rule runs as Plan per slot - All at once. (You will need to change the default Destination Users wizard so that it runs in Advanced Mode.) There are no changes to the default slot settings.
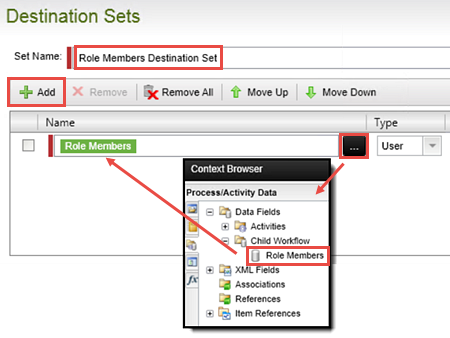
- Create a new Destination Set (remove the Default set) and Name it
Role Members Destination Set
then add the Child Workflow > Role Members data field.
- In the Solution Explorer, double-click the Child Workflow so that it is the active workflow.
- Click the Event Wizards pane or icon to expose the wizards. Drag a Default Client Event onto the design canvas, just below the Start box.
- The Default Client Wizard opens. Click Next on the wizard home screen.Name the event
Child User Task
then click Next. - CHECK the box to Notify participants when they receive a work item, then click Next. (We will not be customizing the email message for this step.)
- On the Configure Actions screen, Add one action and Name it
Child User Task Complete
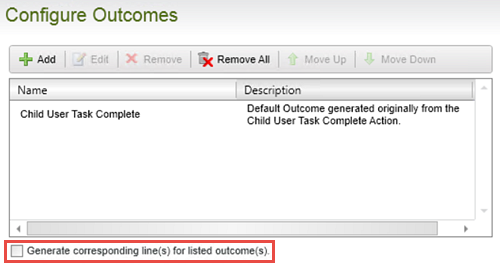
then click OK. (Keep the other default settings as they are.) Confirm that the option to Generate corresponding outcome(s)... is CHECKED, then click Next. - On the Configure Outcomes screen, confirm the action just added is shown and confirm the option to Generate corresponding line(s).... is UNCHECKED. Click Next.
- On the Destination Users screen, Add the Process Originator. Click Next, then Finish when ready.
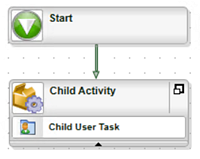
- Double-click the DefaultActivity title and change it to
Child Activity
then connect the Start box with the Child Activity. - Run the Child Activity default wizard.
- Run the Destination Users wizard in Advanced Mode. (Click the Back button or first thumbprint, then select the option to Run this wizard in Advanced Mode.) Click Next to continue.
- On the Destination Rule Options screen, select Plan per destination > All at once. Click Next.
- The slot settings are fine as they are.
- On the Destination Sets screen, click the Default set and then Remove. Click Add.
Name the new set
Role Members Destination Set
then click Add. - Open the Context Browser > Process/Activity Data > Data Fields node and drag the Child Workflow > Role Members data field into the Name field.
- Then click Next, then Finish.
- Save your Parent Child Project (File > Save)
After the task has been actioned, the Child Workflow will be complete. We will not be adding any additional events, so we don't need the outcome line.
We have one last configuration we need to make to complete the Child Workflow. We need to edit the Destination Rules so that the Child Workflows all fire at the same time.
Here we are creating one slot per role. This means there is one Child Workflow per one Role member. Click Next.
The Destination Rule resolves a Destination Set. Destination Sets are comprised of users, groups or roles. In this next step, we will add our Parent Child Sample Role as the Destination Set. Recall in Step 3 (t), we mapped the Activity Destination Instance > Instance Data (that contains the list data discovered in the Parent Child Sample Role) to the Role Members data field. We will now use the Role Members data field for our Destination Set.
Step 4 Review
In this step, we created our Child Workflow. Because we are only using the Child Workflow to demonstrate how multiple workflows can be started from a Parent Workflow, our configurations were very simple. We added one user task, with one action option, which the workflow originator will process. We also configured the Destination User Rules, were we specified that there should one slot per Destination User, the Destination Set is comprised of the Role Members data field (containing the list data discovered in the Parent Child Sample Role) and finally, the Destination Users should receive their worklist items simultaneously.
The final steps we need to make before we can test our project is to deploy the process to the K2 server, then assign permissions (or Process Rights) in K2 Workspace.
Step 5 Tasks
- Deploy the Parent Child Project.
- In K2 Workflow, assign all Domain Users Start and View rights for the Parent Workflow and the Child Workflow.
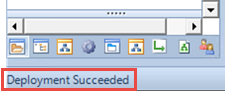
- Deploy the Parent Child Project (File > Deploy) You will first see the 'Build In Progress' status bar, then the Deploy Project Wizard will launch. Click Next, then Finish. Now you will see the 'Deploy In Progress' status bar. When the deployment has successfully completed, the status bar will disappear and there will be a 'Deployment Succeeded' message in the K2 Studio status bar (in the lower left corner of your screen).
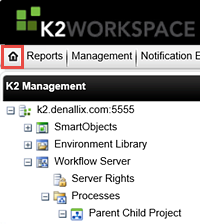
- Launch K2 Workspace. (Start > All Programs > K2 blackpearl > K2 blackpearl Workspace)
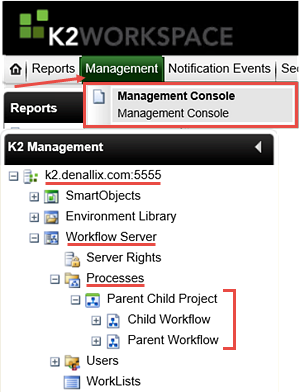
- Access the Management Console. Expand the K2 server (your server name may not be the same as the screen shot) > Workflow Server > Processes > then Parent Child Project. (If you are new to K2 Studio, this is the project we just deployed. The workflow/process will not show up in K2 Workspace until it has been deployed.)
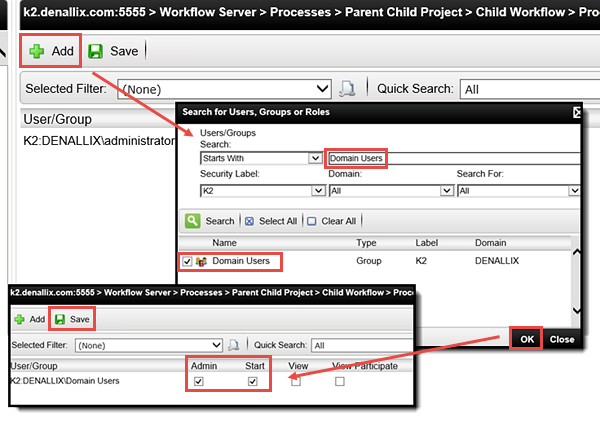
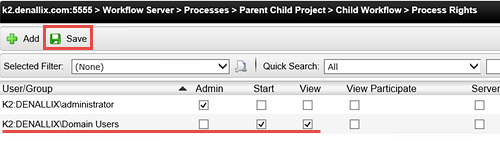
- Notice Parent and Child Workflows are listed under the project name. Expand the Child Workflow node, then click on Process Rights. The Process Right pane loads. By default, K2 will add the user who deployed the workflow to the Process Rights as a Process Administrator. Click Add, then search for
Domain Users
then select the group and click OK. - CHECK the Start and View boxes, then click Save.
- Notice now, that the Domain Users have been added to the Process Rights pane for the Child Workflow. Click Save once again to complete this configuration.
- Using the same steps as above, add the Domain Users to the Parent Workflow, again with Start and View rights.
Now we are ready to switch over to K2 Workspace and assign permissions, or Process Rights.
Step 5 Review
In this step, we deployed our Parent Child Project to the K2 server. We then assigned Start and View permissions to all Domain Users for both the Parent and the Child Workflows.
At this point, we are ready to test our Parent Child Project and see it in action! We will kick off the Parent Workflow from K2 Workspace and observe the Parent Workflow and Child Workflow behavior in both the Instances pane and the Process Overview/View Flow reports.
(Generally speaking, a workflow would start when a form has been submitted. In our case (since we didn't add any forms) we will start the process instances manually from K2 Workspace.)
This will come into play when we submit the Parent Workflow. A process instance of the Parent Workflow will be generated on behalf of the person starting it. (If you are using a K2-provided VM, this will be DENALLIX\Administrator.) As each Child Workflow is started, a new process instance of the Child Workflow is generated, one for each member of the Parent Child Sample Role.
Step 6 Tasks
- In K2 Workspace, start an Instance of the Parent Workflow. Instead of the Date, enter the following for the Folio value:
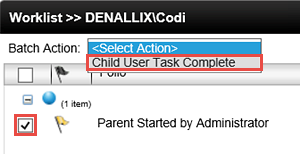
Parent Started by Administrator - Using the Batch Action for Administrator's WorkList Item, select Yes to complete the Parent Workflow User Task.
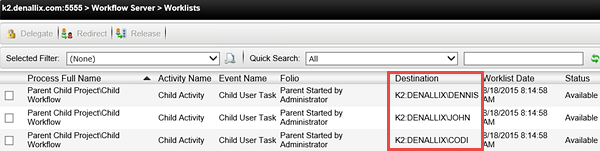
- Navigate to the WorkLists pane in the Management Console and observe the three Processes that have now started and their Destinations.
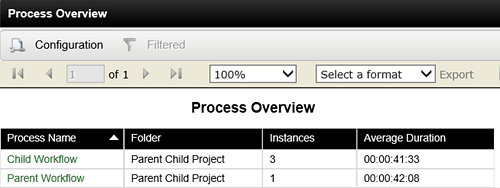
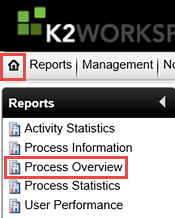
- Open the Process Overview report and observe that the Parent Workflow and the Child Workflow Processes are shown.
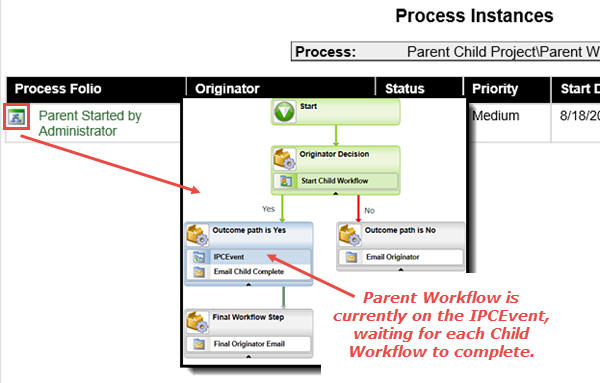
- Open the View Flow report for the Parent Workflow and observe the workflow is currently active on the IPCEvent. Keep the View Flow report open. Return to the Process Instances screen for the Child Workflows.
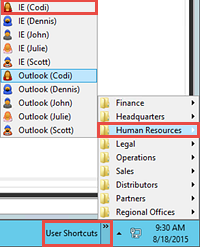
- Using the User Shortcuts, open Codi's IE and navigate to her K2 Workspace.
(On a K2 VM, the workspace URL is https://k2.denallix.com/workspace/ ) - As Codi, use a Batch Action to action the worklist item by selecting Child User Task Completed.
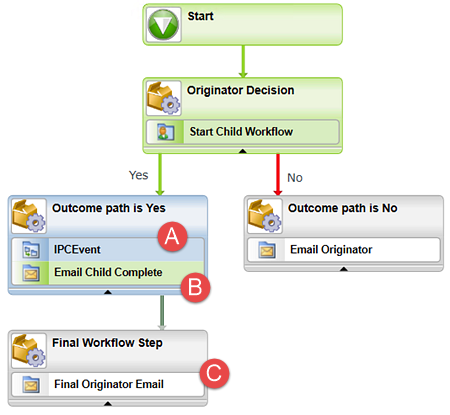
- Return to the Parent Workflow View Flow report and observe that the workflow is still active on the IPCEvent, but now the Email Child Complete has fired. Also observe that the Final Workflow Step activity has not started yet.
- Open Administrator's Outlook and confirm there is a confirmation email indicating that Codi's Child Workflow has completed.
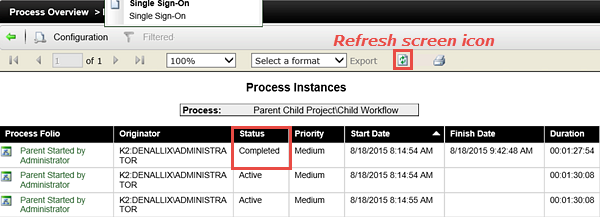
- Open the Child Workflow Process Instances screen and refresh it. Observe that one of three Process Instances now shows a Completed Status.
- Using the User Shortcuts once again, action both of the remaining Child Workflow user tasks for Dennis and John.
- Confirm there is an email confirmation in Administrator's Outlook indicating the Parent Workflow is now complete. (There should also be two additional confirmation emails for the Child Workflows for Dennis and John.)
- Return to the Parent Workflow View Flow report and confirm that it is now complete.

- Click on Instances found under the Parent Workflow node.
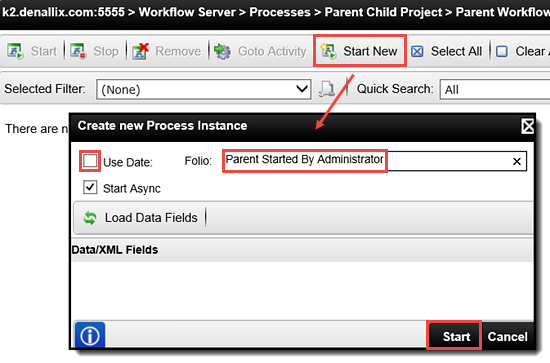
- The Instances pane loads. Click Start New to fire off a new instance of the Parent Workflow process. When the Create a new Process Instance screen appears, UNCHECK the Use Date option for the Folio and enter the following to indicate this is the Parent Workflow Folio:
Parent Started By Administrator
then click Start. - As the originator (or person who started the Parent Workflow), you must now action the user task so that the Parent Workflow will continue. Click the K2 Workspace Home button to access the workspace landing page which contains the originator worklist.
- Notice that your worklist contains the process instance of the Parent Workflow you just started. Select the process instance, then from the Batch Action drop-down, click Yes. (The Batch Action will not show up until you select the process instance.) Select OK to perform this action. Then select OK again to close the completed successfully dialog.
- Return to the Management Console. Navigate to the Child Workflow Instances pane. (K2 server > Workflow Server > Processes > Parent Child Project > Child Workflow > Instances)
- Now, navigate to the WorkLists pane.
- Click the Home button to return to the K2 Workspace landing page. In the Reports pane, double-click the Process Overview report. (It may take a minute or so to open. If it appears to be doing nothing, wait a minute or so.)
- Notice the Process entries for the Child Workflow and the Parent Workflow. (You may have other workflows listed as well, we are just working with the Parent and Child Workflows.)
- Click the Parent Workflow to open the Process Instances. Click the View Flow icon to open the View Flow Report. Notice how the Parent Workflow has paused on the IPCEvent. Keep the View Flow browser window open and return to the Process Instances screen.
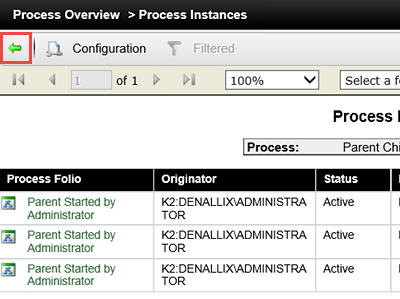
- Use the green back-arrow to return to the Process Overview screen, then open the Child Workflow report. Notice the three Process Instances of the Child Workflow.
- Open Outlook for DENALLIX\Administrator (Start > type Outlook) (If you get a message about syncing CRM, let it complete. If you get a message about licensing, click Close to continue.) Minimize Outlook.
- Use the User Shortcuts found in the lower right corner of your browser screen and open Codi's IE browser.
- In Codi's blank browser, open K2 Workspace.
(For K2 VM users, the URL is https://k2.denallix.com/workspace/). - In Administrator's browser, you should still be on the Child Workflow Process Instances screen. Click the green refresh icon to refresh this screen. Notice now, that one of the process instances has a Completed Status. This reflects Codi's completed Child Workflow.
- Switch to the View Flow report for the Parent Workflow. (It should still be open in a separate browser window.) There are several significant things to notice. The IPCEvent is still active (A below). The Email Child Complete event fired for Codi's completed Child Workflow. (B below) And most significant, the Final Workflow Step activity has not fired. (C below) This is the intended behavior. The Final Workflow Step will not start until all of the Child Workflows have completed.
- Using the same User Shortcuts as above, open the IE browsers for Dennis and John. Open K2 Workspace for each and action their tasks (Child User Task Complete).
(The URL once again for K2 Workspace on a VM is: https://k2.denallix.com/workspace/ ) - Return to the View Flow report for the Parent Workflow and confirm the workflow is now complete.
- Open Administrator's Outlook and confirm there are emails for both Dennis and John, plus the final confirmation email indicating the Parent Workflow is now complete.
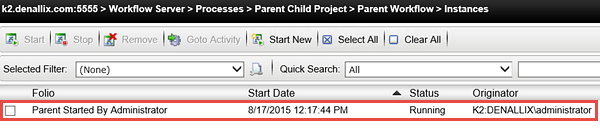
Notice now, that an instance of the Parent Workflow now appears in the Instances pane.
Click on the Instances option for the Child Workflow. Notice there are no entries. This is because the Parent Workflow has a user task where the originator must decide to start or not start the Child Workflows.
Notice the three process instances. Notice that they all have the same 'parent' Folio and Originator.

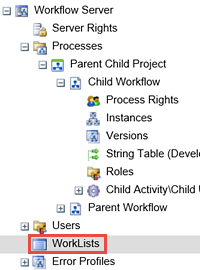
In the WorkLists pane, we now see our three Child Workflows. Notice the Destination for each of the workflows reflect the Parent Child Sample Role members. This is the Destination Set.
In the final steps for testing our parent-child workflow, we will open the Process Overview and View Flow reports. What we will observe is how the Parent Workflow waits until all of the Child Workflows have completed, before our final confirmation email is sent and the Parent Workflow completed.
Recall that the Child Workflow has a user task assigned to its originator. We need each originator to action their task to complete their Child Workflow. If you are using a K2-provided VM, you can open a separate browser for each originator. If you are working within your own environment, you will need to action the user task for each Role member you created. The steps below will reflect the K2 VM environment.
We begin by accessing the K2 Workspace reports. For more expanded details on K2 reports, see the Reporting in K2 tutorial.
Now we will begin completing each Child Workflow and observing the Parent Workflow behavior in the Parent Workflow View Flow report.
Notice the worklist item for Codi. Using the same Batch Action steps we used earlier, action this task by selecting Child User Task Complete, then OK and OK once again. Close Codi's browser.
Let's take a quick look at Administrator's Outlook. We now see the confirmation email indicating that Codi's Child Workflow is complete. We will get a confirmation email for each Child Workflow that is completed.
Step 6 Review
In our final step, we tested the parent-child workflow concept and observed the workflow behavior primarily using the View Flow report. Because it is near real-time, the View Flow report was the ideal tool to use for observing how the Parent Workflow behaved as the Child Workflows were started and then actioned. Some significant points to our parent-child workflow example are that the Parent Workflow remained active on the IPCEvent until all of the Child Workflows were completed. Because we placed an email event in the same activity as the IPCEvent, a confirmation email was sent after each Child Workflow completed. The final email event, contained in a separate activity, fired off after all of the Child Workflows completed.