Task List
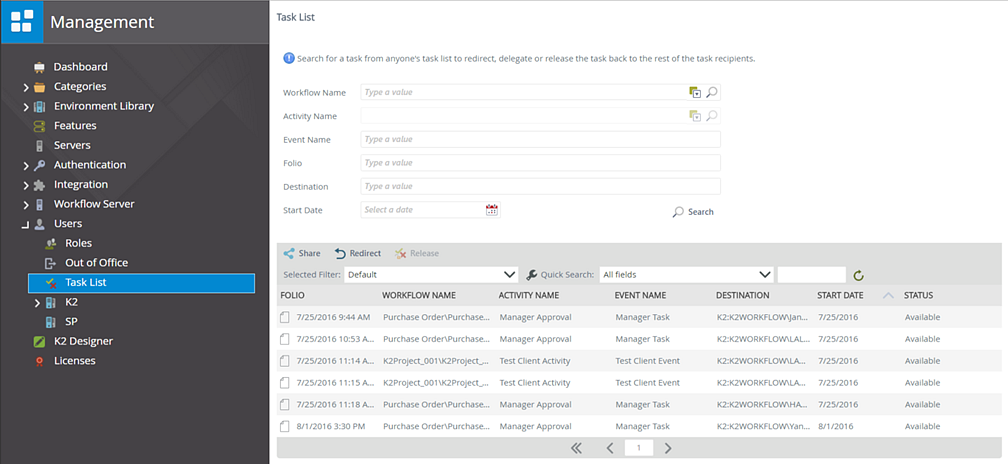
The Task List node displays a list of all K2 tasks (also called "Worklist Items" or "Task List Items") for users. From this page, you can search, share (delegate), redirect or release worklist items.
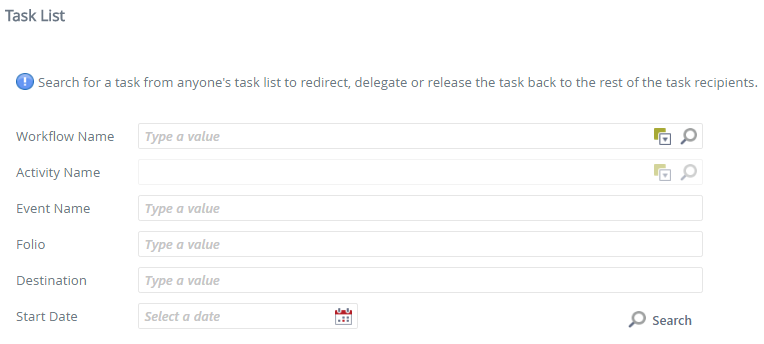
You can search for specific task items using the Search options provided from the Task List node. Use one or more of the fields to search for specific items, or just click the Search button with all fields empty to return all the Task List items. Note that when accessing the Task List node, no items will display until a search is performed.
| Field | Description |
|---|---|
| Workflow Name | The name of the workflow. Select or resolve the required workflow name using the resolve/search buttons. |
| Activity Name | The name of the workflow Activity to search by. Select a workflow, and then resolve the required Activity Name using the resolve/search option. |
| Event Name | The name of the event to search by. Specify the required event by typing in a value. |
| Folio | The Folio to search by. Specify the required Folio by typing in a value. |
| Destination | The user to search by. |
| Start Date | The Start Date of the task. Select a date via the Date control. |
| Search | Click the Search button to execute the search based on the Fields you entered. |
Sharing a Task List item means that you allow another user (in addition to the allocated user) to action the Task List item. Think of this as creating a copy of a Task List item so that either the allocated user or the Shared user can action the task. Follow these steps to Share a Task List item:
- On the list of tasks, locate and select the Task List item you want to share.
- The Share button becomes available. Click Share.

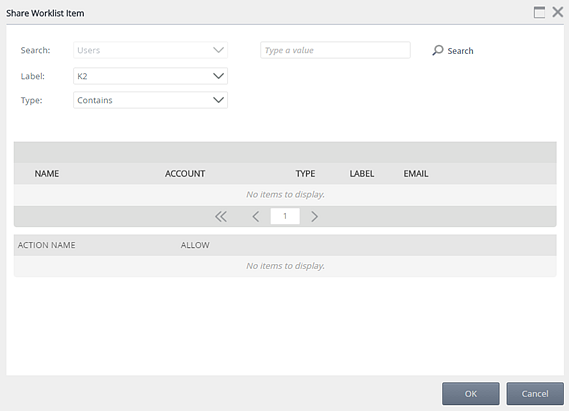
- The Share Worklist Item page opens. Use this page to search for the user that you want to share the Worklist Item with.
- After configuring the shared worklist item, both the destination user and shared user will have the worklist item in their K2 task list, and either user will be able to action and complete the task.
Use the image and table below as a guideline for the configuration:
| Field Name | Description |
|---|---|
| Search | (The drop down option to select Users or Groups is disabled, since you can only share tasks with Users, not Groups). |
| Label | Click the Label drop-down and select the Security Provider label you want to search on. |
| Type | Click the Type drop-down and select the type of search that will be performed. |
| Search Button | Type the name or partial name of the user in the text box marked with Type a value, and click Search. |
| Users Found | Matching users will be returned. Select the user you want to share the task list item to. |
| Action Name | After selecting the user for sharing, the available actions for that task will be listed. |
| Allow | The type indicates if the shared user will be able to take that specific action on the shared task list item. All actions are set to False by default. Double click the Action Name that you want to allow the shared user to be able to perform, and select the check box to change the status to True. |
| OK Button | Click OK to complete the configuration. Click OK on the confirmation message. This will take you back to the Worklist view. |
| Cancel Button | Click Cancel to cancel the screen. Click OK on the confirmation message. This will take you back to the Task List screen. |
Redirecting a Task List item means that you move an item from the allocated user's task list to another user's task list. Think of this as removing a task from one user and assigning that task to another user. Follow these steps to redirect a task list item:
- Select the Task List item you want to redirect. The Redirect button becomes available.
- Click Redirect.

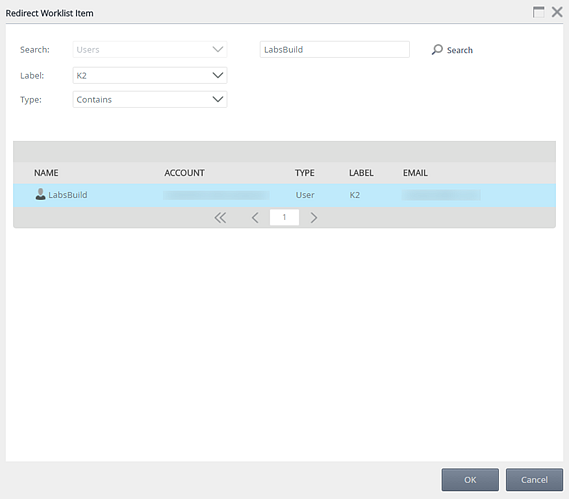
- The Redirect Worklist Item page opens. Use this page to search for the user that you want to redirect the Worklist Item to.
- After configuring the redirect option, note that the destination column will now display the redirected user. This means that the Task List item will no longer be on the original user's task list, but will instead appear on the redirected user's task list.

Use the image and table below as a guideline for the configuration:
| Field Name | Description |
|---|---|
| Search | (The drop down option to select Users or Groups is disabled, since you can only redirect tasks to Users, not Groups). |
| Label | Click the Label drop-down and select the Security Provider label you want to search on. |
| Type | Click the Type drop-down and select the type of search that will be performed. |
| Search Button | Type the name or partial name of the user in the text box marked with Type a value, and click Search. |
| Users Found | Matching users will be returned. Select the user you want to redirect the task list item to. |
| OK Button | Click OK to complete the configuration. Click OK on the confirmation message. This will take you back to the Task List page. |
| Cancel Button | Click Cancel to cancel the screen. Click OK on the confirmation message. This will take you back to the Task List screen. |
The Release option can only be used on Worklist Items with an "Open" status. When a user opens a Worklist Item, they take up one of the available "Slots" for that task. Suppose a task is allocated to two users (Bob and Alice), and there is only one Slot available for that task. As soon as Bob opens the task, the Worklist Item's status changes to "Open" for Bob and "Allocated" for Alice, and Alice will not be able to open the task anymore because there was only one available slot, which has been "taken" by Bob. Releasing the Worklist Item effectively resets the item's status back to "Available" so that either of the two users (Bob or Alice) can open the Worklist Item.
Follow these steps to release a Task List item:
- Select the Task List item you want to release. The Release button becomes available, if the Status of the item is Open.
- Click Release.

- Click OK on the confirmation message.
- The Task List item statuswill change to Available, indicating that the task is available for any member in the group to open.