Server Rights
The Management Console in K2 Workspace is superseded by the K2 Management Site and you should use the K2 Management Site to administer your K2 environment, rather than Management Console in K2 Workspace. (In certain cases you may need to use the Management Console in K2 Workspace to perform tasks that are not exposed in the K2 Management Site.)
The Server Rights settings under Workflow Server will determine which users and groups can administer a K2 environment, export new workflows or impersonate a user. The table below describes each right in more detail.

| Permission | Description | Usually Assigned to |
|---|---|---|
| Admin | Use the management console (and management tools in Process Portals sites) to administer a K2 environment, Users with this right can fully administer a K2 environment and may edit server rights for other users. |
|
| Export | Export/Deploy new workflow definitions to the K2 environment from K2 Studio, K2 for Visual Studio or a K2 deployment (.msbuild) package. |
|
| Impersonate |
Impersonate another user account after the initial connection to K2. This permission is normally used when user credentials cannot be transferred between machines and Kerberos cannot be used to address this requirement, and is also used for K2’s Pass-Through Authentication mechanism . It also allows for connections established in one context to impersonate another user. When the user opens a connection to the server through the client API for an example, you have a method connection ImpersonateUser(Username) which will then open the connection as the userName specified. For example John has impersonate rights. He can now open a connection and impersonate as Sue. With the connection open as Sue, he can do everything as if Sue was logged on. |
|
The following steps describe how to add Server Rights for User or Group:
- On the Server Rights screen, click the Add button.
-
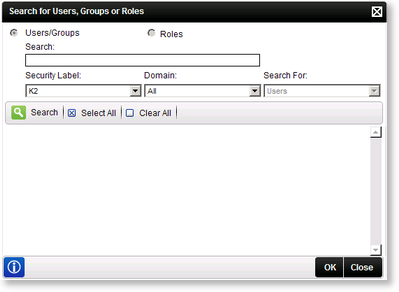
This will open the Search for Users, Groups or Roles screen.
-
Select the required user or group and click OK.
- Select the required rights as per user or group and click Save.


Field Name Description Search Click the Search drop-down and select to search for users or groups. Security Label Click the Security Label drop-down and select the Security Provider label you want to search on. Type Indidcates whether the searched user is user type or group type. Label Indidcates whether the searched user or group is part of the chosen security label. Domain Displays the domain where the searched user or group is part of. Search Button Type a value in the text box provided and click the Search button. Select All Button To remove users, select the user or group and click Clear All. Clear All Button Clears all chosen users or groups. OK Button Click Next to continue with the configuration. Cancel Button Click Cancel if you no longer want to complete the configuration. This will take you back to the Server Rights screen. -
Select the required user or group and click OK.
Follow these steps to edit Server Rights for users or groups:
- On the Server Rights screen, use the check boxes to change the user or groups permissions.
-
Click Save
