Environment Library
The Management Console in K2 Workspace is superseded by the K2 Management Site and you should use the K2 Management Site to administer your K2 environment, rather than Management Console in K2 Workspace. (In certain cases you may need to use the Management Console in K2 Workspace to perform tasks that are not exposed in the K2 Management Site.)
The Environment Library is often used when you have multiple K2 environments, for example Development, Test, QA and Production. These environments usually have different server names, URL’s settings and so on. The Environment Library is essentially a repository of environment-specific values or "placeholders" for each of your K2 environments. Environment-specific values, usually things like server names, connection strings, “from” email addresses and so on.
From time to time, you may need to manage the existing values or add new values in the Environment Library, as shown below. By default K2 is installed with two Environments listed in the Default Template group. It is also possible to add or remove environments from the Environment Library from this page
The environment library allows for the configuration of available environments and the associated variables and security.
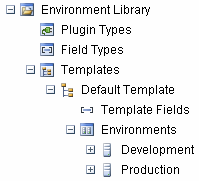
| Node | Description |
|---|---|
| Plugin Types | Configures the Environment Library Plugins. |
| Field Types | Configures the Environment Library Field Types |
| Templates | Configures the Environment Library Templates |
Clicking on Plugin Types will load the Plugin Types Management screen.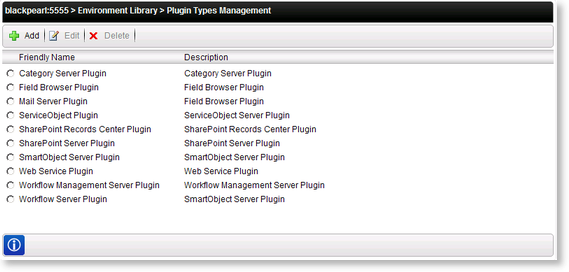
| Option | Description |
|---|---|
| Selected | Select this option to enable Edit or Delete for the Environment Library Plugin. |
| Friendly Name | Displays the name that will be displayed to the end user. |
| Description | Displays a description of the Environment Library Plugin. |
The following table describes the descriptions of the Default Plugin Types:
| Plugin | Description |
|---|---|
| Category Server Plugin | Controls the connection to the Category Server |
| Field Browser Plugin | Controls the connection to the Field Browser |
| Mail Server Plugin | Controls the connection to the Mail Server |
| Service Object Plugin | Controls the connection to the Mail Server |
| SharePoint Records Center Server Plugin | Controls the connection to the SharePoint Records Center |
| SharePoint Server Plugin | Controls the connection to the SharePoint Server |
| SmartObject Server Plugin | Controls the connection to the SmartObject Server |
| Web Service Plugin | Controls the connection to the Web Service |
| Workflow Management Server Plugin | Controls the connection to the Workflow Management Server |
| Workflow Server Plugin | Controls the connection to the Workflow Server |
The Following steps discuss how to add a Plugin type:
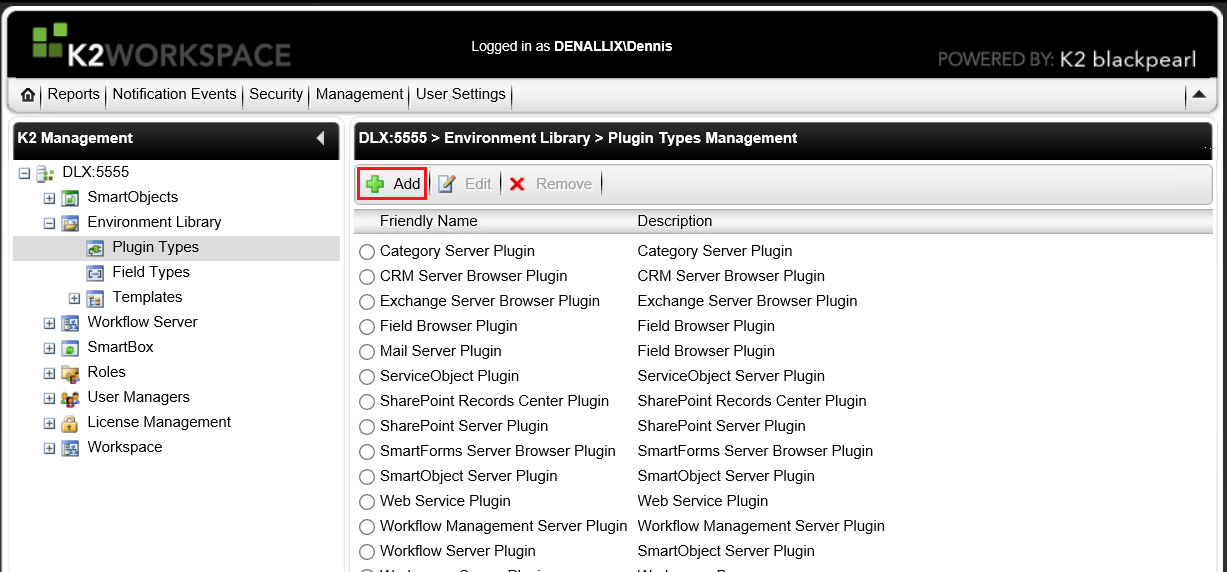
- On the Plugin Types Management screen, click the Add button.
- On the Add Plugin Types screen, the following fields are available.
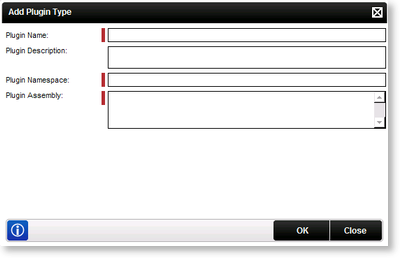
Field Description Plugin Name The Name for the Plugin Type. Plugin Description A Description for the Plugin Type. Plugin Namespace The K2 Namespace that defines the Plugin Type. Plugin Assembly The K2 Object reference for the plugin. - Enter the fields and Click OK.
The following steps discusses how to edit a Plugin Type:
- On the Plugin Types Management screen, select the appropriate Plugin Type to edit and click the Edit button.
- On the Edit Plugin Type screen, edit the required fields and click OK.
- Click the Save button.
Clicking on Field Types will load the Field Types Management screen.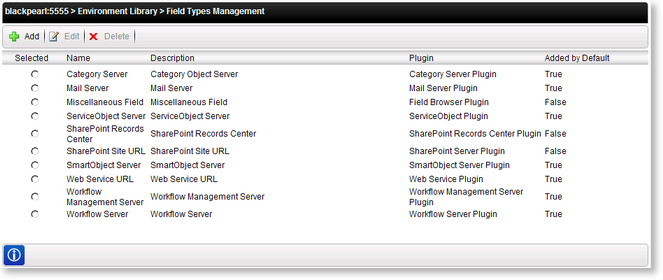
| Option | Description |
|---|---|
| Selected | Select this option to enable the Edit or Delete option for the Environment Library Field Type. |
| Name | Displays the name of the Environment Library Field Type. |
| Description | Displays the description of the Environment Library Field Type. |
| Plugin | Displays the name of the Plugin associated with Environment Library Field Type. |
| Added by Default | Specifies whether the Environment Library Field Type is added to a new Template by default. |
The following table provides descriptions of the default Environment Library Field Types:
| Environmental Field Types | Description |
|---|---|
| Category Server | Defines the Environment's connection to the Category Server Plugin. |
| Mail Server | Defines the Environment's connection to the Mail Server Plugin. |
| Miscellaneous Field | Defines the Environment's connection to the Miscellaneous Field Plugin. |
| Service Object Server | Defines the Environment's connection to the Service Object Server Plugin. |
| SharePoint Records Center | Defines the Environment's connection to the SharePoint Records Center Plugin. |
| SharePoint Site URL | Defines the Environment's connection to the SharePoint Site URL Plugin. |
| SmartObject Server | Defines the Environment's connection to the SmartObject Server Plugin. |
| Web Service URL | Defines the Environment's connection to the Web Service URL Plugin. |
| Workflow Management Server | Defines the Environment's connection to the Workflow Management Server Plugin. |
| Workflow Server | Defines the Environment's connection to the Workflow Server Plugin. |
The following steps discuss how to add a Environmental Field Type.
- On the Field Management Types screen, click the Add button.
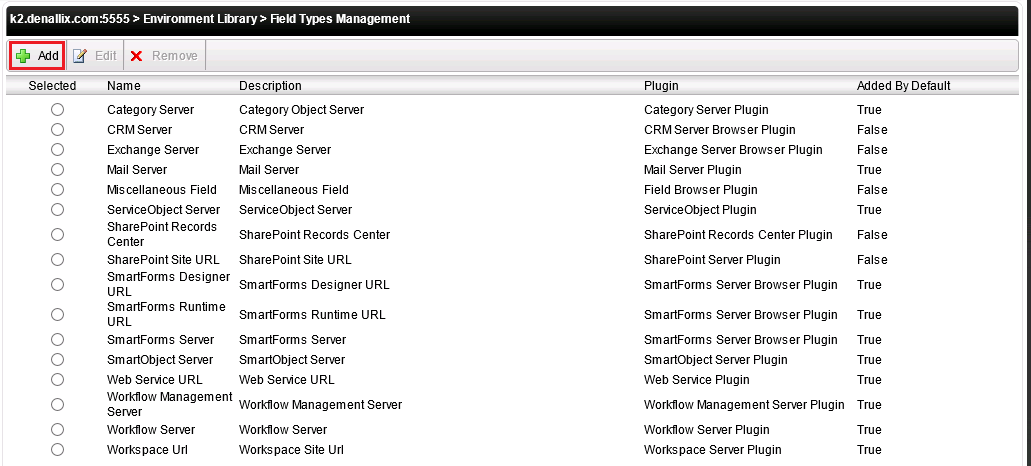
- On the Add Field Type screen, enter the required properties and click OK.
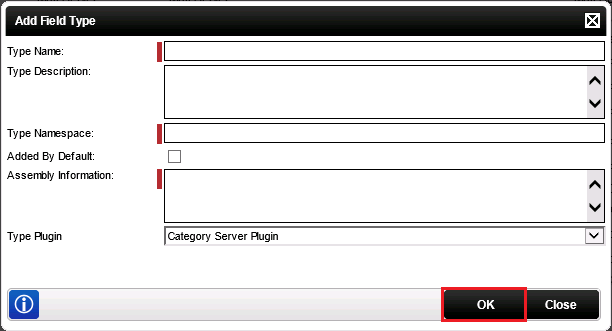
Field Description Type Name The Name for the Field Type Type Description A Description for the Field Type Type Namespace The K2 Namespace that defines the Field Type Added By Default Enabling this option will set this Field Type to be added to every new Environment by default Assembly Information The K2 Object reference for the Field Type Type Plugin The corresponding Plugin associated with the Field Type
The following steps discusses how to edit a Environmental Field Type:
- On the Environmental Field Types Management screen, select the appropriate Field Type to edit and click the Edit button.
- On the Edit Field Type screen, edit the required fields and click OK.
- Click the Save button.
Clicking on the Template node will load the Template Management screen.
| Option | Description |
|---|---|
| Selected | Select this option to Edit or Delete the Environment Library Template. |
| Name | Displays the name of the Environment Library Template. |
| Description | Displays the name of the Environment Library Template. |
| Default | Indicates whether or not the Template is used as the default Template. |
User permissions (Read Only or Modify) can be granted for Actions governed by the associated Template. Click on the name of the Template (i.e. Default Template) to load the Manage Permissions screen. By default, everyone has full rights to work on the Environment and the Manage Permissions screen will therefore be blank by default. When permissions are assigned to specific Users/Groups, the default is overwritten and only those people with rights are able to work on the Environment according to the specific permissions assigned to them.
The following steps discuss how to add Template Permissions.
- Click the Default Template node, and the Manage Permissions screen will open. Click the Add Button.

- On the Search for Users, Groups or Roles screen, search the required user and click OK.
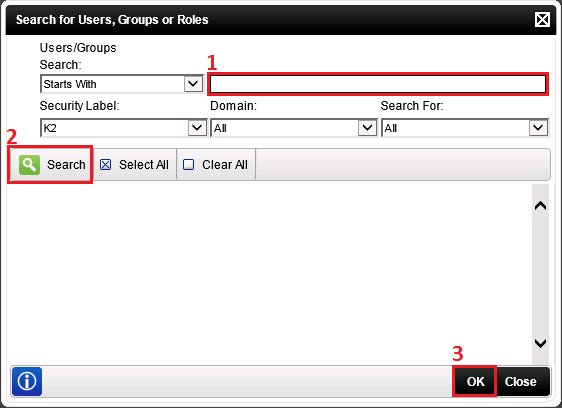
- On the Manage Permissions screen, select the appropriate permissions.

Option Description User Name Presents the path and system name of a User. Read Only Selecting Read Only grants limited read only rights to the associated User, giving them permission to see and use the environment, but is not able to change any environment values such as the SmartObject Server name etc. Modify Selecting Modify grants modification rights to the associated User, giving them permission to modify environment values such as changing the environment field of the SmartObject Server to point to another server etc. Type Presents the User type (i.e. User or Group). - Click the Save button.
Clicking on the Template Fields node will allow the Administrator to Add, Edit, or Delete fields to the default Environment Library Template.
The following steps discuss how to add a Template Field:
- Click on the Temple Field node, on the Field Management screen click Add.

Field Description Selected Select this option to Edit or Delete the Environment Field. Name Displays the name of the Environment Field. Description Displays a description of the Environment Field. Default Indicates whether or not the Field is used within the default Template. Field Type Displays the Template Field Type. - On the Add Field screen, enter the required fields and click OK.
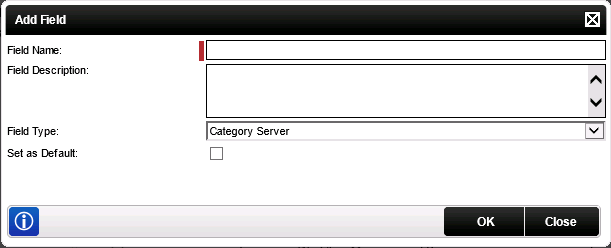
Field Description Field Name The name of the new Field. Field Description The description of the new Field Field Type Displays the Template Field Type. Set as Default Indicates whether or not the Field is used within the default Template. - Click OK.
By default K2 is installed with two Environments listed in the Default Template group. It is possible to add or remove environments from the Environment Library. Clicking the Environments node will load the Environment Management screen.
Think of "Templates" as a collection of pre-defined fields without values. A Template is just another collection of Environments and Environment Fields. Remember that K2 is installed with a Default template containing two environments (Development and Production), and you can add or remove environment from that template quite easily. If necessary, you can add additional Templates, each with its own set of Environments. This allows you to define isolated environment-settings based on some boundary, like business unit. In a large, shared K2 environment where many teams are building and deploying solutions, it might be a good idea to define additional Templates so that teams do not impact each other's environment settings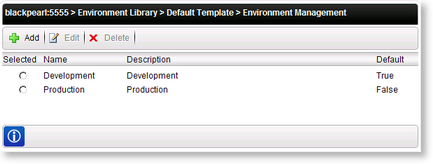
| Option | Description |
|---|---|
| Selected | Select this option to Edit or Delete the Environment Template. |
| Name | Displays the name of the Environment Template. |
| Description | Displays a description of the Environment Template. |
| Default | Indicates whether or not the Template is currently being used as the default Template. |
Clicking on the name of a particular Environment will load the Manage Permissions screen, which is used to configure Read Only and Modify User Rights within that Environment.
By default, all users are granted full rights to work on the Environment, and the Manage Permissions screen will therefore be blank by default:
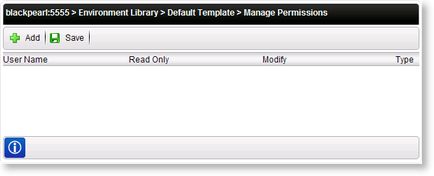
When permissions are assigned to specific Users/Groups, the default is overwritten and only those people with rights are able to work on the Environment according to the specific permissions assigned to them. If you need to specify User/Group account permissions, then accounts must be added and configured using the procedure below in order to avoid errors:
- Add a System Administrator account. Grant this account Read Only and Modify permissions.
- Add an account containing the K2 Designer for SharePoint deployment application pool identity. Grant this account Read Only permission.
- Add accounts for each User/Group who will be working on the environment, granting the needed permissions for each user or group.

| Option | Description |
|---|---|
| User Name | Presents the path and system name of a User. |
| Read Only | Selecting Read Only grants limited read only rights to the associated User, giving them permission to see and use the environment, but is not able to change any environment values such as the SmartObject Server name etc. |
| Modify | Selecting Modify grants modification rights to the associated User, giving them permission to modify environment values such as changing the environment field of the SmartObject Server to point to another server etc. |
| Type | Presents the User type (i.e. User or Group). |
Clicking the Environment Fields node within a particular Environment will load the Fields management screen for that Environment.

| Field | Description |
|---|---|
| Selected | Select this option to Edit or Delete the Environment Field. |
| Name | Displays the name of the Environment Field. |
| Description | Displays a description of the Environment Field. |
| Default | Indicates whether or not the Field is used within the default Template. |
| Field Type | Displays the Template Field Type. |
| Value | Displays the Value of the Server connection. |
You may define additional custom fields in the environment library to store other environment-specific values, if required. This is the recommended approach to store environment-specific configuration values, since they can be maintained easily by developers and/or administrators, are included with K2 deployment packages by default and are very easy to use when designing solutions in K2.
Environment fields are categorized into "Field Types" to make them easier to use at Runtime (for example, groups exist for "Mail Server", "SharePoint Site URL" or "Miscellaneous Field"). We recommend that you store all custom fields in the "Miscellaneous" Type so that all your custom environment fields are grouped together.
The following steps discuss how to add a Environmental Field
- On the Field Management screen, click the Add button.
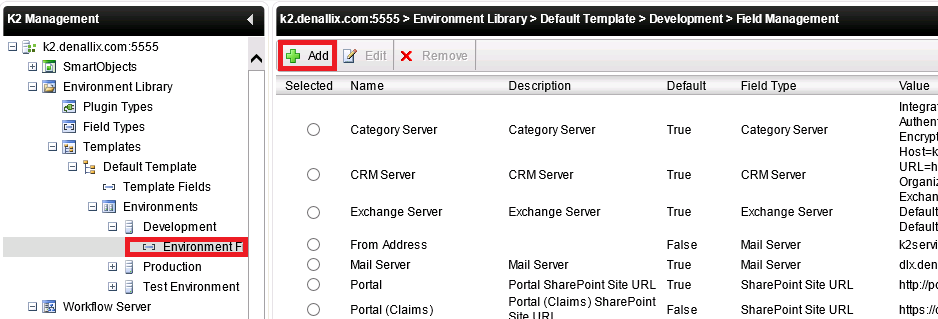
- On the Add Field screen, enter the required fields and click OK.

The following steps discuss how to edit a Environmental Field:
- On the Field Management screen, select the field to edit and click theEdit button.
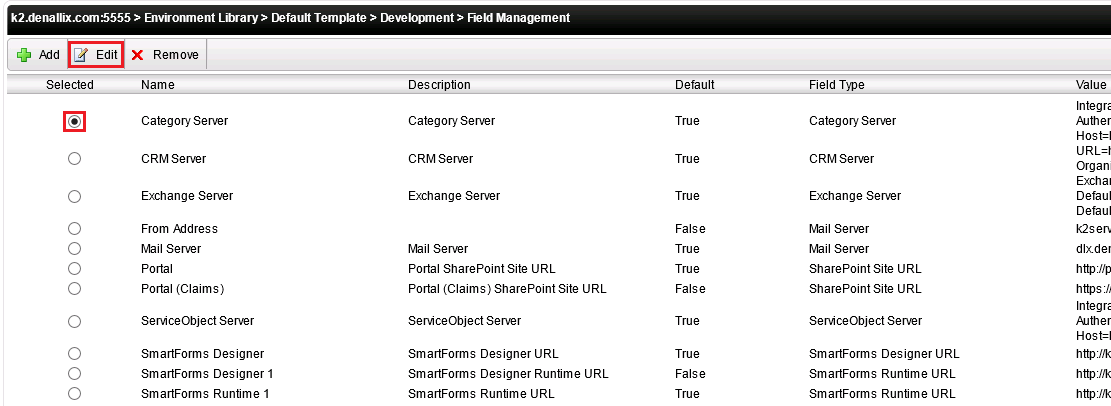
- On the Edit Field screen, edit the required fields and click OK.
The following steps discuss how to remove a Environmental Field:
- On the Field Management screen, select the field to remove and click the Remove button.

- The Environment Field is removed.