Example
The following example shows how to work with complex types via the Endpoint Service Broker with the K2 Services Web Service endpoint. We want to build a form that will allow us to use the web service to open our worklist and action a worklist item.
 |
NOTE: This example uses SmartForms, an add-on product to K2 blackpearl. This example was created with early alpha builds. Some steps might be slightly different with later builds but the concepts remain the same. |
Web.config
K2 Services is setup by default to require the WCF client to provide the ClientCredentialType (ClientCredentialType=None). The current builds do not allow for anything other than ClientCredentialType=Windows so we need to change this in the K2 Services web.config. Open :\Program Files (x86)\K2 blackpearl\WebServices\K2Services\web.config and change the SourceCode.Services.WcfBinding+HTTP binding to look like this.
 Copy Copy |
|---|
|
<binding name="SourceCode.Services.WcfBinding+HTTP"> <security mode="TransportCredentialOnly"> <transport clientCredentialType="Windows" /> </security> </binding> |
Register Service Type
Register the Web Service service type.

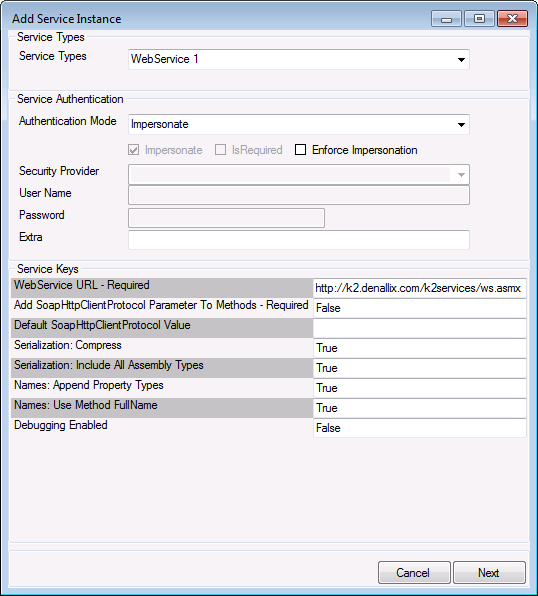
Service Instance
Register the K2 Services Web Service as a service instance and automatically generate the SmartObjects.
|
NOTE: Denallix cores should be configured for the following Web Service URL: http://k2.denallix.com:81/K2Services/WS.asmx. Adjust accordingly for your environment. |
Views
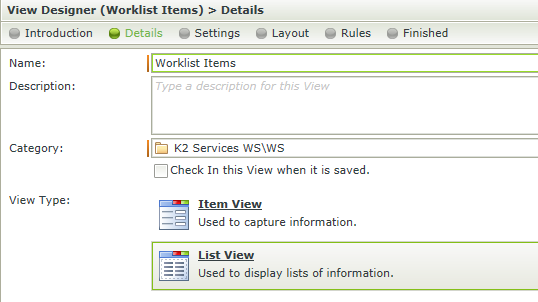
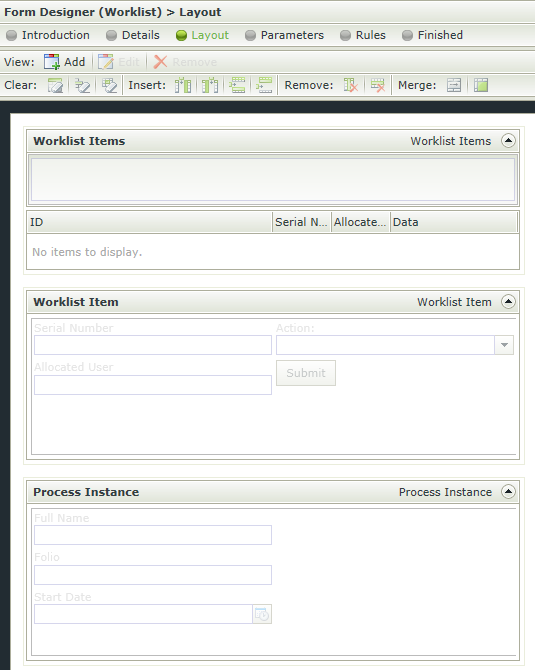
Worklist Items
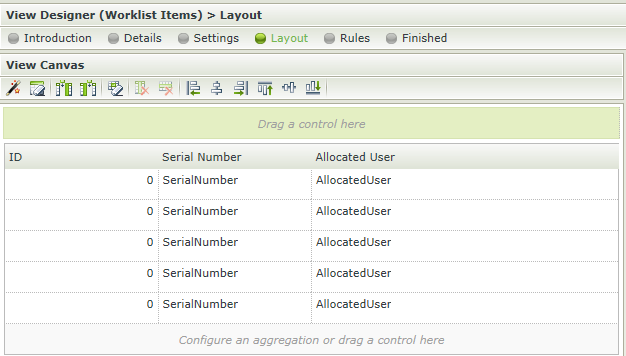
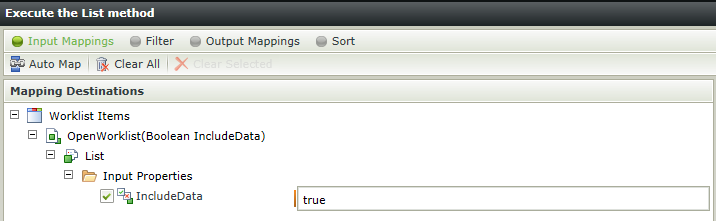
We start building our views by examining the methods and returns for the OpenWorklist SmartObject using the SmartObject Services Tester tool. We see that we have a Read To Serialized Item method that returns a single WorklistItem[] and a List To Serialized Item method that returns a list of WorklistItem objects. There is also a simple List method that deserializes the first level items into simple and complex types which will work great for this exercise. So let’s start by using our OpenWorklist object and create a List View. We will use the List method and only include simple types – ID, SerialNumber and AllocatedUser -- on the view for now since the other items need to be deserialized to be displayed, which we will get to later.
Organize the columns for better display.
Edit the View executed Initialize rule to set the input property on the OpenWorklist method.

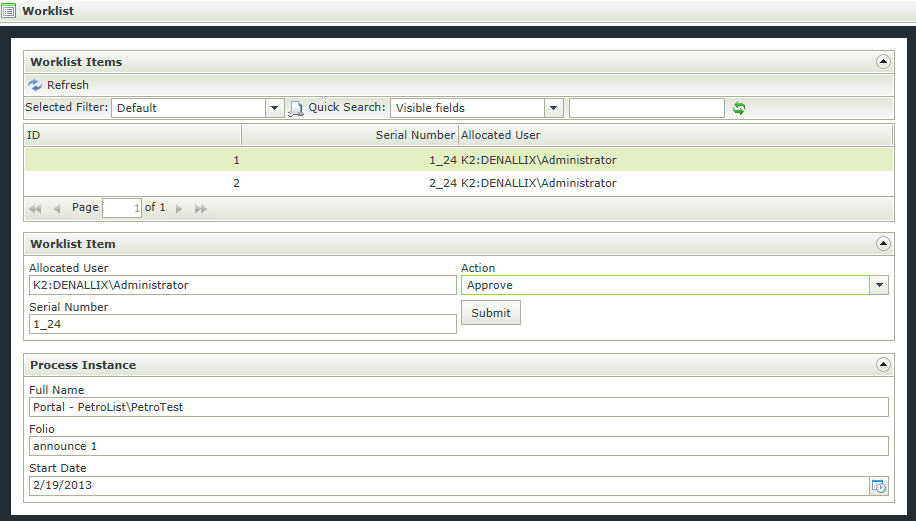
Add some items to your worklist and the finished view should resemble this.
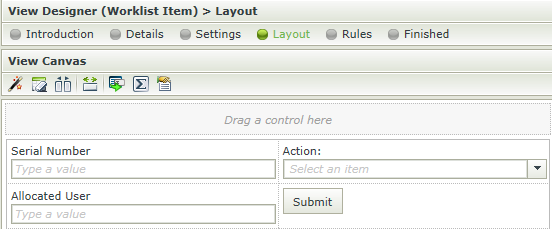
Worklist Item
Now that we have a list of worklist items we can use the WorklistItem Serialization SmartObject to build a Worklist details Item View. We’ll start by just selecting some simple types to display on the form – SerialNumber and AllocatedUser -- but this time we’ll manually add a drop down list control to display our available actions and a submit button. We’ll configure rules on a form later to populate the drop down and execute the button.
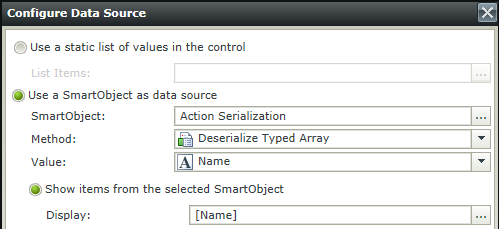
The data for Action property of an individual Worklist Item is a serialized complex type which contains an array of Name and Batchable values for each action available on the client event. We need to deserialize this data to display the Name in the drop-down list. Select the drop-down list and edit the Data Source Type to return Name from the Deserialize Typed Array method on the Action Serialization SmartObject.
|
Note: Make sure to choose Deserialize Typed Array and not Deserialize Array. |
Remove the generated View executed Initialize rule and save the view.
Process Instance
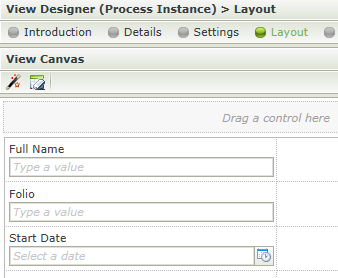
Worklist Item consists of simple types such as ID and SerialNumber and complex types such as ProcessInstance, Actions and ActivityInstanceDestination. We’ve already created a drop-down list to display the Actions data. We can also create Item and List views for displaying each complex type but we’ll just add an Item View for Process Instance to illustrate the steps.
This time we’ll use the ProcessInstance Serialization SmartObject to create an Item View. Select a few simple types to display and remove the generated rule.
Worklist Form
Now that we have some views to represent our data we’ll add them to a form.
And then create some rules to bring it all together.
Item Click Rule
Event: When a View raises an event

Actions
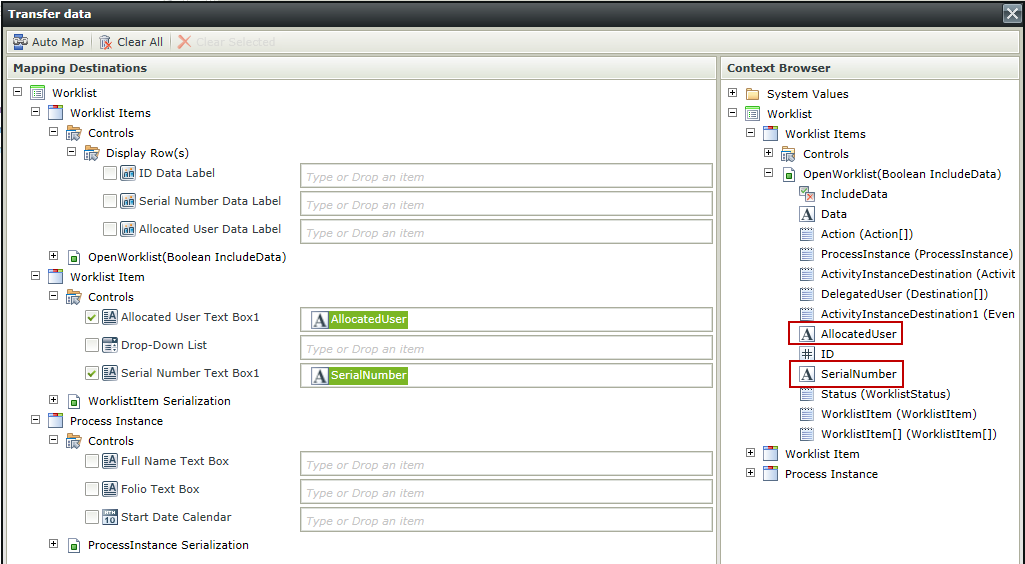
We’ll use the transfer data action to populate our item view (there are other ways, this was quickest).
Action: Transfer data
|
Note: Although it may be tempting to Deserialize the WorklistItem and WorklistItem[] properties on the OpenWorklist SmartObject, they are only populated when using the List to Serialized Item and Read to Serialized Item methods, respectively, and not when using the List method. |
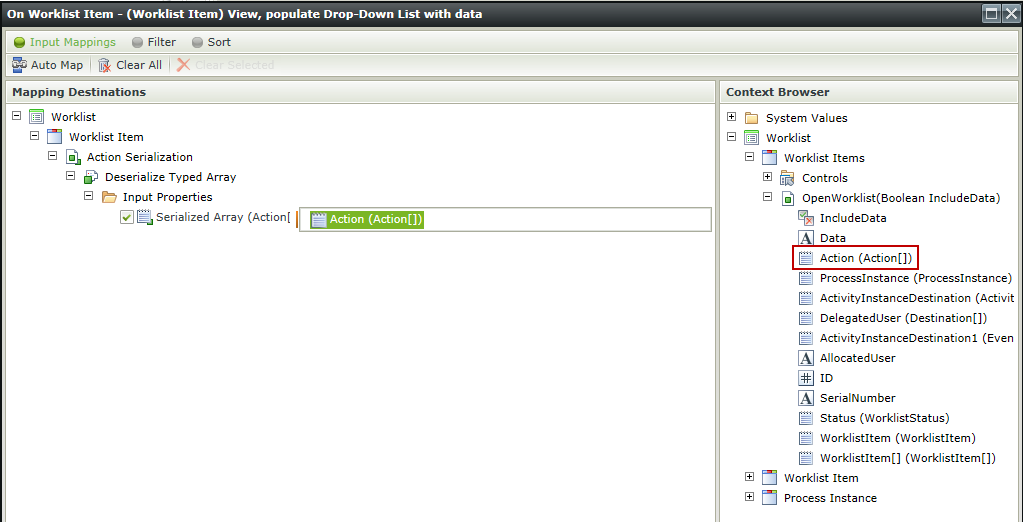
Then we’ll populate the drop-down list on the Worklist Item view by passing the Action[] data as the Serialized Value input for the SmartObject method the drop-down list is bound to.
Action: Populate a list control with data

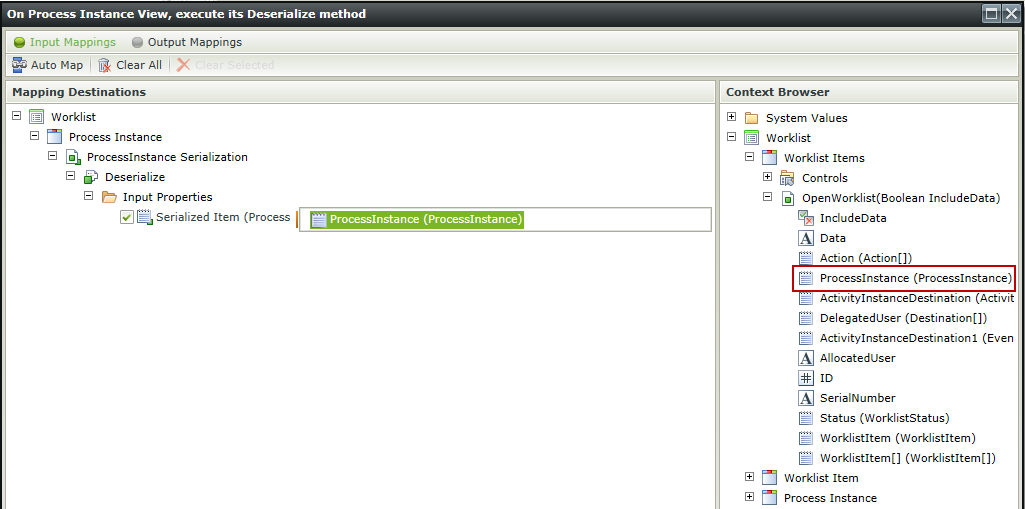
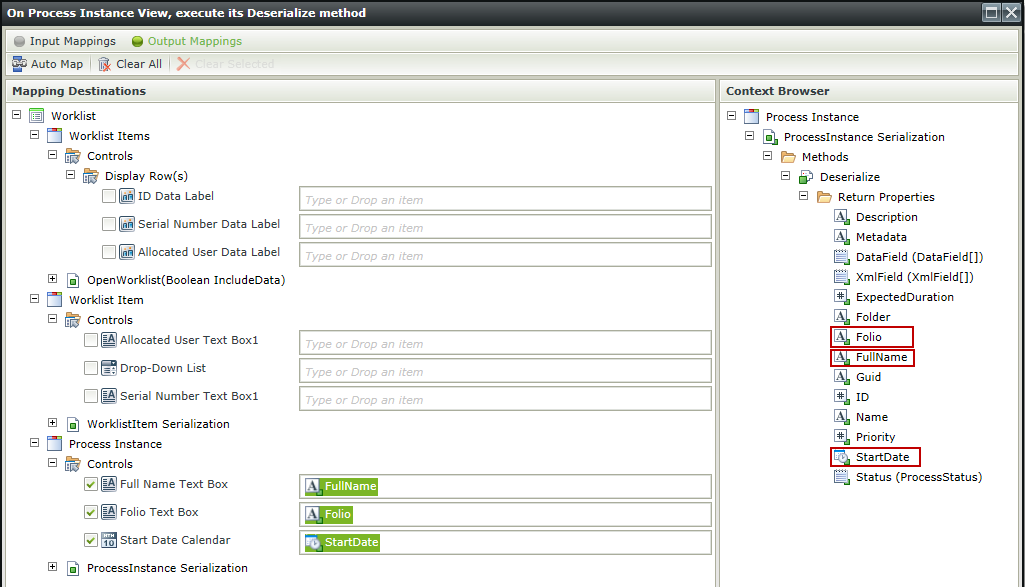
Finally, we’ll add an action to pass the ProcessInstance data as the Serialized Value input for the Deserialize method on the Process Instance view.
Action: Execute a View method

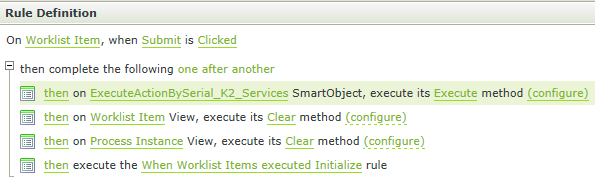
Submit Click Rule
Event: When a control on a View raises an event

Actions
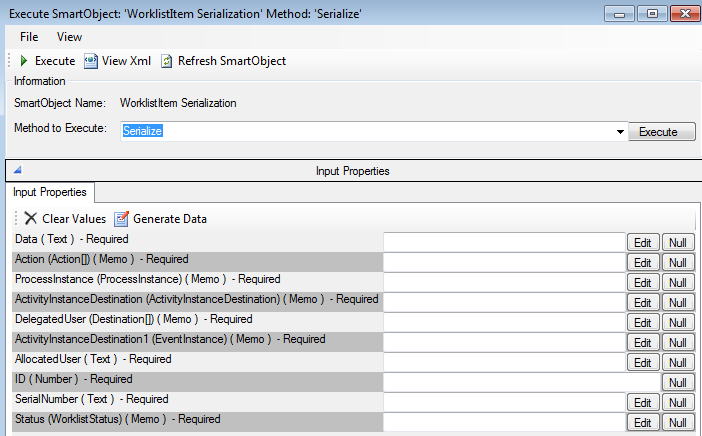
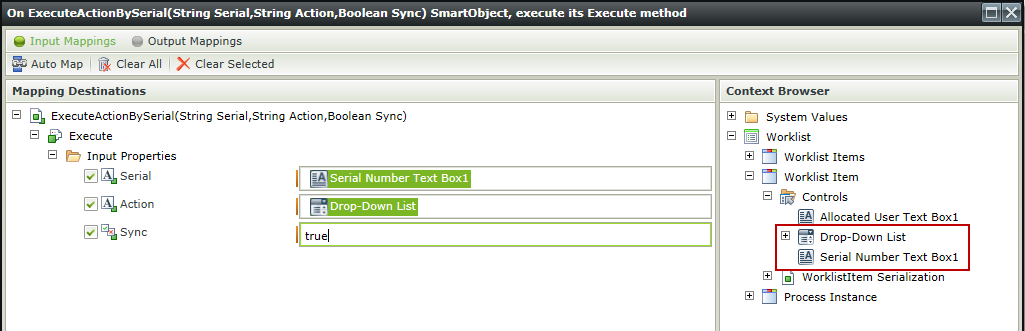
There are two options to execute the worklist item action. We can call ExecuteActionBySerial which requires the Serial Number, the Action and the Sync option – all simple types. Or we can call ExecuteActionByWorklistItem which requires a WorklistItem, the Action and the Sync option – which has a complex type. For this example we don’t have data in the WorklistItem we wish to update so we can simply call ExecuteActionBySerial with the simple type data we have available to us. However, if you needed to pass complex type data as an input, you would simply call the Serialize method on the serialization object, in this example WorklistItem, and pass all the data that makes up that object as input parameters. In some cases, such as this one, some input properties themselves may be complex types. In this case you would need to ‘chain’ the method calls together until all the complex types had been serialized for input. In the figure below from the SmartObject Service Tester tool you can see the items that would require a complex type as input for this method.
Action: Execute a SmartObject Method
Add the Execute a SmartObject Method and select the Execute method on the ExecuteActionBySerial SmartObject mapping the Serial Number Text Box and Drop-Down List values as inputs.

Since we’ve submitted this worklist item we can clear the data from the views.
Actions: Execute a View method

And finally execute the Worklist Items views Initialize rule to reload the list.
Action: Execute another rule
That’s it! You now have a form that can use web services to display simple and complex data as both singletons and lists with full fidelity of the underlying objects’ data.