Create Report - Filter the Data
The Filter the data screen allows the user to configure the report to only display the relevant data by applying standard date, interval or advanced conditional filters. The Filter the Data screen is the fifth step in the Create Report Wizard.
_thumb.PNG)
Fig. 1. Create Report Wizard steps 5 -Filter the Data
Adding Filters
- Drag and drop Report Data fields from the middle of the screen to the Field section of the Filters screen on the right
- Then specify the Operator and the Value
- If more filters are required, add as per the above
 |
When using Date filters, and any one of the Last x days filters is selected, it is important to note that the current date will not be included in the result. In the example where current date is 10/8/2009, and the Date filter Last 7 Days is selected, data will be retrieved from 03/08/2009 to 09/08/2009. |
Adding Filter Conditions
Once all the information has been set for the filter, select the number of the filter in the drop down in the Filter Conditions section and click on Insert. This will insert that particular filter number into the Filter Conditions. In the example above, conditions 1 and 2 have been applied to filter the data. The filter screen provides many options and possible combinations for building rich, complex filtering support into the reports. These filters are processed before the report is rendered to the user
| Feature | What it is | How to use it |
|---|---|---|
| Report Data | Lists the SmartObject properties that can be used in building report filters | Drag the SmartObject property from the Report Data menu and drop it in Field 1 in the DROP HERE area |
| Filters | Create filters on the SmartObject properties by dragging them onto the DROP HERE area and selecting the required operation from the drop down list. Insert a value for the filter. Various Value options are available depending on the SmartObject type, i.e. Date/time - a range of date formats become available | Drag the SmartObject property from the Report Data menu and drop it in Field 1 in the DROP HERE area. Select an operator from the drop down list such as equal. Select an option from the Value drop down list or type a value in the Value box if no option list is presented |
| Filter Conditions | Advanced conditional filtering can be built on existing filters. Filters need to be built before conditions can be added to the filters | Build conditions for the filters in the Filter Conditions section. Click on a variable to assign it to the condition |
| Search Report Data | A Property can be found by using the search field. | Enter the name or first letter of the Property in the search text box |
| Preview | Provides a user with a quick view of the report layout before you continue configuring the report | Click the Preview button to open the Report Viewer |
| Save As | The Report can be saved in a specific location determined by the user. The Report can be saved to a Public location where it can be accessed by other users or it can be kept private to be be used only by the report creator | Click the Save As button and supply a location to save the report to |
| Save | The Report can be saved in a location determined by the system | Click the Save button and supply a location to save the report to |

Fig. 2. Delete a Filter
|
The Filter the data screen is not mandatory and can be skipped by clicking Next |
Value
The Value field is determined by the SmartObject Type. For example, If a SmartObject property name Date of Birth with the type Date Time is clicked and dragged into Field 1 of the filter the Value field will change to a drop down list and will allow the user to select from a range of date formats.
The Fiscal Year can be set in the web.config file by changing the number in the <add key="FinYearMonth" value="6" />, and the number indicates the month of the year. For example, value="6" represents the Fiscal Year ending 30th June.
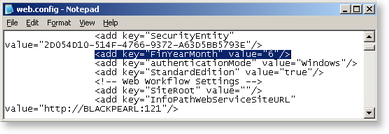
Fig. 3. Web.config file
 |
The default location of the web.config file is C:\Program Files\K2 blackpearl\WorkSpace\Site\web.config |
