Deploying Packages to more than one Target Environment
K2 Package and Deployment allows packages to be deployed from a source environment to an unlimited number of target environments.
However, package deployments made to multiple environments can only be made to one environment at a time. Currently, users cannot deploy a package to all target environments at the same time.
For packages to be deployed to more than one target environment, the server containing each target environment must be added to the user's Package and Deployment console using the procedure below.
Adding Multiple Servers
If the permissions below are not set correctly, the administrative changes that are applied will not persist.
Users tasked with adding multiple servers must have administrator privileges for the relevant source environment.
- Open the Windows Start menu.
- Navigate to All Programs / K2 blackpearl / K2 Package and Deployment.
- Right click the K2 Package and Deployment link. From the options menu, select the Author option.
- The Options window will open. Select Author mode from the Console mode: drop down list:
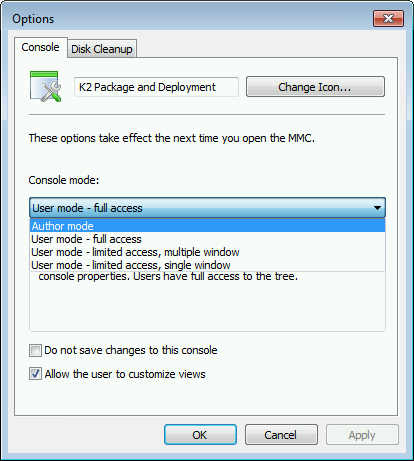
- Click Apply, then click OK.
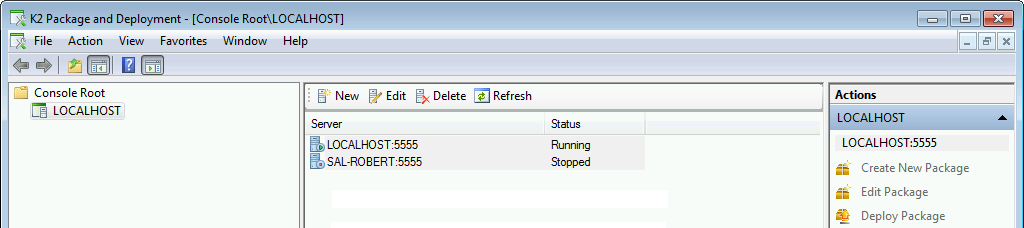
- Within the Package and Deployment console, you can now add a new target server. Click the New button above the server list column:

- The Add new server window will open. Populate the Server Name and Server Port fields with valid server connection values only.
- Click OK. A Servers Found. Retrieving Connection Information progress update may appear.
- The server which has been added will now be listed under the original server in the server list column:
- If you need to add more than one server, repeat the process. You may add as many servers as necessary.
If multiple servers are added to the K2 Package and Deployment console, ensure that all the servers are running the same version of K2.
- To save the changes, click on File / Save from the top ribbon of the Package and Deployment console.
- From this time, whenever the user launches Package and Deployment, the new server will be displayed in the server list column.
- When all needed servers have been added to the server list, the MMC console must be set from Author mode to User mode. This will help prevent unauthorized addition or removal of target servers.
- To set the MMC console from Author mode to User mode, open the Windows Start Menu. Click All Programs / K2 blackpearl. Right-click Package and Deployment. Click Author from the pop-up menu.
- From the top ribbon of the Package and Deployment MMC console, click File / Options.
- The Options window will open. Select User mode – Full Access from the Console mode: drop down list.
- Click Apply, then click OK.
- A window will appear, asking Save console settings to Package and Deployment.msc? Click Yes.
Removing Added Servers
- Users tasked with removing servers from the server list must have administrator privileges for the relevant source environment.
- Open the Package and Deployment console.
- Click on the server to be removed. Click the Delete button above the server list column and follow the prompts to remove the server.
- To save the changes, click on File / Save from the top ribbon of the Package and Deployment console.