Creating the K2 database in the Azure SQL Database server
If you are using Azure SQL Database to host the K2 database, the K2 database needs to be set up before you run the K2 installer for the first time. This topic describes how to install the K2 database in the Azure SQL Database server.
At a high level, the sequence of steps are:
- Create an Azure SQL Database logical server.
- Extract the DAC packages from the K2 installation media.
- Deploy the DAC package using Microsoft SQL Server Management Studio.
- Install K2 and point to the Azure SQL database.
You must create a SQL Database logical server in Azure to host the SQL database you will deploy using the DACPAC in the next steps. To do so, follow the instructions for the first part of the SQL Database tutorial: Create a SQL database in minutes using the Azure portal, titled: Create an Azure SQL Database logical server.
Take note of the Server Name, Server Admin Login and Password, since you will need to use these values when deploying the DAC Package to the SQL Database logical server, and to configure the connection between K2 and Azure SQL Database when installing the K2 server components.
Do not create a database in the new server, as you will be deploying the DAC package as described in the following steps.
- Using an administrative account, log into a virtual machine hosted in the same Azure subscription as the Azure SQL Database.
- Download the K2 installer file to the Virtual Machine.
- Run the K2 blackpearl 4.7 (*).exe installer, which will extract the K2 installation files to a folder you specify. Cancel the Setup Manager that starts automatically, since we will not be using the Setup manager yet.
- Locate the zip file (SourceCode.Data.All.AzureDb.zip) that contains the DAC Packages and .sql files. By default, the zip file will be located in [Extracted Directory]\Installation\Data\SourceCode.Data.All.AzureDb.zip
- Using an extraction tool of your choice, extract the files from the zip file to a folder on the virtual machine (in this example c:\dacpac) . The following files are typically included in the zip file:
- SourceCode.Data.All.dacpac
- Master.dacpac
- SourceCode.Data.All.PostDeploy.sql
- SourceCode.Data.All.PreDeploy.sql
To deploy the extracted .dacpac file, you must use Microsoft SQL Server Management Studio (SSMS) to connect to the Azure SQL Database you created. This topic shows screenshots when using SSMS 2014, but later versions will also work.
- If necessary, install Microsoft SQL Server Management Studio on a machine that can connect to the Azure SQL Database (typically, a VM in the same Azure subscription), and then launch Microsoft SQL Server Management Studio.
- Enter the connection details for the database you created.
The details for the connection should be the Server Name, Server Admin Login and Password that you specified when you created the SQL Database in Azure SQL Database.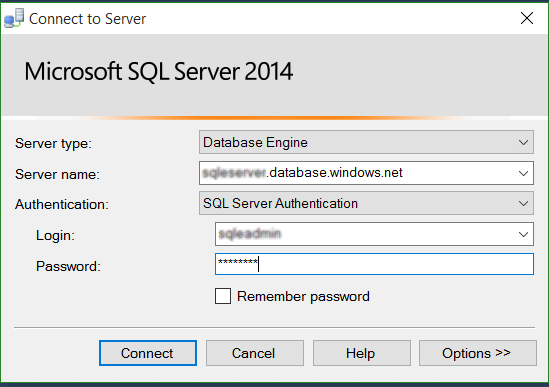
Alternatively enter the whole connection string into Additional Connection Parameters (found under Options).
The connection string will look something like this:
Server=tcp:[SQLserverName].database.windows.net;Data Source=[SQLserverName].database.windows.net;Initial Catalog=SQLEDB;Persist Security Info=False;User ID=[SQLUSER];Password=[PASSWORD];Pooling=False;MultipleActiveResultSets=False;Encrypt=True;TrustServerCertificate=False;Connection Timeout=30;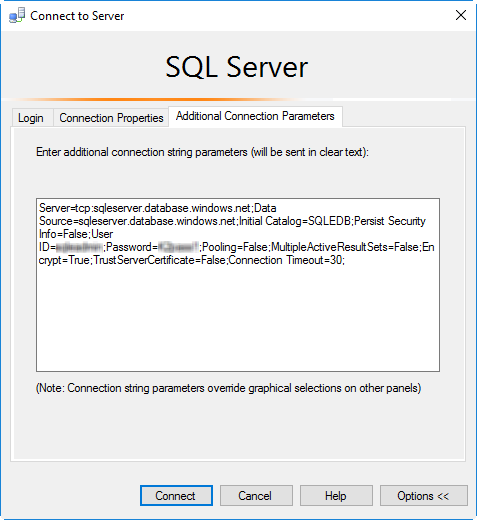
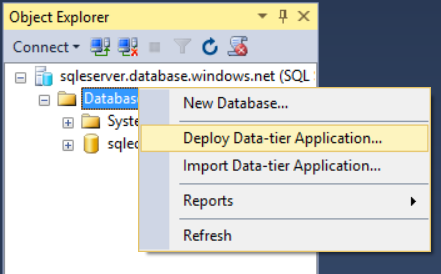
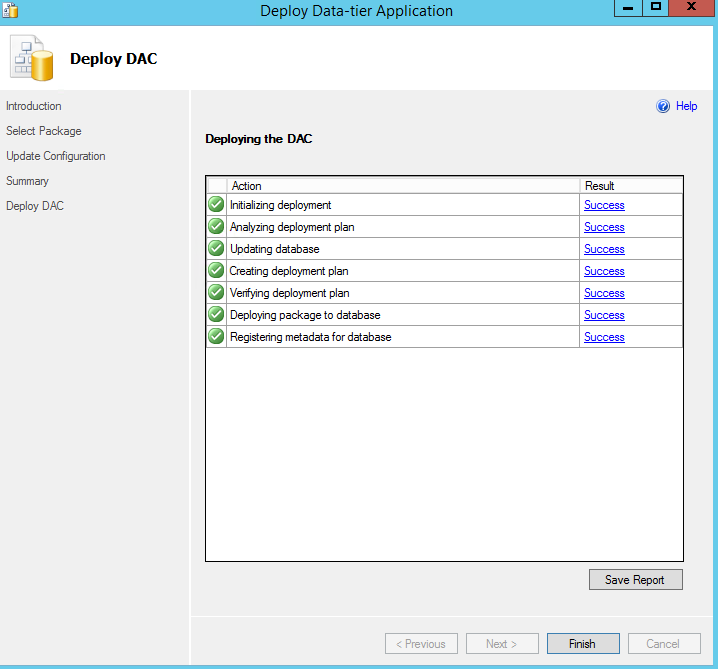
- Once connected to the Azure SQL Database, right-click the Database node and select Deploy Data-tier Application... to start the deployment wizard. Using the Next button or the wizard step links, run through the wizard up to the Select Package step.
 If you created a blank database when you created the SQL Database logical server, or already have an empty database added manually, you must use the Update Data-tier Application option by selecting it from the right-click menu of the Database node > Database Tasks.
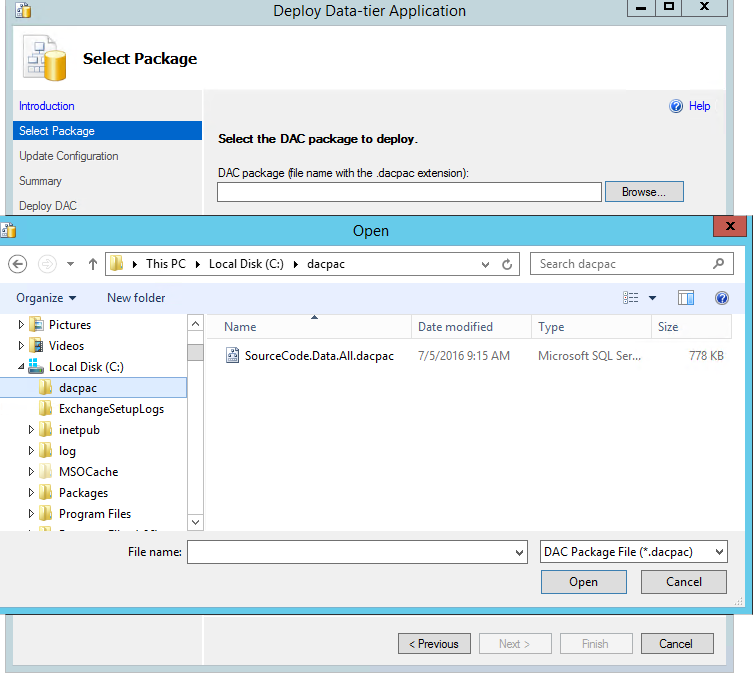
 - On the Select Package step, browse to and select the SourceCode.Data.All.dacpac file that you extracted earlier.
- In the Update Configuration step, change the database Name to whatever name you want (K2 is recommended as the name). Keep note of this database name, since you will need to use it when installing K2 later on.
- Review the Summary page and confirm the details, then click the Next button or the Deploy DAC link to start the deployment.
-
Once deployment is complete, click the Finish button.
Installing K2 on Virtual Machines that are hosted in Azure and that connect to a K2 database hosted in Azure SQL follows the same basic installation approach as when the K2 database is located in a on-premises SQL Database. During installation, you will point the installer to the database in Azure SQL to allow the K2 installer to perform the necessary configuration for the database.
For information on installing K2 in such an environment, see the topic Non-AD workgroup installation.
Remember to use the database name you created in the Update Configuration step of Install K2 blackpearl with SQL Azure, and use the server name, user name and password used when you created the database.
Considerations
- Azure SQL Database has a default connection string starting with “tcp:”. Exclude the tcp: part of the connection string in the server name textbox, otherwise it will cause errors.
- When installing K2 on a Virtual Machine (VM) hosted in Azure, in workgroup mode as opposed to domain-joined mode, you need to install using a local administrative user on the VM, not with the Azure user account
- When installing K2 on a Virtual Machine (VM) hosted in Azure, in workgroup mode as opposed to domain-joined mode, you need to create MSMQ private queues as described in the topic Creating private queues when installing K2 on a non-domain server.
- If the K2 application server or K2 SQL Database is hosted in a cloud service, it is highly recommended that the K2 database is installed in a SQL server where there is high bandwidth and low latency between the K2 application server(s) and the database server. (For example, in Microsoft Azure the Application Server Virtual Machine and the SQL Database should be in the same subscription and geographical location.) Alternatively, when installing the K2 database in an Azure SQL database but the K2 application server is in a different location, ensure that the network latency between the application server and the SQL server is as low as possible (for example by configuring Azure ExpressRoute or a dedicated network circuit). Excessive network latency between the application server and SQL server will negatively impact performance of your K2 environment.
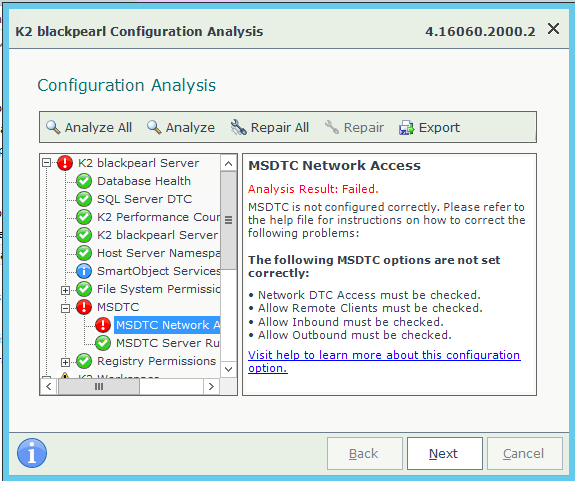
- SQL Azure does not support MSDTC. Because of this, you may see an MSDTC error during the configuration analysis of the install. This is a known issue that can be ignored.
-
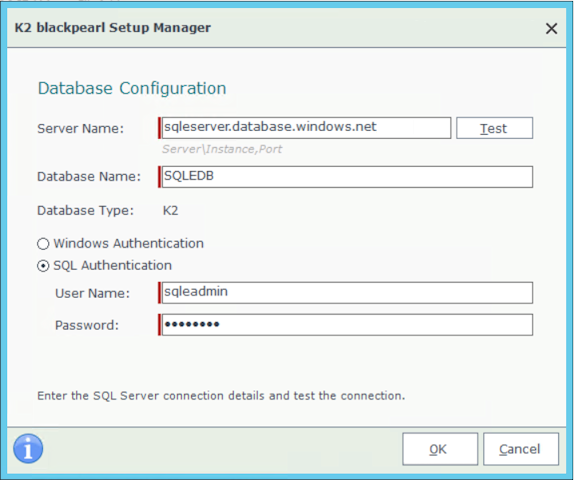
When using an Azure SQL Database, you must use SQL authentication on the database configuration page of the installer, and provide credentials for an SQL administrative account.