Install the K2 for Reporting Services component
 |
Download: You can download an Excel Workbook to help you organize your K2 blackpearl installation by clicking here. Use this checklist to ensure that all topics have been read, understood and implemented successfully before, during and after K2 blackpearl installation. The checklist includes all possible items for both Standalone and Distributed installations. Please read the Reference Topic to determine if the item applies to your environment. There is also a worksheet where users can record their configured settings as reference. |
Prerequisites
![]()
The Microsoft SQL Server 2008 Reporting Services component is now optional for all K2 blackpearl installations and can only be installed during a custom K2 blackpearl installation. The K2 for Reporting Services component requires the following prerequisites:
| K2 blackpearl Prerequisites for the K2 for Reporting Services component | |
|---|---|
| Operating System |
|
| Windows Components |
|
| Additional Software |
NOTE:
|
 |
Important: You must be running Reporting Services in Native mode. K2 blackpearl does not currently support SharePoint Integrated mode. |
Rights and Permissions
The Reporting Services Service Account is the account that the Reporting Services application pool (called ReportServer) will run under. This account probably already exists in your environment, but there are some permissions that should be validated to ensure that the K2 integration with Reporting Services functions properly.
The rest of this guide will use domain\Reporting Services Service Account as a placeholder for the Reporting Services Service Account name. When installing K2 in your environment, replace this placeholder with your actual account name.
Application Pool Rights
The SQL Reporting Services Service Account will require elevated permissions to run the application pool. We will use the aspnet_regiis command to configure this. This tool ships with the .NET Framework, and takes the pain out of configuring all the required NTFS permissions, IIS_WPG group membership, security policy user rights assignments, and IIS metabase access rights. For more information, see the MSDN article on setting security rights for .NET Applications, at http://msdn2.microsoft.com/en-us/library/ms998297.aspx.
To use the aspnet_regiis command, perform the following steps:
 |
Open a command prompt (Start > Run > cmd) |
 |
Change directories to the .NET Framework folder (C:\WINDOWS\Microsoft.NET\Framework\v2.0.50727) |
 |
Type aspnet_regiis -ga domain\Reporting Services Service Account and hit Enter |
 |
After the command completes, type iisreset and hit Enter |
Reporting Services Permissions
The SQL Reporting Services Service Account will also require permissions on the SQL Reporting Services databases. To set these permissions, perform the following steps:
|
Open Reporting Service Configuration (Start > All Programs > Microsoft SQL Server 2008 > Configuration Tools > Reporting Services Configuration Manager) |
|
Connect to the appropriate Instance |
|
On the Web Service Identity tab, confirm that Reporting Services picked up the new service account and listed it in the ASP.NET Service Account text box |
|
Make sure the SQLRS Service Account is selected, and click Apply |
 |
The Task Status will update, and the icon next to the Web Service Identity will change to Configured (a green check mark). Check that the Web Services URL and Report Manager URL are correct |
 |
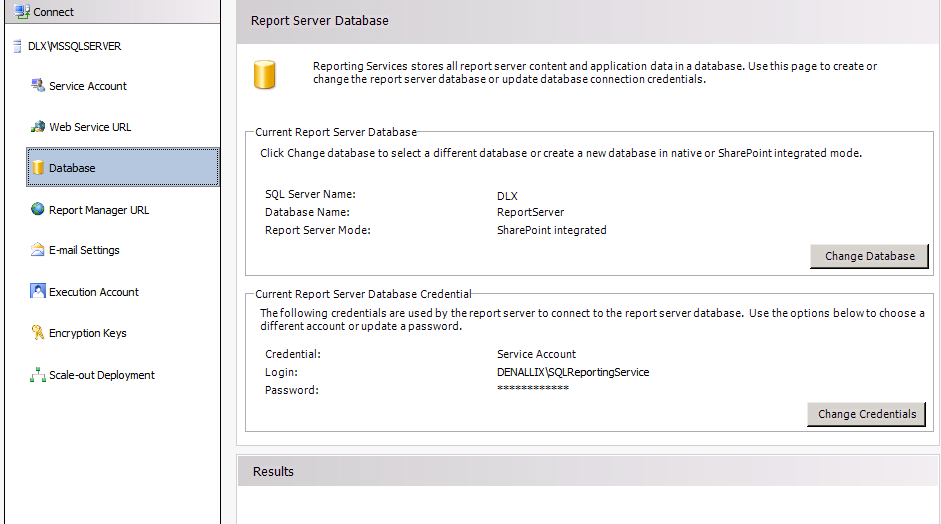
Change or create a new database on the Database tab |
 |
Close the Reporting Services Configuration Manager window |
Additional Configuration.
In order for users to browse the reports on the server, the following permissions must be configured:
Server Properties => Permissions, add <DOMAIN>\Domain Users place a check in the box for the role System User
Home Folder Properties => Permissions, add <DOMAIN>\Domain Users place a check in the box for the role Browser
|
While infrastructure changes are required by K2, each environment is different and has its peculiarities which must be taken into account. Modifying the infrastructure could have unforeseen results if the changes are not appropriately understood or managed. Given the broad spectrum of underlying infrastructure utilized, it is recommended that a panel or committee with appropriate skill in each area concerned be assembled to outline the underlying infrastructure changes and gauge the impact of the required changes. |
Kerberos / Pass Through Authentication
When components are installed on separate servers, credentials must be passed between the services. This can be accomplished by setting up Kerberos, which should be configured prior to installing K2. Any time where two or more hops are required for user authentication, Kerberos must be configured.
Pass Through Authentication is a K2 proprietary authentication methodology specifically for authenticating users whose credentials need to be passed between machines that interact with the K2 APIs. This authentication model can be used as an alternative to Kerberos, but is not in any way intended to be a replacement for Kerberos within the overall infrastructure.
Steps to install
After you have installed all the prerequisites, created the service accounts, enabled DTC and installed MSMQ, you are now ready to install the K2 for Reporting Services component on the Reporting Services Server.
Once the installation is done, the Configuration Analysis tool will be available to help troubleshoot any errors detected during the installation.
|
It is important to copy the installation files local to the server before installing. Do not install from a network share or UNC path. The installation will not work properly. |
 |
It is recommended to install all K2 components using the K2 Service Account. Log on to the server as the K2 Service Account before installing. |
To install the K2 for Reporting Services component, follow the below steps:
|
From the local installation folder, double-click on the Setup.exe file |
||
|
On the Welcome screen, click Next |
||
|
On the End User License Agreement screen, read through the EULA. You must select the I agree to the terms and conditions of the license option before you can continue with the installation. You can print out the EULA for your records. Once you have read the EULA, click Next |
||
|
On the Installation Type screen, select the Custom Installation option and enter an Installation Folder, and click Next |
||
|
On the Select Components screen, make sure that the Required Components and K2 for Reporting Services boxes are checked. You might also see links to Check Dependencies for the other components.
|
||
|
Once you have verified the components, click Next.
|
||
|
On the K2 Database screen, type in the name of the SQL Server where you installed the K2 Database. This points the K2 component to the K2 database set up by the K2 Server, to share configuration information. If you changed the Host Server database name, update it here and click Next |
||
 |
On the SQL Reporting Services Configuration screen, select the Web Site and enter the Virtual Directory that is used for the Reporting Services Web Site. If this is a default installation of SQL Reporting Services, the Virtual Directory is ReportServer. You can test the connection, and when successful, click Next |
||
 |
On the Configuration Summary screen, validate the settings. You can go back to make any necessary changes, and you can print this page for reference later. Once you are satisfied with your settings, click Install. |
||
 |
The Setup Manager will update and show you the progress of the components as it installs. |
||
 |
When the installation has completed, you will see a finished screen. There will also be a link to the created configuration log file. When you click Finish, you will be prompted to restart now (click Yes) or restart later (click No). It is important to restart in order to complete the installation and configuration of K2 blackpearl. |
Reporting Services Service Account
In a distributed environment where components are installed on more than one server or if host headers are used, Kerberos security must be configured. One of the components of Kerberos is the Service Principal Name (SPN). Whenever user credentials must be passed from one system to another, the system that is attempting to pass the credentials must be trusted for delegation. For this step to take place successfully, Kerberos delegation must be configured.
|
Configuring SPNs is an advanced task and should only be performed by an appropriately trained professional. The steps and configurations given in this help file are to be used as a guide - your system may require additional configuration due to different hardware and software compatibilities. |
Set SPNs
In order to access the K2 Reports from the K2 Workspace, you need to set the SPNs for the Reporting Services Service Account.
The following placeholders are used in the commands:
- domain\Reporting Services Service Account - The Reporting Services Service Account that runs the Reporting Services application pool
- MachineName - The name of the computer on which Reporting Services is running
- MachineName.FQDN - The fully qualified domain name of the computer on which Reporting Services is running
|
Be sure to set all the SPNs as listed below. Also, the service account is required so be sure to specify the account properly. |
|
If you are using Host Headers to access your Reporting Services Service, use the HostHeader value instead of the MachineName in the below commands. An SPN for each Host Header will need to be created. |
Open a command prompt on a server that has the Windows Support Tools installed, and execute the following commands:
- setspn -A HTTP/MachineName domain\Reporting Services Service Account
- setspn -A HTTP/MachineName.FQDN domain\Reporting Services Service Account
After the commands have successfully executed, you can verify the SPNs were set by executing the following command:
- setspn -L domain\Reporting Services Service Account
Configure Delegation for Reporting Services Service Account
After the SPN has been set, a new Delegation tab is available in Active Directory Users and Computers for the Service Account. By default, the option selected is the Do not trust this user for delegation. You need to set the account to be trusted for delegation, by following the below steps:
|
If you are running your Active Directory domain in Windows 2000 native mode, the Delegation tab will not be present. Instead, on the Account tab, you will see a Trust this user for delegation check box. |
|
Open Active Directory Users and Computers (Start > All Programs > Administrative Tools > Active Directory Users and Computers) |
|
Find the domain\Reporting Services Service Account and view its properties |
|
On the Delegation tab, select the Trust this user for delegation to specified services only option |
|
Select the Use Kerberos only option, and click on Add |
|
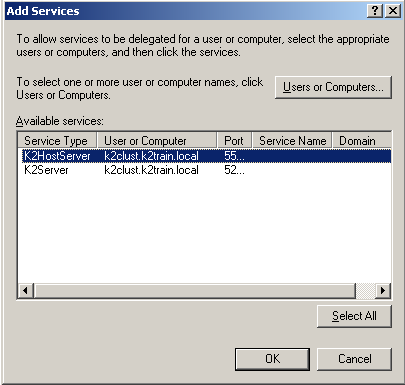
Click on Users or Computers and select the domain\K2 Service Account you created as the K2 Server Service Account |
|
In the Available Services section, select the K2HostServer item listed: |
|
Click OK. Your properties should resemble the following: |
|
Click OK |

Configure Delegation for the K2 Service Account
In order to use the SQL Server Reporting Services Service Object to schedule Reporting Services reports and include SmartObject data, you will need to configure the K2 Service Account with delegation.
|
If you are running your Active Directory domain in Windows 2000 native mode, the Delegation tab will not be present. Instead, on the Account tab, you will see a Trust this user for delegation check box. |
|
Open Active Directory Users and Computers (Start > All Programs > Administrative Tools > Active Directory Users and Computers) |
|
Find the domain\K2 Service Account and view its properties |
|
On the Delegation tab, select the Trust this user for delegation to specified services only option |
|
Select the Use Kerberos only option, and click on Add |
|
Click on Users or Computers and select the domain\Reporting Services Service Account you created as the SQL Server Reporting Services Service Account |
|
In the Available Services section, select the HTTP item listed |
|
Click OK twice to exit the dialog windows |
|
While infrastructure changes are required by K2, each environment is different and has its peculiarities which must be taken into account. Modifying the infrastructure could have unforeseen results if the changes are not appropriately understood or managed. Given the broad spectrum of underlying infrastructure utilized, it is recommended that a panel or committee with appropriate skill in each area concerned be assembled to outline the underlying infrastructure changes and gauge the impact of the required changes. |
Enable Direct Metabase Edit
|
Configuring Kerberos is an advanced task and should only be performed by an appropriately trained professional. The steps and configurations given in this help file are to be used as a guide - your system may require additional configuration due to different hardware and software compatibilities. |
In order to allow Kerberos authentication on the Reporting Services web site, you need to first enable the metabase edit in IIS:
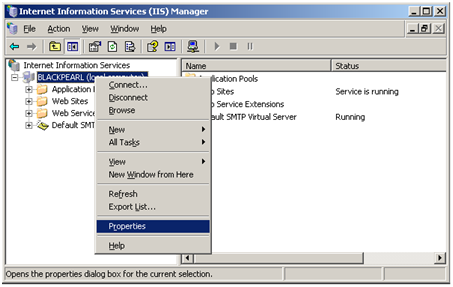
- Open the Internet Information Services (IIS) Manager (Start > All Programs > Administrative Tools > Internet Information Services (IIS) Manager)
- Right-click the top node in the tree view and select Properties
- Check the check box next to the Enable Direct Metabase Edit option
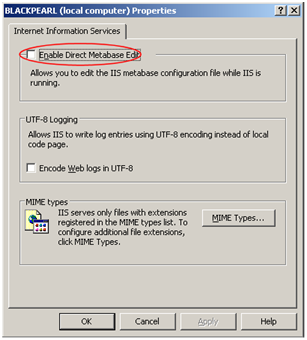
- Click OK and when prompted, click OK to confirm
Configure Reporting Services Web Site to use Kerberos
After allowing the Service Account to use delegation, the Reporting Services web site still needs to be configured to use Kerberos as an authentication method. This will be done by using the ADSUTIL script.
To configure the Reporting Services Web Site to use Kerberos, follow the below steps:
- Still in IIS Manager, click on the Web Sites node
- On the right hand side, you will see all of the configured Web Sites on this server. Locate the Site Identifier for the Reporting Services web site. In the script below, this will be identified as Site Identifier Be sure to replace this place holder with your actual identifier in the below scripts.
- Open a command prompt (Start > Run > cmd)
- Change directories to C:\Inetpub\AdminScripts
- To force IIS to use Kerberos for the site, execute the following command:
cscript adsutil.vbs set w3svc/NTAuthenticationProviders "Negotiate,NTLM"
cscript adsutil.vbs set w3svc/Site Identifier/NTAuthenticationProviders "Negotiate,NTLM"
|
Important: This command and the parameters are case sensitive. Ensure that the case is correct and that you typed everything correctly. Pay particular attention to the spelling of Negotiate and use double quote marks, these are common errors. |
- Type iisreset and hit Enter
After installing and configuring the K2 for Reporting Services component, you can validate that the K2 Reports are functioning properly by running the K2 Service in console mode and then accessing the K2 Reports from Reporting Services. Console mode is a useful troubleshooting tool, as all error and informational messages are sent to the console window so you can watch what is going on. It is important that you run the service as the Service Account in order to accurately troubleshoot permissions and other errors.
To run in console mode, perform the following steps:
- Open the Services manager (Start > All Programs > Administrative Tools > Services)
- Scroll down to the K2 blackpearl Server service, select it and click the Stop Service button
- Once the service shows as stopped, you can close the Services manager
- Right-click on the K2 blackpearl Server item in the Start menu (under Start > All Programs > K2 blackpearl) and select Run as...
- Select The following user option, and type in the domain\K2 Service Account as the User Name and password, and click OK
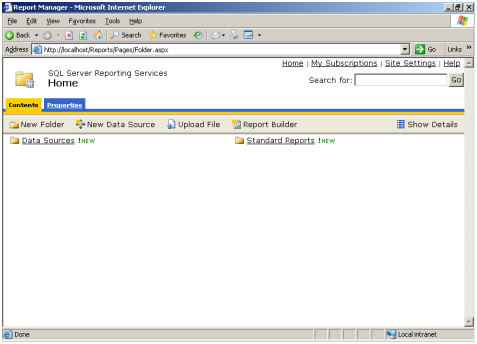
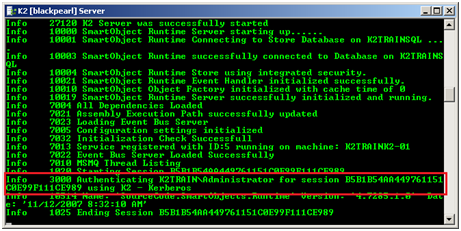
The K2 Server will start and initialize. You will see several messages starting the various components. Once you see the line stating "Info 7010 MSMQ Thread Listing", you know the service has started successfully. - Next, open Internet Explorer from the K2 Server machine. Access the SQL Server Reporting Services home page.
You will see the new Data Sources and Standard Reports folders listed, as shown below. These are the standard, out-of-the-box reports that ship with K2 blackpearl. When you create new reports and publish them to Reporting Services, you will also see those reports listed here.
- Click on the Standard Report link, the Hidden link, and then click on Process Overview
This will display the out-of-the-box Process Overview Report, as shown below:

- Also, you should see a message in the K2 Server console window showing that Kerberos was used for authentication:
|
Be sure to see the section on Post instillation common tasks once done with the install. |
