SharePoint 2010 Publishing Wizard
The Publishing Event Wizard can only be used with Microsoft Office SharePoint Server (MOSS). This wizard is accessible through K2 Studio, but will not be functional within Windows SharePoint Services (WSS).
What does the SharePoint Publishing Wizard Do?
The SharePoint Publishing Wizard is used to manage and configure Publishing Pages.
Why use the SharePoint Publishing Wizard?
Publishing pages can be edited and saved, then routed through an approval process before going live on a site. This functionality allows users to edit pages on production servers without allowing the edited page to be viewed until it has been approved. New publishing pages can be created and made available through the same process.
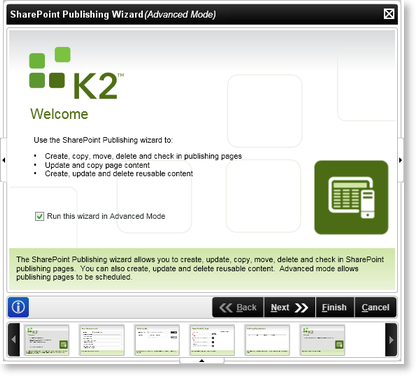
The SharePoint Publishing event wizard provides support for SharePoint publishing features. With this event users can do the following:
- Create a Publishing Page
- Copy a Publishing Page
- Move a Publishing Page
- Update a Publishing Page Content
- Delete a Publishing Page
- Check In a Publishing Page
- Get Publishing Page Content
- Create a Page using the Converter
- Create Reusable Content
- Update Reusable Content
Important Considerations when using the SharePoint Publishing Event Wizard:
- To make use of the Publishing Event Wizard the Publishing Site must already exist within SharePoint during Runtime
- The Publishing Event Wizard can only be used in conjunction with a Publishing Site
- The Publishing Event Wizard only supports the Collaboration Portal and Publishing Portal SharePoint Templates
Using the SharePoint Publishing Wizard
To start the SharePoint Publishing Wizard, select this wizard from the Events Templates and drag the event onto the design canvas or onto your activity.
| Icon | Feature | What it is |
|---|---|---|
| Run this wizard in Advanced Mode | Runs the wizard in Advanced Mode | Check this option to run this wizard in Advanced Mode |
The Event Name and Action Wizard screen fully integrates with the SharePoint Publishing Site, allowing the management and configuration of Publishing Pages.
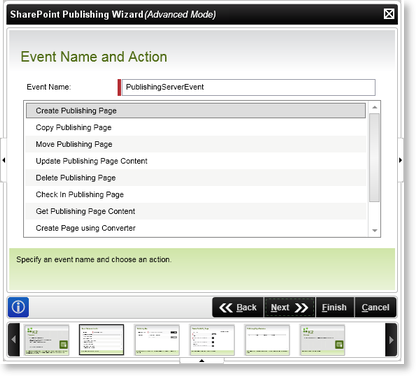
| Feature | What it is |
|---|---|
| Create a Publishing Page | To Create a Publishing Page select this option |
| Move a Publishing Page | To Move a Publishing Page select this option |
| Copy a Publishing Page | To Copy a Publishing Page select this option |
| Remove a Publishing Page | To Remove a Publishing Page select this option |
| Update Publishing Page Content | To Update Publishing Page Content select this option |
| Copy Publishing Page Content | To Copy Publishing Page Content select this option |
| Check in Publishing Page | To Check in Publishing Page select this option |
The Create Publishing Page function in the Publishing Event Wizard is used to create new Publishing Pages within SharePoint automatically.
The Create Publishing Page function does not support the overwriting of an existing Publishing Page. The Publishing Page being created must therefore not exist within SharePoint
Information required to create a Publishing Page
- An existing Publishing Site within SharePoint where the new Publishing Page should be created in
- An existing SharePoint Site URL
Publishing Site
The Publishing Site wizard screen is used to specify which Publishing Site should be used. The Publishing Site screen is context sensitive and will display different options depending on whether Standard or Advanced mode is used with the Publishing Wizard.
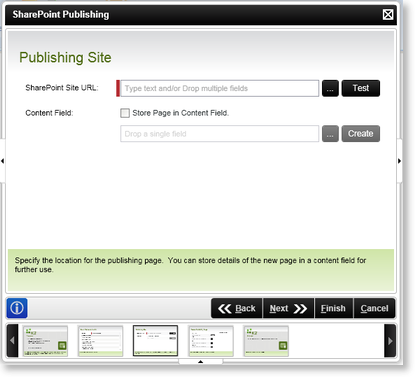
Publishing Site (Standard Mode)
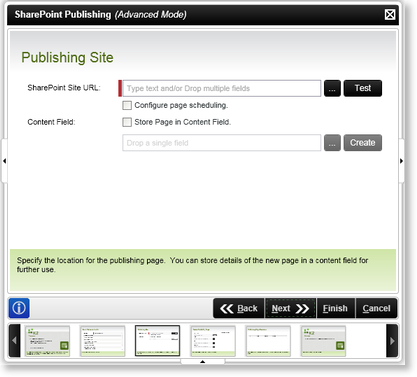
Publishing Site (Advanced Mode)
| Feature | What it is | How to use it |
|---|---|---|
| SharePoint Site URL | Stipulate the SharePoint Publishing Site URL that should be used | Click on the ellipse button and browse to the required SharePoint Publishing Site or type in the URL in the text box |
| Configure page scheduling (Advanced Only) | Configures the page scheduling of the Publishing Page | Select this check box to configure the page scheduling |
| Store Page in Content Field | This will add the Publishing Page to a Content Field for future use | Select this option if required |
| Content Field | Specifies the Content Field that should be used to store the Publishing Page information | Drop the XML Node or DataField containing the Content Field from the Context Browser, alternatively click the Create button to create a new Content Field |
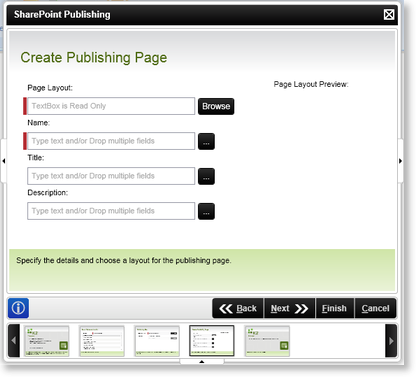
Create Publishing Page
The Create Publishing Page configures the page layout, the name and additional information for the new Publishing Page.
| Feature | What it is | How to use it |
|---|---|---|
| Page Layout | Configures the page layout of the Publishing Page | Click on the ;Browse button and browse to the required layout |
| Name | Specifies the name of the new Publishing Page. The name of the new Publishing Page must specify the file extension of the new Publishing Page, for example Budget.aspx | Type in the name and file extension of the new Publishing page in the text box alternatively click on the ellipse button and browse to the relevant DataField or XML Node |
| Title | Specifies a title for the new Publishing Page | Type in a Title for the Publishing Page in the text box, alternatively click on the ellipse button and browse to the relevant DataField or XML Node |
| Description | Specifies a description for the new Publishing Page | Type in a description for the Publishing Page in the text box, alternatively click on the ellipse button and browse to the relevant DataField or XML Node |
Selecting the Browse button will open the following screen:
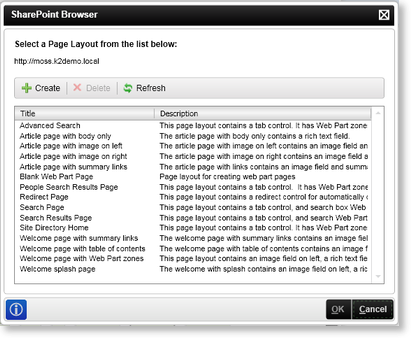
This screen displays all the available SharePoint Page Layout templates that can be used to configure the Publishing Page.
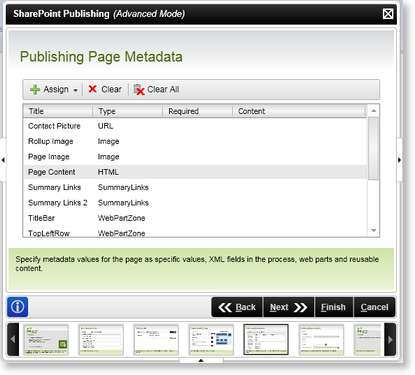
Publishing Page Metadata
The Publishing Page Metadata wizard screen is used to assign values to the Metadata fields of the Publishing Page.
| Feature | What it is | How to use it |
|---|---|---|
| Assign |
The Assign button assigns values to the selected Metadata field. The following values can be assigned:
|
Click on the Metadata field that should be configured, click on the down arrow next to the Assign button and select the type of value that should be used. |
| Clear | Clears the assigned value from the selected Metadata field | Select the relevant metadata field and click clear |
| Clear All | Clears all the assigned values form all the Metadata fields | Click Clear All to clear all the Metadata values |
| Title | Displays the title of the Metadata | User Reference |
| Type | Displays the type of Metadata | User Reference |
| Required | Displays whether the value is required | User Reference |
| Value | Displays the value | User Reference |
Metadata Types
The Metadata types that surface in K2 Studio and K2 for Visual Studio, exist in SharePoint.
Here are some links to certain explanations on this topic.
Publishing Sites: Field Controls or Web Parts http://blogs.msdn.com/b/ecm/archive/2008/10/09/ecm.aspx.
Add a list of summary links to a publishing page layout - http://office.microsoft.com/en-us/sharepoint-designer-help/aspx.aspx.
No HTML Markup in MOSS 2007 Managed Properties - http://blogs.msdn.com/b/jjameson/archive/2009/09/23/no-html-markup-in-moss-2007-managed-properties.aspx.
Change the properties of a page on a publishing site - http://office.microsoft.com/en-us/sharepoint-server-help/aspx.aspx.
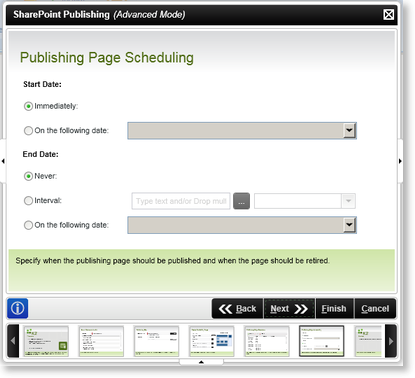
Publishing Page Scheduling (Advanced Only)
The Publishing Page Scheduling wizard screen is displayed when the Configure Page Scheduling check box was selected in the Publishing Site wizard screen. The Publishing Page Scheduling wizard screen configures scheduling of the Publishing Page
| Feature | What it is | How to use it |
|---|---|---|
| Start Date |
The Start Date options configures when the Publishing Page should be published. Select one of the following options:
|
Select the relevant option |
| End Date |
The End Date options configures when the Publishing Page should be retired. Select one of the following options:
|
Select the relevant option |
The Copy Publishing Page function in the Publishing Event Wizard is used to copy existing Publishing Pages within SharePoint automatically.
Information required to create a Publishing Page
- An existing Publishing Page within SharePoint
- An existing SharePoint Site URL
- An existing Publishing Site
Copy Publishing Page Source
The Copy Publishing Page Source wizard screen specifies the location of the Publishing Page that should be copied.
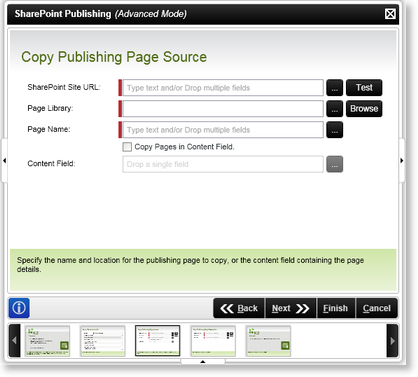
| Feature | What it is | How to use it |
|---|---|---|
| SharePoint Site URL | Stipulates the SharePoint Publishing Site URL that should be used | Click on the ellipse button and browse to the required SharePoint Publishing Site or type in the URL in the text box |
| Page Library | Stipulates the Page Library where the Publishing Page resides | Click on the Browse button and browse to the required Page Library, alternatively click on the ellipse button and select the relevant XML Node or DataField that should be used |
| Page Name | Stipulates the Publishing Page's name that should be copied. The name of the Publishing Page must specify the file extension of the Publishing Page, for example Budget.aspx | Type in the name and file extension of the Publishing page in the text box alternatively click on the ellipse button and browse to the relevant DataField or XML Node |
| Copy Pages in Content Field | The Copy Pages in Content Field check box stipulates that the Publishing Page should be stored in a content field for future use | Select this option if required |
| Content Field | Specifies the Content Field that should be used to store the Publishing Page information | Drop the XML Node or DataField containing the Content Field from the Context Browser, alternatively click the Create button to create a new Content Field |
Copy Publishing Page Destination
The Copy Publishing Page Destination wizard screen specifies the location where the Publishing Page should be copied to.
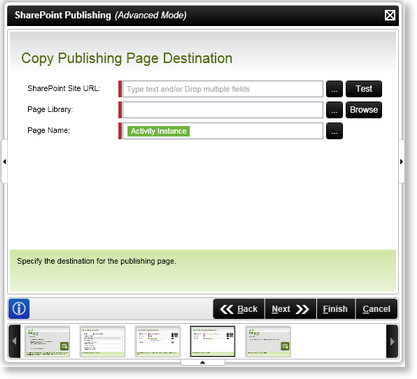
| Feature | What it is | How to use it |
|---|---|---|
| SharePoint Site URL | Stipulates the SharePoint Publishing Site URL that should be used | Click on the ellipse button and browse to the required SharePoint Publishing Site or type in the URL in the text box |
| Page Library | Stipulates the Page Library where the Publishing Page should be copied to | Click on the Browse button and browse to the required Page Library, alternatively click on the ellipse button and select the relevant XML Node or DataField that should be used |
| Page Name | Stipulates the newly copied Publishing Page's name that should be used. The name of the Publishing Page must specify the file extension of the Publishing Page, for example Budget.aspx | Type in the name and file extension of the Publishing page in the text box alternatively click on the ellipse button and browse to the relevant DataField or XML Node |
The Move Publishing Page function in the Publishing Event Wizard is used to move existing Publishing Pages within SharePoint automatically.
Information required to move a Publishing Page
- An existing Publishing Page within SharePoint
- An existing SharePoint Site URL
- An existing Publishing Site
Move Publishing Page Source
The Move Publishing Page Source wizard screen specifies the location of the Publishing Page that should be moved.
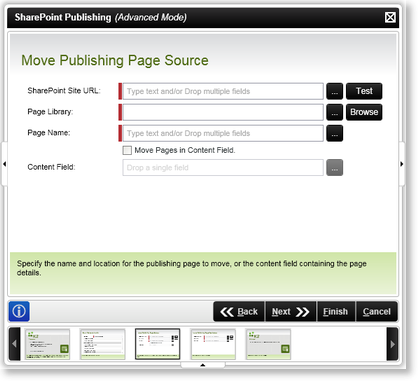
| Feature | What it is | How to use it |
|---|---|---|
| SharePoint Site URL | Stipulates the SharePoint Publishing Site URL that should be used | Click on the ellipse button and browse to the required SharePoint Publishing Site or type in the URL in the text box |
| Page Library | Stipulates the Page Library where the Publishing Page resides | Click on the Browse button and browse to the required Page Library, alternatively click on the ellipse button and select the relevant XML Node or DataField that should be used |
| Page Name | Stipulates the Publishing Page's name that should be moved. The name of the Publishing Page must specify the file extension of the Publishing Page, for example Budget.aspx | Type in the name and file extension of the Publishing page in the text box alternatively click on the ellipse button and browse to the relevant DataField or XML Node |
| Copy Pages in Content Field | The Move Pages in Content Field check box stipulates that the Publishing Page should be stored in a content field for future use | Select this option if required |
| Content Field | Specifies the Content Field that should be used to store the Publishing Page information | Drop the XML Node or DataField containing the Content Field from the Context Browser, alternatively click the Create button to create a new Content Field |
Move Publishing Page Destination
The Move Publishing Page Destination wizard screen specifies the location where the Publishing Page should be moved to.

| Feature | What it is | How to use it |
|---|---|---|
| SharePoint Site URL | Stipulates the SharePoint Publishing Site URL that should be used | Click on the ellipse button and browse to the required SharePoint Publishing Site or type in the URL in the text box |
| Page Library | Stipulates the Page Library where the Publishing Page should be moved to | Click on the Browse button and browse to the required Page Library, alternatively click on the ellipse button and select the relevant XML Node or DataField that should be used |
| Page Name | Stipulates the newly moved Publishing Page's name that should be used. The name of the Publishing Page must specify the file extension of the Publishing Page, for example Budget.aspx | Type in the name and file extension of the Publishing page in the text box alternatively click on the ellipse button and browse to the relevant DataField or XML Node |
The Update Publishing Page function in the Publishing Event Wizard is used to update existing Publishing Pages within SharePoint automatically.
Information required to update a Publishing Page
- An existing Publishing Page within SharePoint
- An existing SharePoint Site URL
- An existing Publishing Site
Publishing Site
The Publishing Site wizard screen is used to specify which Publishing Site should be used. The Publishing Site screen is context sensitive and will display different options depending on whether Standard or Advanced mode is used with the Publishing Wizard.
Publishing Site (Standard Mode)
Publishing Site (Advanced Mode)
| Feature | What it is | How to use it |
|---|---|---|
| SharePoint Site URL | Stipulate the SharePoint Publishing Site URL that should be used | Click on the ellipse button and browse to the required SharePoint Publishing Site or type in the URL in the text box |
| Configure page scheduling (Advanced Only) | Configures the page scheduling of the Publishing Page | Select this check box to configure the page scheduling |
| Store Page in Content Field | This will add the Publishing Page to a Content Field for future use | Select this option if required |
| Content Field | Specifies the Content Field that should be used to store the Publishing Page information | Drop the XML Node or DataField containing the Content Field from the Context Browser, alternatively click the Create button to create a new Content Field |
Update Publishing Page
The Update Publishing Page updates the configuration of the page layout, the name and additional information for the specified Publishing Page.
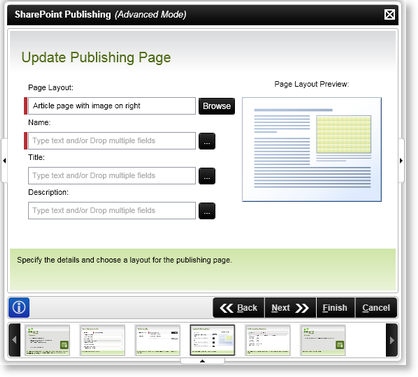
| Feature | What it is | How to use it |
|---|---|---|
| Page Layout | Configures the page layout of the Publishing Page | Click on the Browse button and browse to the required layout |
| Name | Specifies the name of the Publishing Page. The name of the Publishing Page must specify the file extension of the Publishing Page, for example Budget.aspx | Type in the name and file extension of the Publishing page in the text box alternatively click on the ellipse button and browse to the relevant DataField or XML Node |
| Title | Specifies a title for the Publishing Page | Type in a Title for the Publishing Page in the text box, alternatively click on the ellipse button and browse to the relevant DataField or XML Node |
| Description | Specifies a description for the Publishing Page | Type in a description for the Publishing Page in the text box, alternatively click on the ellipse button and browse to the relevant DataField or XML Node |
Publishing Page Metadata
The Publishing Page Metadata wizard screen is used to assign values to the Metadata fields of the Publishing Page.
| Feature | What it is | How to use it |
|---|---|---|
| Assign |
The Assign button assigns values to the selected Metadata field. The following values can be assigned:
|
Click on the Metadata field that should be configured, click on the down arrow next to the Assign button and select the type of value that should be used. |
| Clear | Clears the assigned value from the selected Metadata field | Select the relevant metadata field and click clear |
| Clear All | Clears all the assigned values form all the Metadata fields | Click Clear All to clear all the Metadata values |
| Title | Displays the title of the Metadata | User Reference |
| Type | Displays the type of Metadata | User Reference |
| Required | Displays whether the value is required | User Reference |
| Value | Displays the value | User Reference |
Metadata Types
The Metadata types that surface in K2 Studio and K2 for Visual Studio, exist in SharePoint.
Here are some links to certain explanations on this topic.
Publishing Sites: Field Controls or Web Parts http://blogs.msdn.com/b/ecm/archive/2008/10/09/ecm.aspx.
Add a list of summary links to a publishing page layout - http://office.microsoft.com/en-us/sharepoint-designer-help/aspx.aspx.
No HTML Markup in MOSS 2007 Managed Properties - http://blogs.msdn.com/b/jjameson/archive/2009/09/23/no-html-markup-in-moss-2007-managed-properties.aspx.
Change the properties of a page on a publishing site - http://office.microsoft.com/en-us/sharepoint-server-help/aspx.aspx.
The Delete Publishing Page function in the Publishing Event Wizard is used to delete existing Publishing Pages within SharePoint automatically.
Information required to delete a Publishing Page
- An existing Publishing Page within SharePoint
- An existing SharePoint Site URL
- An existing Publishing Site
Delete Publishing Page
The Delete Publishing Page wizard screen specifies the location of the Publishing Page that should be deleted.
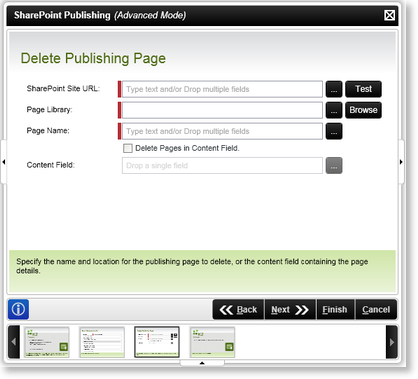
| Feature | What it is | How to use it |
|---|---|---|
| SharePoint Site URL | Stipulates the SharePoint Publishing Site URL that should be deleted | Click on the ellipse button and browse to the required SharePoint Publishing Site or type in the URL in the text box |
| Page Library | Stipulates the Page Library where the Publishing Page resides | Click on the Browse button and browse to the required Page Library, alternatively click on the ellipse button and select the relevant XML Node or DataField that should be used |
| Page Name | Stipulates the Publishing Page's name that should be deleted. The name of the Publishing Page must specify the file extension of the Publishing Page, for example Budget.aspx | Type in the name and file extension of the Publishing page in the text box alternatively click on the ellipse button and browse to the relevant DataField or XML Node |
| Copy Pages in Content Field | The Delete Pages in Content Field check box stipulates that the Publishing Page should be deleted from the content field | Select this option if required |
| Content Field | Specifies the Content Field where the Publishing Page should be deleted from | Drop the XML Node or DataField containing the Content Field from the Context Browser. |
The Check In Publishing Page function in the Publishing event Wizard is used to check in Publishing Pages in SharePoint automatically as part of the workflow. The Check In Publishing Page function can stipulate whether a major or minor version of the Publishing Page should be checked in.
Information required to check in a Publishing Page
- An existing Publishing Site URL
- An existing Publishing Page, DataField or XML Node
Check In Publishing Page
The Check In Publishing Page wizard screen is used to specify which Publishing Page to check in.
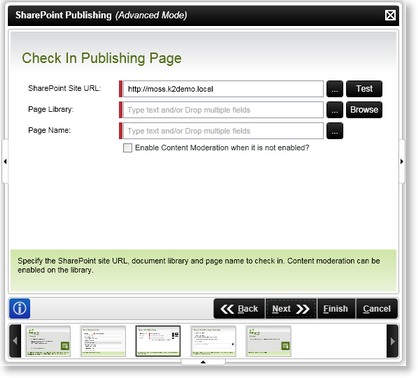
| Feature | What it is | How to use it |
|---|---|---|
| SharePoint Site URL | Stipulate the SharePoint Publishing Site that should be used | Click on the ellipse button and browse to the required SharePoint Publishing Site |
| Page Library | Specifies the Page Library that should be used | Click on the ellipse button and browse to the required SharePoint Page Library |
| Page Name: | Specifies the Page Name that should be used | Click on the ellipse button and browse to the required SharePoint Page Name. |
| Enable Content Moderation when it is not enabled? | Enables Content Moderation when it is not enabled | Select if relevant |
Check in Publishing Page (Continued)
The Check In Publishing Page (Continued) wizard screen is used to specify additional check in details, such as versioning settings and additional comments.
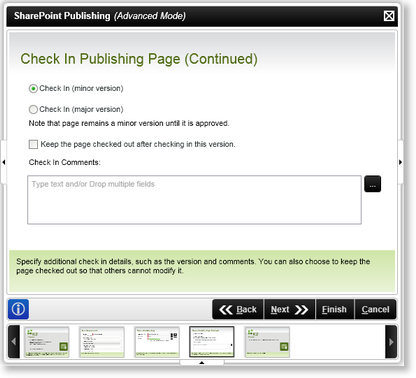
| Feature | What it is | How to use it |
|---|---|---|
| Check In (minor version) | Minor versioning will be applied when the publishing page is checked in to SharePoint. The Publishing Page will be checked in as an unpublished page in draft mode | Select if applicable |
| Check In (major version) | Major versioning will be applied when the Publishing Page is checked in to SharePoint. The Publishing Page will be checked in as a published page | Select if applicable |
| Keep the page checked out after checking in this version | Will keep the Publishing Page checked out after the Publishing Page has been checked in | Select if applicable |
| Check In Comments | Specify comments that should be added to the Publishing Page when checking in | Type in comments if applicable |
The Get Publishing Page Content function loads content from a specified Publishing Page for use in the workflow.
Information required to make use of the Get Publishing Page Content function:
- An existing Publishing Page
- An existing Publishing Site URL
Publishing Site
The Publishing Site wizard screen is used to specify which Publishing Site should be used. The Publishing Site screen is context sensitive and will display different options depending on whether Standard or Advanced mode is used with the Publishing Wizard.
Publishing Site (Standard Mode)
Publishing Site (Advanced Mode)
| Feature | What it is | How to use it |
|---|---|---|
| SharePoint Site URL | Stipulate the SharePoint Publishing Site URL that should be used | Click on the ellipse button and browse to the required SharePoint Publishing Site or type in the URL in the text box |
| Configure page scheduling (Advanced Only) | Configures the page scheduling of the Publishing Page | Select this check box to configure the page scheduling |
| Store Page in Content Field | This will add the Publishing Page to a Content Field for future use | Select this option if required |
| Content Field | Specifies the Content Field that should be used to store the Publishing Page information | Drop the XML Node or DataField containing the Content Field from the Context Browser, alternatively click the Create button to create a new Content Field |
Publishing Page Content Page
The Publishing Page Content Page wizard screen is used to specify the settings of the existing Publishing Page that is going to be applied during Run Time.
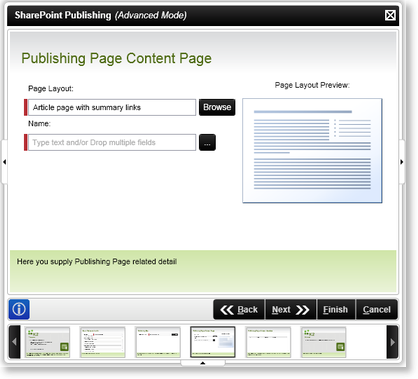
| Feature | What it is | How to use it |
|---|---|---|
| Page Layout | Configures the page layout of the Publishing Page | Click on the Browse button and browse to the required layout |
| Name | Specifies the name of the Publishing Page. The name of the Publishing Page must specify the file extension of the Publishing Page, for example Budget.aspx | Type in the name and file extension of the Publishing page in the text box alternatively click on the ellipse button and browse to the relevant DataField or XML Node |
Publishing Page Metadata
The Publishing Page Metadata wizard screen is used to assign values to the Metadata fields of the Publishing Page.
| Feature | What it is | How to use it |
|---|---|---|
| Assign |
The Assign button assigns values to the selected Metadata field. The following values can be assigned:
|
Click on the Metadata field that should be configured, click on the down arrow next to the Assign button and select the type of value that should be used. |
| Clear | Clears the assigned value from the selected Metadata field | Select the relevant metadata field and click clear |
| Clear All | Clears all the assigned values form all the Metadata fields | Click Clear All to clear all the Metadata values |
| Title | Displays the title of the Metadata | User Reference |
| Type | Displays the type of Metadata | User Reference |
| Required | Displays whether the value is required | User Reference |
| Value | Displays the value | User Reference |
Metadata Types
The Metadata types that surface in K2 Studio and K2 for Visual Studio, exist in SharePoint.
Here are some links to certain explanations on this topic.
Publishing Sites: Field Controls or Web Parts http://blogs.msdn.com/b/ecm/archive/2008/10/09/ecm.aspx.
Add a list of summary links to a publishing page layout - http://office.microsoft.com/en-us/sharepoint-designer-help/aspx.aspx.
No HTML Markup in MOSS 2007 Managed Properties - http://blogs.msdn.com/b/jjameson/archive/2009/09/23/no-html-markup-in-moss-2007-managed-properties.aspx.
Change the properties of a page on a publishing site - http://office.microsoft.com/en-us/sharepoint-server-help/aspx.aspx.
The Create Page using Converter function is used to create a Publishing Page from a specified source using the converter functionality within SharePoint. For example, when an existing Office documents located within a SharePoint Document Library should be converted to a Publishing Page.
The Create Page using Converter function is only available when MOSS is configured as a Member Server and will not operate if MOSS is set up as a Domain Controller.
Important Considerations when using the Create Page using Converter function:
- The Document Conversions Load Balancer Service and the Document Conversions Launcher Service needs to be configured in SharePoint to make use of the Converter function.
- The Source Documents that should be converted must be located within SharePoint.
Documents created by the SharePoint Documents Event Wizard can be converted into Publishing Pages by using the SharePoint Publishing Wizard.
Information required to make use of the Create Page using Converter function:
- An existing document that should be converted
- An existing Publishing Site URL
Create Page using Converter Source
The Create Page using Converter Source wizard screen is used to specify the Source Document's location within SharePoint.
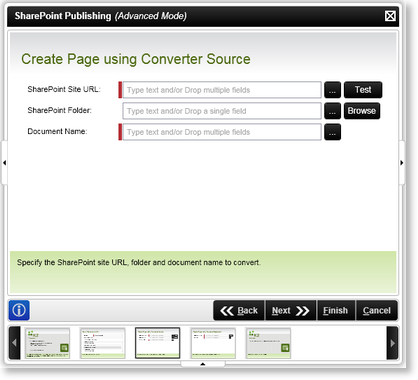
| Feature | What it is | How to use it |
|---|---|---|
| SharePoint Site URL | Stipulate the SharePoint Site URL where the source Document is located | Click on the ellipse button and browse to the required SharePoint Site URL or type in the URL in the text box |
| SharePoint Folder | A folder within SharePoint where the source Document is located | Provide the SharePoint Folder if relevant |
| Document Name | Specifies the source Document's Name that should be converted | Click on the Browse button and browse to the required Document, alternatively click on the ellipse button and select the relevant XML Node or DataField that should be used |
Create Page using Converter Destination
The Create Page using Converter Destination wizard screen is used to specify the target Publishing Page's destination.
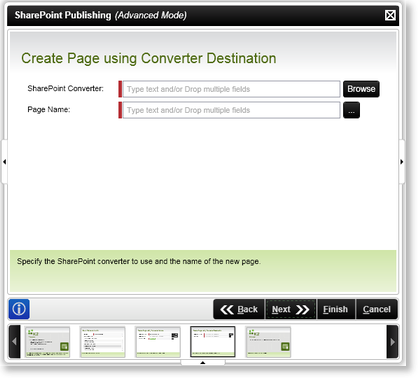
| Feature | What it is | How to use it |
|---|---|---|
| SharePoint Site URL | Specifies which converter should be used | Click on the Browse button and browse to the required Document, alternatively click on the ellipse button and select the relevant XML Node or DataField that should be used |
| Page Name | Stipulates the Publishing Page's name that should be created. The name of the Publishing Page must specify the file extension of the Publishing Page, for example Budget.aspx | Type in the name and file extension of the Publishing page in the text box alternatively click on the ellipse button and browse to the relevant DataField or XML Node |
The Create Reusable Content function is used to create reusable content within SharePoint automatically as part of the workflow. The Reusable content created can be either static or dynamic.
Information required to create Reusable Content
- An existing SharePoint Site URL
Content Reuse
The Content Reuse wizard screen specifies the location where the reusable content is stored and specifies the content type of the reusable content.
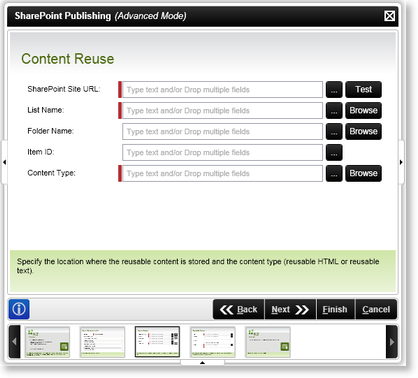
| Feature | What it is | How to use it |
|---|---|---|
| SharePoint Site URL | The SharePoint Site URL text box specifies the SharePoint Site URL that should be used | Specify the SharePoint Server URL e.g. http://SPSServer:121 OR use the ellipse button to open Context Browser and select the SharePoint URL |
| List Name | Specifies the List where the Reusable Content should be created or updated | Enter the List Name OR use the Context Browser to select a DataField or XML Node. Alternatively use the Browse button to locate the List Name on the SharePoint Site |
| Folder Name | Specifies the folder where the Reusable Content is located | If the Reusable Content is located in a Folder, click on the Browse button to specify the Folder |
| Item ID | Specifies the List Item ID of the Reusable Content that should be updated | Enter the List Item ID OR use the Context Browser to select a DataField or XML Node. |
| Content Type | Content Type is a customizable meta description of content that can include custom properties, a retention policy, and an associated set of workflows/business processes | Enter the description of the Content Type OR use the Context Browser to select a DataField or XML Node. Alternatively use the Browse button to select the Content Type from the SharePoint Site |
Create Reusable Content
The Create Reusable Content wizard screen is used to configure the reusable content.
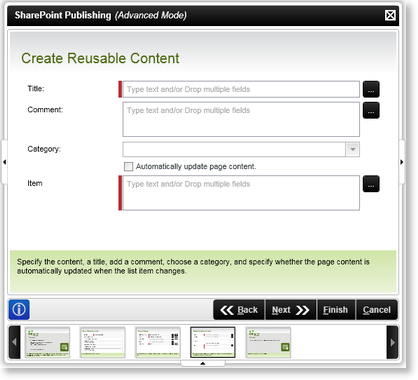
| Feature | What it is | How to use it |
|---|---|---|
| Title | Supplies the Reusable Content with a unique Title for easy reference | Type in a Title for the Reusable Content, alternatively click on the ellipse button and select the relevant DataField or XML Node |
| Comment | The comment field adds additional comments to the reusable content | Add any comments in the text box, alternatively click the ellipse button and browse to a DataField or XML Node |
| Category | If any Content Categories have been defined, it can be selected in the Category drop-down list | Select the relevant category if relevant |
| Automatically update page content | When selected this will automatically update the publishing page content | Select if required |
| Item | The Item text box specifies the Reusable Content | Type in the Reusable Content that should be created in the text box, alternatively click on the ellipse button and browse to a DataField or XML Node that should be used |
The Update Reusable Content function is used to update existing reusable content within SharePoint automatically as part of the workflow. The Reusable content can be either static or dynamic.
Information required to create Reusable Content
- An existing SharePoint Site URL
Content Reuse
The Content Reuse wizard screen specifies the location where the reusable content is stored and specifies the content type of the reusable content.
| Feature | What it is | How to use it |
|---|---|---|
| SharePoint Site URL | The SharePoint Site URL text box specifies the SharePoint Site URL that should be used | Specify the SharePoint Server URL e.g. http://SPSServer:121 OR use the ellipse button to open Context Browser and select the SharePoint URL |
| List Name | Specifies the List where the Reusable Content should be created or updated | Enter the List Name OR use the Context Browser to select a DataField or XML Node. Alternatively use the Browse button to locate the List Name on the SharePoint Site |
| Folder Name | Specifies the folder where the Reusable Content is located | If the Reusable Content is located in a Folder, click on the Browse button to specify the Folder |
| Item ID | Specifies the List Item ID of the Reusable Content that should be updated | Enter the List Item ID OR use the Context Browser to select a DataField or XML Node. |
| Content Type | Content Type is a customizable meta description of content that can include custom properties, a retention policy, and an associated set of workflows/business processes | Enter the description of the Content Type OR use the Context Browser to select a DataField or XML Node. Alternatively use the Browse button to select the Content Type from the SharePoint Site |
Update Reusable Content
The Update Reusable Content wizard screen is used to configure the reusable content.

| Feature | What it is | How to use it |
|---|---|---|
| Comment | The comment field adds additional comments to the reusable content | Add any comments in the text box, alternatively click the ellipse button and browse to a DataField or XML Node |
| Category | If any Content Categories have been defined, it can be selected in the Category drop-down list | Select the relevant category if relevant |
| Automatically update page content | When selected this will automatically update the publishing page content | Select if required |
| Reusable Text | The Reusable Text box specifies the Reusable Content | Type in the Reusable Content that should be created in the text box, alternatively click on the ellipse button and browse to a DataField or XML Node that should be used |
This Screen marks the end of the SharePoint Publishing Event Wizard

Once the wizard has configured the integration process, it can be accessed to change configuration settings by double-clicking on the workflow design canvas to load the workflow project properties and selecting the SharePoint Integration Process Property Wizard