Exchange Event
What does the Exchange Event Wizard Do?
The Exchange Event allows you to create and disable mailboxes on the Microsoft Exchange Server, and to create meeting requests and tasks, in a K2 process.
Why use the Exchange Event Wizard?
When you need to include Exchange-based tasks in a K2 process, you can automate these tasks by dynamically configuring them in the process.
Using the Exchange Event Wizard
The Exchange Event wizard is available from the K2 Toolbox. To load the Exchange Event onto the canvas, click and drag the item onto the design canvas. The Exchange Event Configuration wizard is then displayed.
The K2 Service Account must have View-Only Administrator rights on the Microsoft Exchange Server.
In the Object Browser, in order to be able to expand the Exchange Server field into the Storage Group and Mailbox Database nodes, the K2 Service account needs Exchange View Only Administrator rights.
To be able to execute the Create Mailbox and Disable Mailbox actions, the Exchange Event must be configured to run as a service or user account with Exchange Organization administrator rights.
To be able to execute the Send Meeting Request and Send Task actions the Exchange Event must be configured to run as a service or user account with Impersonation rights and NOT Exchange Organization administrator rights. The service or user account should also have a trusted server certificate from the Exchange web service in his or her personal certificate store.
The K2 Service Account needs Exchange View-Only Administrator rights. These rights are needed because the K2 Studio Object Browser uses the K2 Service account to view the Storage Groups and Mailbox Databases on an Exchange server.
In order for these rights to take effect, the K2 Server must be restarted.
Installation Account
This account should have View-Only rights for Exchange to be able to browse Exchange servers and mailbox databases.
Also give the account Execute rights on the Microsoft.PowerShell configuration, by running the following command in the Exchange Management Shell:
Set-PSSessionConfiguration Microsoft.PowerShell –ShowSecurityDescrtiptorUI
K2 Service Account
This account should have Recipient Management rights for Exchange to be able to create and disable mailboxes and browse Exchange servers and mailbox databases.
Also give the account Execute rights on the Microsoft.PowerShell configuration, by running the following command in the Exchange Management Shell:
Set-PSSessionConfiguration Microsoft.PowerShell –ShowSecurityDescrtiptorUI
Impersonation Account
This account should be assigned the Application Impersonation role to be able to impersonate users for sending meeting requests and creating tasks.
Run the following command in the Exchange Command Shell to give impersonation rights:
new-ManagementRoleAssignment -Name: _suImpersonateRoleAsg -Role: ApplicationImpersonation -User: “impersonation account name”
Give this account Log on as batch job rights on the K2 Server machine to be able to run Exchange Events as this account.
Configuring WinRM
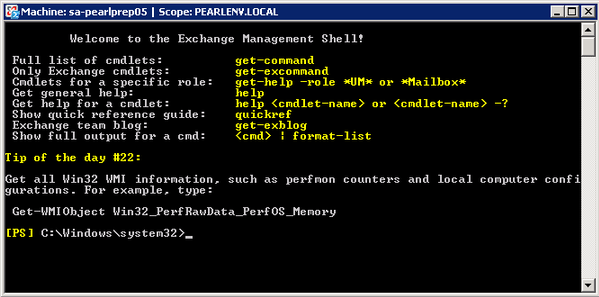
The following commands should be run through the Exchange Management Shell on the Exchange server machine:
Enable-PSRemoting
Set-Item wsman:\localhost\client\trustedhosts “k2server machine fan”
Configure IIS on the Exchange server machine:
By default, WinRM uses http and connects through the Default Web Site on port 80.
Add bindings to http port 80, with no host name and All Unassigned if they don’t exist.
\PowerShell should not have SSL enabled.
\PowerShell should have only anonymous access enabled.
Troubleshooting
To resolve possible connection issues with WinRM, try the following:
On the Exchange server, edit group policy and under Computer Configuration\Administrative Templates\Windows Components\Windows Remote Management (WinRM)\WinRM Service, set IPv4 & IPv6 filters = *
IPv6 should be enabled
On the K2 server machine, run the following cmd let in PowerShell
Set-ExecutionPolicy Unrestricted
PowerShell can’t connect to host headers, so the Exchange certificate should be issued to the Exchange server machine name and the Exchange service instances should point to the machine name as well
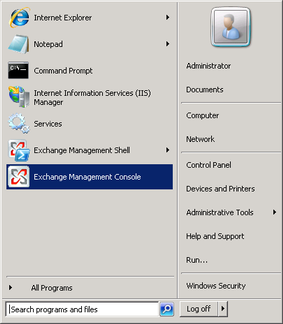
Configuring Exchange Organization and View-Only Administrator rights can be done through the Exchange Management Console:
- Open the Exchange Management Console
- Select the user account to be configured with the new rights

- Then click on the Add Exchange Administrator link in the right hand column and select the required rights.
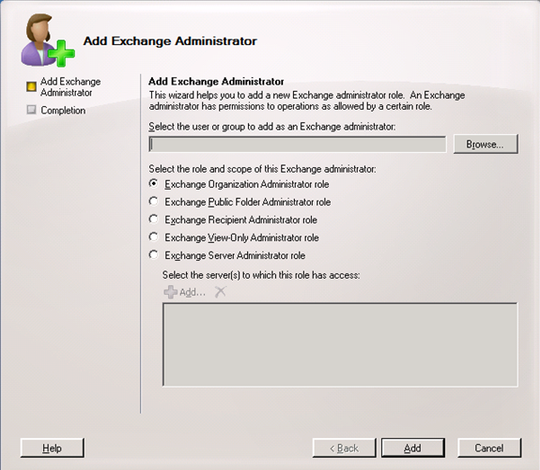
- Click on the Add button to complete the account configuration
- An Exchange administrator account should be created and given Exchange Organization administrator rights.
- When the Create/Disable mailbox action is selected, the wizard should be configured to Run As the Exchange administrator account.
- An Exchange service account should be created and given Exchange Impersonation rights.
- When a Meeting Request or a Send Task action is selected in the Exchange Event wizard, the wizard should be configured to Run As the Exchange service account.
- Using the Exchange Web Service requires the K2 server machine to trust the EWS certificate and its signing Certificate Authority. This is required for the following operations:
- Exchange Calendar SmartObject (used by Send Meeting Request)
- Exchange Task SmartObject (used by Send Task)
- Exchange Meeting SmartObject (for using the Get Meeting Suggestions and Get Specific Time methods)
K2 Service Account
This account should have Recipient Management rights for Exchange to be able to create and disable mailboxes and browse Exchange servers and mailbox databases.
Also give the account Execute rights on the Microsoft.PowerShell configuration, by running the following command in the Exchange Management Shell:
Set-PSSessionConfiguration Microsoft.PowerShell –ShowSecurityDescrtiptorUI
Configuring Exchange Organization and View-Only Administrator rights can be done through the Exchange Management Console:
- Open the Exchange Management Console
- Select the user account to be configured with the new rights
- Then click on the Add Exchange Administrator link in the right hand column and select the required rights.
- Click on the Add button to complete the account configuration
Giving Exchange impersonation rights for an account requires the account to NOT be part of the Exchange Organization Administrator group.
The rights are given to a user for a specific server.
The following commands should be run in the Exchange Management Shell, replacing <ExchangeServer> with the Exchange server’s name where the Exchange web service is running and replacing <ExServiceAccount> with the name of the Exchange service account which the rights should be given to:
Add-ADPermission -Identity (get-exchangeserver -identity <ExchangeServer>).DistinguishedName -User (Get-User -Identity <ExServiceAccount> | select-object).identity -AccessRights GenericAll -InheritanceType Descendents
Add-ADPermission -Identity (get-exchangeserver -identity <ExchangeServer>).DistinguishedName -User (Get-User -Identity <ExServiceAccount> | select-object).identity -ExtendedRight ms-Exch-EPI-Impersonation
Add-ADPermission -Identity (get-exchangeserver -identity <ExchangeServer>).DistinguishedName -User (Get-User -Identity <ExServiceAccount> | select-object).identity -ExtendedRight ms-Exch-EPI-May-Impersonate
Add-ADPermission -Identity (get-exchangeserver -identity <ExchangeServer>).DistinguishedName -User (Get-User -Identity <ExServiceAccount> | select-object).identity -ExtendedRights Send-As
Add-ADPermission -Identity (get-exchangeserver -identity <ExchangeServer>).DistinguishedName -User (Get-User -Identity <ExServiceAccount> | select-object).identity -ExtendedRights Receive-As
- Select the Exchange Management Shell from the Start menu
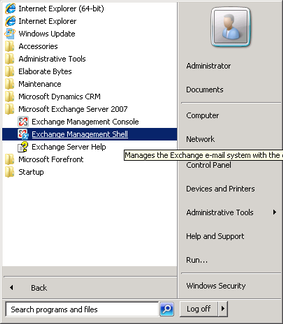
- This opens the console window, to execute the above commands
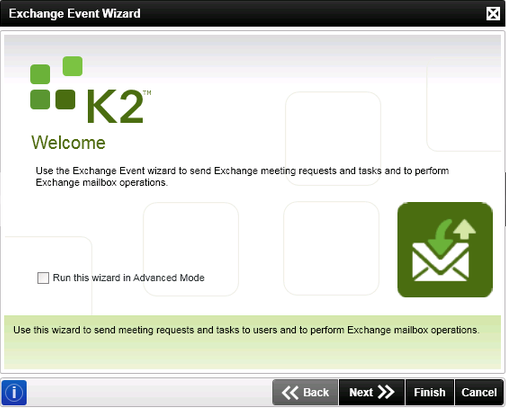
The Welcome page is the entry point to the wizard and is used to configure the Exchange Events in either standard or advanced mode. Selecting advanced mode adds the Advanced Settings page to the wizard. On this page, you can choose a SmartObject server which may be different to the pre-populated server default.
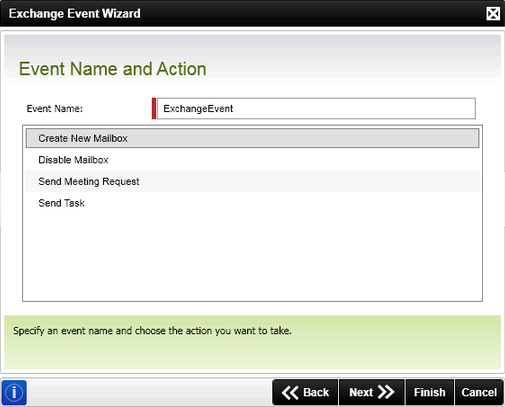
This page presents you with the Exchange Event name and the action that the event takes.
| Field | Description | Sample Value |
|---|---|---|
| Create New Mailbox | Configures the Exchange Event to create a mailbox for the specified user. | Select this event to create the mailbox of a specified user |
| Disable Mailbox | Configures the Exchange Event to disable the specified user's mailbox. | Select this event to disable the mailbox of a specified user |
| Send Meeting Request | Configures the Exchange Event to send a meeting request to meeting participants and attendees. | Select this event to start the configuration of a workflow event that will send a meeting request |
| Send Task | Configures the Exchange Event to send a task to a specific user. | Select this event to start the configuration of a workflow event that will send a task to a user |
The Create New User Mailbox action and the Disable Mailbox action require specific permissions to perform their actions. Please use the Run As setting to provide the account that these actions are run as.
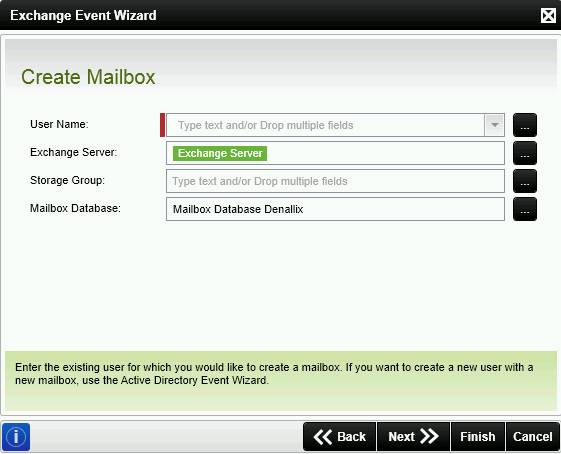
The Create Mailbox action provides the ability to setup a user's mailbox account from within a workflow.
When creating a mailbox for a user that resides in Exchange Online, ensure that when the user is created before the workflow runs, that the Exchange License is activated on Exchange Online, and that the Exchange Account should be set to Disabled (Enabled by default), prior to creating the mailbox via the Create Mailbox wizard.
| Field | Description | Sample Value |
|---|---|---|
| User Name | The user whose mailbox will be created. This is a required field and must contain a value. | Enter the user account e.g. K2\DemoUser, or use the ellipsis button to open the Context Browser and drag the user's account or a variable to the User Name field. |
| Exchange Server | The Microsoft Exchange Server network address that the Exchange wizard Create Mailbox Event will communicate with. This field is prepopulated with the Exchange Server connection string. | Enter the address of the Exchange Server, or click the ellipsis button to open the Context Browser and drag the Exchange Server address or variable to this field. |
| Storage Group | This field allows the workflow creator to enter or select the specific Storage Group on the Exchange Server that the user mailbox will be created in. Note that this field must only be populated when Exchange Server 2007 is being used. | Enter the Storage Group name or click the ellipsis button to open the Context Browser and drag the Storage Group address or variable to this field. |
| Mailbox Database | The name of the Exchange Server's Mailbox database. This field is prepopulated with the Mailbox Database environment field that is associated with the default Exchange Server environment field. | Enter the Mailbox Database name or click the ellipsis button to open the Context Browser and drag the Mailbox database information or variable to this field. |
To be able to execute the Create Mailbox action, the Exchange Event should be configured to run as a service or user account with Exchange Organization Administrator rights.
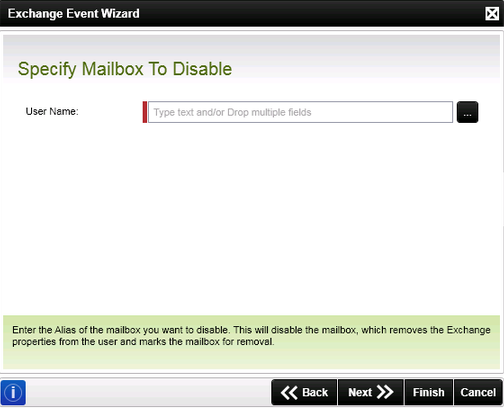
The Disable Mailbox action allows the workflow creator to suspend an Active Directory user's mailbox from within a workflow.
| Field | Description | Sample Value |
|---|---|---|
| User Name | The Active Directory user whose mailbox is to be disabled | Enter the user domain account e.g. K2\DemoUser, or use the ellipsis button to open the Context Browser and drag the user's account or a variable to the User Name field |
To be able to execute the Disable Mailbox action, the Exchange Event should be configured to run as a service or user account with Exchange Organization Administrator rights.
Meeting Details
This page allows you to send a meeting request from the workflow.
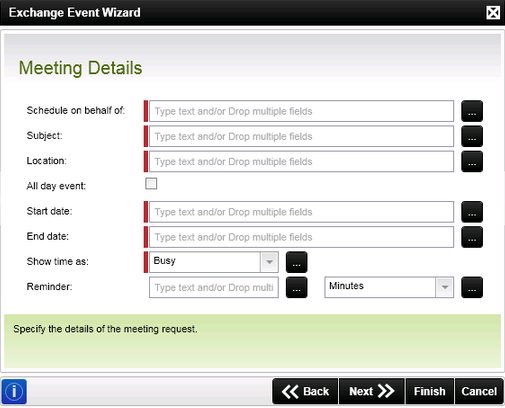
| Field | Description | Sample Value |
|---|---|---|
| Schedule on behalf of: | Configures user sending the meeting request. The e-mail address of the user (or users) is required | Enter the e-mail address e.g. Webmaster@K2.com, or use the ellipsis button to open the Context Browser and drag the e-mail address or variable to this field |
| Subject: | The subject line of the meeting request - often one of the process or activity data fields is used to give a more precise context to the meeting request subject | Enter the subject of the requested meeting e.g. Time Studies Discussion |
| Location: | Allows the configuration of a location for the requested meeting | Enter the Active Directory Address of the meeting location or use the ellipsis button to open the Context Browser and drag the Active Directory Address or variable to this field |
| All day event: | Denotes whether or not the meeting request is an all day event | Select the option |
| Start date: | The date and time on which the meeting will be held. The date/time format is MM-DD-YYYY HH:MM:SS | Enter the starting Date/Time of the meeting or use the ellipsis button to open the Context Browser and drag a date variable to this field. |
| End date: | The date and time that the requested meeting will end. The date/time format is MM-DD-YYYY HH:MM:SS | Enter the ending Date/Time of the meeting or use the ellipsis button to open the Context Browser and drag a date variable to this field |
| Show time as: | Configures how the meeting request displays the available time of the meeting attendees | Select the type of time displayed from the drop down menu |
| Reminder: |
Configures the reminder time for the meeting request |
Enter the time duration amount and select the duration type from the drop down menu. The value must be a whole number. |
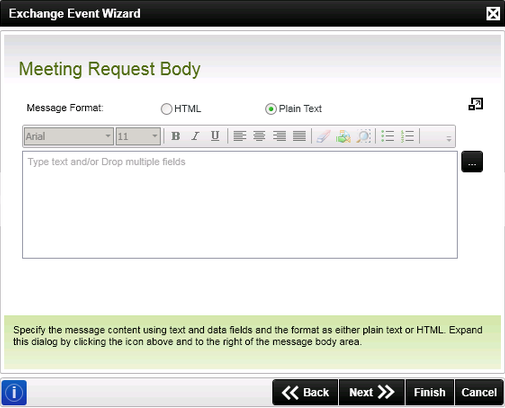
Message Body
The meeting request body is the message contents as directed to the reader or the meeting request recipients. The message contents may be plain text or a combination of text and data fields. The data fields can be configured to be populated automatically depending on the criteria specified at design time.
| Field | Description | Sample Value |
|---|---|---|
| Message Format | Plain Text: Standard text e-mail message. The message may contain automated fields / URL links etc. | Select the option |
| HTML: Selecting HTML format will enable HTML content in the meeting request. This will enable the developer to include HTML content, images etc. | Select the option | |
| Message Text Area | Use the Message Text Area to compose the message that the recipient will receive. The message may contain instructions, feedback etc. The message contents can be enhanced by including automated fields at design time that will import relevant information into the contents of the e-mail at run time that is of interest to the recipient | Enter the content of the message |

|
Clicking this control for a larger area to enter the message | Click to enlarge |

|
Access to the Context Browser is gained by clicking the context browser command | Click to open Context Browser |
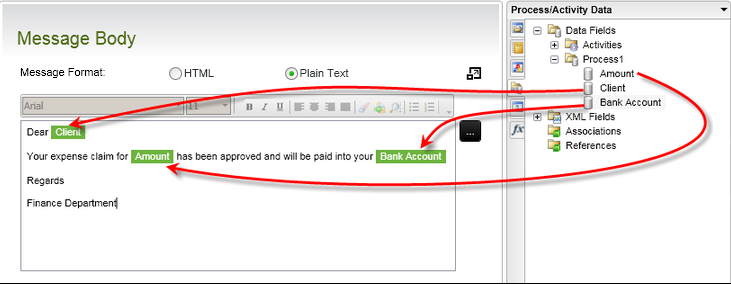
Adding variables to the Message Body
Dynamic meeting request messages can be created by dragging Data Fields and XML Fields from the Context Browser into the body of the message as shown below. The Data Field or XML Field's value will populate at runtime.
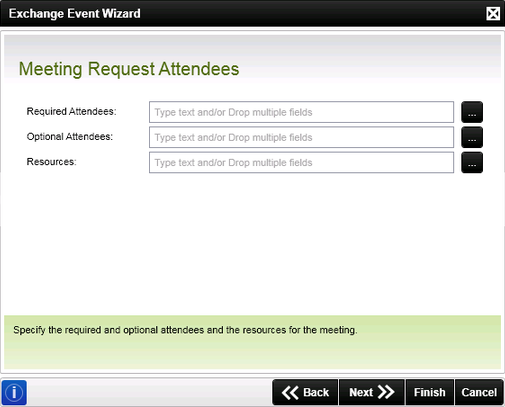
Meeting Attendees
The meeting attendees are those who are being invited to the meeting. Configure those who are required to attend the meeting and then add the optional attendees and resources when needed.
| Field | Description | Sample Value |
|---|---|---|
| Required Attendees: | Users who are required to attend the meeting. All these users must agree to the meeting request for the meeting to be booked. Enter the e-mail address of the user (or users). | Enter the e-mail addresses of the required attendees or use the ellipsis button to open the Context Browser and drag the names or variables to the field |
| Optional Attendees: | Users who will be invited to the meeting whose agreement to the request is not required for the meeting to be booked. Enter the e-mail address of the user (or users). | Enter the e-mail addresses of the optional attendees or use the ellipsis button to open the Context Browser and drag the names or variables to the field |
| Resources: | Additional resources needed for the meeting | Enter the needed meeting resources or use the ellipsis button to open the Context Browser and drag the variables to the field |
Task Details
This page allows you to send a task notification to a recipient.
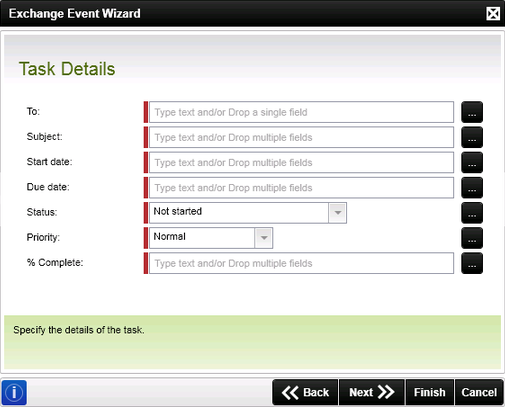
| Field | Description | Sample Value |
|---|---|---|
| To: | The address to which the task is to be sent - whether specified directly or resolved from the process originator or activity destination. The e-mail address of the user (or users) is required. | Enter the e-mail address using the ellipsis button to open Context Browser and drag the e-mail address of the user or a configured variable to the field |
| Subject: | The subject line of the task e-mail - often one of the process or activity data fields is used to give a more precise context to the task's notification e-mail | Enter the subject of the task message e.g. Account Synchronization |
| Start date: | The date and time that the Task is set to begin on | Enter the Date/Time value or select it from the Context browser |
| Due date: | The date and time that the Task is set to be completed on | Enter the Date/Time value or select it from the Context browser |
| Status: |
Provides the following Status options:
|
Select the appropriate status from the drop down |
| Priority: |
Provides the following Priority options:
|
Select the appropriate priority for the Task message from the drop down |
| % Complete: | Captures the percentage completed value of the task | Enter the percentage value of how much work has been done on the task |
Task Body
The task body is the message contents as directed to the reader or the task recipient. The message contents may be plain text or a combination of text and data fields. The data fields can be configured to be populated automatically depending on the criteria specified at design time.
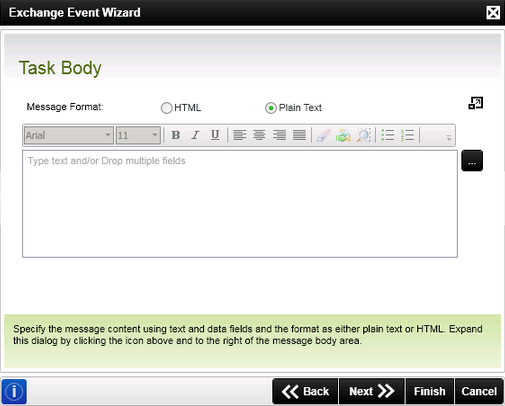
| Field | Description | Sample Value |
|---|---|---|
| Message Format |
Plain Text: Standard text e-mail message. The message may contain automated fields / URL links etc.
|
Select the option |
| Message Text Area | Use the Message Text Area to compose the message that the recipient will receive. The message may contain instructions, feedback etc. The message contents can be enhanced by including automated fields at design time that will import relevant information into the contents of the e-mail at run time that is of interest to the recipient. | Enter the content of the message |
|
|
Clicking this control for a larger area to enter the message | Click to enlarge |
|
|
Access to the Context Browser is gained by clicking the context browser command. | Click to open Context Browser |
Adding variables to the Message Body
Dynamic meeting request messages can be created by dragging Data Fields and XML Fields from the Context Browser into the body of the message as shown below. The Data Field or XML Field's value will populate at runtime.
This completes the configuration of the Exchange Event wizard. The wizard can be re-run to make changes.

Troubleshooting
If the Microsoft Exchange Server that is configured for a particular K2 Exchange action is not available on the network during the runtime of the event, the process enters an error state. If the process is in error state, make sure that the Exchange server is started and available and then retry the process.