Data Event
What does the Data Event do?
The Data Event wizard works together with other K2 Integration wizards where data retrieval, manipulation and transfer is required. To use the wizard within a process, the process must already have some form of integration in place - for example InfoPath or SharePoint integration. The the data source must be able to provide an XML schema. The schema is used by the data wizard to retrieve, manipulate and transfer between source and destination.
Why use the Data Event wizard?
The Data Event wizard is intended for applications where the need exists to extract data from XML and XSLT documents to either transfer the data as is to a new location for storage, or transform the data into a new document. The wizard requires an XML based input which can be sourced from the XML data of an InfoPath form, a SmartObject or any data source that can provide an XML data structure.
Usage of the XML modes in this wizard requires a working knowledge of XML and XSLT as applied in the use of complex data structure provided by forms such as InfoPath and data objects such as SmartObject.
Using XML
Recommend reading:
http://w3schools.com/xml/default.asp
http://w3schools.com/xsl/default.asp
http://w3schools.com/xpath/default.asp
http://w3schools.com/schema/default.asp
Using the Data Event wizard
The Data Event wizard is available from the K2 Toolbox. To load the Data Event onto the canvas, click and drag the item onto the design canvas.
The Welcome page is the first page shown.
Runtime Considerations with InfoPath
This information regarding the Data Event wizard applies to its runtime use in conjunction with InfoPath Integration
At runtime, and when the Data Event wizard has been used in conjunction with InfoPath Integration the following features are supported.
| Data Type Validation | |
|---|---|
| Data Casting | XML that specifies data types, cast the data type to supported data type and format |
| XSD | Define patterns, applies validation |
Only one of the following options can be selected per Data Event Activity. You may, however, have multiple data assignments for the particular option chosen.
There are a number of data mapping options which enable different types of extraction and outcome which differ depending on the requirements and levels of extraction from different formats for example XML (repeating and simple structures) and XSLT, used to transform documents from one form into another.
| Data Event | ||
|---|---|---|
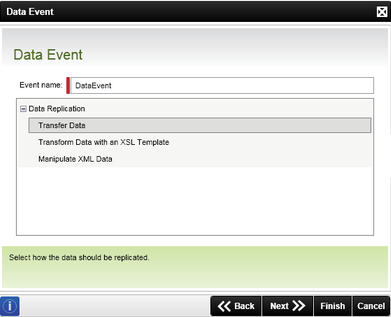
| Event Name | The name of the event given to the Data Event instance when it was added to the design canvas. | The data event is added to a process to process incoming data from integrated applications where the data source is provided by an XML data structure. |
| Data Replication | ||
| Transfer Data | This option enables data transfer from your XML / Data Field source to the specified destination. | Transfers or moves data from the designated source field to the designated destination field. |
| Transform Data with an XSLT Template | This option enables complex, or repeating data structures to be processed by the data event wizard. | This option requires that a XSLT file be specified as the means to transform an incoming XML document to another document. This is a custom XSLT that must be supplied to the wizard. For more information Data Events |
| Manipulate XML Data | The manipulate option enables data to be extracted from the repeating section and an element from inside the XML field. | Enables the manipulation of an incoming XML data structure. |
The tooling available when the Assign button is selected will differ depending on the Data Replication option selected
Data Manipulation | Transfer Data
This option enables you to identify the data source and its destination. The data source would typically be an XML document that contains data fields which have been populated from either a human to machine or machine to machine process interaction.
The XML document is shown in the content browser, and can be accessed using the ellipses command on the right hand side of the field box. The content browser will assist you to locate your XML documents, but these must exist to begin with.
Drop an XML field onto the destination to see the NIL behavior. They are basically the same as the ones in the (XML Manipulation)/(Mapping Properties) window.
![]()
| Data Location | Description | Sample Value |
|---|---|---|
| Assign | Select this option to configure a new assignment | The Assign command creates a data assignment for the selected Data Manipulation Method. More than one data assignment can be created per selection. However, only 1 data manipulation method can be selected. |
| Edit | Edits an existing, selected assignment | Select a Data assignment and then click the Edit option. This enables you to make changes to the existing assignment(s). |
| Remove | Removes the existing assignment | Highlight at least one data assignment and then click Remove to delete it. |
| Remove All |
Removes all configured assignments
Note: There is no undo for this action and all configurations will be lost. |
This option should only be used if you are clearing ALL the data assignments from the Data Manipulation wizard. |
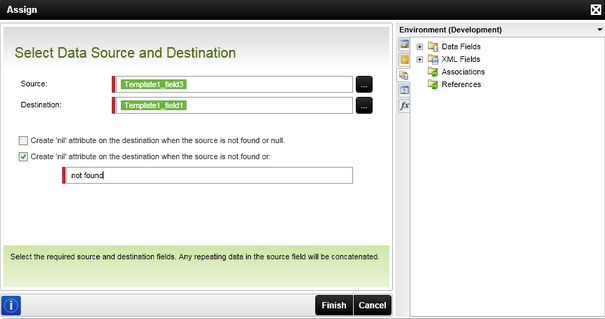
| Select Data Source and Destination | ||
|
Source |
The source location of the XML document that surfaces in the K2 Content Browser; identifies that data that will be transferred to the location as specified in the destination field for storage. |
Click the ellipse to load the Context Browser. Enables you to load the source location of the incoming XML. |
|
Destination |
The destination specified by you; identifies the location where the incoming data will be transferred to and stored. |
Click on the ellipse to load the Context Browser. Enables you to load the destination location for the XML. |
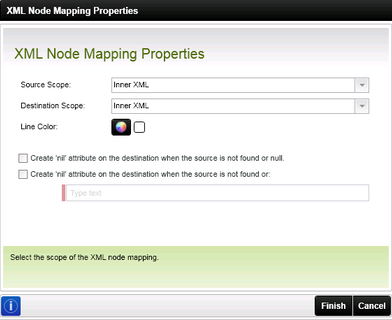
When the source and the destination is of type XML, the NIL attribute options becomes available. When selecting this option, it behaves in the following manner. If the source field is either not found, in other words the XML document did not contain the node specified, OR if the source is null, OR if the value in that node is equal to not found as specified in the example below, a NIL attribute will be created in the destination XML field.
This option requires that an XSLT Location be specified.
| Data Source and Destination | Description | Sample Value |
|---|---|---|
| Assign | Select this option to configure a new assignment | The Assign command creates a data assignment for the selected Data Manipulation Method. More than one data assignment can be created per selection. However, only 1 data manipulation method can be selected. |
| Edit | Edits an existing, selected assignment | Select a Data assignment and then click the Edit option. Enables you to make changes to the existing assignments. |
| Remove | Removes the existing assignment | Highlight at least one data assignment and then click Remove to delete it. |
| Remove All |
Removes all configured assignments
Note: There is no undo for this action and all configurations will be lost. |
This option should only be used if you are clearing ALL the data assignments from the Data Manipulation wizard. |
| Select Data Source and Destination | ||
| Source | Data source from where the wizard extracts data | Click on the ellipse to load the Context Browser. This enables you to load the source location for the data mappings |
| Destination | Destination where the data is written to | Click on the ellipse to load the Context Browser. This enables you to load the destination location for the data mappings |
| XSLT Location | The location of the XSLT template | Click on the Browse button to locate the XSLT template. This enables you to load the XSLT file that will be used to transform the source XML document into the XML document required for the destination |
What is XSLT ?
Definition: Extensible Stylesheet Language Transformations (XSLT) is an XML-based language used for transforming XML documents. XSLT files are used to transform XML files to XML files or into other formats like HTML or formatting objects (FO) for generating PDF files.
XSLT support and its associated features may not be supported directly or out of the box by K2 blackpearl. Additional integration suites and or custom code may be required in addition to the K2 blackpearl Event wizard to fully facilitate the full capability of an XSLT file.
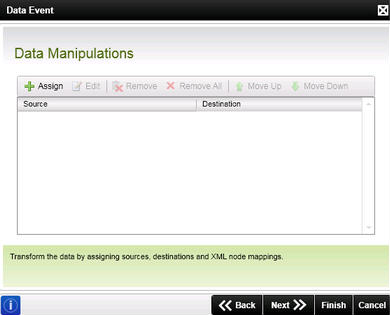
The Data Manipulations step enables you to assign source locations for the data and destination locations where the data will be stored. The source can be an XML document or XSLT when the data needs to be transformed from one document to another.
| Field | Description | Sample Value |
|---|---|---|
| Assign | Select this option to configure a new assignment | The Assign command creates a data assignment for the selected Data Manipulation Method. More than one data assignment can be created per selection. However, only one data manipulation method can be selected. |
| Edit | Edits an existing, selected assignment | Select a Data assignment and then click the Edit option. This enables you to make changes to the existing assignment(s). |
| Remove | Removes the existing assignment | Highlight at least one data assignment and then click Remove to delete it. |
| Remove All |
Removes all configured assignments
Note: There is no undo for this action and all configurations will be lost. |
This option should only be used if you are clearing ALL the data assignments from the Data Manipulation wizard. |
| Move Up | Moves the current assignment one position up | Select an assignment and click Move Up |
| Move Down | Moves the current assignment one position down | Select an assignment and click Move Down |
This portion of the wizard is more detailed and includes a number of pages that need to be stepped through and settings that must be configured.
| Data Manipulations | Description | Sample Value |
|---|---|---|
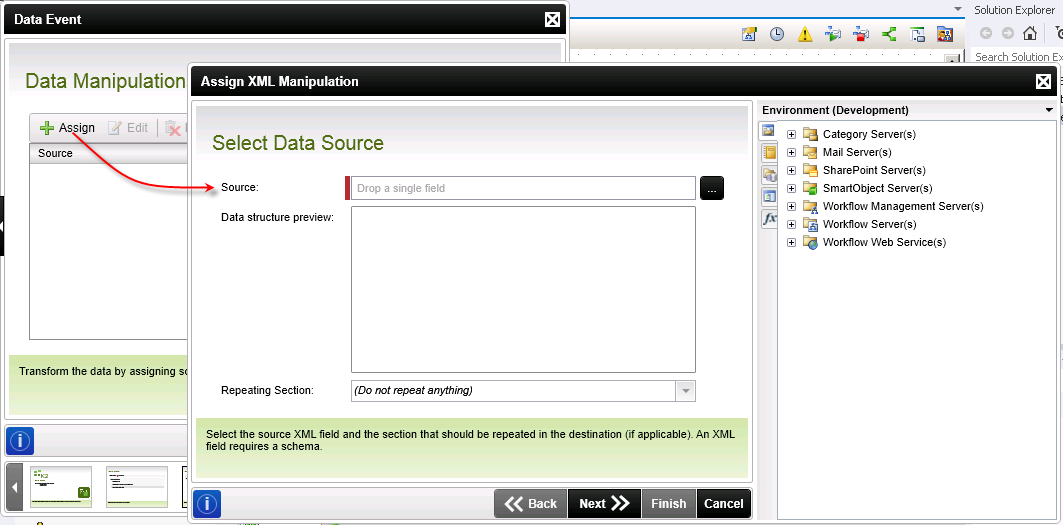
|
Source |
The source is the location of the XML data source |
Click on the ellipse button to load the context browser. Use the context browser to locate the XML data source. |
| Data Structure Preview | Displays the Data Structure preview | Displays the Data Structure preview |
| Repeating Section | Displays the repeating section | Select the section to repeat |
Mappings | Data Source
The step below requires that three individual items be configured
- Identify the source
- Identify the elements or repeating section to be returned
- Configure the manner in which the element or repeating sections are returned
| Data Mappings | |
|---|---|
| Source | The data source; the source is an XML schema that surfaces in the context browser |
|
Schema |
Use the schema to describe and validate the data source; selecting the data element or repeating section that must be returned from the data source |
| Include Data | Configure the items / elements that need to be included |
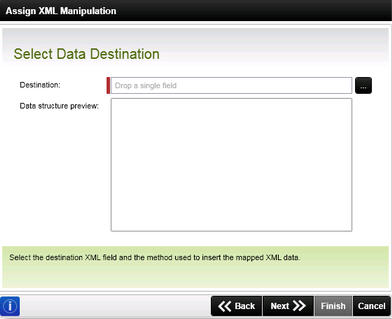
The destination is the location where the data is stored once it has been manipulated. The data destination can only be an XML data field. This step in the wizard also enables you to configure the outcome when there is existing data in the destination fields.
| Field | Description | Sample Value |
|---|---|---|
|
Destination |
This field holds the destination location for the data that has been manipulated. |
The field must be populated with a destination, and if no field has been added the wizard prompts you for a destination. Adding a destination is completed by clicking on the Context Browser button and locating the destination. |
|
Data Structure Preview |
Displays the structure of the XML data field. |
Once the destination has been selected, the schema associated with the XML data field is used to display the data structure. From the XML listing, you are required to select their Destination XML data field. 
|
The previous step enables you to map the incoming data to the parent or root node. This step in the mappings process has a number of considerations before you are able to deploy your project. Create node mappings by dragging lines from the Source XML data to the Destination XML data nodes. To access the Line Properties, click on one of the lines created to enable the Line Properties button.
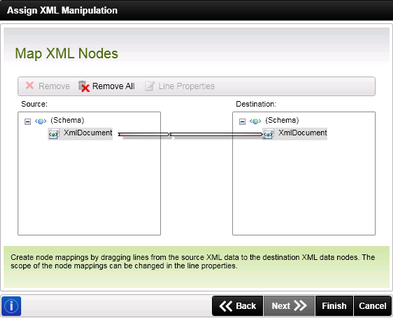
You cannot combine data mappings for repeating and non-repeating XML structures.
| Data Mappings | Description | Sample Value |
|---|---|---|
| Source (Left Hand Column) | When the Data Source and destination locations are identified, these two columns display. | This box is the source for your data mappings, that are represented graphically using lines. Locate the field that will be the source, and "draw" a line across to the right hand field. |
| Destination (Right Hand Column) | When the Data Source and destination locations are identified, these two columns display. | This box is the destination for your data mappings, that are represented graphically using lines. Locate the field that will be the source, and "draw" a line across to the right hand field to the destination field. |
|
Line Color |
Opens the color palette for a line |
Right click on the line and select the option Set Color and the color palette will open. Once the required color has been selected click Ok to complete the color change or click cancel to abort the change |
| Data Lines | The data lines connect source to destination fields for data mappings. | Use the data fields to map the source to destination fields. If the wizard was launched in advanced mode, then the full context menu's options will be available. |
|
Properties |
Sets the XML extraction properties for a selected line |
Right click on the designated line and select the Properties option to make changes |
| Data Location | Description | Sample Value |
|---|---|---|
|
Outer |
Enables you to select the outer XML from the incoming source data field | Click on the drop down and select this option from the list. The selection applies to the source or incoming XML. Selecting this option will the take the entire XML structure, i.e. the root node, child nodes and the values contained therein. |
|
Inner |
Enables you to select the inner XML from the incoming source data field | Click on the drop down and select this option from the list. The selection applies to the source or incoming XML. Click on the drop down and select this option from the list. Selecting this option will ignore the outer XML taking returning only the inner XML structure. |
|
Value |
Disregards the XML data structure and selects the Value within the field | Click on the drop down and select this option from the list. This selection enables you to return from the incoming XML structure the value held by the XML structure as opposed to the data and the structure that holds it. |
| Destination | ||
|
Outer |
Enables you to select the outer XML from the incoming source data field |
Click on the drop down and select this option from the list. The selection applies to the destination or location to where the Data wizard will write the XML data. Selecting this option will the take the entire XML structure, i.e. the root node, child nodes and the values contained therein and write it to the specified destination. |
|
Inner |
Enables you to select the inner XML from the incoming source data field | Click on the drop down and select this option from the list. The selection applies to the destination or location to where the Data wizard will write the XML data. Selecting this option will ignore the outer XML taking writing only the inner XML structure to the destination. |
|
Value |
Writes the XML data value to an existing field within the XML data structure | Click on the drop down and select this option from the list. This selection enables you to write to a destination XML structure the value to be held by the XML structure as opposed to the data and the structure that holds it. |
Mapping Node Behavior
These define how the combinations of mappings are performed in the ‘Line Properties’ window.
| Destination -> Source V | Inner XML | Outer XML | Value |
|---|---|---|---|
| Element to Element | |||
| Inner XML | Direct Set | Copy children of source to parent of destination, then delete original destination | Direct Set (Inner Text) |
| Outer XML Value | Direct Set | Direct Set | Direct Set (Inner Text) |
| Outer XML Value | Direct Set (Inner Text) | Direct Set (Inner Text) | Direct Set (Inner Text) |
| Attribute to Attribute | |||
| Inner XML | Not Possible | Not Possible | Not Possible |
| Outer XML Value | Not Possible | Not Possible | Not Possible |
| Outer XML Value | Not Possible | Not Possible | Direct Set |
| Element to Attribute | |||
| Inner XML | Not Possible | Not Possible | Direct Set |
| Outer XML Value | Not Possible | Not Possible | Direct Set |
| Outer XML Value | Not Possible | Not Possible | Direct Set |
| Attribute to Element | |||
| Inner XML | Not Possible | Not Possible | Not Possible |
| Outer XML Value | Not Possible | Not Possible | Not Possible |
| Outer XML Value | Direct Set | Direct Set | Direct Set (Inner Text) |
XML Example
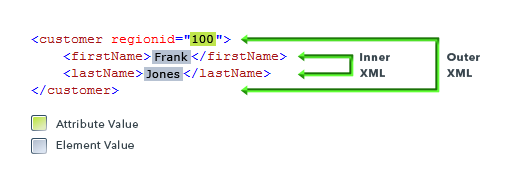
The following diagram explains how the scopes work. The element scopes are in relation to the customer element and the attribute scopes are in relation to the regionid attribute.
| Scope | Element | Attribute |
|---|---|---|
| Inner XML | <firstName>Frank</firstName> <lastName>Jones</lastName> |
Not Valid |
| Outer XML | <customer regionid="100"> <firstName>Frank</firstName> <lastName>Jones</lastName> </customer> |
Not Valid |
| Value | Frank Jones | 100 |
The element value is therefore the concatenated text (without the XML tags) that the element contains. In the following example, the value of the element would be FrankJones. This is because there is no white space between the “firstName” and “lastName” elements.
<customer><firstName>Frank</firstName><lastName>Jones</lastName></customer>
The W3C XML Specification draws a distinction between “Inner Text” and “Value”. The two were combined into “Value” in the Data Event wizard because “Inner Text” cannot be used on an attribute, and “Value” cannot be used on an element.
Once you have mapped their data requirements, the final page displays. The wizard is now complete.