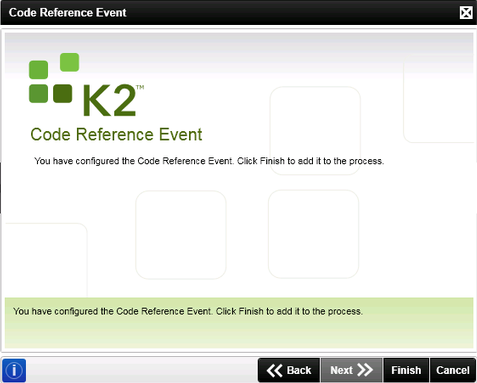
Code Reference Event
What does the Code Reference Event do?
The Code Reference Event wizard is aimed primarily at workflow developers who need to call some code (static, constructors and instance methods) in a server event. The wizard provides you with the ability to consume process references in a visual manner as opposed to writing code. This increases efficiency and effectiveness as coding errors are lessened by the visual presentation. The Code Reference Event wizard makes it easy to use referenced classes and assemblies during runtime.
Customized constructors can be created for use in the wizard by creating a new Class Library project in Visual Studio. Once the project has been built, MS Build generates a Class Library (Assembly) as output. If you created a class in your project, a constructor is used to create a new instance of your class - an object instance. The same applies to assemblies from 3rd parties. The References page reflects the assemblies referenced by the current process.
Properties are assigned during invocation of referenced methods. Specifically, these properties are mapped to Data and XML fields on the process. Depending on how the event has been configured, these Data fields and XMLfields may be altered during the runtime execution of the reference event. These results can then be used in line rules, for example.
Knowledge of Constructors, Constructor Calls, Methods, Method Calls and References are a prerequisite to making use of the Code Reference Event wizard.
Code Reference Event wizard Configuration:
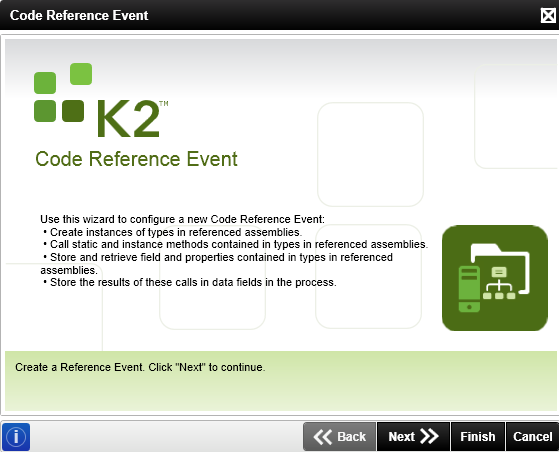
The Welcome page starts the process of the Code Reference Event configuration. To launch the Code Reference Event wizard, select this wizard from the Toolbox and drag it onto the design canvas.

The Event Name page is used to configure the name of the event.
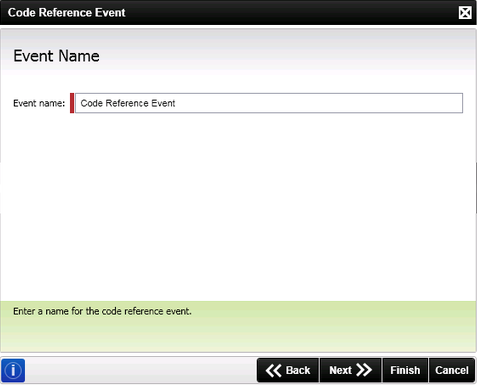
| Field | Description | Sample Value |
|---|---|---|
| Event Name | Provides a name for the new Code Reference Event | Type in a name for the event in the text box |
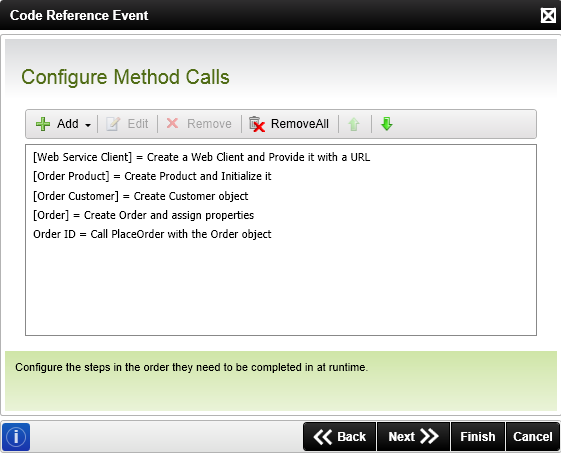
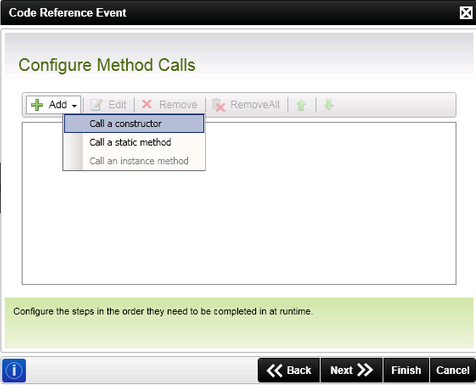
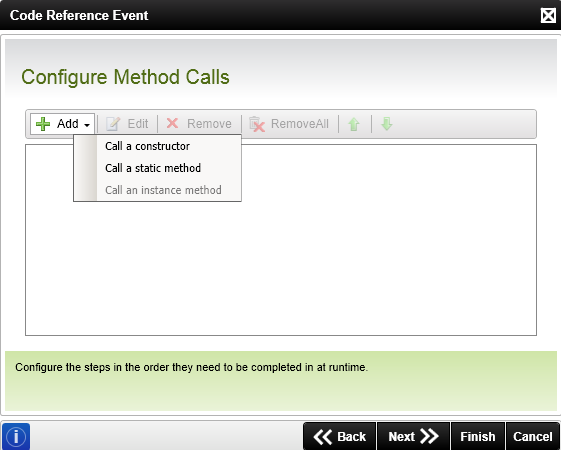
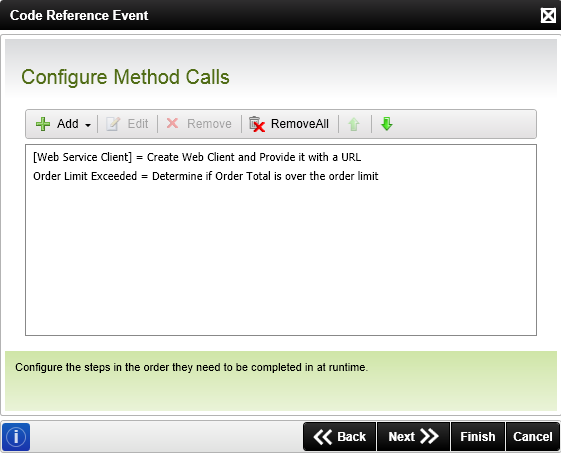
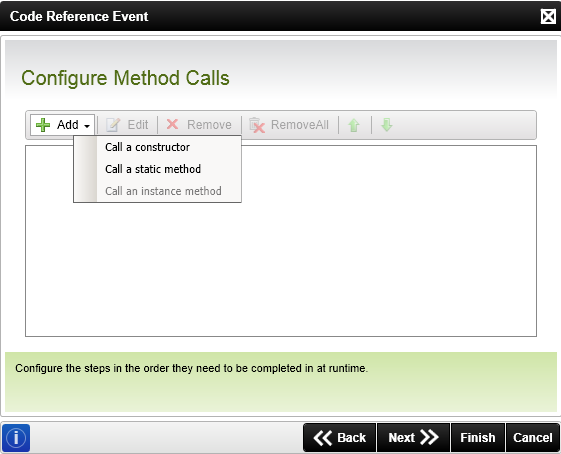
The Configure Method Calls page is used to select and start the configuration of the code reference method calls.
| Field | Description |
|---|---|
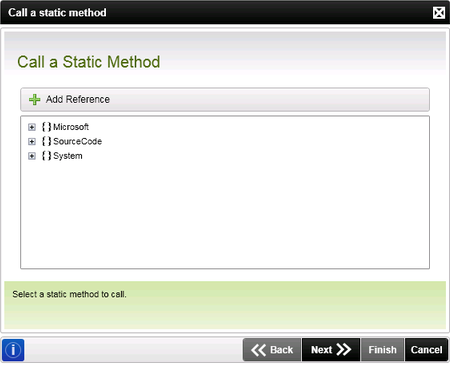
| Add | To add a constructor, static or instance method, select the Drop Down Arrow and select the required method call |
| Edit | Modifies the selected method call |
| Remove | Removes the selected method call |
| Remove All | Removes All the method calls |
Method Configuration Steps:
Method Call
The Method Call page will reflect the method type selected in the Add Reference drop down - Constructor, Static method, or Instance method. These pages are used to select the reference to be configured by the method call.
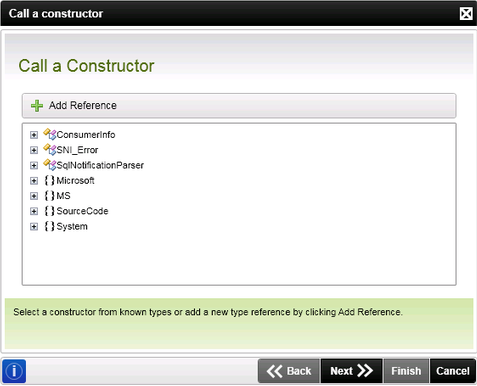
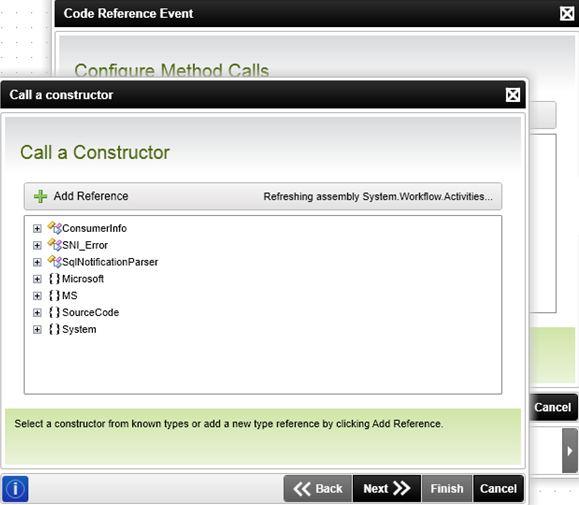
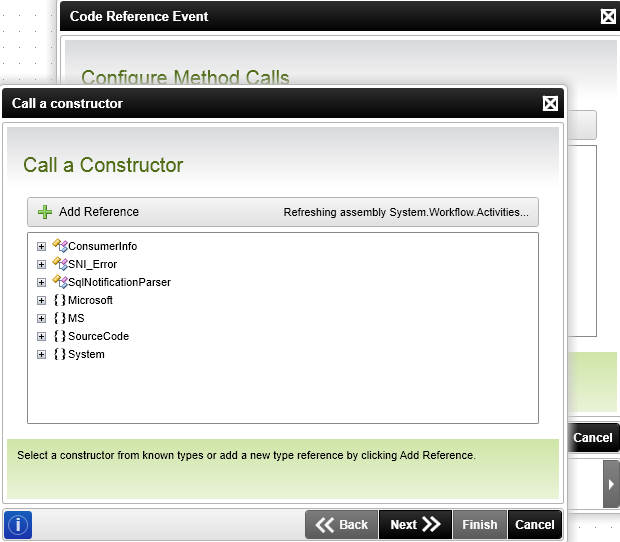
Constructor Method Call
| Field | Description |
|---|---|
| Add Reference |
Opens the Configure Property Mappings dialogpage to configure the properties of the reference call parameters. Click on the Add Reference button to configure a selected reference call. |
| Reference List | Displays the code objects that can be referenced by the method call |
Static Method Call
| Field | Description |
|---|---|
| Add Reference |
Opens the Configure Property Mappings dialog to configure the properties of the reference call parameters. Click on the Add Reference button to configure a selected reference call. |
| Reference List | Displays the code objects that can be referenced by the method call |
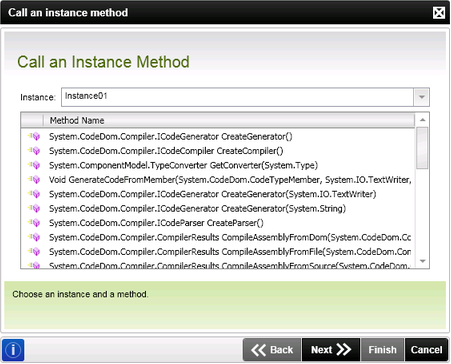
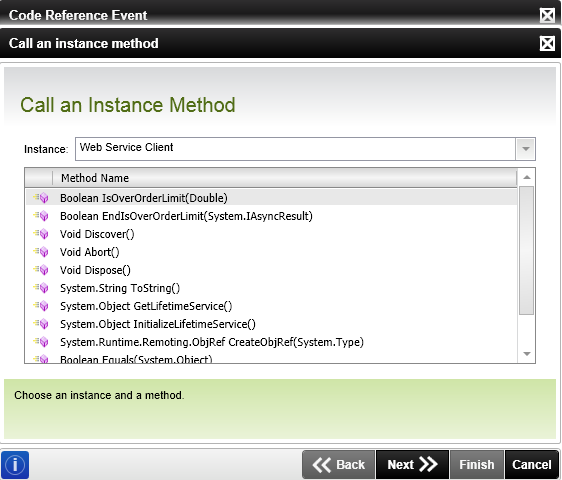
Instance Method Call
| Field | Description |
|---|---|
| Instance |
A drop down that contains all the currently configured instances within the Code Reference Event. Click on the drop down to select the desired instance. |
| Method name |
Displays the list of possible methods available within the instance. Click on a Method to select it. |
Once you have selected the instance and the method, click Next
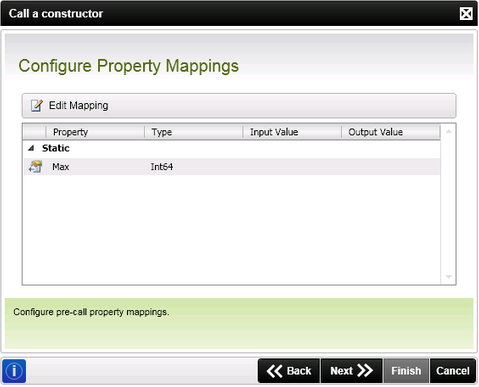
The first Configure Property Mappings page is used to configure the input and return parameters that are passed through the method.
| Field | Description |
|---|---|
| Edit Mapping |
Opens the Edit Mapping dialog to assign values to the selected property. Click on the Edit Mapping button to assign values to a selected property. |
| Property | Displays the Property Name |
| Type | Displays the Property Type |
| Input Value | Displays the Input Value |
| Output Value | Displays the Output Value |
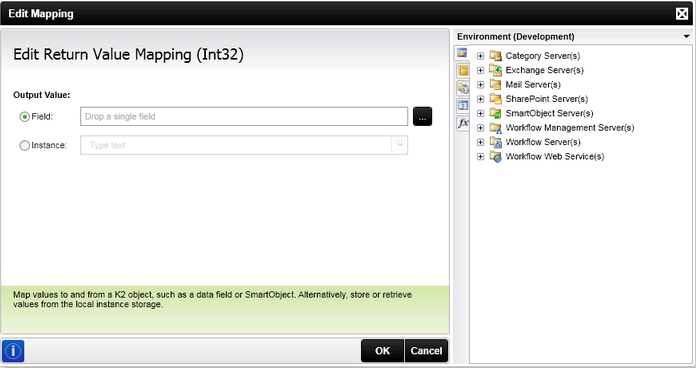
Mapping Editor
The Mapping Editor is used to assign values or variables to the called method's properties.
| Field | Description |
|---|---|
| Field | If the property value is to be set to a field property, select the required field value property variable from the Object Browser |
| Instance | If the property value is to be set to an instance value, select the required instance value from the drop down |
The Configure Call Parameters and Return Value page is used to configure the input and output values of the call parameters.
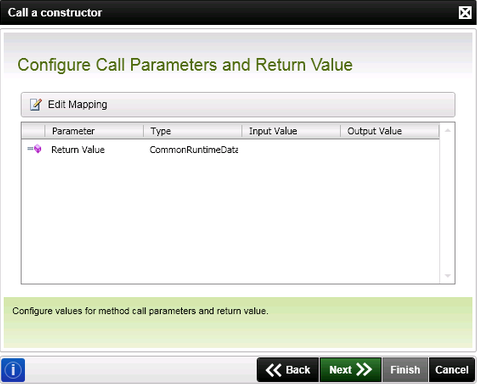
| Field | Description |
|---|---|
| Edit Mapping |
Opens the Edit Mapping dialogpage to assign values to the selected property. Click on the Edit Mapping button to assign values to a selected property. |
| Property | Displays the Property Name |
| Type | Displays the Property Type |
| Input Value | Displays the Input Value |
| Output Value | Displays the Output Value |
See the Mapping Editor for more information.
The second Configure Property Mappings wizard page is used to configure the input and output properties from the runtime instance of 'x' where 'x' is the class name.
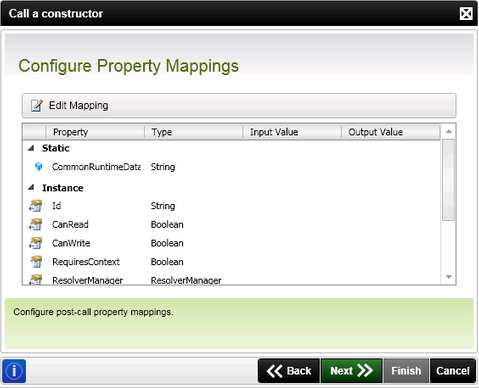
| Field | Description |
|---|---|
| Edit Mapping |
Opens the Edit Mapping dialogpage to assign values to the selected property. Click on the Edit Mapping button to assign values to a selected property. |
| Property | Displays the Property Name |
| Type | Displays the Property Type |
| Input Value | Displays the Input Value |
| Output Value | Displays the Output Value |
See the Mapping Editor for more information.
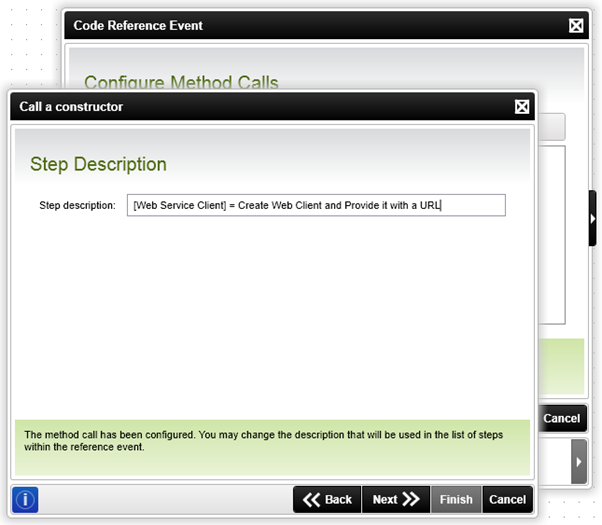
The Step Description page is used to configure the description property of the configured method call.
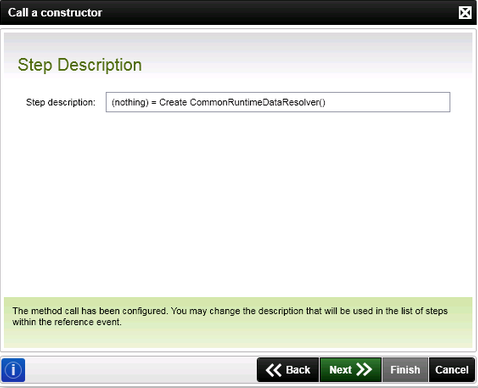
| Field | Description | Sample Value |
|---|---|---|
| Step Description | Provides a description for the method call that has just been configured | Type in a description |
The Method Call configuration is now complete, click Finish to return to the Method Selection page.
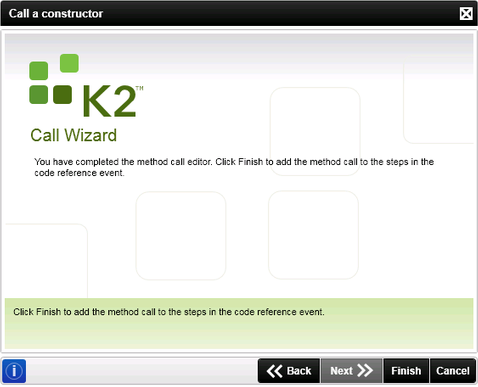
The Code Reference Event wizard is now complete, click Finish to close the wizard.
Code Reference Event Examples:
This example demonstrates how to call a web service with the following C# signature:
public bool IsOverOrderLimit(double orderTotal)
The example service would be located at http://localhost/SampleWebService/CustomerService.asmx.
Introduction
The web service clients generated by the ‘Add Reference’ functionality are instance types. This means that once a reference to the service has been added an instance of the service needs to be created. Once the instance has been created we are able to call instance methods against it.
Part 1: Create the Code Reference Event
Drag a Code Reference Event onto the workflow canvas; or use the Z gesture directly on the canvas. The Code Reference Event wizard's Welcome page will now open:

Part 2: Add the Reference to the Web Service
Click the Next button until you reach the Configure Method Calls. On this page click the Add button followed by the Call a constructor menu item.
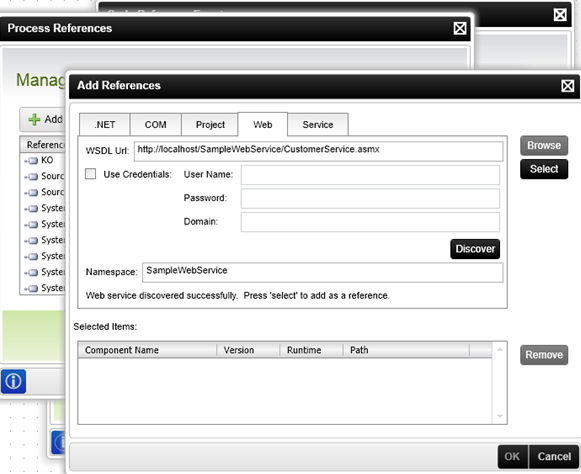
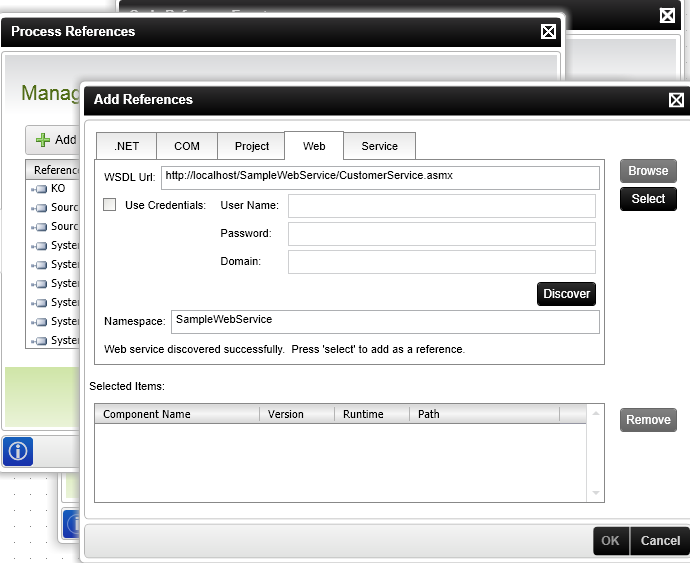
A reference to the web service has not yet been defined – to define it click the Add Reference Button.
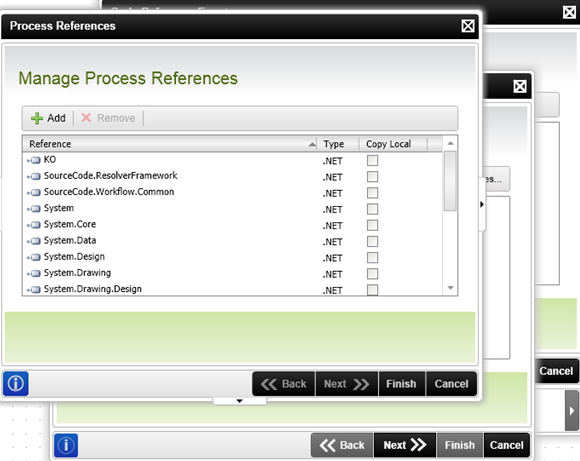
Add a reference to the web service and click Finish. You will be returned to the Manage Process References page; click on Finish to close this page.
Part 3: Create an Instance of the Web Service Client
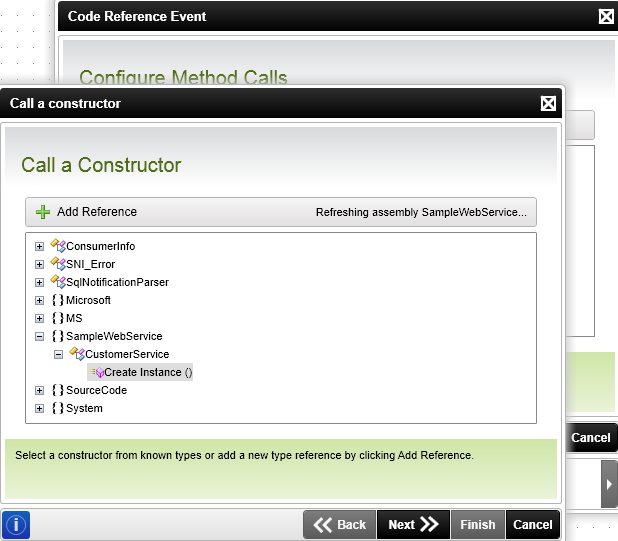
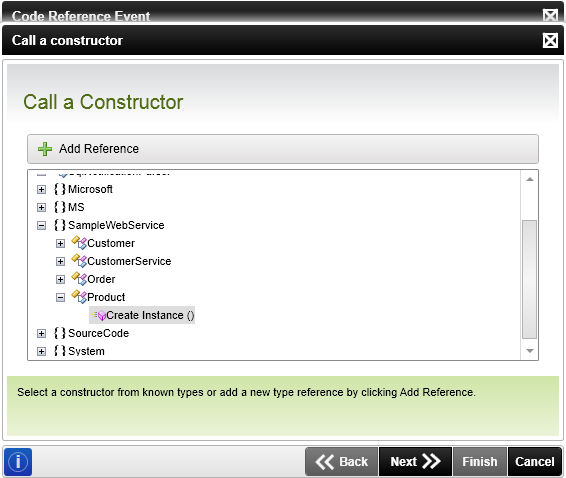
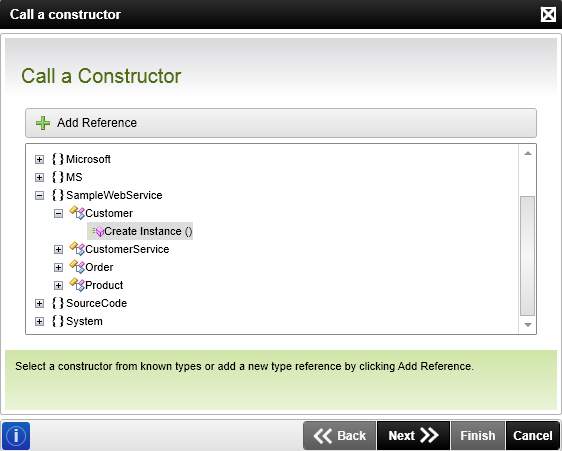
The assembly can now be used in the Code Reference Event. Expand the new SampleWebService namespace available in the constructor selection tree, followed by the CustomerService type and finally select the Create Instance() constructor.

Click Next. The Configure Property Mappings page, during construction, allows you to assign or retrieve any static (non-instance) properties and fields on the type before the constructor is called. In this specific scenario there are no static properties or fields; click Next to skip the page.
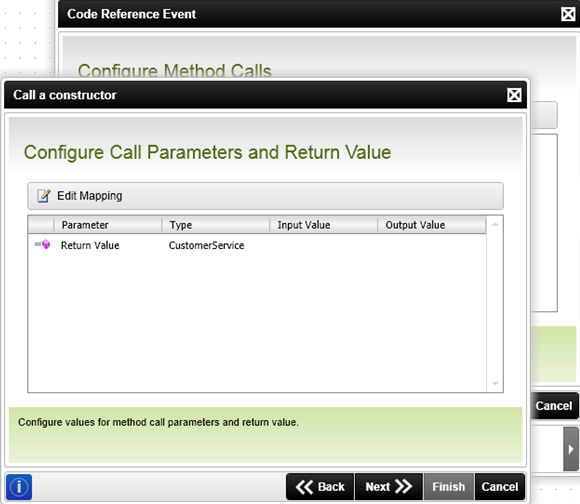
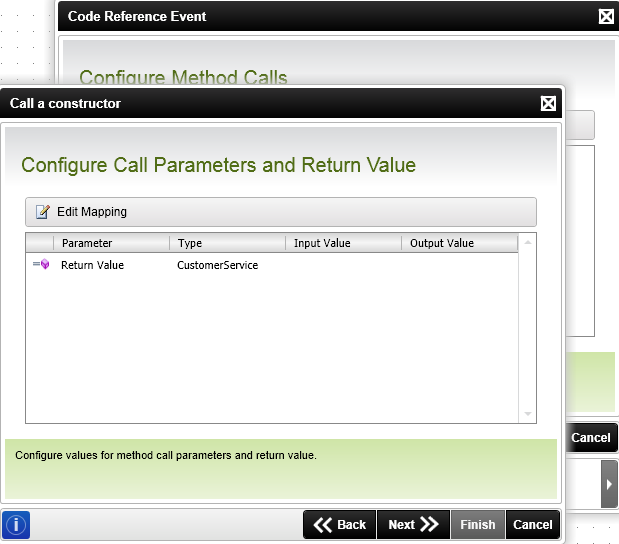
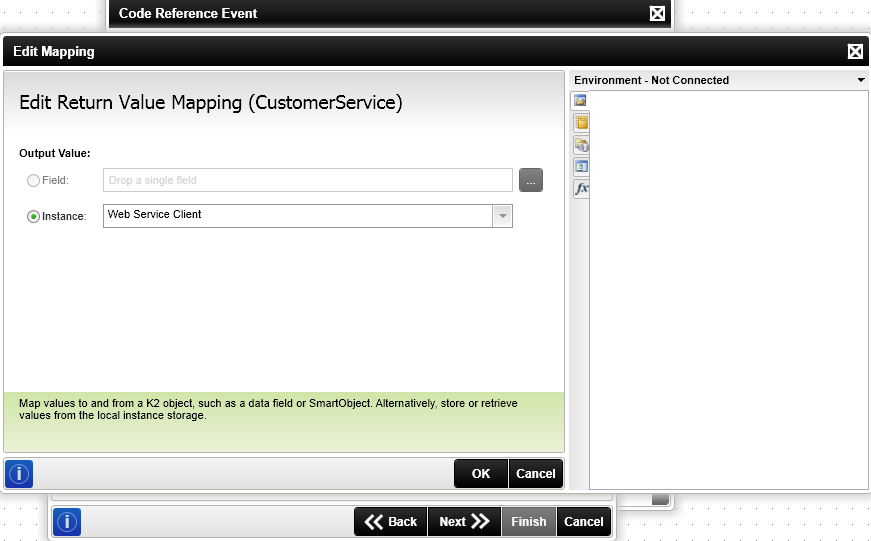
The Configure Call Parameters and Return Value page allows you to provide parameters to the method (via either ‘in’ or ‘in/out’ parameters); as well store any values that are returned by the method (via ‘out’, ‘in/out’ parameters or the return value). The return value from the constructor needs to be stored for later use: select the Return Value parameter and click the Edit Mapping button.
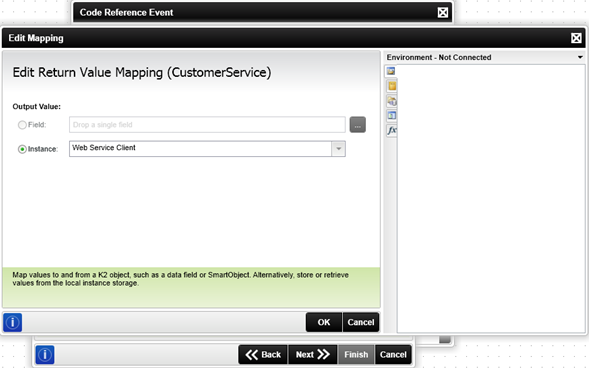
The return type of the constructor is a complex type (that is, any non-scalar type, such as Integer and String); this means that it has to be stored in the local instance storage. As such you are not allowed to use field parts from the context browser (or literal values in the case of input parameters). The local instance storage is an area to store complex objects for the duration of the reference event. Type a name for the instance and click OK.
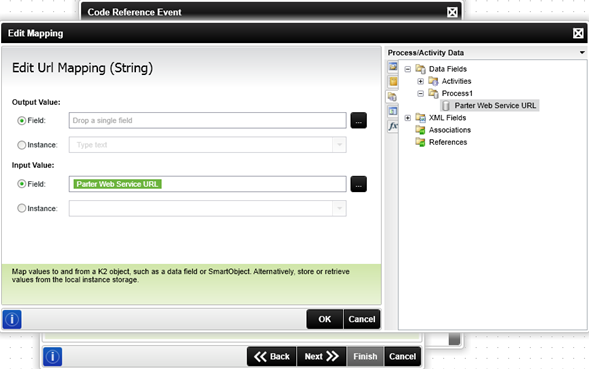
Click the Next button once the parameter has been mapped to the local instance storage. The next page allows you to assign or retrieve and static or instance properties after the method (or constructor) call. Click the URL property and click the Edit Mapping button. The Output Value area allows you to retrieve the value of the property before you store a value in it via the Input Value area – you do not need to configure both areas. You may type in the URL, or use any context browser field to configure it.
Click OK and continue to the next page. This page allows you to configure and informative name for the call. This name will be shown in the Configure Method Calls page as well as provided at runtime in the event that an error occurs.
Click the Next button followed by Finish to add the constructor call.
Part 4: Perform the Instance Method Call
Click the Add button and select the Call an instance method menu item; this menu item is only available if instances exist in the wizard. When the Call an Instance Method page appears select the instance from the Instance drop down, select the method and click Next.
The Configure Property Mappings page, similarly to the same page in the constructor call, allows you to configure fields and properties before calling the method; because an instance currently exists access to instance field and properties is also provided. The URL property was configured in the constructor call and as such does not need to be configured here. Click Next to skip the page.
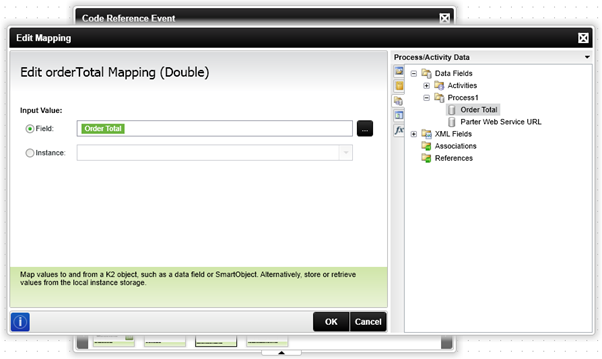
Configure the orderTotal parameter and either type in a value or use a field from the context browser:
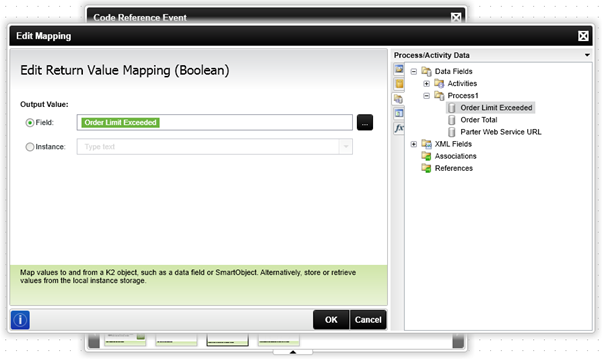
The Return Value is a scalar (non-complex) type and can be stored in a Data or XML field.
Once all the mappings have been configured click Next to progress to the Configure Property Mappings page. This page is optional. Finally, describe the call and finish the wizard.
This example demonstrates how to call a web service with the following C# signature:
public class Product
{
public string Name;
public string Variant;
}
public class Customer
{
public string Contact;
public string CustomerID;
}
public class Order
{
public Product Product;
public Customer Customer;
public int Quantity;
}
Introduction
The web service clients generated by the Add Reference functionality are instance types. This means that once a reference to the service has been added an instance of the service needs to be created. Once the instance has been created we are able to call instance methods against it.
Part 1: Create the Code Reference Event
Drag a Code Reference Event onto the workflow canvas; or use the Z gesture directly on the canvas. You are presented with the Welcome page:
Part 2: Add the Reference to the Web Service
Click the Next button until the Configure Method Calls page is reached. When the page is reached click the Add button followed by the Call a constructor menu item.
A reference to the web service has not yet been defined – to define it click the Add Reference button.
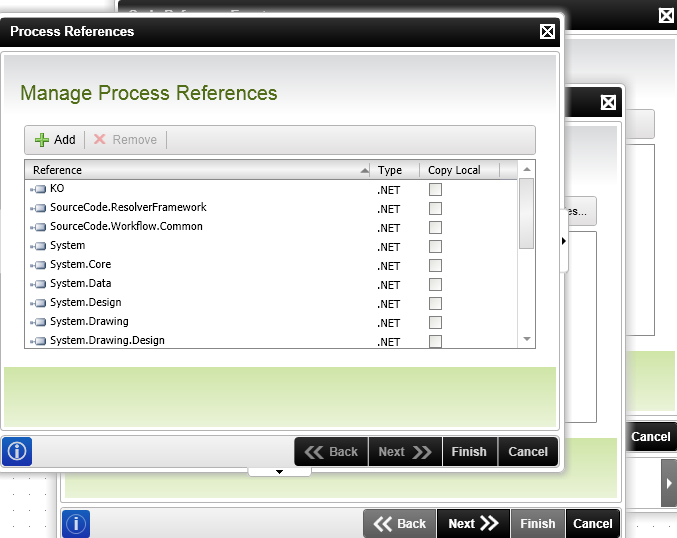
Add a reference to the web service and click Finish. You are returned to the Manage Process References page; click on Finish to close this page.
Part 3: Create an Instance of the Web Service Client
The assembly can now be used in the Code Reference Event. Expand the new SampleWebService namespace available in the constructor selection tree, followed by the CustomerService type and finally select the Create Instance() constructor.
Click Next. The Configure Property Mappings page, during construction, allows you to assign or retrieve any static (non-instance) properties and fields on the type before the constructor is called. In this specific scenario there are no static properties or fields; click Next to skip the page.
The Configure Call Parameters and Return Value page allows you to provide parameters to the method (via either ‘in’ or ‘in/out’ parameters); as well store any values that are returned by the method (via ‘out’, ‘in/out’ parameters or the return value). The return value from the constructor needs to be stored for later use: select the Return Value parameter and click the Edit Mapping button.
The return type of the constructor is a complex type (that is, any non-scalar type, such as Integer and String); this means that it has to be stored in the local instance storage – and as such you are not allowed to use field parts from the context browser (or literal values in the case of input parameters). The local instance storage is an area to store complex objects for the duration of the reference event (keep in mind that instances are destroyed when the reference event completes, they cannot be shared across the process). Type a name for the instance and click OK.
Click the Next button once the parameter has been mapped to the local instance storage. The next page allows you to assign or retrieve and static or instance properties after the method (or constructor) call. Click the URL property and click the Edit Mapping button. The Output Value area allows you to retrieve the value of the property; before you store a value in it (via the Input Value area) – you do not need to configure both areas. You may type in the URL, or use any context browser field to configure it.

Click OK and continue to the next page. This page allows you to configure and informative name for the call. This name will be shown in the Configure Method Calls page as well as provided at runtime in the event that an error occurs.

Click the Next button followed by Finish to add the constructor call.
Part 4: Create Complex Object Parameter
In order to create the complex object the child objects need to be created first, so that they may be assigned to the properties during the constructor call. This means that the Product and Customer instances should be created, followed by the Order instance.
1: Create the Product Object
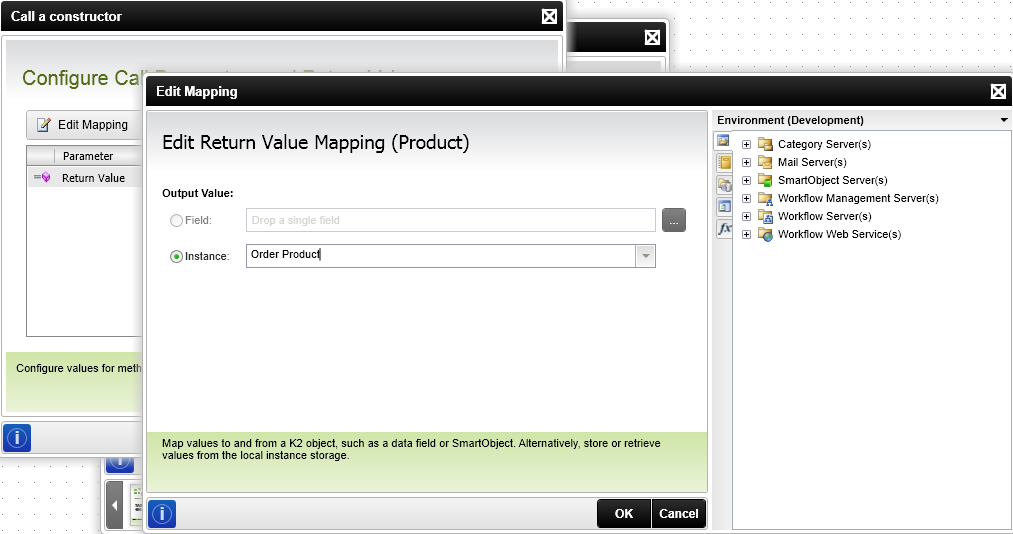
Add a new constructor call that creates a new Product object:
Assign it to local instance storage and proceed to the property mappings.
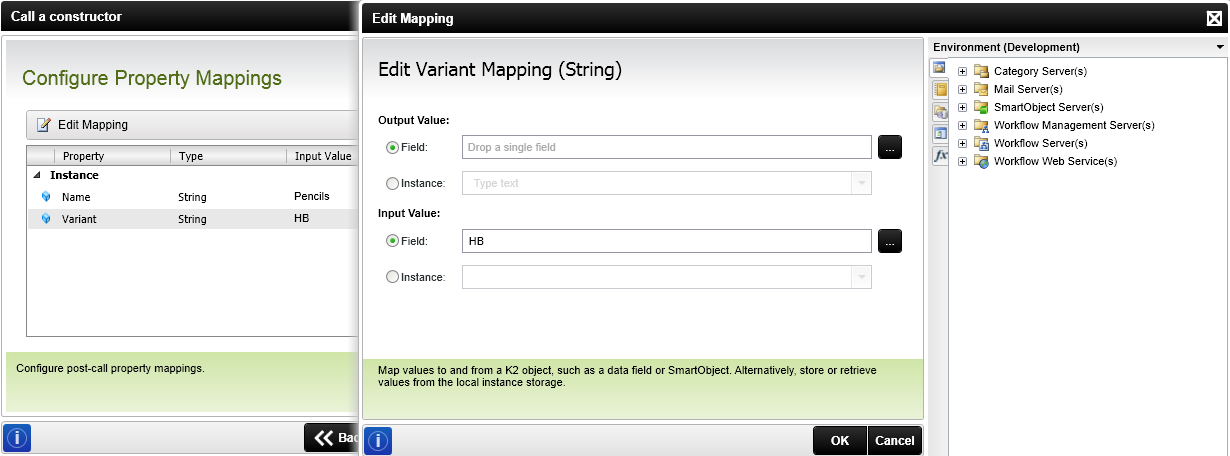
Enter values for the properties by selecting them and selecting Edit Mapping (use the Input Value area to assign a value to the property or field):
Optionally enter in a description for the step and finish the wizard.
2: Create the Customer Object
Add a new constructor call that creates a Customer object:
Assign it to local instance storage, set up the property values and complete the wizard.
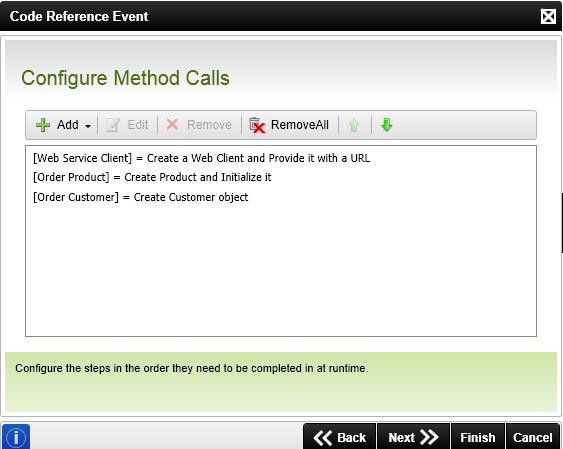
3: Create Order Object
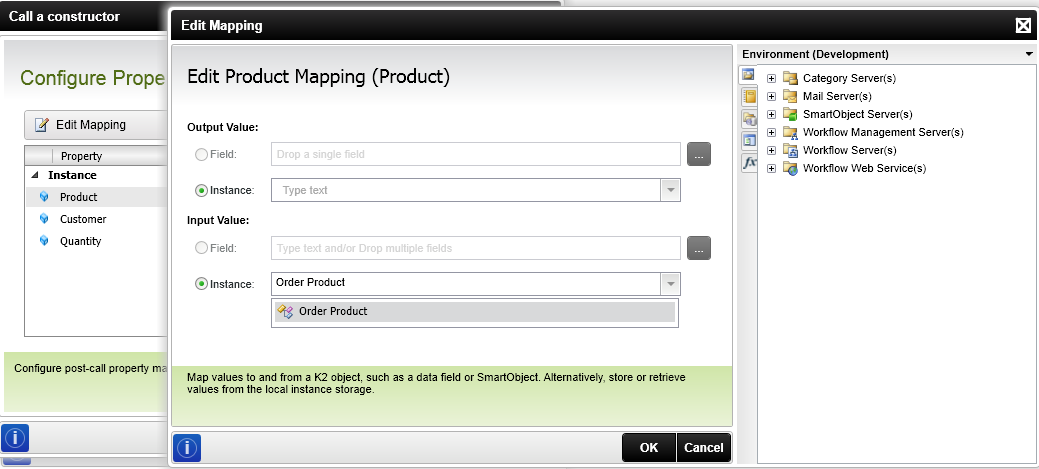
The Order object can now be created because the Product and Customer objects are ready to be assigned into its fields. Create an Order object via a constructor call, assign it to local instance storage and proceed to the Configure Property Mappings page. Select the Product property and assign the local Customer object instance to it.
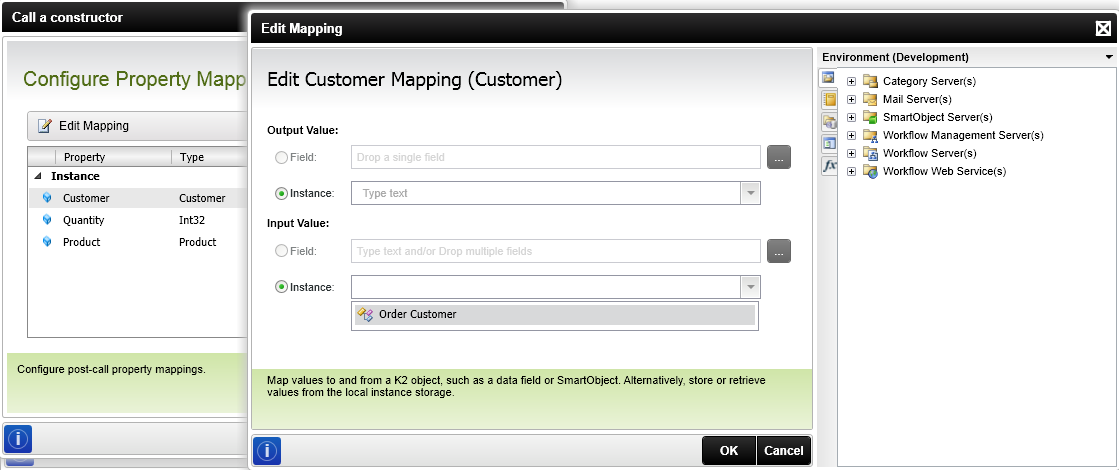
Next, select the Customer property and assign the Customer object instance to it:
Finally assign a value or field from the object browser to the Quantity property and finish the wizard.
Part 5: Perform the Instance Method Call
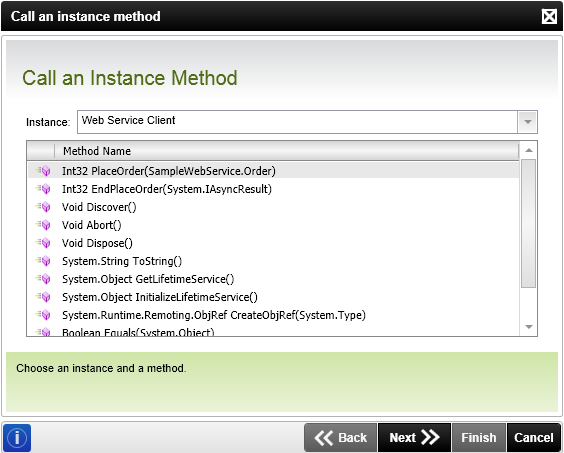
Click the Add button and select the Call an Instance Method’ menu item; this menu item is only available if instances exist in the wizard. When the Call an Instance Method page appears select the instance from the Instance drop down, select the method and click Next.
The Configure Property Mappings page, similar to the same page in the constructor call, allows you to configure fields and properties before calling the method, but because an instance currently exists, access to instance field and properties is also provided. The URL property was configured in the constructor call and as such does not need to be configured here. Click Next to skip the page.
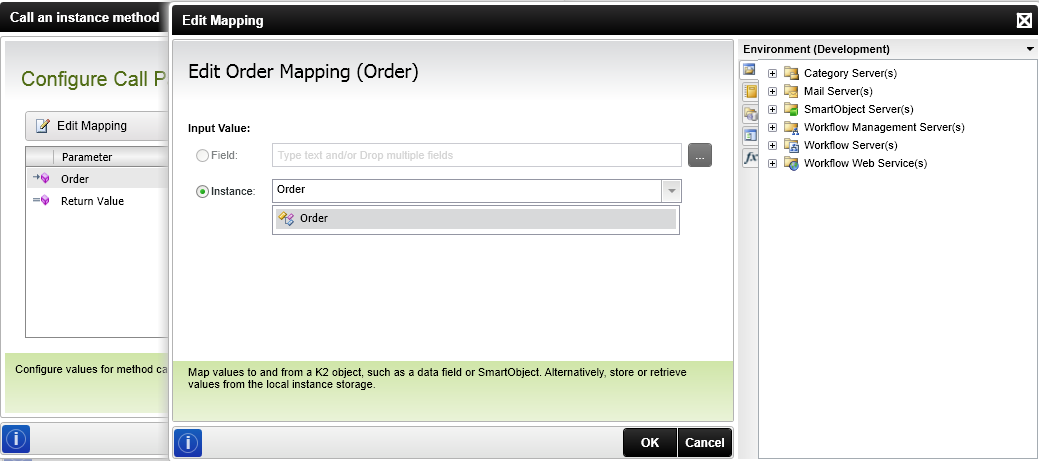
Configure the Order parameter and select the Order object from the local instance storage:
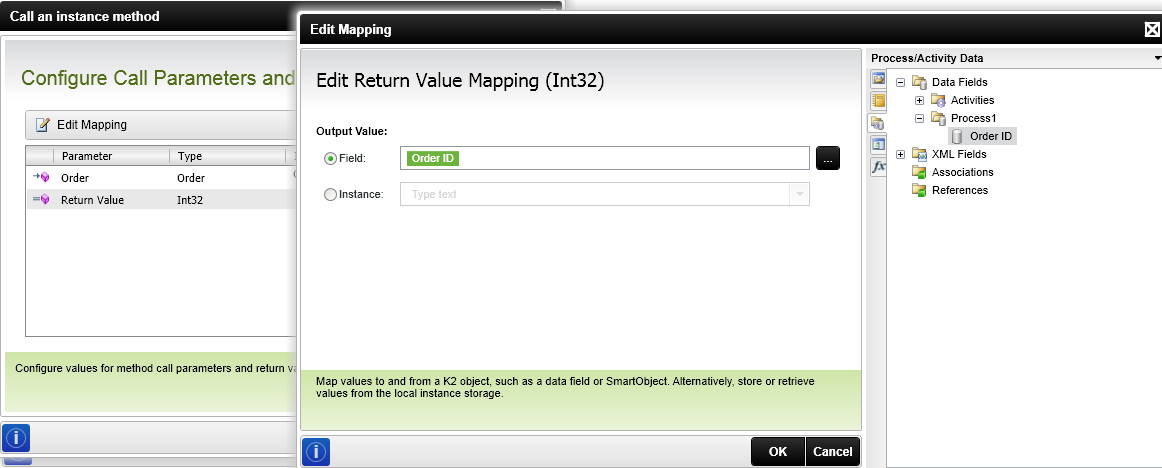
The Return Value is a scalar (non-complex) type; and, as such, can be stored in a Data or XML field.
Once all the mappings have been configured click Next to advance to the Configure Property Mappings page. Once again, this page can be skipped. Finally describe the call and finish the wizard.