CRM 4
The CRM4 integration allows you to create, update and delete entities stored on a Microsoft CRM4 server.
Installation and Configuration of Microsoft Dynamics CRM is beyond the scope of this topic or the K2 product documentation. For further assistance, see the following Microsoft resource: Microsoft Dynamics CRM 4.0
Microsoft CRM Server
Microsoft Dynamics CRM is intended for small businesses, midsized companies, and large enterprises and part of the Microsoft ERP product stack offering. K2 integrates with the CRM server in the following ways:
- The CRM4 Event wizard this enables code-free integration with Microsoft Dynamics CRM
- At run time the Workflow interacts with the Microsoft Dynamics CRM automatically providing human to system and system to system automated task completion
- K2 CRM4 Event wizard is capable of the following tasks
-
- Create Entity
- Edit Entity
- Delete Entity
- The K2 Event Template can be configured to:
-
- Focus on a single entity to perform any one of the three key tasks at a time
- Perform multiples of any one of the above tasks multiple times on multiple servers similar in concept to a batch job
Security Requirements
Ensure to take note of the following security requirements:
| CRM Security Requirements | ||
|---|---|---|
|
Web Designer Site Application Pool Identity |
System Administrator Role in CRM |
FULL User rights |
| K2 Server service account |
System Administrator Role in CRM |
FULL User rights |
Example of CRM rights
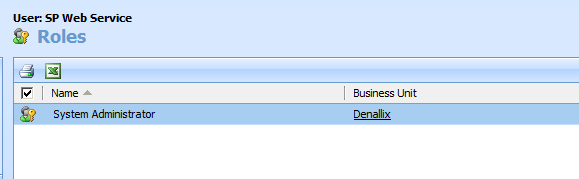
Fig 1. System Administrator Role in CRM
Microsoft CRM Entity Usage
The following Microsoft CRM entities may be used with K2:
The list provided below is considered correct at the time of publishing and is subject to availability via the Microsoft CRM server.
- Account
- Address
- Appointment
- Campaign
- Campaign Activity
- Campaign Response
- Case
- Competitor
- Contact
- Contract
- Facility/Equipment
- Fax
- Invoice
- Lead
- Letter
- Main Merge Template
- Marketing
- Opportunity
- Order
- Phone Call
- Product
- Quote
- Sales literature
- Service activity
- Task
- User
Using the CRM 4 Event wizard
Wizard Navigation is dependent on the availability of a Microsoft CRM server, and if no server is available you will be unable to run and configure the event using the wizard.
The CRM wizard launches as soon as the CRM Client Event has been added to the K2 Designer's design canvas. The drop downs below explain the pages available and the role of each page.
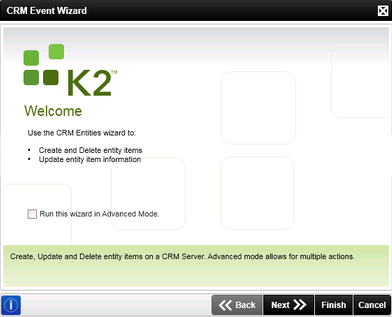
The Welcome page introduces the wizard and provides you with the choice between running the wizard in Standard Mode (Default) or Advanced Mode (Optional). Click Nextto proceed. K2 wizard buttons and controls are available for user throughout the duration of the wizard.
To enable the Advanced Mode, click in the check box before clicking Next to proceed with this wizard.
| CRM Entity wizard | |
|---|---|
|
Run this wizard in Advanced Mode |
Optional Setting: Enable this option to run the CRM wizard in Advanced mode. The default setting is the Standard Mode |
Advanced Mode versus Standard Mode
The CRM Event wizard can be configured in one of two ways:
- Configure a CRM event or action that performs one action or event at a time and add the entity instances and data
- Configure the entity wizard to create multiple entity instances as part of a single CRM Client Event.
The Event Name and Action page enables you to do the following:
- Name the Event
- Select the type of action that the CRM Event will perform
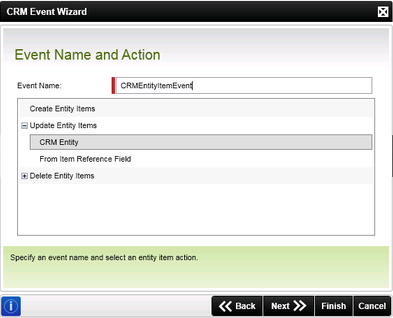
| CRM Entity wizard - Event Name and Action | |
|---|---|
| Create Entity | Creates new entity items |
| Update Entity | Updates existing entity items |
| Delete Entity | Deletes existing entity items |
The Create Entity option enables a K2 workflow to interact with an existing Microsoft Dynamics CRM server and create an instance of an entity (aka entity Item), such as an Account. The wizard, once connected to the CRM server, retrieves a list of entities that can be used.

| CRM wizard - Create Entity | |
|---|---|
| CRM server URL | The location of the Microsoft Dynamics CRM server. This URL should be validated by clicking the Test button |
| Test | Click this once the URL has been entered to verify that the CRM server is available. This action will also ping the server and refresh the contents of the Entity Name drop down when you next click on it. |
| Organization Name | Enter the name of the Organization as recorded within the CRM server. Although any name can be entered here, if the actual organization name is not entered, the ser page will be unable to retrieve Entity type or Name information. |
| Entity Name | The name of the entity that is available from within Microsoft CRM |
| Add Item to this Item Reference field | Optional User Setting: Enable the option to add a reference |
| Item Reference Field | Dependency: Enable the optional user setting
Usage: Enables you to add a reference |
| Test |
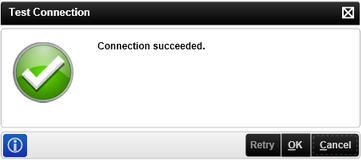
This button allows you to test the connection to the CRM server. Click on the Test button to test the CRM server connection. If successful the following message is displayed:
|
Create From Item Reference Field
This page is not in sequence and appears directly after the Event Name and Action page if you select it from the menu.
This option enables you to create the item reference name that points to an existing entity item on the CRM server.
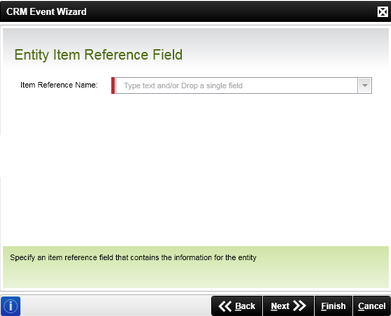
| Entity Item Reference Field | |
|---|---|
|
Item Reference Name |
The item reference name is used refer to an existing entity item instance; i.e. the process must first either have created an entity item or have access to existing entity items. The reference is used to create a relationship with an existing entity instance, retrieve the data associated with the entity instance, and manipulate it's data. |
Create Entity Attributes
Once you have established a connection with the designated CRM server and an entity item will be created, the entity items's attributes must be specified.
For you to complete this step in the wizard at least one attribute must be specified.
From the previous page, you selected to create an Account entity and shown below as an example of what would be required is the entity attributes typically associated with a CRM account.
A full discussion of all the entity names and entity attributes is beyond the scope of this topic. .
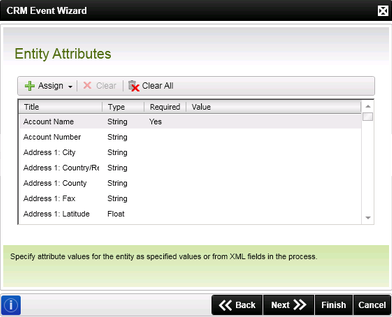
| CRM Event wizard | Attributes | |
|---|---|
| Assign |
Clicking Assign when an Entity Name is selected loads the Supply a value for dialog as shown below. You can populate the field in two ways
|
| Clear | Clears the values stored for the currently selected item |
| Clear All | Clears all the values stored for the current entity name |
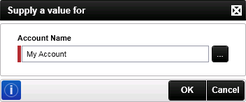
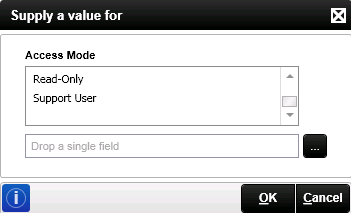
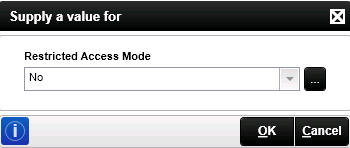
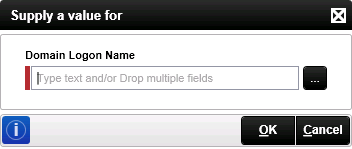
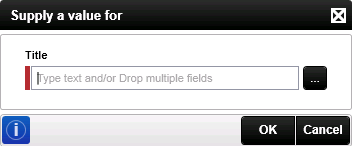
Supply a Value
When a wizard is used to perform a function and certain information is required for the wizard to perform its function, an input page is displayed requesting additional information. All the relevant input fields display as required. Provide the requested information and click OK.
Examples of these pages and the input type are displayed below:
| Value | Input Type |
|---|---|
|
|
DateTime |
|
|
Picklist |
|
|
Boolean |
|
|
Default: Example - String/Integer/Float/UniqueIdentifier/Money |

The Update Entity page enables you to identify an existing entity and update it.
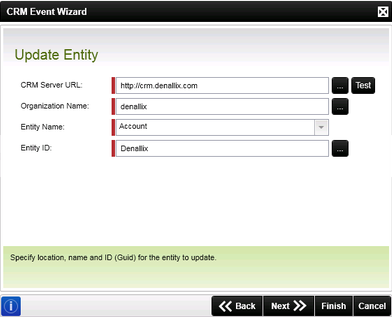
| Update Entity | |
|---|---|
| CRM server URL | The URL identifying the location of the CRM server |
| Organization Name | The name of the Organization which exists with in the CRM server |
| Entity Name | The name of the Entity Account that already exists within the CRM server |
| Entity ID | Entity reference ID |
| Test |
This button allows you to test the connection to the CRM server. Click on the Test button to test the CRM server connection. If successful the following message is displayed:
If the test is unsuccessful check the CRM server's configuration |
Update From Item Reference Field
This page is not in sequence and appears directly after the Event Name and Action page if selected from the listed menu.
This option enables you to update the Item Reference Name to an existing Entity Item Instance within CRM server.
| Entity Item Reference Field | |
|---|---|
| Item Reference Name | The item reference name is used refer to an existing entity item instance; i.e. the process must first either have created an entity item or have access to existing entity items. The reference is used to update the relationship with an existing entity instance, retrieve the data associated with the entity instance and manipulate it's data. |
Update Entity Attributes
The Update Entity Attributes page enables automated changes to be made to an existing entity that has already been created within the CRM server. The requirement is to identify the Entity Name and then provide the values that the Client Event uses to overwrite the existing values.
For youto complete this step in the wizard at least one attribute must be specified.
From the previous page, you selected to create an Account Entity item and shown below as an example of what would be required is the Entity Attributes page listing attributes that would be normally associated with an Account.
| CRM Event wizard | Attributes | |
|---|---|
| Assign |
Clicking Assign when an Entity Name is selected loads the Capture UI as shown below. The user can populate the Field in two ways
|
| Clear | Clears the values stored for the currently selected item |
| Clear All | Clears all the values stored for the current entity name |
Supply a Value
When a wizard is used to perform a function and certain information is required for the wizard to perform its function, an input page is displayed requesting additional information. The relevant input fields required. To make use of these pages, provide the requested information and click OK.
Examples of these pages and the input type are displayed below:
| Value | Input Type |
|---|---|
|
|
DateTime |
|
|
Picklist |
|
|
Boolean |
|
|
Default: Example - String/Integer/Float/UniqueIdentifier/Money |
Deleting entities is configured in much the same way as creating an entity, however deleting entities carries the following additional considerations:
- When deleting an entity item, it's the instance that is deleted, i.e. the wizard does not allow you to delete the entire entity
- There are no security checks when the Delete Entity wizard is used and the instance is deleted completely - i.e. the instance when lost cannot be recovered
The Delete Entity thread of the CRM wizard deletes a Entity instance and once deleted the instance cannot be recovered.
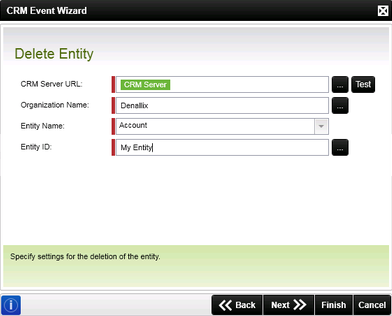
| Delete CRM Entity wizard | |
|---|---|
| CRM server URL | The location of the Microsoft Dynamics CRM server. This URL should be validated by clicking the Test button |
| Test | Click this once the URL has been entered to verify that the CRM server is available. This action will also ping the server and refresh the contents of the Entity Name drop down when you next click on it. |
| Organization Name | Enter the name of the Organization as recorded within the CRM server. Although any name can be entered here, if the actual organization name is not entered, the ser page will be unable to retrieve Entity type or Name information. |
| Entity Name | The name of the entity that is available from within Microsoft CRM |
| Entity ID | Relates to the Entity ID Reference that was created in the Create Entity ID |
| Test |
This button allows you to test the connection to the CRM server. Click on the Test button to test the CRM server connection. If successful the following message is displayed:
If the test is unsuccessful check the CRM server's configuration |
Delete From Item Reference Field
This page is not in sequence and will appear directly after the Event Name and Action page if selected from the listed menu.
This option enables you to delete the Item Reference Name to an existing Entity Item Instance within CRM server.
| Entity Item Reference Field | |
|---|---|
| Item Reference Name | -The Item Reference Name is used refer to an existing entity item instance; i.e. the process must first either have created an entity item or have access to existing entity items. The reference is used to delete the relationship with an existing entity instance. |
The Advanced wizard's pages are identical to the Default mode, with the exception that the configuration options are introduced to you and made available at different times during the progress of the wizard through the key stages of the wizard. As can be seen below, the three options are listed and available, but without the sub options as in the default mode.

For example, if you select the option to Create Entities, a list of Entities can be created. You add an entity item to create by clicking on the Add button and the Create Entity page is populated in the same way as the Default Mode. The user can add as many Entities to this list as required, which includes being able to connect to multiple Microsoft CRM servers and creating entities within multiple servers using the Advanced Mode of the CRM Event wizard.
This principle of creating Lists applies to all three CRM Event wizard Options. Advanced Mode enables you to create a list of CRM related Events and Actions and they are completed as a single client Event.

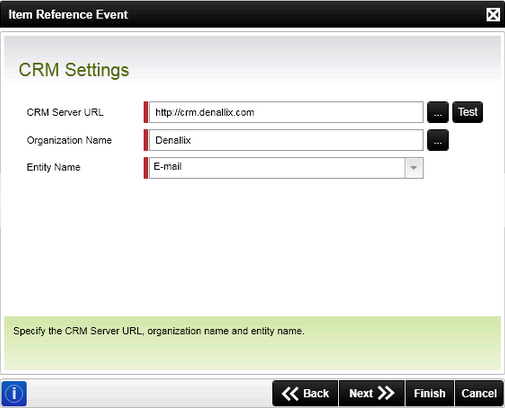
The CRM Entity reference allows your to create a process reference to a CRM Entity item property. The CRM Settings page configures the CRM server URL, Organizational Name and CRM Entity Name to be referenced by the field.
| Field | Description | Sample Value |
|---|---|---|
| CRM server URL | The CRM server connection URL |
Enter the CRM server URL or click on the ellipsis button to open the Context Browser and drag the variable containing the CRM server URL onto the field Click on the Test button to test the connection to the CRM server |
| Organizational Name | The associated CRM Organizational Name | Enter the Organization Name or use the ellipsis button to open the Context Browser and drag the variable containing the Organizational Name onto the field |
| Entity Name | The specific CRM Entity to be referenced | Select the required CRM Entity from the drop down. If the drop down is un-populated then click on the Test button from the CRM server URL property to activate the connection and retrieve the list of entities |
The Test button only tests the ability of the K2 Server to connect to the CRM server. It will not test the Organizational Name or Entity Name, even though those properties may form part of the connection string.
| CRM Security Requirements | ||
|---|---|---|
|
Web Designer Application Pool |
The CRM server and the K2 Server require the following rights: |
FULL User rights |
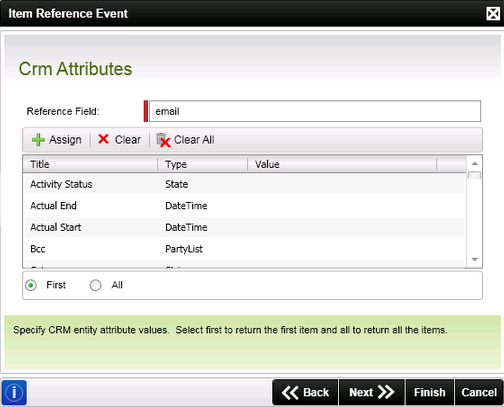
CRM Attributes Screen
The CRM Attributes page allows the configuration of the referenced item data return filter
| Field | Description | Sample Value |
|---|---|---|
| Reference Field | The name of the CRM Entity to be referenced | |
| Assign | Opens the assign value dialogue. See the Assign a Value section below | Once you have selected a data field from the table, click on the Assign button to assign a filter value |
| Clear | Clears the value of the selected data item | Once you have selected a data field to clear, click on the Clear button to remove it's assigned value |
| Clear All | Clears all the assigned values from the data table | Click on the Clear All button to clear all the assigned values |
| First | Sets the filter type to the first returned value | Select this option by clicking on the associated radio button |
| All | Sets the filter type to return all values | Select this option by clicking on the associated radio button |
Assign a Value
To assign a value to a data item, click on the Assign button and enter the required value in the field, or use the ellipsis button to open the Context Browser and drag the variable containing the value onto the field.
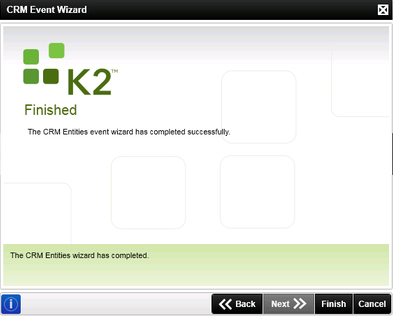
Now that the CRM wizard is complete, the following page is displayed. There is nothing further to on this page; click Finish to complete the wizard.
To apply any changes to the configuration use the Back button to return to the previous pages and make any changes.