Creating a K2 Package
NOTE: Any validation errors that occur during the configuration of a package must be resolved before the package can be built.
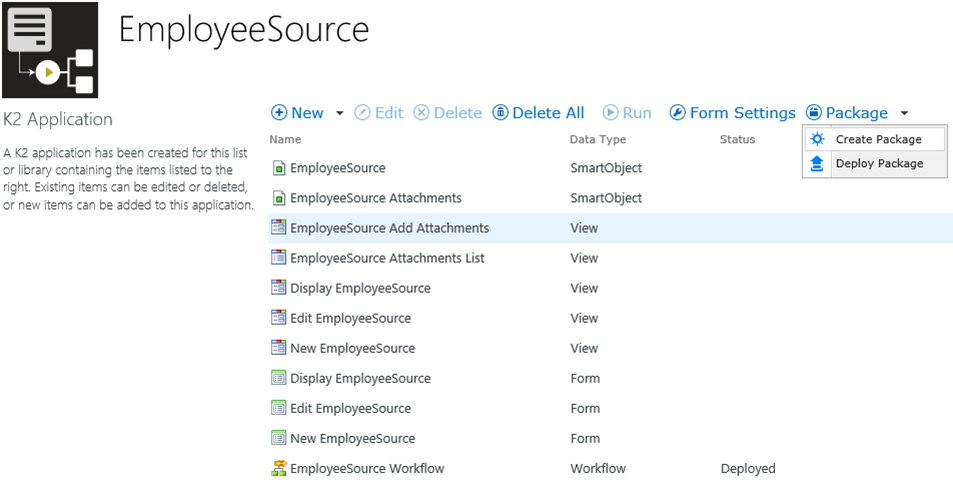
A K2 package can be created from the K2 Application page associated with a SharePoint 2013 list or library.
When using the K2 Package and Deployment tool to create or deploy a package in K2 for SharePoint, do not click the Back button in the browser to navigate back. Doing so may result in increased memory usage on the K2 server due to session management. The correct way to cancel out of the Deploy Package screens is to click the Cancel button at the bottom of the screen.
Step 1: Create a Package
Select the Create Package option from the Package menu. A list of the K2 artifacts associated with this list or library will be presented.
Step 2: Dependent Items
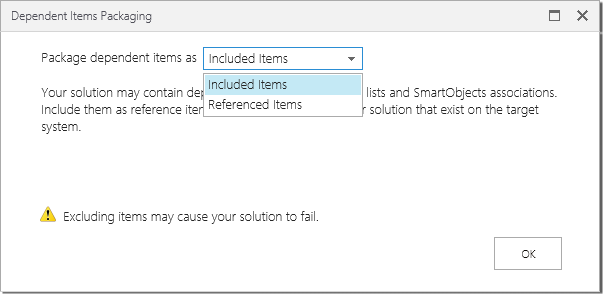
All dependent items are packaged by default. Package SmartObject associations and lookups to other lists and libraries as referenced items if those artifacts already exist on the target environment. This will create a smaller package that is faster to deploy on the target. If you know that the target environment already contains the dependent items, then select Referenced Items from the drop down. Click OK to continue. You can also configure specific referenced items in the next page.
Step 3: Package Items
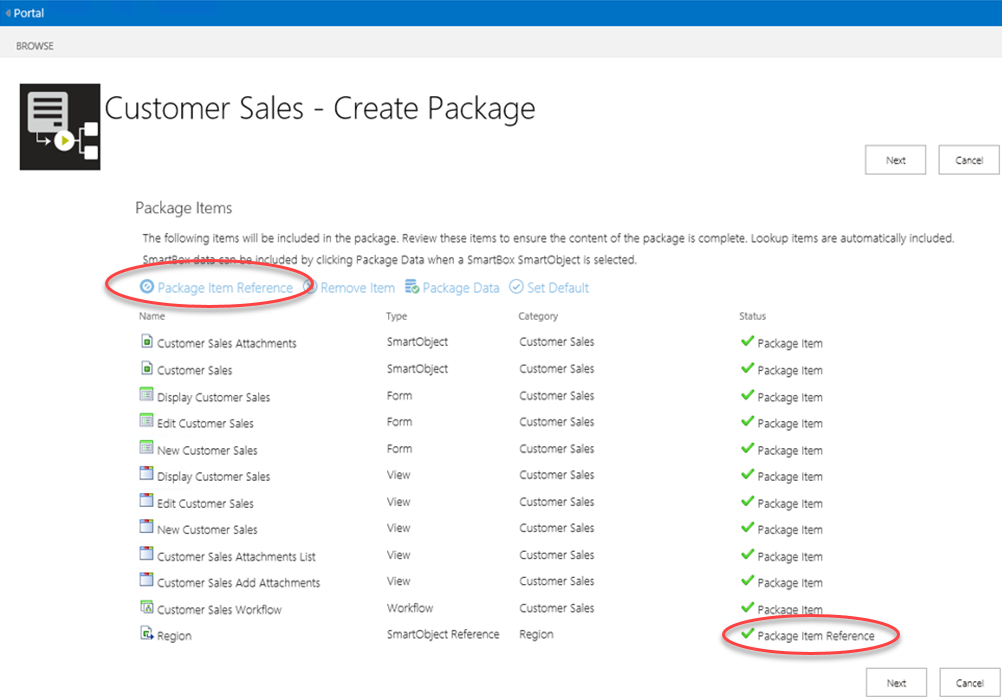
All K2 artifacts for the list or library are pre-selected. SmartBox data is excluded by default. Click on a SmartObject and use the Package Data/Exclude Data option to enable or disable the data packaging for that SmartObject. Click on a form and use the Set Default/Clear Default option to enable or disable the default form (a default form is the K2 form that is made available as a button on the final deployment screen).
The default context of the K2 app in SharePoint 2013 is used when creating a K2 package. If forms and views have been moved or if other categories have been applied, K2 will NOT be able to package those artifacts.
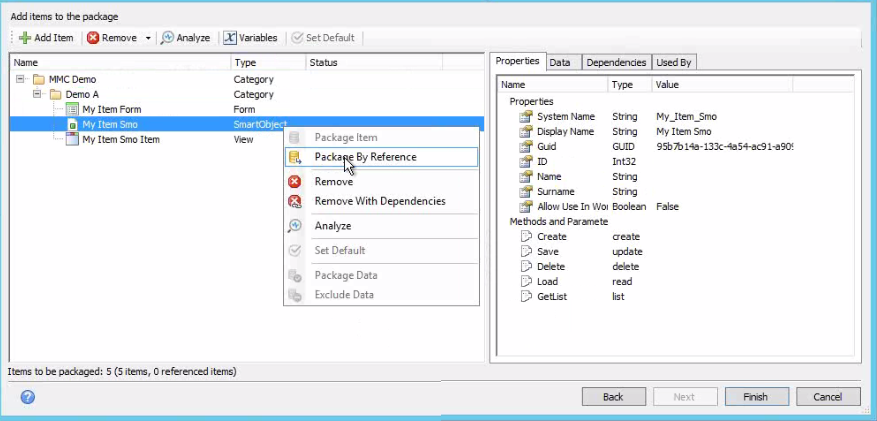
If an artifact already exists on the target environment, select the artifact and use the Package Item Reference option to add just the reference to that object to the K2 package being created. The artifact type will then show that just a reference will be packaged.
Click Next to continue creating the package.
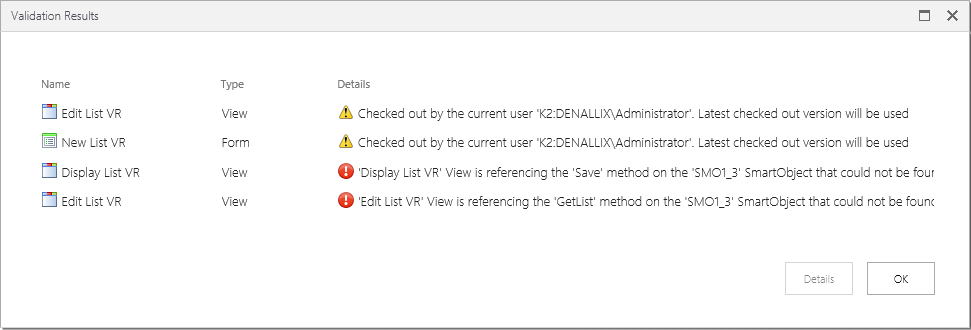
If validation warnings occur, hover over the Status message for more information. When validation errors are reported, click the artifact presenting an error and use the Details button, or double-click the artifact for more information. Errors must be fixed before the package can be created.
Step 4: Additional Items
K2 service instances may also be included in the package as additional items. We recommend that service instances are packaged by 'Reference Only". Click on the Exclude option to change the status of the service instance from Add to Package to Package by Reference. Some K2 service instances are automatically excluded and packaged by reference only. System items may also be listed by clicking on the Show/Hide System Items option.
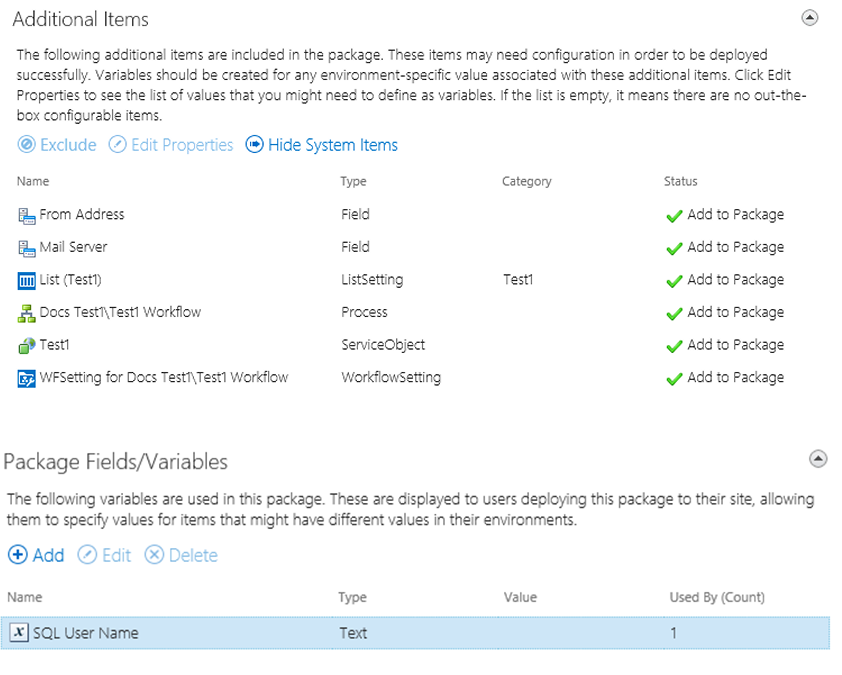
Variables can be added to the package to help configure service instances, and workflow process data and XML fields.
Adding a Variable:
- Click on the Add option of the package, Fields/Variables screen.
- Fill in the Variable Name and a Description that identifies what the variable is for. Click on the Type drop-down and select the data type. If there is a known value of this variable for the deployment environment, enter that in the Default Value text box.
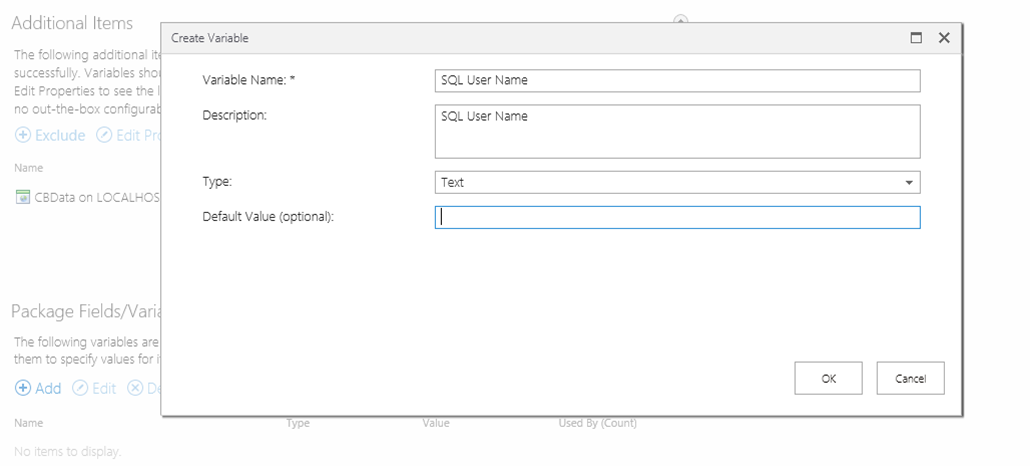
Assigning Variables:
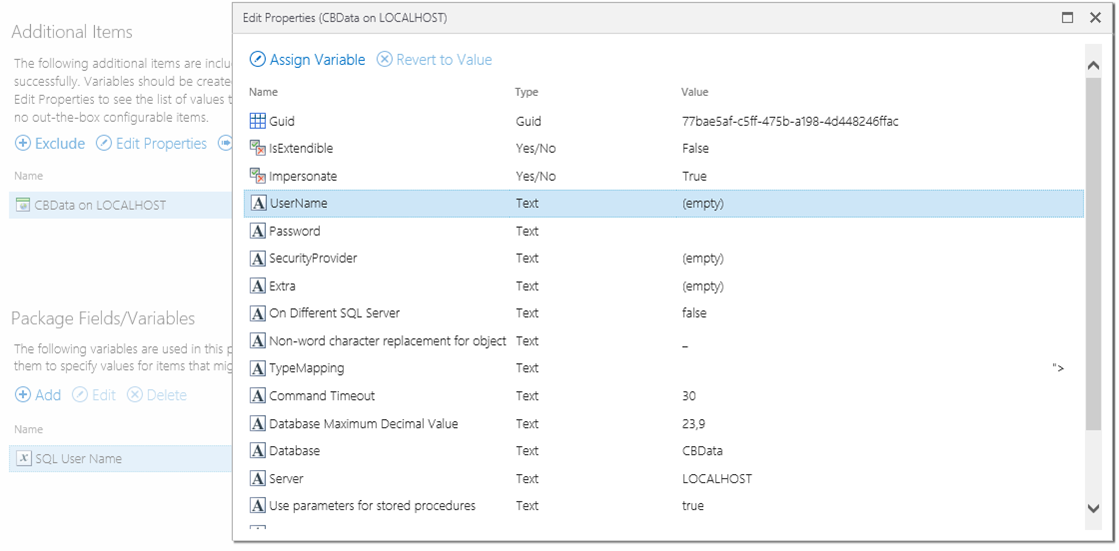
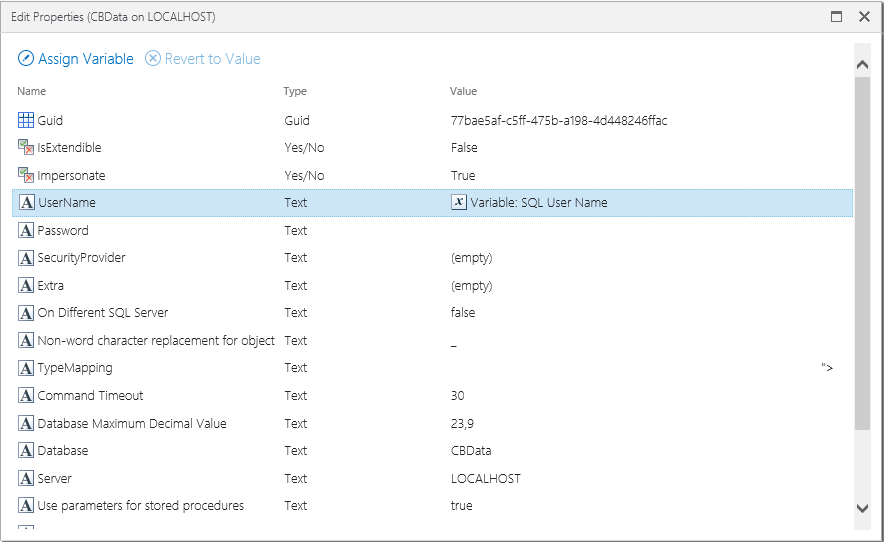
- To assign a variable to a field, select the service instance or workflow data/XML field and click the Edit Properties button. Select one of the properties and click the Assign Variable button.
- You can either add a new variable, or use an existing variable.
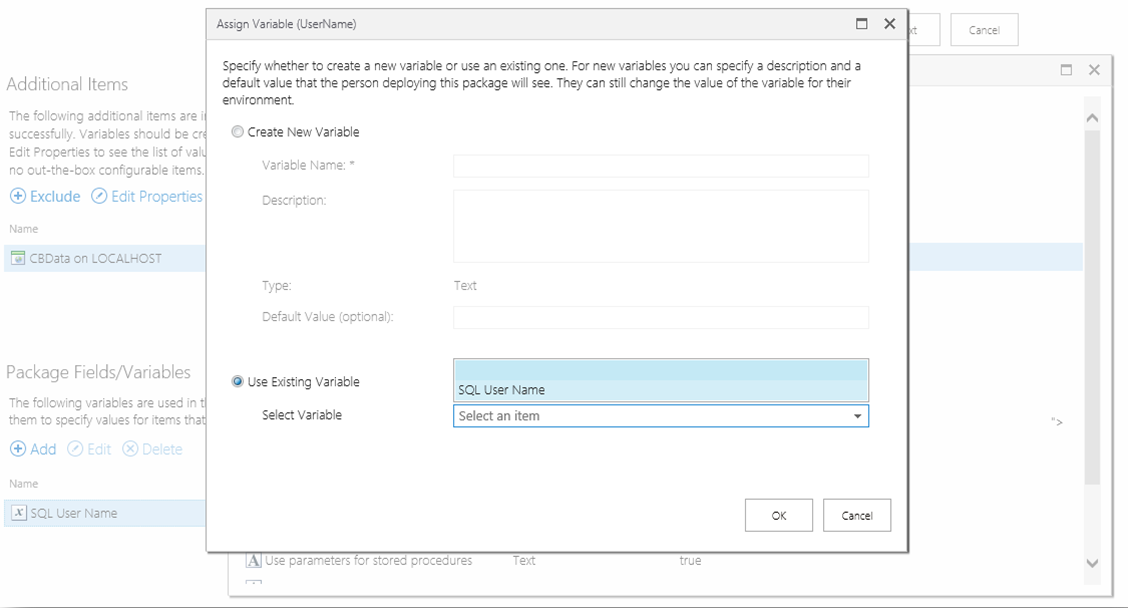
- After clicking the OK button, the variable will be assigned to the property. Scroll down and click on the OK button to close the Edit Properties window.
Click Next to continue to the creation of the K2 package.
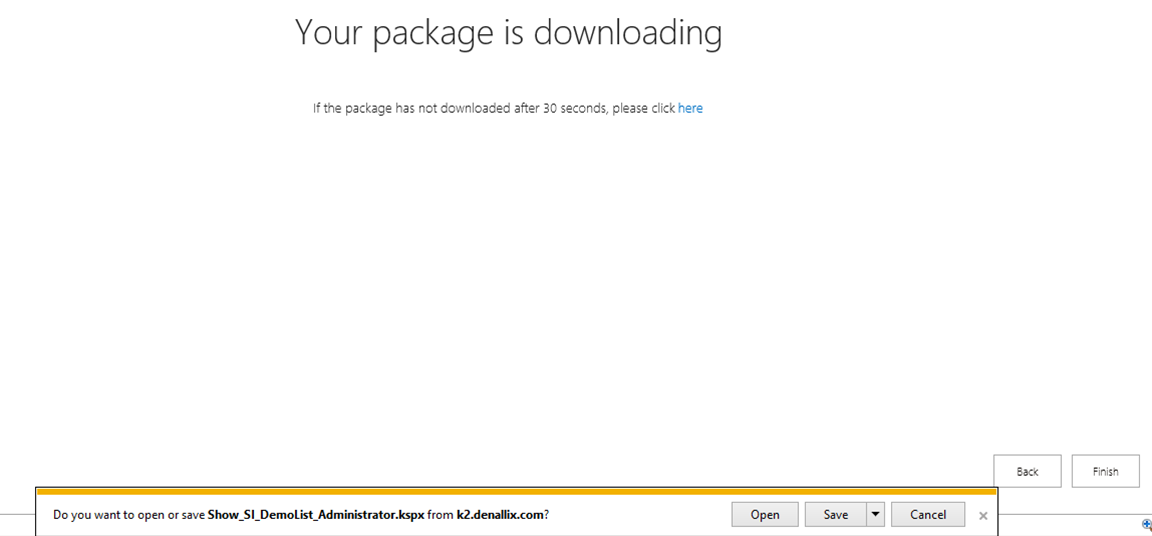
Step 5: K2 Package File
Save the created K2 package file.
Step 1: K2 Package and Deployment
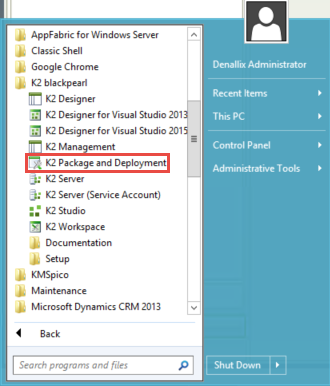
Open K2 Package and Deployment from Start > All Programs > K2 blackpearl > K2 Package and Deployment
Step 2: Create
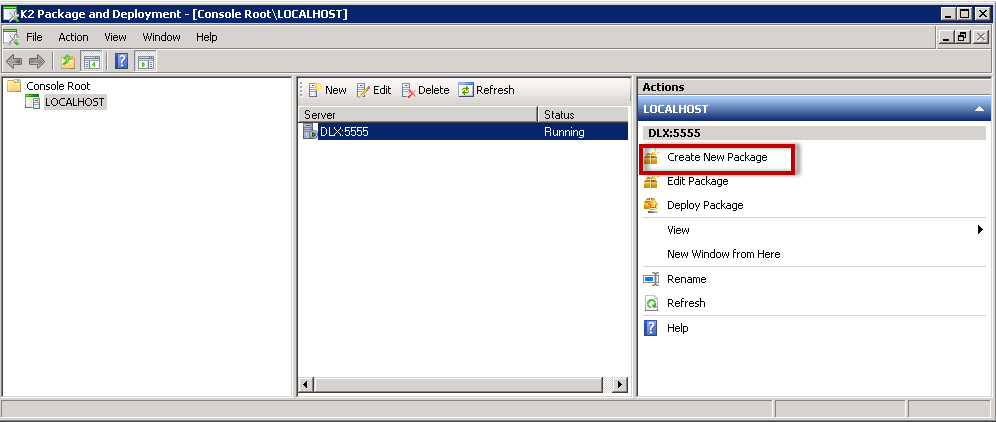
Ensure that the relevant server is highlighted. Select Create New Package from the Actions pane on the right.
Once the Create Package window has loaded, enter the name of the package in the Package Name text box, plus a description of what will be defined within the package. Use the Browse button to navigate to the location where the package will be saved.
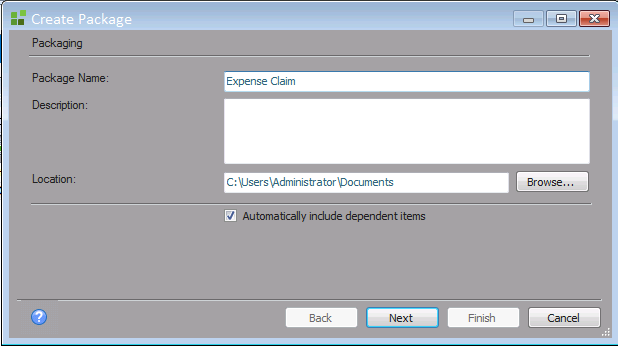
The Automatically include dependent items check box should only be deselected by administrator-level developers who have advanced knowledge of K2 systems. If this check box is deselected, K2 Package and Deployment will not check for artifact dependencies. This means that resulting packages may be created with dependency issues. Deploying a package with dependency issues may cause system errors. Workflows and SmartObjects have many levels of dependencies, and not including a given association or service instance could have serious consequences. If you deselect the Automatically include dependent items check box, you must manually expand and select each of the nodes and sub-nodes of the artifacts you wish to include in the package.
You do not need to package the artifacts in the Management node as these are automatically created when the K2 application is registered on a SharePoint site. It is also not necessary to package any specific environment fields when creating a package of K2 for SharePoint.
The default context of the K2 app in SharePoint 2013 is used when creating a K2 package. If forms and views have been moved, or if other categories have been applied, K2 will NOT be able to package those artifacts.
Step 3: Add Items
- Click on Next to navigate to the Add Items window.
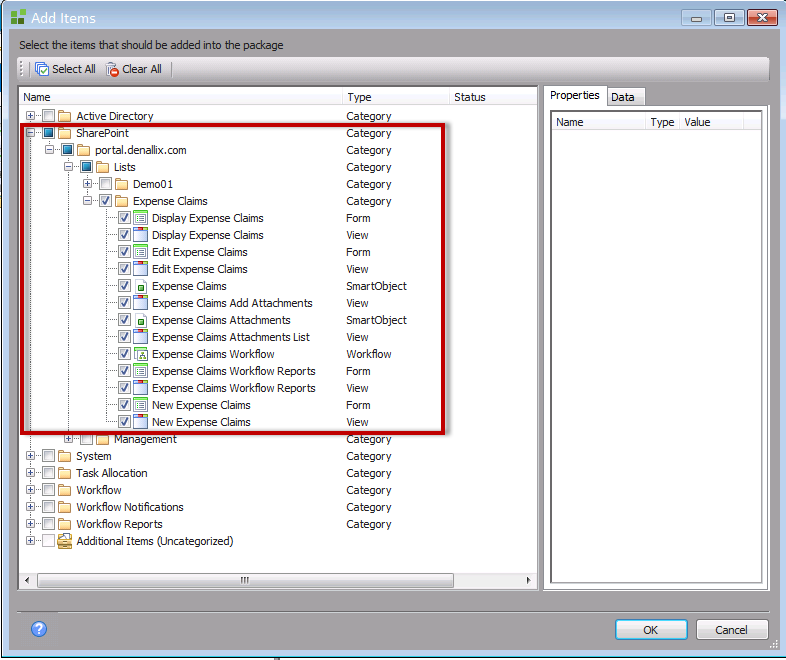
- Click Add Items. The K2 Package and Deployment tool will query the K2 server and compile a list of K2 artifacts which can be packaged. The status of all artifacts which are currently checked out will be marked with a red exclamation mark. If K2 artifacts are not checked in, K2 Package and Deployment will not be able to reference them for packaging.
- Select the K2 application artifacts (SmartObjects, forms, workflows and reports) that must be included in the package.
- The Type column shows what the K2 artifact is defined as.
- Clicking on the K2 artifact in the left column will show the properties of the object in the right-hand column.
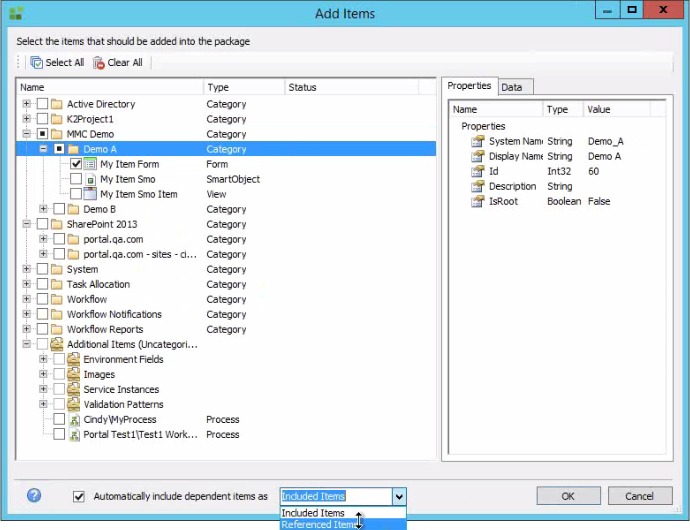
Artifacts may be packaged as full objects, or as referenced items. Referenced items are artifacts that have already been deployed to your target environment. By engaging the check box at the bottom of the Add Items screen you may configure the package to automatically include all dependent items as Included Items (full objects), or as Referenced Items, or you can de-select the check box and configure each artifact manually by right-clicking the artifact and selecting the required behavior in the next screen.
By default, SmartObjectData is deselected so that SmartBox SmartObject data from one environment is not automatically deployed to a new environment. This is done in order to prevent deployment packages from becoming oversized (due to the potentially large amount of data stored within a SmartObject). If you need to package the SmartBox data associated with a particular SmartObject, open the SmartObject node and manually select the required SmartObjectData.
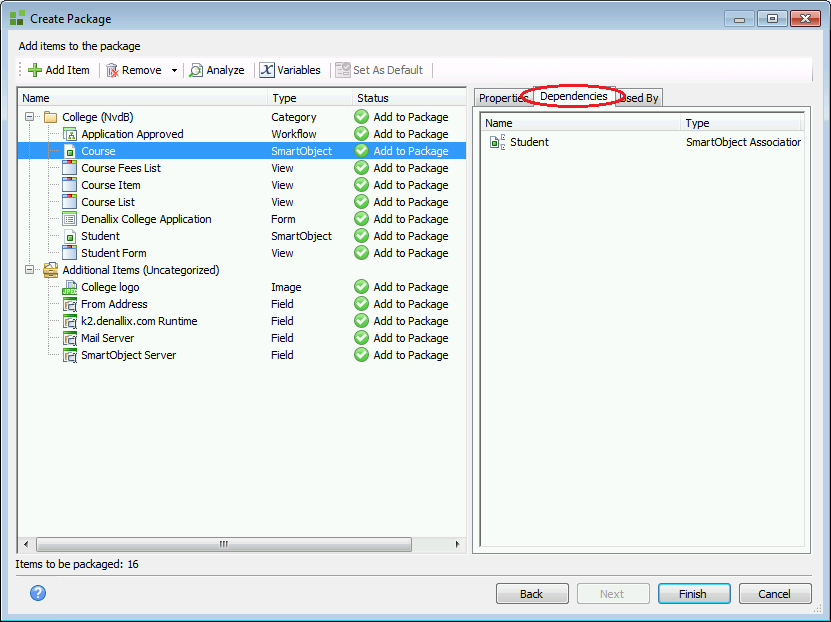
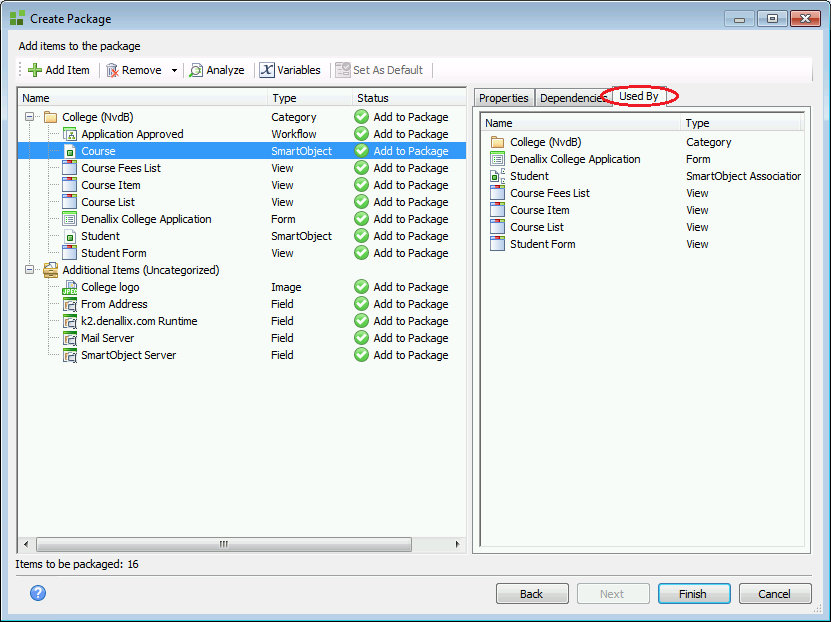
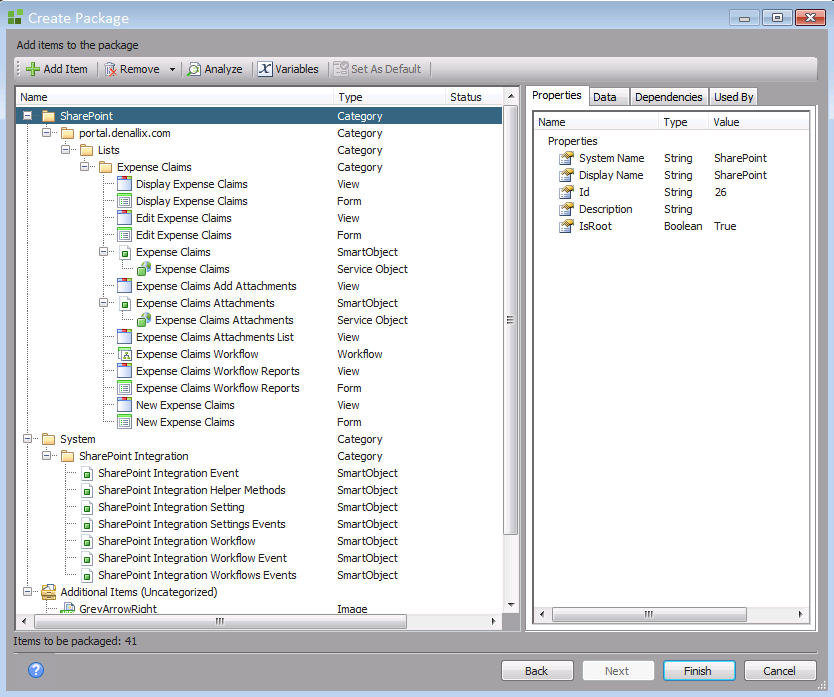
Once you have selected one or more of the K2 artifacts listed, click OK to add them to the deployment package list. The Create Package screen will now display the selected artifacts. The right-hand window displays the artifact properties, dependencies, and what the artifact is used by. The number of items to be included in the package is displayed in the bottom left-hand corner of the window. In the screen shot below, the object Properties tab has been selected, allowing the user to view the properties of the selected object. The top menu provides options for adding, removing, re-analyzing, and creating or modifying the variables for a package.
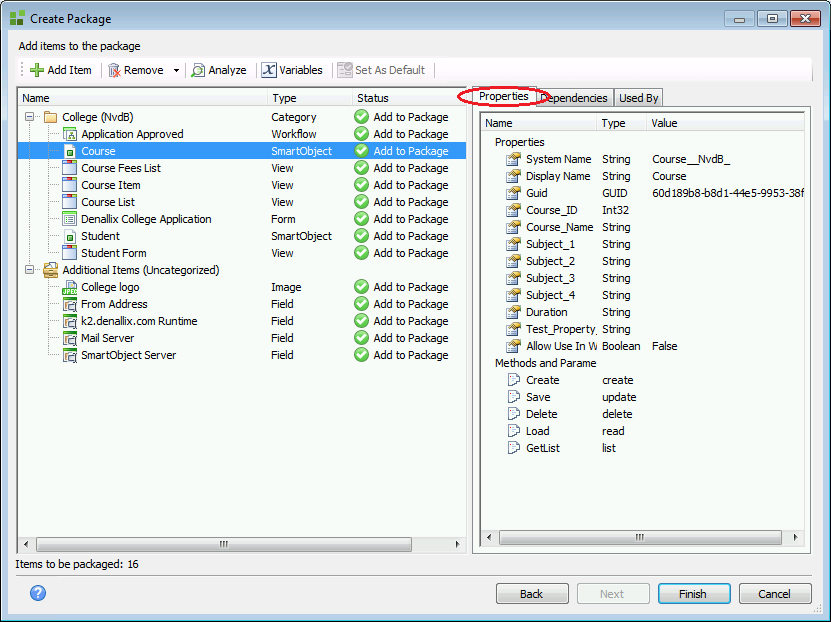
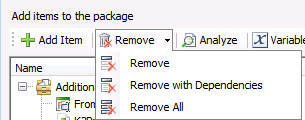
- The Remove option provides three sub-options; Remove, Remove with Dependencies, and Remove All. These provide the package creator with specialized artifact removal options. Artifacts that have been added to the package must be selected before using these sub-options.
- In the screen shot below, the object Dependencies tab has been selected, allowing the user to view the dependencies for the selected object.
- In the screen shot below, the Used By tab has been selected, allowing the user to view other objects the selected object is used by.
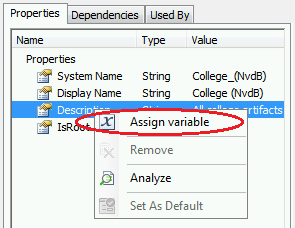
- At this point, you can create assignable variables for specific properties of any deployment package objects which require different values within a new environment (for example, service instance credentials).
Step 4: Finish
Click OK and Finish to create the package.
Validation
Warning and error messages shown in the Status property of an artifact need to be resolved before the package can be created. Double-click the status message to show more information about the warning or error status.
If the properties of packaged artifacts will be different in a target environment (for example, service instance credentials), create variables for those properties. If the environment information is not known at the time of creating the package, use the conflict resolution dialogue during deployment.
Assigning Deployment Package Variables
- Right-click on the relevant field. Select the Assign variable option.
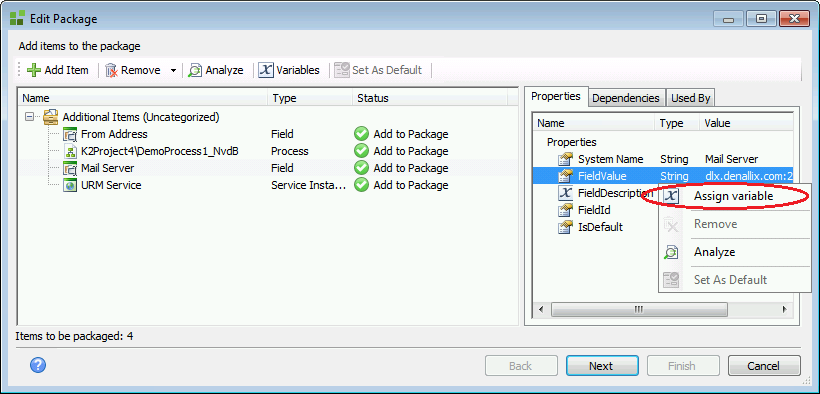
If the Assign variable option does not appear, the field to which you are attempting to assign a variable is not a property to which a variable can be assigned.
- The Variables window will open. Click the Add button.

- If you have already created a variable for this field during this session, it will be listed here. You may choose to select it from the list instead of adding a new one.
- In the Edit Variable window, specify a Name, Description, and new Value for the variable.
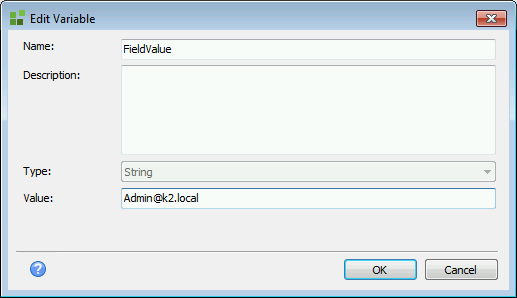
- Click OK to assign this variable to the selected field.
- Once a variable has been assigned, the Status column will show how many deployable fields have been assigned a new value from that variable.

SmartObject data is excluded by default due to the typical size and performance effect of including the data.
Click on the SmartObject and use the Package Data/Exclude Data option to enable or disable the data packaging for the SmartObject. When deploying a package that includes SmartObject data, you will have the option to overwrite the data on the target environment if the SmartObject already exists, or to keep the target data and exclude the packaged data from deployment.
Artifacts may be packaged as full objects, or as referenced items. Referenced items are artifacts that have already been deployed to the target environment. Referencing items that already exist on the target environment saves space and time when creating and deploying packages across environments.
If an artifact already exists on the target environment, select the artifact and use the Package Item Reference option to add just the reference to that object to the K2 package being created. The artifact type will then show that just a reference will be packaged.
For example, if multiple workflows use an Employee SmartObject, the first package deployed to a target environment can contain the full Employee SmartObject artifact. Subsequent packages that package other workflows (that use the same SmartObject) may then simply use the Package Item Reference option. The package will not contain the SmartObject definition, but when the package is deployed it will use the reference to create the required links to the existing Employee SmartObject on the target environment.
The How to create a package using K2 for SharePoint and How to use a package using Microsoft Management Console subsections above have more information on configuring the package by reference options.
K2 for SharePoint Package and Deployment:

Microsoft Management Console Package and Deployment:
