The Ribbon
The ribbon (menu bar) of K2 Studio contains options necessary to create and modify K2 processes. It is designed to help you quickly find the commands that you need to complete a task. Commands are organized in logical groups, which are collected together under the three main tabs.

The color scheme used in K2 Studio is based on the user defined color scheme of Microsoft Office.
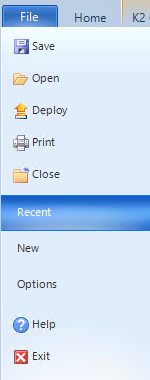
The File tab enables designers to interact with K2 Studio files, file locations and data sources.
| Field | Notes | ||||||||||||||||||||
|---|---|---|---|---|---|---|---|---|---|---|---|---|---|---|---|---|---|---|---|---|---|
| Save | Save saves the project and files currently open. | ||||||||||||||||||||
| Open | Openis available from both the K2 Studio File tab and the K2 Studio Home tab. The dialog enables you to open existing projects and files. When the menu is clicked, the default location for project file storage is opened. Depending on the client operating system, the default location is the Documents library.. | ||||||||||||||||||||
| Deploy | Deploy enables you to deploy your current project along with its associated project files to the K2 Server. The project is checked for any errors during the deployment process and, if present, must be resolved before the project can be deployed. The Deploy option is available from both the K2 Studio File tab and the K2 Studio Home tab. The Deploy Project Wizard is invoked by clicking on any of the three points from which it is accessible. If there are no errors with the process, then the Deploy Project Wizard appears and takes you through the steps required to deploy your process to the K2 Server. The Deploy Project Wizard does not appear unless there are no immediate errors with the process.. | ||||||||||||||||||||
| Print enables you to produce a printed copy of the design canvas.. | |||||||||||||||||||||
| Close | Close closes the K2 Studio environment. Ensure that the changes to the current project are saved. | ||||||||||||||||||||
| Recent | Displays the list of recent projects | ||||||||||||||||||||
| New | Opens the New dialog. This enables you to start a new K2 Project, K2 Process, K2 SmartObject and choose an available K2 Template based on the type chosen. | ||||||||||||||||||||
| Options |
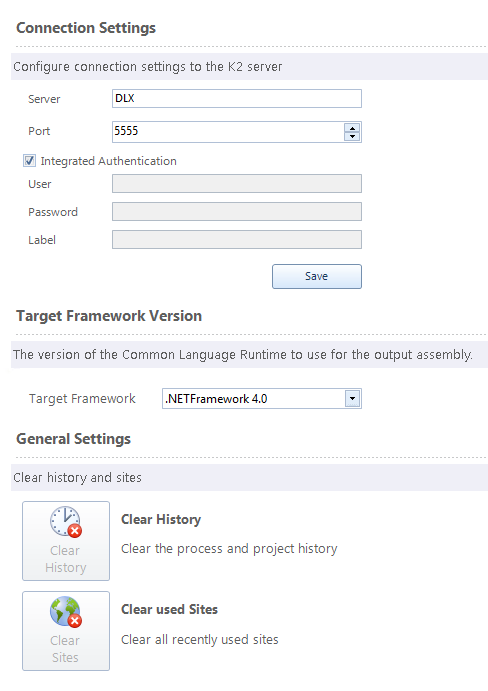
Options enables you to configure and manage environmental connections and sources. The connection settings allow you to design against a specific K2 server. Make sure the K2 Studio version and the K2 Server version are the same. If developing against a K2 server where integrated authentication is not required or non-integrated authentication is preferred, user credentials and a K2 server label can be defined to connect to that specific K2 environment.
Connection Settings The connection setting determine which K2 sever the K2 Studio environment deploys against. These settings are captured at the time of installation and can be changed at any time and for any project to suit design-time requirements. Ensure that the K2 Studio version and the K2 Server version are the same.
General Settings General Settings enable you to manage the recent and web site browsing history that may have been collected while developing projects.
|
||||||||||||||||||||
| Help | Opens the K2 Documentation | ||||||||||||||||||||
| Exit | Exits K2 Studio | ||||||||||||||||||||
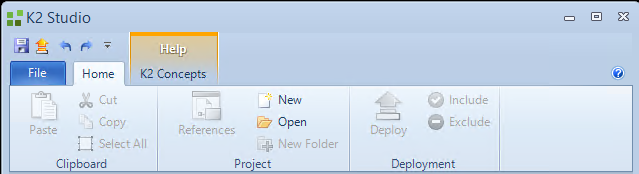
The Home tab contains standard K2 Studio interface functions. The menu bar has four option groups - Clipboard, Project, and Deployment.
| Button | Notes | Shortcut |
|---|---|---|
| Paste | Pastes the cut or copied item from the clipboard | Ctrl + V |
| Cut | Cuts the selected item and loads it into the clipboard | Ctrl + X |
| Copy | Copies the selected item to the clipboard | Ctrl + C |
| Select All | Selects all the items on the canvas | Ctrl + A |
| References | Opens the Project References wizard. See Project References. | Ctrl + R |
| New | Opens the New dialog. See New Project. | Ctrl + Shift + N |
| Open | Opens an existing Project or Project item | Ctrl + Shift + O |
| New Folder | Creates a new folder within the Solution Explorer tree | Ctrl + Shift + F |
| Deploy | Deploys the K2 Process | Ctrl + D |
| Include | Includes the selected process from deployment within the K2 project | Ctrl + Shift + I |
| Exclude | Excludes the selected process from deployment within the K2 project | Ctrl + Shift + E |
Clicking on the New button on the Home tab opens the New dialog. The image below shows the default K2 Project creation dialog:
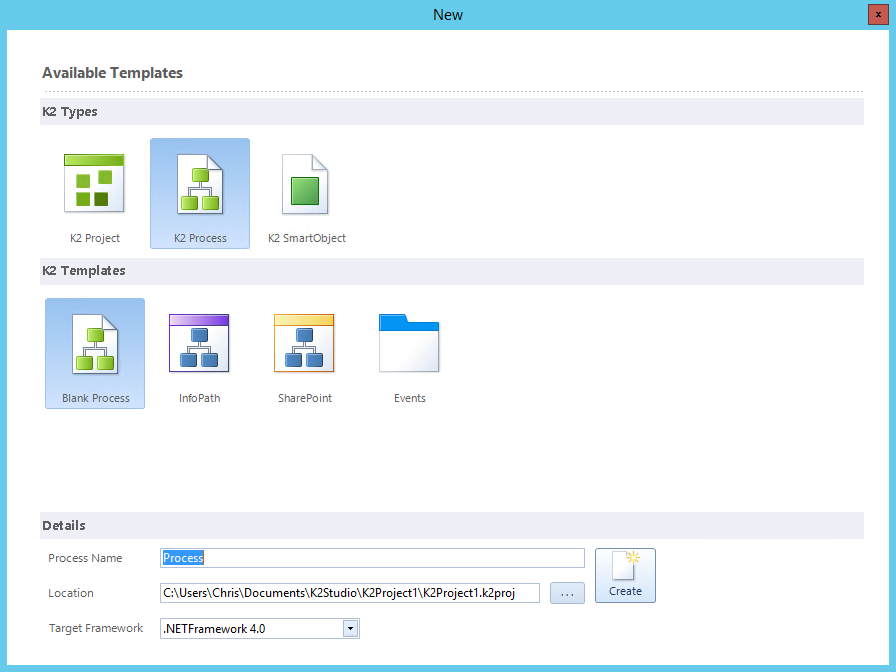
The K2 Project is the container for one or more processes and SmartObjects. Once the project has been created you can add additional processes and SmartObjects to the project. If you have more than one process as part of a single project, you can switch between the processes by clicking the process name in the Solution Explorer.
To create a project with a project item already included in the project (such as a project with a process or a project with a SmartObject), select the K2 Process or K2 SmartObject option found under the K2 Types option.
Once you have selected the process type, browse to the location where you want to save the project and enter the name of the project in the Project text box, then click Create.
| Item | Description |
|---|---|
| K2 Type | Base project which can contain multiple process types. |
| K2 Templates | The K2 Templates for the K2 Type selected. The template options will change according to the K2 Type. |
| Name | The user defined name for the project which will contain the process items associated with it. |
| Location | The location (i.e. local machine hard drive) where the project folders will be saved. |
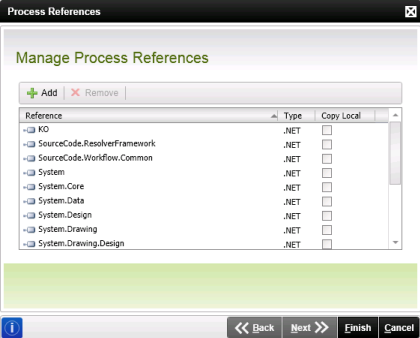
Process references refer to external objects or components and frameworks that a K2 process can access during process deployment and runtime. By using the Project References dialog, you can access 3rd party and custom built objects, incorporating them within the workflow using the References Event wizard.

Click on the References button to open the Project References dialog.
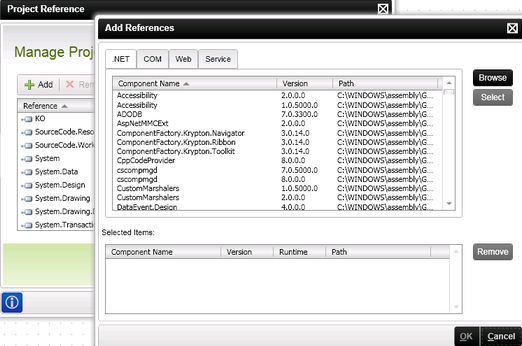
Add References
The Add References dialog presents .NET, COM, Web, and service reference selection tabs. The Add References dialog allows you to manage the available modules, components and frameworks necessary for your project. Items can be removed from the Project References dialog as well.
Removing references from the Project References dialog makes them inaccessible to the process at deploy and runtime. Any items within the process that make use of the item removed are not supported by the project and must be removed from the process before deployment.
| Button | Description |
|---|---|
| Browse | Opens the file browser dialogue, allowing the process designer to navigate to, and select, a custom reference object |
| Select | Selects the reference object for inclusion in the K2 process project |
| Remove | Removes the reference object from being included in the K2 process project |
Selecting the K2 Process option displays the following K2 Templates:
Blank Process
This template creates a blank K2 process within the K2 Studio Design Canvas.
InfoPath
This template creates an InfoPath-integrated process, surfacing the associated InfoPath form details in the Process Helper pane which appears when the template is opened.
SharePoint
This template creates a SharePoint-integrated process, surfacing the associated SharePoint details within the Process Helper pane which appears when the template is opened.
Events
This template creates an Events-integrated process, surfacing the associated Events details within the Process Helper pane which appears when the template is opened.
Item Name
Once you have selected the process type, browse to the location where you want to save the project and enter the name of the project in the Project text box, and then click Create.
| Field | Notes |
|---|---|
| K2 Type | Base project which can contain multiple process types. |
| K2 Templates | The K2 Templates for the K2 Type selected. The template options will change according to the K2 Type. |
| Name | The user defined name for the project which will contain the process items associated with it. |
| Location | The location (i.e. local machine hard drive) where the project folders will be save |
Clicking on the K2 SmartObject option displays the one available K2 Template, SmartObject.:
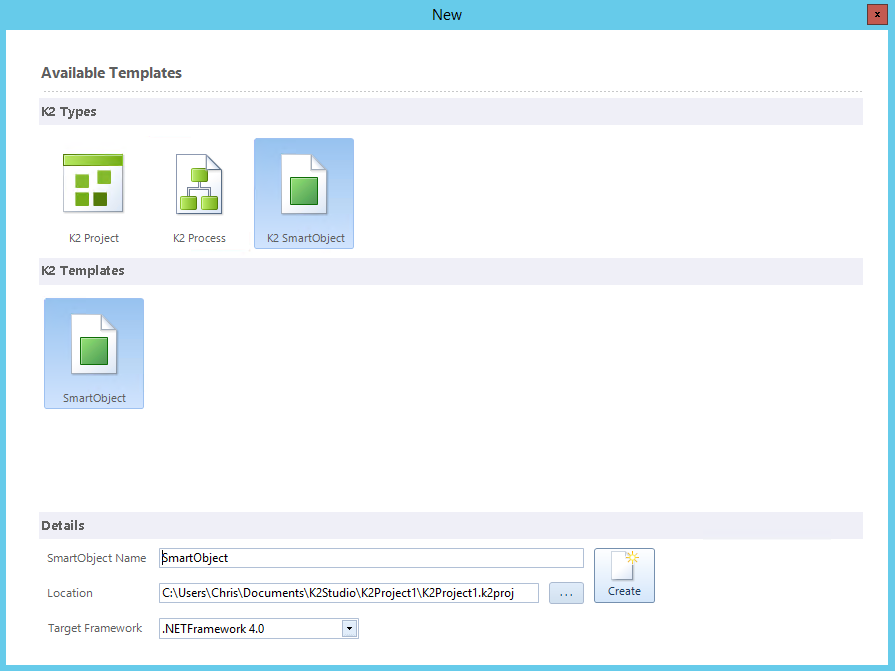
SmartObject
Creates a project for a SmartObject. The project contains default items which can be customized to suit your needs, and includes simple and advanced modes (the latter being for editing SmartObject methods).
Browse to the location where you want to save the project and enter the name of the SmartObject in the Name text box, and then click Create.
Item Name
Browse to the location where you want to save the project and enter the name of the project in the Project text box, and then click Create.
| Item | Description |
|---|---|
| K2 Type | Base project which can contain multiple process types. |
| K2 Templates | The K2 Templates for the K2 Type selected. The template options will change according to the K2 Type. |
| Name | The user defined name for the project which will contain the process items associated with it. |
| Location | The location (i.e. local machine hard drive) where the project folders will be save |
K2 Studio provides an explanation of the various K2 Concepts. The Concepts tab provides one-click access to relevant information and includes a Process Templates section which contains videos on creating different objects, such as the following:
