K2 Designer for SharePoint - Participants
Users are required as participants in a Workflow, to ensure the completion of a Workflow. Users are referred to as Participants in K2 Designer for SharePoint. Multiple users can be assigned per Workflow step. Participants can be built into the Workflow ensuring the work item is assigned to the correct user.
There are various methods in which a user can be assigned as the Participant user on a step, namely:
- Favorites Menu
- Participants
- User Task
The Participants icon is next to a step on the design canvas, as shown below:
Fig. 1. Participants
The configured participants' names will display under the Step name.
Fig. 2. Participants
 |
All steps created from the Templates menu will require a participant user, while steps created from the Wizards Menu will not require participant users |
Participants and Task Groups
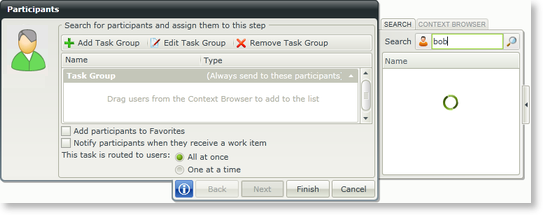
Fig. 3. Participants
Task Groups are used to build logic into the workflow to streamline the Workflow.
| Feature | What it is | How to use it |
|---|---|---|
| Search | Searches for users in the Active Directory | Enter the name of the required user in the search text box, click the search icon |
| Name | List of user names retrieved from Active Directory | Select a user's name from the list of available users |
| Add Task Group | Adds a new Task Group to the step | Click Add Task Group |
| Edit Task Group | Edits an existing Task Group. Task Groups can be renamed to create easily identifiable groups of users. Selecting this option will open the Edit Task Group Rule screen. This screen is used to rename the Task Groups and build in logic to the Task Groups | Select a Task Group and click Edit Task Group |
| Remove Task Group | Removes the selected Task Group | Select a Task Group and click Remove Task Group |
| Add participants to Favorites | Selecting this option will add the users listed under Allocated to the Favorites menu, these users can then be assigned as participant users to future Workflows directly from the Favorites menu by dragging the user's name and dropping it onto the required step | Tick the option |
| Notify participants when they receive a work item | The destination Participants will receive a notification using the default mail template | Tick the option |
| This task is routed to users All at once/One at a time | Indicates the type of destination rule option to be used, see Destination Rule Options | Select the required option |
Edit Task Group
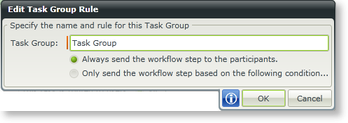
When editing the Task Group, the name and the rule of the Task Group can be changed.

Fig. 4. Edit Task Group Rule
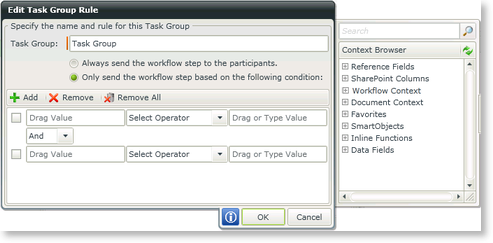
When selecting to add a condition, the condition rules section opens as shown below:

Fig. 5. Edit Task Group Rule Logic
| Feature | What it is | How to use it |
|---|---|---|
| Task Group | Enter the name of the required user in the search text box, click the search icon. If the user is in the Active directory the name will appear under the column | Type a name |
| Always send the workflow step to the participants | Workflow step is always sent to the participants | Select the option |
| Only send the workflow step based on the following conditions | Workflow step is only sent based on certain conditions | Select the option |
| Add | Adds a condition line | Click Add |
| Remove | Removes a condition | Click Remove |
| Remove All | Removes all the condition | Click Remove All |
| Drag Value | The first Value to be used in the condition | Drag and drop a value from the Context Browser |
| Select Operator |
Operator to be used in the condition. The operators differ depending on the type of field used. The following operators are available:
|
Select an Operator |
| Drag or Type Value | The second Value to be used in the condition | Drag and drop a value from the Context Browser or type a value in the text box |
| And/Or | Links the conditions together with a And/Or operator | Select the operator to be used |
Search for Participants
To search for a specific participant to add to a Workflow, type in the participant's name in the Search field and click the Search icon.

Fig. 6. Search for Participants
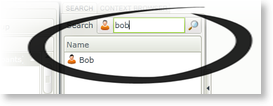
The required participant will be displayed in the results window.

Fig. 7. Search for Participants
 |
When using SharePoint Groups it is important to assign Group Permissions such as Full Control, Design or Contribute to the Group for the SharePoint Group to appear in the Context Browser. |
