K2 Process Portal - Scheduler
The Scheduler node allows a manager to schedule the start of a K2 Process.
 |
The Scheduler only has access to those K2 Processes that have been added to the Process Portal. You may need to add the process to the portal before creating a schedule. See Adding a K2 Process to the Process Portal |
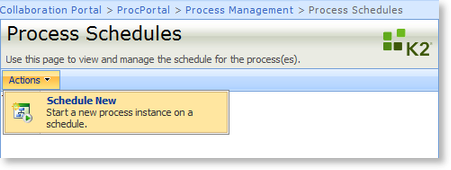
To start the process Scheduler, select the Schedule New option from the Actions menu of the Process Schedules screen.

Fig. 1. Select the 'Schedule New' option to start a new process schedule
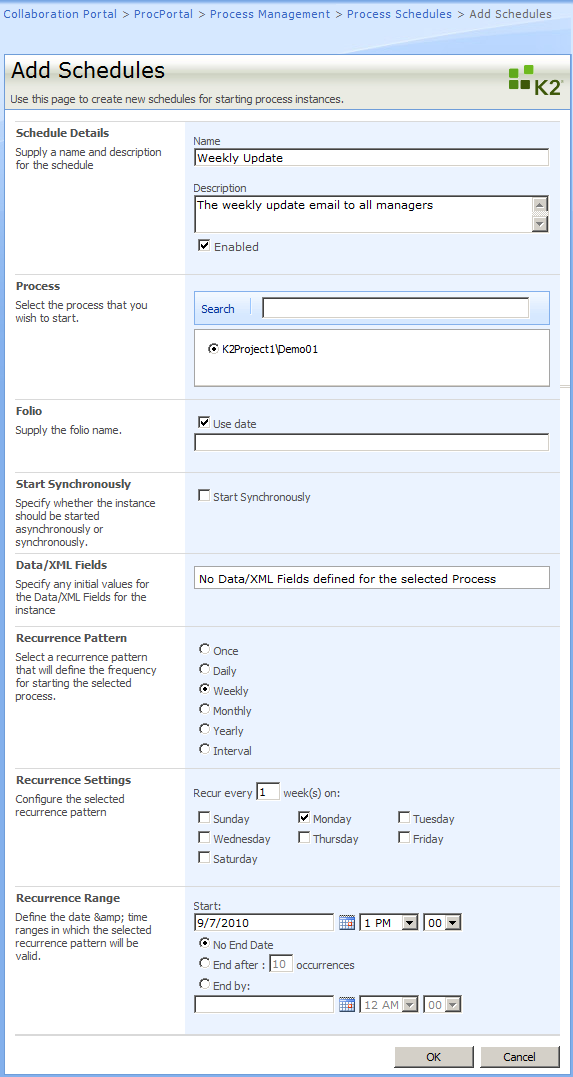
This will open the Add Schedules page where the options regarding the type of schedule are configured.

Fig. 2. Add Schedules Configuration Screen
| Feature | Option | How to use it |
|---|---|---|
| Schedule Details | Name | Enter the name of the Schedule that will be created by this page |
| Description | Enter a description of the Schedule | |
| Enabled Check Box | The Enabled check box is selected by default. Deselect the Enabled check box to disable the Schedule | |
| Process | Search | Enter the name (or part of the name) of the process and click on the Search button to return a list of Processes |
| Process List | Select a process from the list. This is the process that the Schedule will start once the configured conditions have been met | |
| Folio | Use Date Check Box | Select this option to use the Date that the process starts on as the process Folio name |
| Folio Text Box | If you have deselected the 'Use Date' check box, enter the Folio name for the process in this text box | |
| Start Synchronously | Start Synchronously Check Box | The default setting is to start the process in Asynchronous mode. If you need the process to start in synchronous mode click on the check box to enable it |
| Data/XML Fields | Data/XML Field List | If the process has Data or XML fields, they will be listed here. Click on the field to assign a value to it |
| Recurrence Pattern | Once | Sets the process to start only once |
| Daily | Sets the process to start every day | |
| Weekly | Sets the process to start on a weekly basis | |
| Monthly | Sets the process to start on a monthly basis | |
| Yearly | Sets the process to start on a yearly basis | |
| Interval | Selecting this option will allow the workflow creator to schedule the start of the process on a custom made interval | |
| Recurrence Settings | Recurrence Value Box | Presents a value option for the recurrence pattern selected above |
| Recurrence Type Options | Presents the recurrence pattern options (i.e. when the Weekly option is selected, the days of the week will be presented here). Click on the required recurrence option | |
| Recurrence Range | Start | Configure the required starting time |
| No End Date Check Box | This option is selected by default. If the process schedule has a specific date that the schedule should end on, de-select this option | |
| End After | Enter a numerical value in the text box if the process schedule will have a limited number of occurrences | |
| End By | Configure the required ending time. This option will only be configurable if the 'No End Date' check box has been de-selected |
Once the Schedule has been configured, click on the OK button to create it. The schedule will show in the list on the Process Schedules page.
