7. Edit the New Expense Claim View
In this step, you begin working with the views and forms for the Expense Claim application. Previously, you generated views and forms as part of the application elements. You will "tweak" several views and forms, removing unnecessary controls, editing formats, and setting rules. You will also add a new list view to capture expense claim line items. You will not integrate any forms with the workflow just yet. You will build the workflow in a later step, then integrate the forms needed.
-
Begin by checking out and editing the New Expense Claim View generated by K2. You will delete several unused controls from this view, then mark other controls as read-only.
- From the Expense Claim list in SharePoint, navigate to the K2 Application elements page.
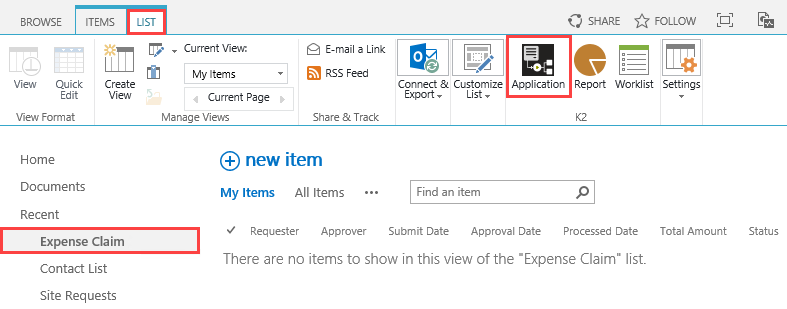
- Right-click and Check Out the New Expense Claim view, then Edit the view.
- From the Expense Claim list in SharePoint, navigate to the K2 Application elements page.
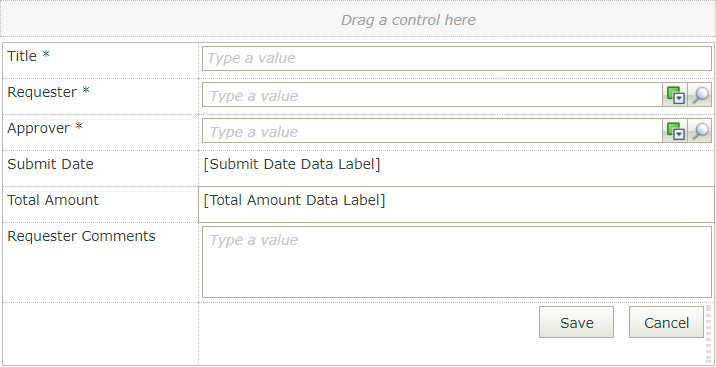
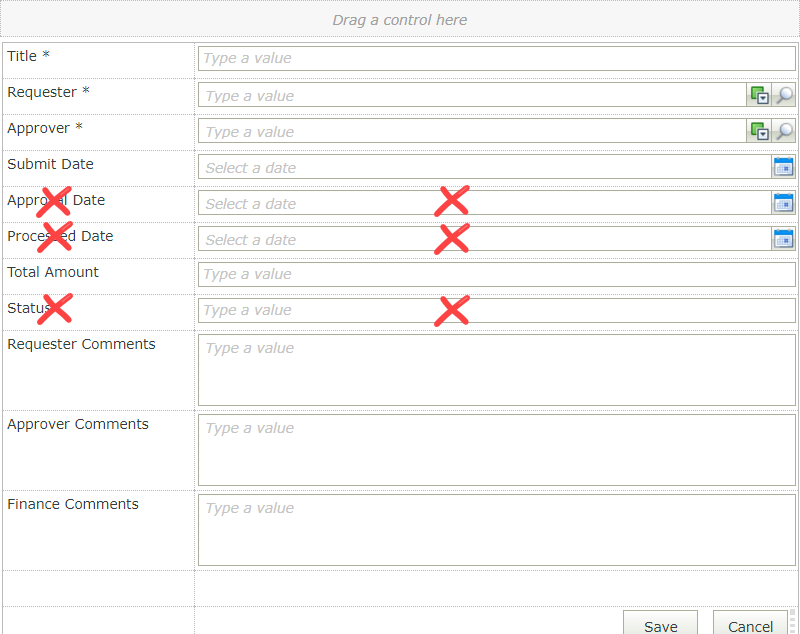
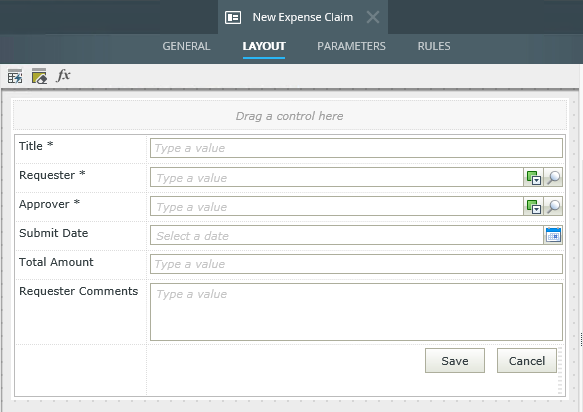
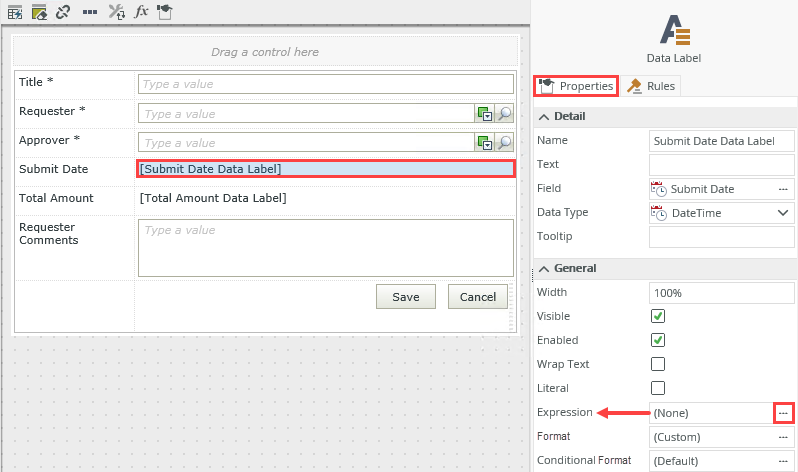
- Remove the Approver Comments, Finance Comments, Approval Date, Processed Date, and Status labels and controls. Remove the resulting empty rows. You will see a dependencies warning. Change the option to Remove all dependencies. Change the Submit Date and Total Amount controls to Data Label controls. The updated view should look like the image below.
- First you will remove unused controls. These are controls the workflow updates, so you don't need them on the form when you submit a new request. Delete the Approver Comments label and text box. You will see a warning indicating the controls have dependencies. Change the warning value to Remove all dependencies, then click OK. Delete the Finance Comments label and text box, removing all dependencies once again.
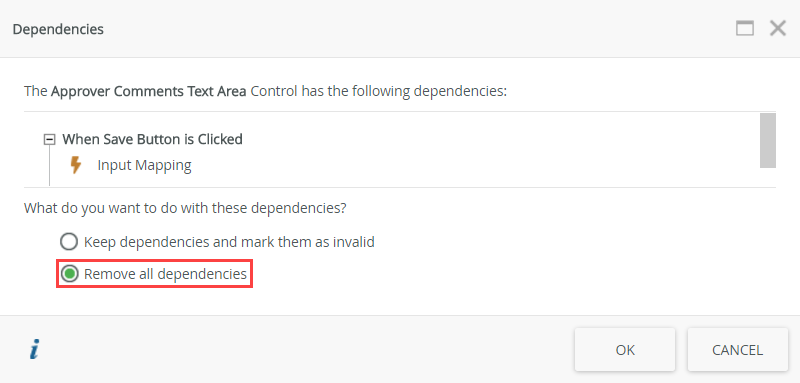 When you change a control that results in a rule discrepancy, you will see the Dependencies warning. At the top of the dialog, you will see the reference control name. The middle pane displays the rules that are dependent on the control. In the sample below, the Request Status Text Box control is being deleted from the view, resulting in the dependencies warning. There is one rule dependent on the Request Status Text Box control: When Save Button is Clicked.
You have two options: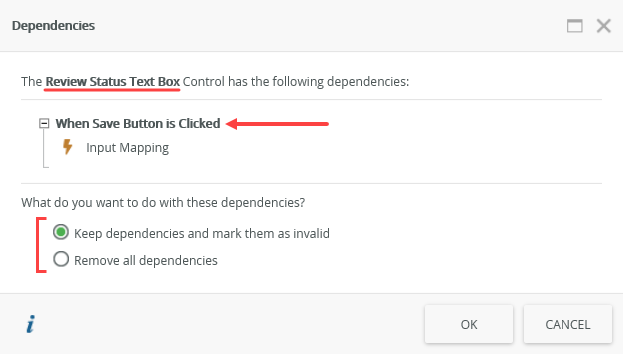
Keep dependencies and mark them as invalid: This option keeps the dependency in place and flags its location (in the rule) with a red error badge. You must edit the rule and fix or remove the dependency. You cannot check in a view or form that has dependency errors. In this example, deleting the Request Status Text Box control results in the Create Button input mapping property becoming invalid. Since you deleted the control from the view, the fix here is to delete the control reference from input mappings.
- Remove all dependencies: This option removes the dependency from any rules that reference it.
- Delete the Approval Date, Processed Date, and Status labels and controls. Once again, when you see the dependencies warning, select the option to Remove all dependencies.
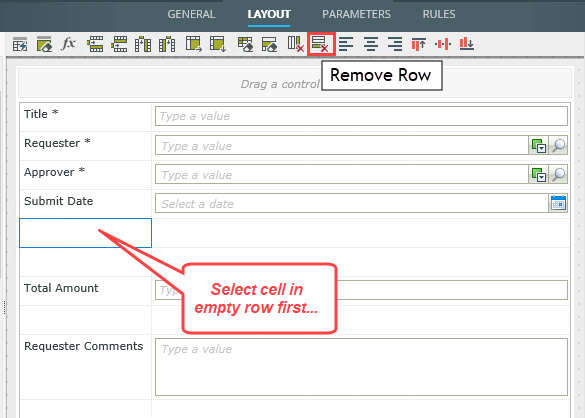
- Remove the empty rows from the view. First, select a cell in an empty row. Then, click the Remove Row icon in the view canvas menu. Repeat this to remove all empty rows.
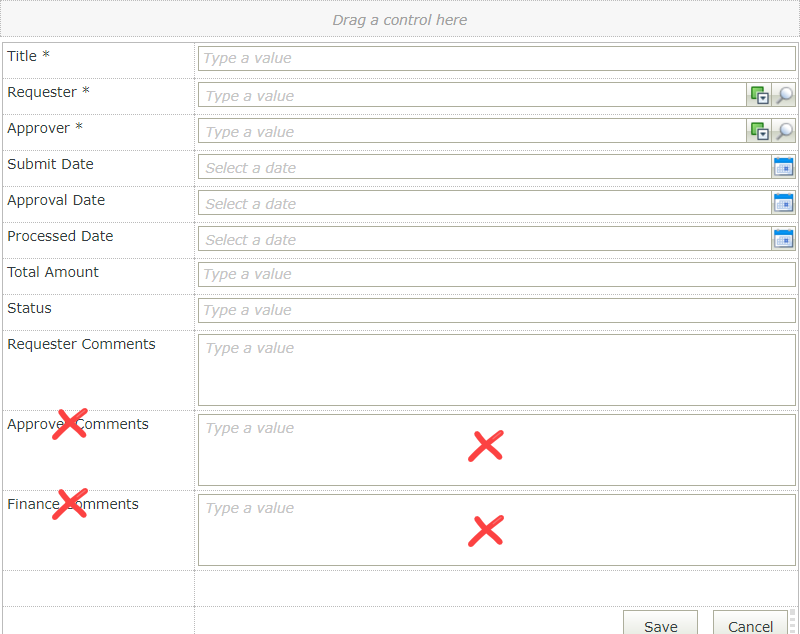
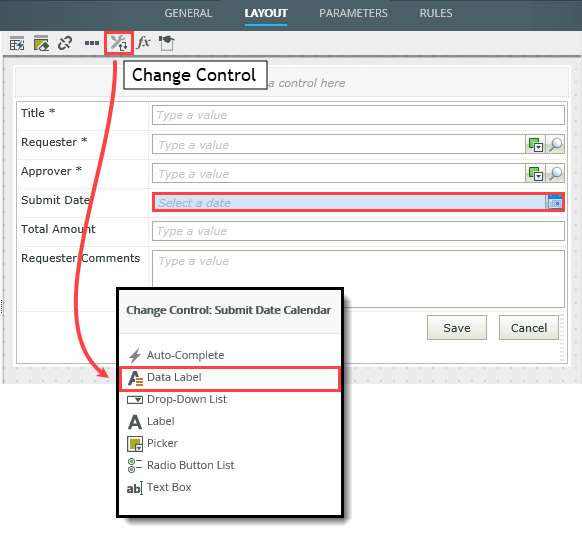
- Now, you will change two controls to data labels. Data labels display "live" content at runtime, but you cannot edit them. Select the Submit Date Calendar control, then click the Change Control icon in the view canvas menu. Select Data Label, then click OK. Repeat this step for the Total Amount control. Labels are static controls in that their value does not change. You cannot edit a label's value. For example, Approver or Submit Date. Data labels are controls that you cannot change, but are dynamic in nature. The data label's value can change as a result of a rule or expression, or even when the form loads. For example, the Total Amount Data Label changes as the running total of the expense items change. Data labels are an effective method of providing information or feedback to your users without their input.
Your view should look like the image below.
- First you will remove unused controls. These are controls the workflow updates, so you don't need them on the form when you submit a new request. Delete the Approver Comments label and text box. You will see a warning indicating the controls have dependencies. Change the warning value to Remove all dependencies, then click OK. Delete the Finance Comments label and text box, removing all dependencies once again.
-
Change the format for the Total Amount Data Label to a number with two decimal places.
- In the next few steps, you will format several controls so they display content appropriate for their data types. Select the Total Amount Data Label, then change the Format of the label to a Number format with two decimal places. (If the default format is already a number with two decimals, you do not need to change anything.) Select the Font tab and right-align the control. Click OK to set the format.
- In the next few steps, you will format several controls so they display content appropriate for their data types. Select the Total Amount Data Label, then change the Format of the label to a Number format with two decimal places. (If the default format is already a number with two decimals, you do not need to change anything.) Select the Font tab and right-align the control. Click OK to set the format.
- Add an expression to set the value for the Submit Date Data Label to the current date. Change the format to Short date.
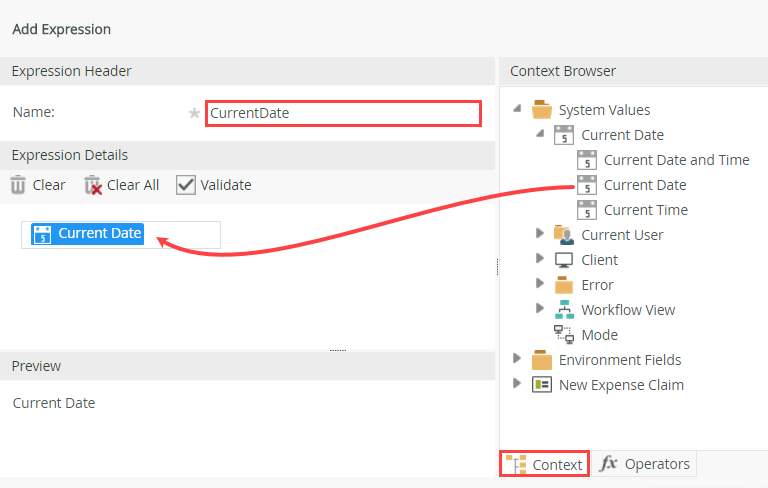
- Next you will set the Submit Date’s value so that it defaults to the current date. Select the Submit Date Data Label, then add an Expression.
- In the Expression editor, click the Add button to create a new expression.
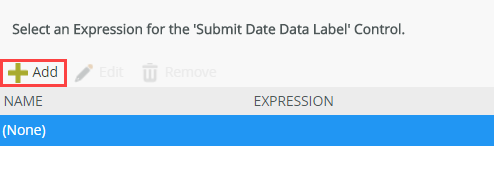
- Name the new expression
Current Date
then drag the Current Date value from the Context Browser. Click OK. - Click OK to return to the view design canvas. Notice the Submit Date Data Label - Expression now defaults to the current date.
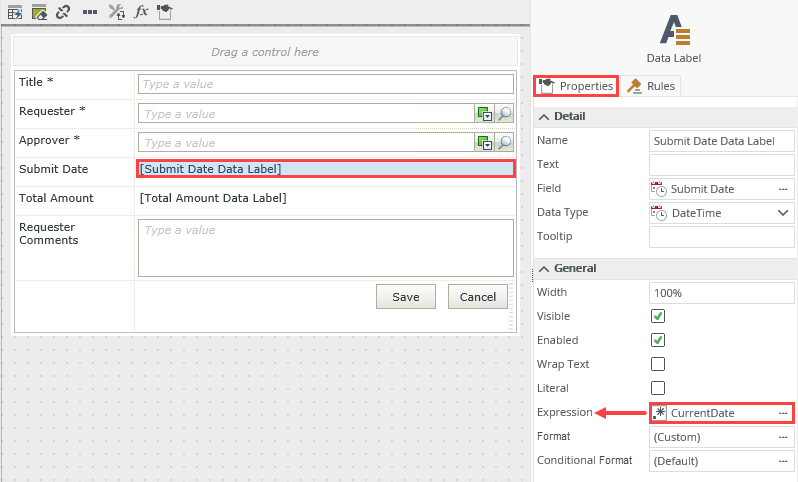
- Next, you will change the format to short date, so that it displays the date only (without the time). Select the Submit Date Data Label, then set the Format to display a Short date. (If the default format is already set for Short date, you do not need to change anything.) The short date format removes the time aspect from the date/time control and displays the date only. Click OK.

- Next you will set the Submit Date’s value so that it defaults to the current date. Select the Submit Date Data Label, then add an Expression.
-
By default, K2 generates save and cancel buttons for adding new items. You will add your own buttons at the form level, so you do not need either of these buttons. Each button has rules tied to it that perform save or cancel functions. You will reuse these rules later, so you do not want to delete the buttons entirely. Instead, you will just hide them.
Set the Save and Cancel buttons' Visible property to false.- You can associate rules with individual controls, views, and forms. In this case, there are rules associated with both the Save and Cancel buttons. You can reuse rules to save time and maintain consistency, which you will do in later steps. Select the Save and Cancel buttons and set their Visible properties to false (UNCHECKED).
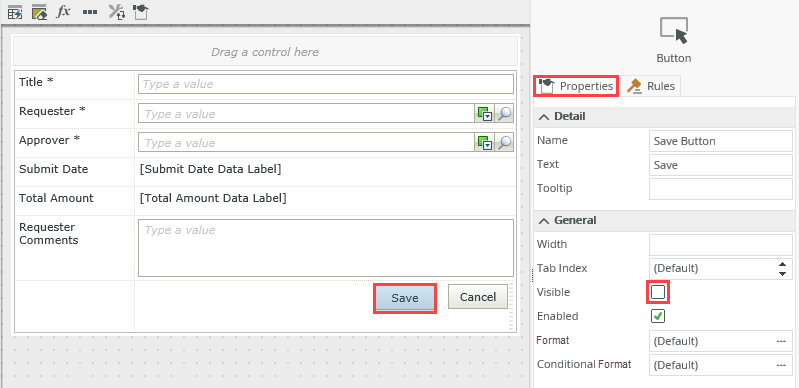
- You can associate rules with individual controls, views, and forms. In this case, there are rules associated with both the Save and Cancel buttons. You can reuse rules to save time and maintain consistency, which you will do in later steps. Select the Save and Cancel buttons and set their Visible properties to false (UNCHECKED).
-
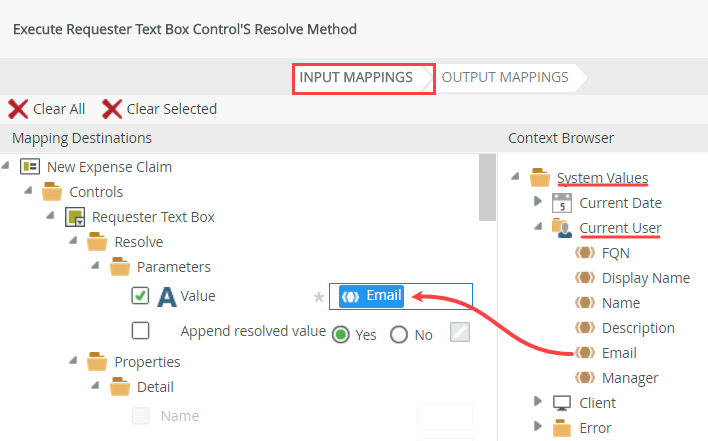
Add an action to the view initialize rule that calls the Resolve method of the Requester Text Box control, then set the Value to the current user’s email.
After you set the rule, finish the view, then check in the view. Depending on your version of K2, you may see the requester control named Requester Picker or Requester Text Box. It is still the same control regardless of the name.
- Next, you will add a rule that sets the Requester value to the current user. Users can submit expense claims for others, for example, a manager's assistant submitting a claim for the manager. Most of the time, the user is likely submitting a claim for themselves. So, for convenience, you will prepopulate the Requester control with the current user's name. When the view loads, K2 retrieves the current logged-in user's credentials. This rule retrieves the email credential, then searches Activity Directory for that email. Finally, it returns the user's full name, based on the email filter. Click the RULES tab.
- Events define when the rule should run, such as when a button is clicked, or when the form loads. (Events are optional, you can define "event-less" rules that you can call from other rules.)
- Conditions define whether the rule should run. If the criteria are true, continue the rule, and if the criteria are not met, stop the rule. For example, a condition might evaluate a form to confirm that required fields have content. (Conditions are optional - not all rules will require conditions.)
- Actions define what the rule should do. For example, show a message, start a workflow, or enable a form field. Rules can contain multiple actions that are run in sequence or in parallel.
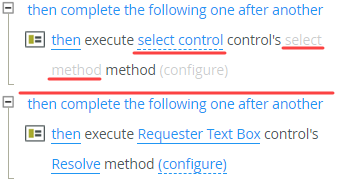
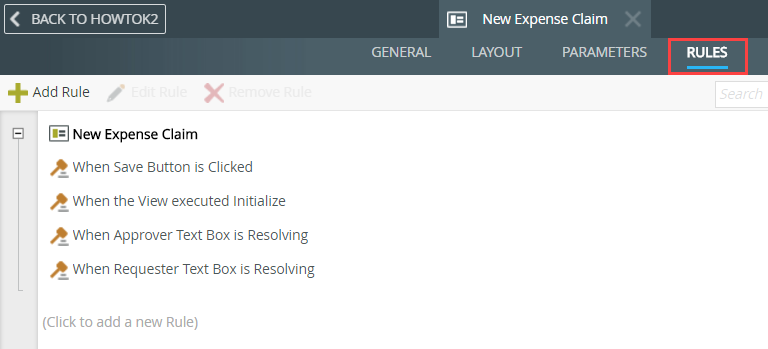
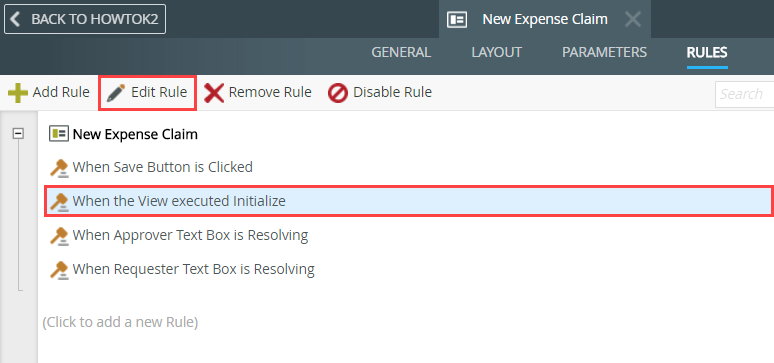
- Select the When the View executed Initialize rule, then click the Edit Rule button.
- Confirm you are on the Actions screen. In the search box, enter
Execute a control.
K2 returns search results as you type. Select the Execute a control’s method action to add it to the list of actions in the rule definition pane on the right-hand side.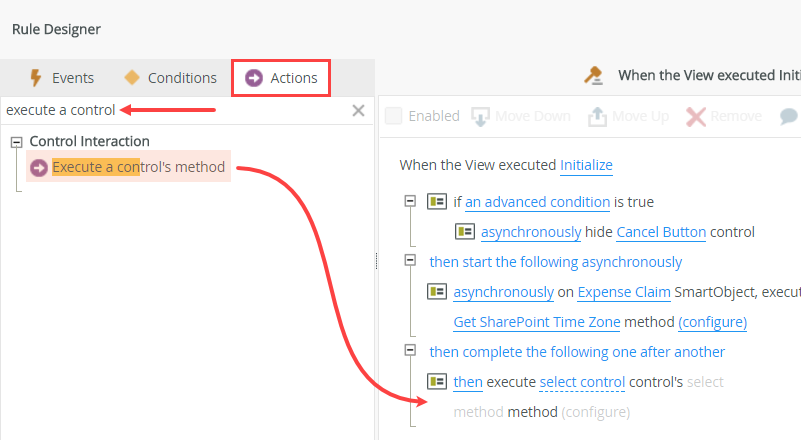
- Click the select control link, then select the Requester Text Box from the list of options. Click the select method link and select Resolve.
Depending on your version of K2, you may see the requester control named Requester Picker or Requester Text Box. It is still the same control regardless of the name.The resolve method simply tells K2 that when the view loads, search for and return the properties for the user account that you specify.
- Click the configure link.

- From the Context Browser, drag the Current User Email property into the Value text box, then click FINISH. This setting is telling K2 to filter the records based on the current logged-in user's email.
- Click OK to close the Rule Designer window.
- You have completed editing the New Expense Claim View, so click FINISH to save and exit the view. Check in the New Expense Claim View.
Rules consist of events, conditions and actions. A valid rule contains at least one action.The Requester control displays the user's display name after it has searched for and resolved the query input. In other words, you can type in a few characters, click the search icon and K2 will resolve (return) the results of its search. In your case, you want to provide a default value (the current user's display name) as a convenience. To return a default value, you need to provide a parameter for K2 to use in its search. You want K2 to return the current user's display name, so you will configure the parameter to search for a value that will return the current user. To do this, you configure the action with some contextual information. Contextual content is a variable (found in the context browser) K2 replaces at runtime with an actual value. This particular control searches for users by display name, email or user name. Because email addresses are unique, you will configure the action to search for the current user's email, then return the display name as the control's default value. - Next, you will add a rule that sets the Requester value to the current user. Users can submit expense claims for others, for example, a manager's assistant submitting a claim for the manager. Most of the time, the user is likely submitting a claim for themselves. So, for convenience, you will prepopulate the Requester control with the current user's name. When the view loads, K2 retrieves the current logged-in user's credentials. This rule retrieves the email credential, then searches Activity Directory for that email. Finally, it returns the user's full name, based on the email filter. Click the RULES tab.
-
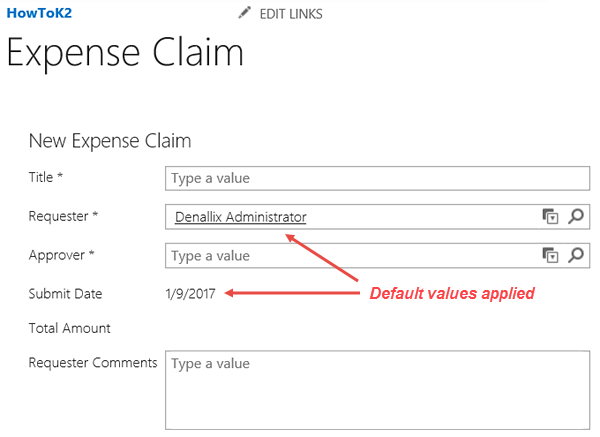
Test the edited view by opening the new item form in the Expense Claim list.
- If you want to see the impact of the changes you just made, navigate back to the Expense Claim list, then add a new item. The "new" form contains the "new" view, so you should see the following:
- The unused controls no longer appear
- The Save and Cancel buttons no longer appear
- Your name is the default Requester value
- The Submit Date defaults to today's date
- If you want to see the impact of the changes you just made, navigate back to the Expense Claim list, then add a new item. The "new" form contains the "new" view, so you should see the following:
Review
In this step, you edited the view used to capture the "header" details of a new expense claim. You removed unused controls, edited formats, and added an expression so that the Submit Date defaults to the current date. You learned how to access properties in the Context Browser, which provide dynamic content at runtime. In the next step, you will edit the "display" view and remove unused labels and controls.