2. Create Supporting Lists and Groups in SharePoint
In this step, you will create a list in SharePoint that acts as the primary data source for the application. This list stores the "header" content such as name, status, and comments. (In a later step, you will create a SmartBox SmartObject that stores the "details" content such as expense claim line items, payee, and amount.) You will also create two new user groups that contain the task recipients for two workflow steps. Below is a breakdown of the artifacts you create in this step:
- Expense Claim Approvers: This is a new SharePoint user group. You will add users to this group that are the task recipients for the Approve Expense Claim task step.
- Expense Claim Processing: This is a new SharePoint user group. You will add users to this group that are the task recipients for the Finance Processing task step.
- Expense Claim: This is a new SharePoint list that acts as the primary data source for this application. You will create application elements from this list that form the base of the application (including data, forms, workflow, and reports). This list stores the header content.
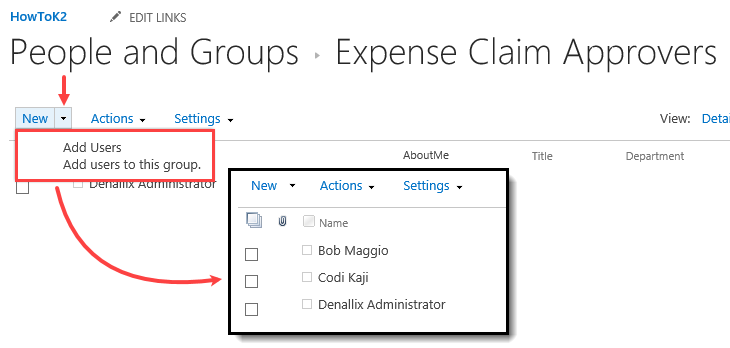
- From your SharePoint site or subsite, create a new group called Expense Claim Approvers, then add users to the group that are responsible for approving expense claims. For testing purposes, add your own user name to this list.If you are working in a shared environment and the Expense Claim Approvers group already exists, you can use the existing version. As an alternative, if you want to create your own group, you can add your initials to the group name to make it unique.
- From your SharePoint site or subite, open Site Settings, then open the People and groups page.
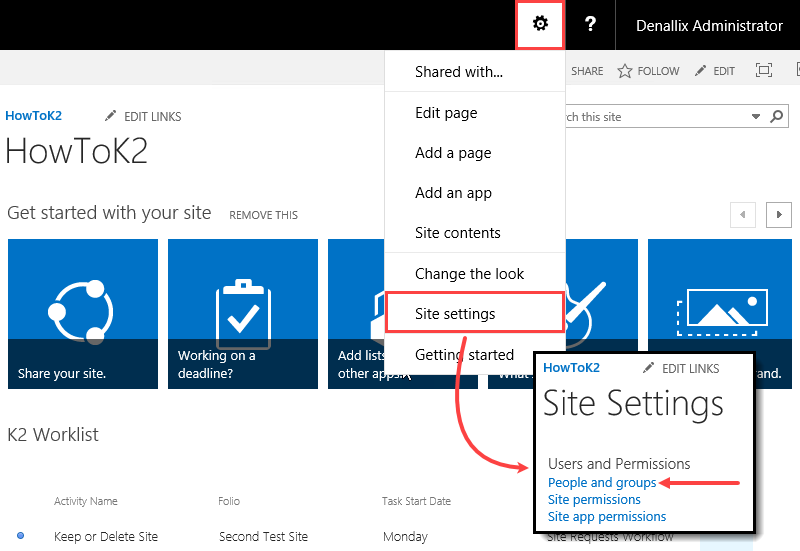
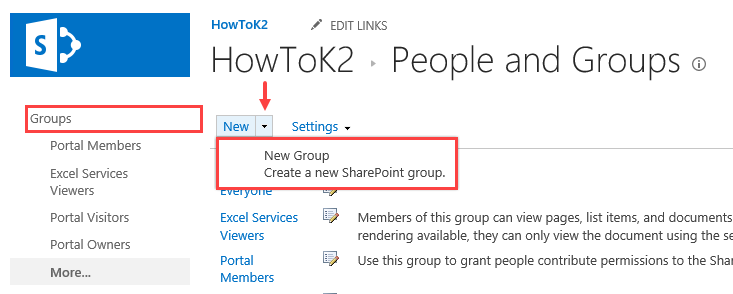
- On the People and Groups page, click Groups on the left side of your screen; click New and select New Group.
- Name the new group
Expense Claim Approvers
then click Create. (Leave the other default settings as is.)If you are working in a shared environment and the Expense Claim Approvers group already exists, you can use the existing version. As an alternative, if you want to create your own group, you can add your initials to the group name to make it unique. - Use the New > Add Users button to add users to this new group.
This group of users approve new expense claims. Depending on the size of your organization, this group may include managers, directors, or finance members. Add as many users as you like, but you must have at least one. For testing purposes, add your own account as well. Your values may be different than the image below.
- From your SharePoint site or subite, open Site Settings, then open the People and groups page.
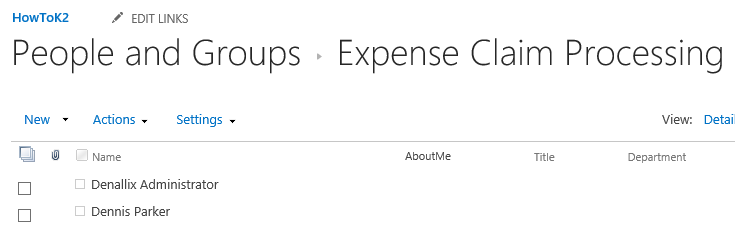
- From the People and Groups page, create a second new group called Expense Claim Processing, then add users to the group that are responsible for processing expense claims. For testing purposes, add your own user name to this list.If you are working in a shared environment and the Expense Claim Processing group already exists, you can use the existing version. As an alternative, if you want to create your own group, you can add your initials to the group name to make it unique.
- On the People and Groups page, click the Groups heading once again (in the left column). Add another group to the site, and name the group
Expense Claim Processing
then add users to this group like you did for the approvers group. Be sure to add your own account for testing purposes.If you are working in a shared environment and the Expense Claim Processing group already exists, you can use the existing version. As an alternative, if you want to create your own group, you can add your initials to the group name to make it unique.
These are the users who are processing expense claims and are usually finance or HR members. In the workflow, you assign the task to all members of this group. The first member to open the task is responsible for processing the expense claim. (Your screen may not match the image below exactly.)
- On the People and Groups page, click the Groups heading once again (in the left column). Add another group to the site, and name the group
- Now, you will add a new list that acts as the primary data source for the application. From your SharePoint site, create a new custom list called Expense Claim. Configure the list as follows:
- Attachments are disabled (you do not want attachments added in the header view).
- New Folder command is not available.
- Do not allow Quick Edit (you do not want users editing items directly in the list).
If you are working in a shared environment where there are multiple builds of the same SharePoint list, consider adding your initials to the list name to make it unique. For example, Expense Claim YourInitials. - Add the following new columns to the list:
Column Name Column Type and other settings Title Single line of Text Requester Person or Group - Require that the column contains information: Yes
- Enforce unique values: No
- Allow multiple selections: No
- Allow selection of: People only
Approver Person or Group - Require that the column contains information: Yes
- Enforce unique values: No
- Allow multiple selections: No
- Allow selection of: People only
- Select from SharePoint Group: Expense Claim Approvers
Submit Date Date and Time - Require that the column contains information: No
- Enforce unique values: No
- Date and Time format: Date Only
- Display Format: Standard
- Default date: (None)
Approval Date Date and Time - Require that the column contains information: No
- Enforce unique values: No
- Date and Time format: Date Only
- Display Format: Standard
- Default date: (None)
Processed Date Date and Time - Require that the column contains information: No
- Enforce unique values: No
- Date and Time format: Date Only
- Display Format: Standard
- Default date: (None)
Total Amount Number - Require that the column contains information: No
- Enforce unique values: No
- Number of decimal places: 2
Status Single line of Text - Require that the column contains information: No
- Enforce unique values: No
Requester Comments Multiple lines of Text - Require that the column contains information: No
- Number of lines for editing: 4
- Type of text to allow: Plain text
- Append changes to existing text: No
Approver Comments Multiple lines of Text - Require that the column contains information: No
- Number of lines for editing: 4
- Type of text to allow: Plain text
- Append changes to existing text: No
Finance Comments Multiple lines of Text - Require that the column contains information: No
- Number of lines for editing: 4
- Type of text to allow: Plain text
- Append changes to existing text: No
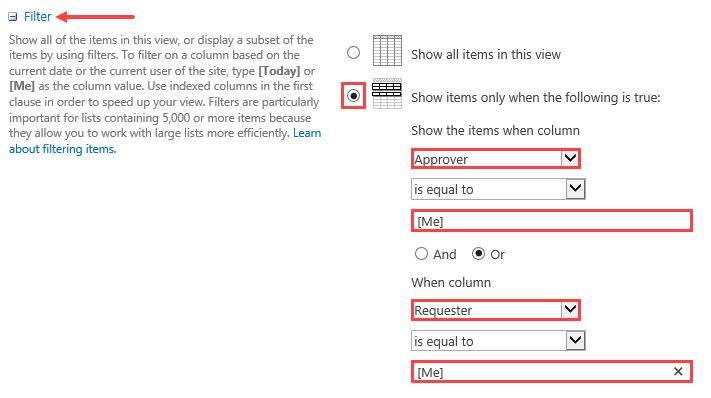
- Create a new default view for the list so that users can only see items where they are the requester or the approver.
- In this series of steps, you will create the Expense Claim list in SharePoint. This is the primary data source for the application. In a later step, you will generate application elements from this list which create the base data, forms, workflow, and reports. After creating this list, you will add several new columns, then create a new view so that the list only displays your content.
From your SharePoint site landing page, click the Add lists, libraries and other apps button or open the Add an app page.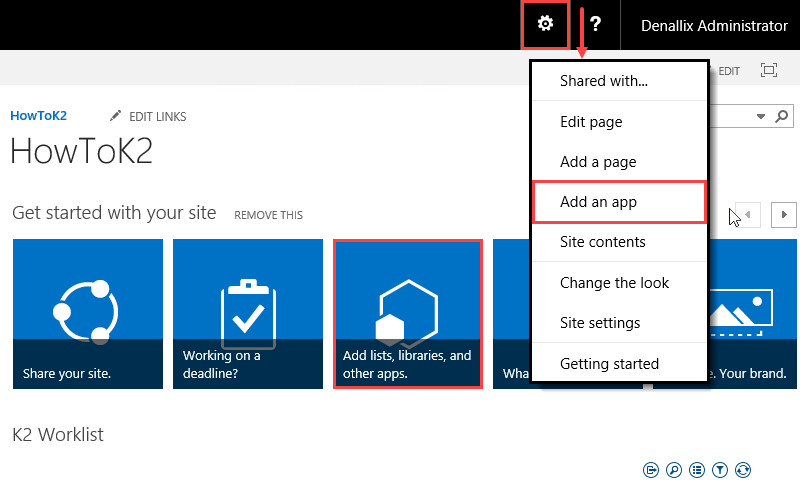
- Select the Custom List app, then name the new list
Expense Claim.If you are working in a shared environment where there are multiple builds of the same SharePoint list, consider adding your initials to the list name to make it unique. For example, Expense Claim YourInitials.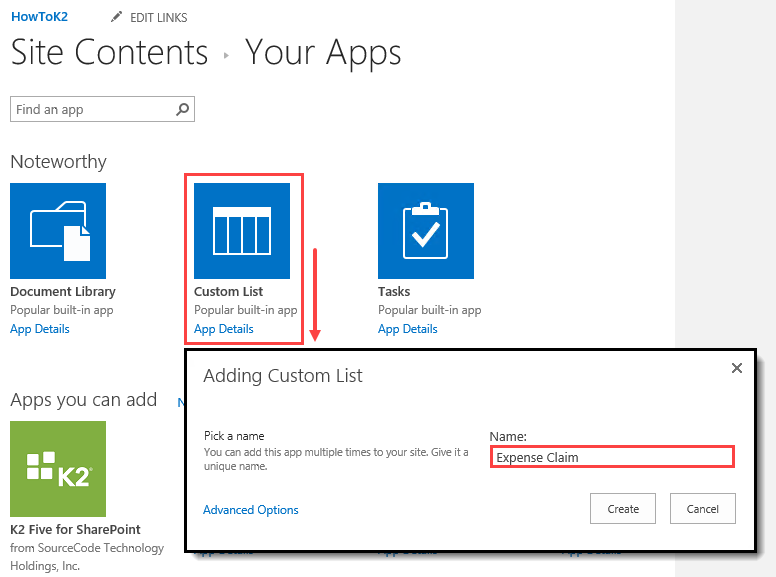
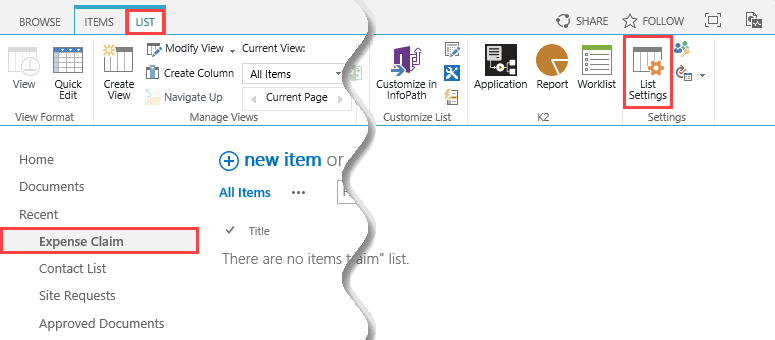
- Open the list, then access List Settings.
- Open Advanced settings.
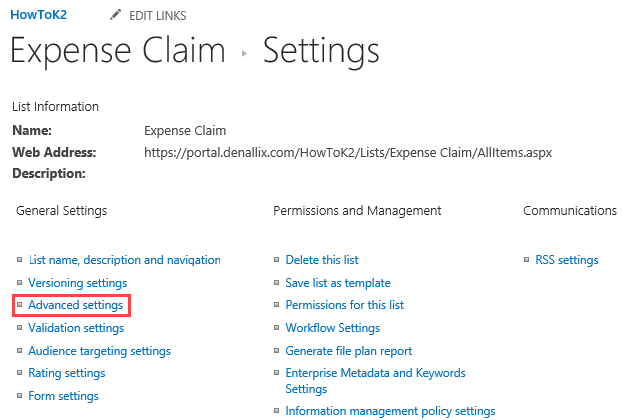
- On the Advanced Settings page, configure the list as follows, then click OK to continue: (Click OK when you see the warning about attachments.)
- Attachments are disabled (you don’t want users adding attachments to the expense claim "header"). When you save your settings, you will see a confirmation dialogue about disabling attachments, click OK to continue.
- New Folder command is not available.
- Do not allow using Quick Edit (you do not want users editing items directly in the SharePoint list).
- Next, you will add several new columns. Back on the Settings page, create a new column called
Requester
using the table below for reference. Click OK to continue. (If a setting is not specified in the table, assume the default value.)Column Settings Requester Type of Information Person or Group Require that the column contains information Yes Enforce Unique Values No Allow multiple selections No Allow selection of People Only 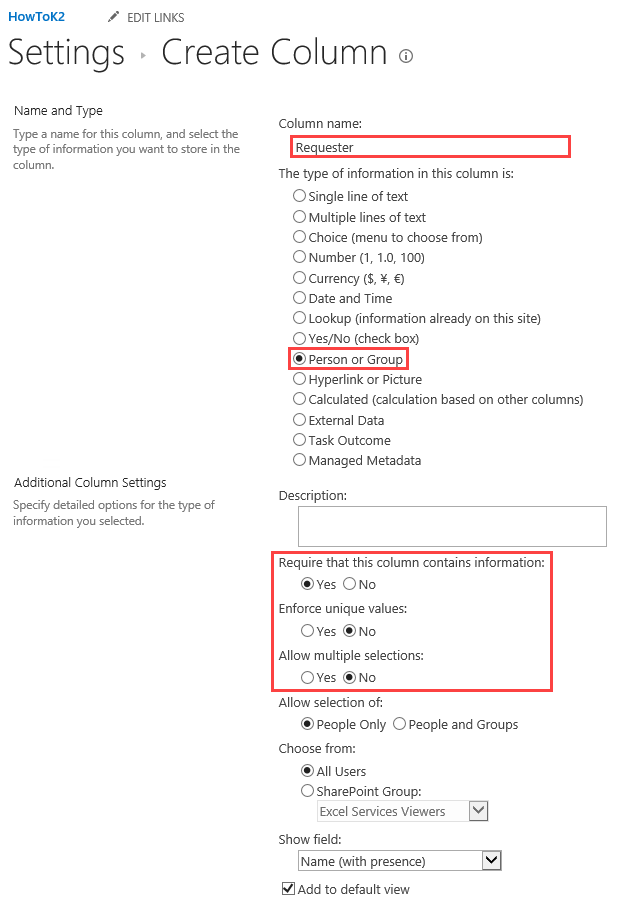
- Create a new column called
Approver
with the following settings, then click OK to continue.Column Name Approver Type of Information Person or Group Require that the column contains information Yes Enforce Unique Values No Allow multiple selections No Allow selection of People Only Choose From SharePoint Group: Expense Claim Approvers 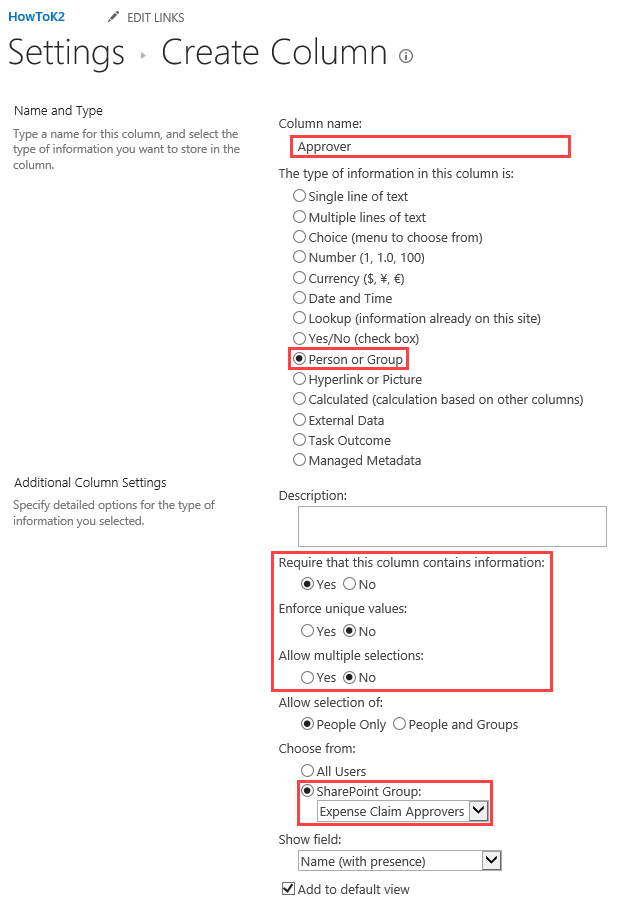
- Create the remaining columns using the table below as a guide:
Column Name Column Type and other settings Notes Submit Date Date and Time - Require that the column contains information: No
- Enforce unique values: No
- Date and Time format: Date Only
- Display Format: Standard
- Default date: (None)
A view expression populates this date after the originator submits the form. Approval Date Date and Time - Require that the column contains information: No
- Enforce unique values: No
- Date and Time format: Date Only
- Display Format: Standard
- Default date: (None)
The workflow populates this date after the approver approves the claim. Processed Date Date and Time - Require that the column contains information: No
- Enforce unique values: No
- Date and Time format: Date Only
- Display Format: Standard
- Default date: (None)
The workflow populates this date after finance processes the claim. Total Amount Number - Require that the column contains information: No
- Enforce unique values: No
- Number of decimal places: 2
The total amount of all expense claim items. Using a decimal number helps avoid calcuation and formatting issues. Status Single line of text - Require that the column contains information: No
- Enforce unique values: No
The workflow updates the status throughout the process. Requester Comments Multiple lines of text - Require that the column contains information: No
- Number of lines for editing: 4
- Type of text to allow: Plain text
- Append changes to existing text: No
Approver Comments Multiple lines of text - Require that the column contains information: No
- Number of lines for editing: 4
- Type of text to allow: Plain text
- Append changes to existing text: No
Finance Comments Multiple lines of text - Require that the column contains information: No
- Number of lines for editing: 4
- Type of text to allow: Plain text
- Append changes to existing text: No
- Under the Views heading near the bottom of the page, click the Create view link. Select Standard View. Name the view
My Items
then CHECK the box to make it the default view.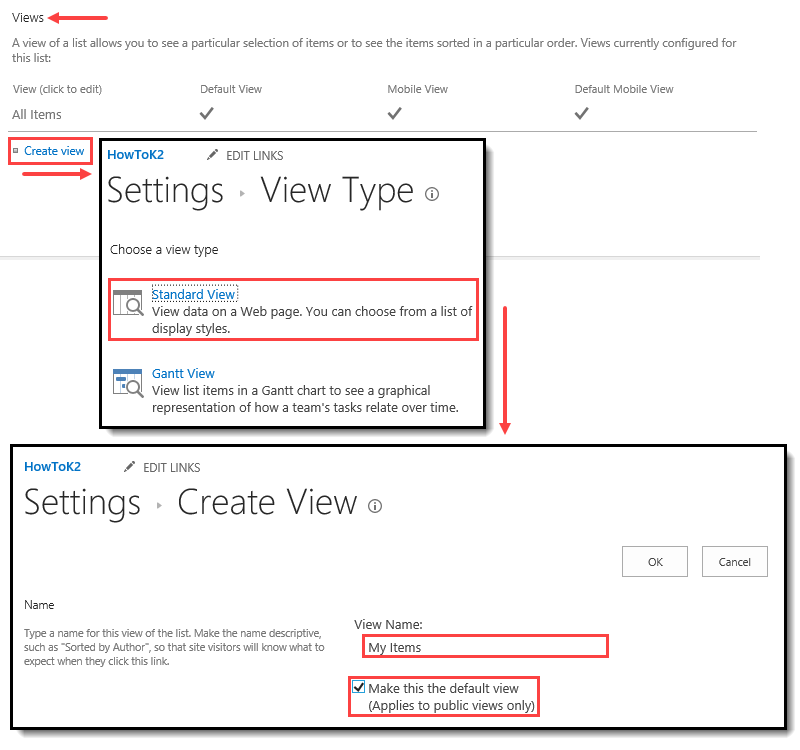
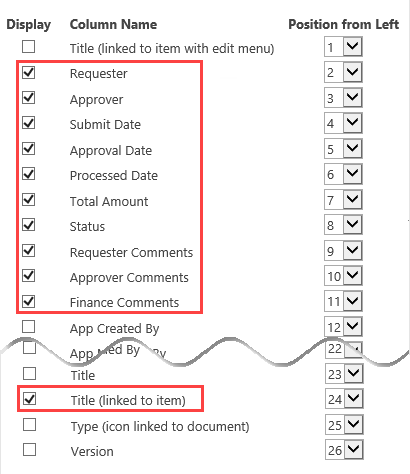
- Select the columns you want to display on the view. Use the image below for reference, if needed.
- Configure a filter so that you only see items where you are either the requester or approver. Click OK to continue.
[Me] is a reserved syntax in SharePoint and will return the current user’s user name.
First, you will configure several advanced settings for this list, such as not allowing attachments or new folders.
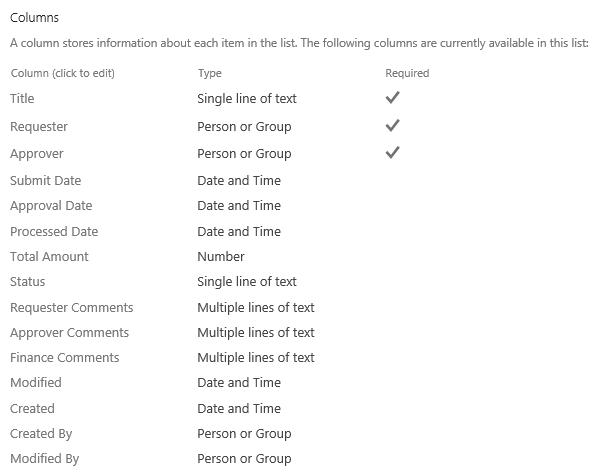
Your list columns should look like the image below.
The Expense Claim list is complete. In the next few steps, you will set up a new default view so that originators and approvers can only see their claims. This does not affect the application but can be helpful from a data security perspective.
- In this series of steps, you will create the Expense Claim list in SharePoint. This is the primary data source for the application. In a later step, you will generate application elements from this list which create the base data, forms, workflow, and reports. After creating this list, you will add several new columns, then create a new view so that the list only displays your content.
Review
In this step, you created a SharePoint list that acts as the primary data source for the Expense Claim application. This list stores the "header" content such as name, status, and comments. In a later step, you will create a SmartBox SmartObject that stores the "details" content such as line items, payee, and amount. You also created two new groups for the application; the approvers group and the (finance) processing group. As you build the workflow, you will configure both these groups as task recipients, or users assigned specific expense claim tasks. In the next step, you concentrate on the data components for this application by creating new service instances, or data source connections, to external data sources.